Table of Contents
Advertisement
Quick Links
Advertisement
Table of Contents

Subscribe to Our Youtube Channel
Related Manuals for Apogee Ensemble Thunderbolt


Summary of Contents for Apogee Ensemble Thunderbolt
-
Page 1: Audio Interface
Apogee Ensemble Thunderbolt Audio Interface User’s Guide v2.0 July 2017... -
Page 2: Table Of Contents
Enable Input Monitor in Logic Pro X ������������������������������������������������������������������������������������������������ 23 Enable Input Monitor In Pro Tools ���������������������������������������������������������������������������������������������������� 23 Enable Input Monitor in Ableton Live ����������������������������������������������������������������������������������������������� 23 Using the Apogee Control mixers to Direct Monitor ���������������������������������������������������������������������24 Guitar I/O ..........................25 Introduction �������������������������������������������������������������������������������������������������������������������������������� 25 Guitar Input Features ���������������������������������������������������������������������������������������������������������������������25... - Page 3 Adjust for Volume Differences Between Speakers ������������������������������������������������������������������������37 Clocking with External Equipment ��������������������������������������������������������������������������������������������� 38 Configure Ensemble as Clock Master ���������������������������������������������������������������������������������������� 38 Configure Ensemble as Clock Slave ������������������������������������������������������������������������������������������ 39 Apogee Control Software .......................40 Essentials Window���������������������������������������������������������������������������������������������������������������������� 41 Primary Window ������������������������������������������������������������������������������������������������������������������������� 42 Tool Bar �����������������������������������������������������������������������������������������������������������������������������������������42 System Sidebar �����������������������������������������������������������������������������������������������������������������������������43...
- Page 4 Understanding Latency �������������������������������������������������������������������������������������������������������������� 59 What is latency? ������������������������������������������������������������������������������������������������������������������������� 59 How does Apogee Control resolve latency? ������������������������������������������������������������������������������ 59 Do I need the Apogee Control Mixers? �������������������������������������������������������������������������������������� 60 How do I set my software’s I/O buffer? �������������������������������������������������������������������������������������� 60 Soft Limit ������������������������������������������������������������������������������������������������������������������������������������ 61 When to use Soft Limit ������������������������������������������������������������������������������������������������������������������61...
-
Page 5: Overview
Overview Introduction The new Apogee Ensemble is the first Thunderbolt™ 2 audio interface to offer superior sound quality, the lowest latency performance and the most comprehensive studio functionality all in one box� Ensemble includes 8 Advanced Stepped Gain mic preamps, monitor controller functionality including talkback, front panel Guitar I/O, two headphone outputs and digital connectivity for a total of 30 x 34 I/O�... -
Page 6: Package Contents
The following items are included in the box with Ensemble: • 3 pin-IEC power cable • QuickStart Guide • Rubber Feet • Warranty Booklet Register your product • Access Apogee’s expert Technical Support for free • Receive important product update information by email www�apogeedigital�com/register... -
Page 7: Ensemble Thunderbolt Panel Tour
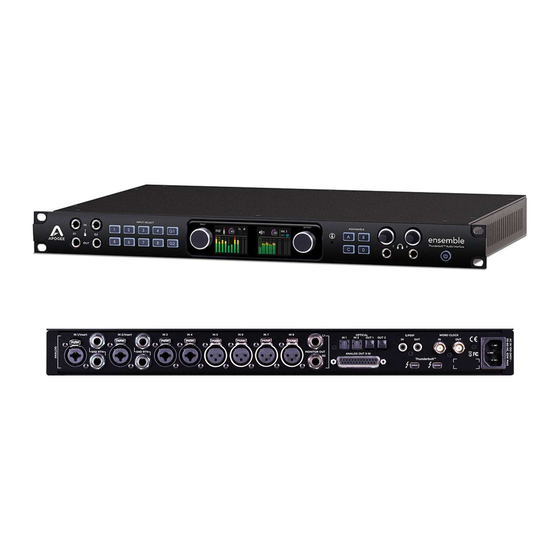
Apogee Ensemble Thunderbolt | User’s Guide Ensemble Thunderbolt Panel Tour Front Panel 1. Guitar I/O (see 5. Built-in Mic (see page 25): page 32): a� Inputs ch 11/12: Connect high a� The built-in mic can be recorded, impedance (Hi-Z) instruments or used for the talkback function�... -
Page 8: Rear Panel
Apogee Ensemble Thunderbolt | User’s Guide Rear Panel 1. Inputs 1-4: Combination (combi) jacks receive XLR or 1/4” 5. Analog Out: connectors Balanced outputs 3-10� Requires a 25-pin D-Sub a� Use XLR for a microphone or line level input� analog breakout cable�... -
Page 9: Display
Apogee Ensemble Thunderbolt | User’s Guide Display Input Settings Display Screen This screen appears when an Input Select button is pressed a second time� The parameters available will change depending on the channel being viewed, and the settings made� For navigation instructions, see page 17�... -
Page 10: Control - Hardware Remote (Optional)
Control - Hardware Remote (Optional) This programmable control surface is used to adjust settings and parameters of your Ensemble Thunderbolt� For a full list of programmable features, see the Control Remote Assignments section of the Apogee Control Software section on page 51�... -
Page 11: Getting Started
Apogee Ensemble Thunderbolt | User’s Guide Getting Started Precautions when powering Ensemble On/Off Before powering Ensemble On, ensure that any speakers or amplifiers connected to Ensemble’s analog outputs are powered off, or the volume turned down to the minimum setting� This will prevent potential damage to your speakers and other equipment from “pops”... -
Page 12: Multiple Units
• Four optical cables will be required if the second unit is another Ensemble Thunderbolt or Element 88. • Two optical cables will be required if the second unit is an Element 46 or Element 24. -
Page 13: Thunderbolt Notes
Thunderbolt-3 enabled. If so, then Apple’s Thunderbolt 3 to Thunderbolt 2 adapter can be used. Thunderbolt-3 Port Thunderbolt-3 to Thunderbolt-2 adapter Note: Apogee cannot guarantee performance if utilizing an uncertified Thunderbolt device in the same chain as Ensemble. To see if a device is certified, please go to: https://thunderbolttechnology�net/products... -
Page 14: Ensemble Software
As a result of the software install: • Apogee Control software is placed in the Mac’s Applications folder (see page 40). • When connected, Ensemble Thunderbolt appears as an audio input/output device in Mac Sound System Preferences (see page 19). -
Page 15: Update Ensemble Firmware
1� Make sure Ensemble is connected to the computer and is powered on� Make sure only one Apogee device is connected� 2� If a prompt does not appear, manually open the Apogee Firmware Updater�app which is located in the Mac’s Applications >... -
Page 16: Connection Examples Diagram
Apogee Ensemble Thunderbolt | User’s Guide Connection Examples Diagram... -
Page 17: Front Panel Controls
Apogee Ensemble Thunderbolt | User’s Guide Front Panel Controls Many Ensemble settings can be controlled from the front panel� For full control over all settings, use the Apogee Control Software (page 40)� Adjust the Input Gain 1� Turn the Input Controller knob to adjust the input gain for the selected channel�... -
Page 18: Adjust Output Volume
Assignable buttons A, B, C, & D can be programmed to perform different functions. Press an Assignable button to perform it’s programmed function� • Programming of the Assignable Buttons can only be done in the Apogee Control software’s Front Panel & Remote Control Assignments window. See... -
Page 19: Getting Started With Audio Software
To get sound from general audio applications such as iTunes and Safari to play out of Ensemble, it must be selected as the output device in Mac System Preferences� • Make sure you have already installed the most recent Ensemble Thunderbolt Software from the Apogee website before proceeding. -
Page 20: Route Mac System Sound To Different Outputs
Route Mac System Sound to Different Outputs 1� Open the Audio/MIDI Setup Utility, found in the Applications > Utilities folder of your Mac� 2� In the Audio Devices window, [Control+click] on Apogee Ensemble� 3� In the Menu that appears, select “Configure Speakers”. -
Page 21: Select Ensemble In Your Daw
Apogee Ensemble Thunderbolt | User’s Guide Select Ensemble in your DAW Most professional applications have their own audio preferences that are separate from the Mac System Preferences� Basic steps for setting up Ensemble are provided� For more detail on this topic, refer to the documentation that comes with your recording program�... -
Page 22: Select Ensemble In Ableton
Apogee Ensemble Thunderbolt | User’s Guide Select Ensemble in Ableton 1� Go to Live > Preferences� Select the Audio Tab� 2� In Driver Type, select “CoreAudio”� 3� In Audio Input & Output Devices, select “Ensemble”� “Apogee Thunderbolt” when in Multi-Unit mode. -
Page 23: Monitoring The Input Signal
Apogee Ensemble Thunderbolt | User’s Guide Monitoring the Input Signal Using your DAW to Monitor By default, Ensemble is configured for your recording software or DAW to perform the monitoring duty of passing your input signal on to your output. For instructions on configuring some of the major DAW programs... -
Page 24: Using The Apogee Control Mixers To Direct Monitor
Apogee Control software to monitor your signal instead� Here’s a simple way to set this up: 1� Open Apogee Control and go to the menu File > Open Snapshot Template 2� Click the “Direct Monitoring” template so it’s highlighted, then click Load... -
Page 25: Guitar I/O
• “Thru” setting provides a zero latency direct output for the instrument connected to the guitar input� • “From Software” setting means only non-direct signals such as audio from a DAW or the Apogee Control Mixer is output� • Unity Gain feature takes care of level matching the input vs output signals�... -
Page 26: Stage 1: Record The Performance
Connect a guitar cable from Ensemble’s guitar out to an amplifier’s input. b� Set the guitar output to “Thru”� This can be done with the front panel Assignable C button (page 51), or in Apogee Control’s Out tab of the Primary window (page 50)�... -
Page 27: Stage 2, Part 1: Playback Through Your Guitar Rig
2� Make the appropriate settings to get the mic input working using Ensemble’s Front Panel controls (page 17), or Apogee Control’s Input settings in the Mix tab of the Primary window (page 45)� 3� In your DAW, setup a new audio track, and set the input source to record the microphone�... -
Page 28: Notes About Re-Amping With Ensemble
Apogee Ensemble Thunderbolt | User’s Guide Notes about re-amping with Ensemble: If you decide to use Ensemble’s guitar input preamp to increase the dry guitar signal level into your DAW, be aware that this will also increase the track’s output level to Ensemble’s guitar output�... -
Page 29: Inserting Effects Pedals
Apogee Ensemble Thunderbolt | User’s Guide Inserting Effects Pedals Ensemble’s Front Panel Guitar inputs and outputs are perfect for inserting external hardware processors designed for Hi-Z and instrument level signals - such as pedal style effects - into a track. This is not limited to guitar tracks alone, but allows you to also run vocals, drums, and other recordings through these types of effects for a unique sound�... -
Page 30: Main Features
Apogee Ensemble Thunderbolt | User’s Guide Main Features Analog Audio Inputs Ensemble’s 12 analog audio inputs provide a multitude of connectors and options coupled with Apogee’s dynamically optimized preamps and premium circuit design that provide for all the interconnections you need with your external gear�... -
Page 31: Channel 1 & 2 Analog Insert Send/Return Jacks
1� Connect a 1/4” cable from Insert Send jack to the external hardware’s Input jack� 2� Connect another 1/4” cable from the output of the external gear to Ensemble’s Insert Return jack� 3� In Apogee Control, go to the Mix View of the Primary Window (page 45)�... -
Page 32: Built In Mic
• In your DAW, set the track’s Input Source to Channel 9 or Channel 10� • The Built-In Mic gain is controlled from the Mix View of the Primary window in Apogee Control (page 45)� Analog Audio Outputs Ensemble provides 16 analog outputs for connecting to your external gear�... -
Page 33: Guitar Outputs
Optical Two pairs of optical (Toslink) in and out ports are provided. These ports can be configured independently via the Device Sidebar of the Apogee Control software (page 44) to use ADAT/SMUX or S/PDIF protocols, and are capable of sample rates between 44�1 - 96k�... -
Page 34: Monitor Control Center
2� Under Talkback Source, select your device� If choosing a device such as Apogee ONE or Duet or a USB mic, the talkback mic’s gain is controlled on that device� If choosing the Mac’s built-in mic, the input gain is controlled through the Mac Sound Preferences: 1�... -
Page 35: Choosing The Talkback Destination
From the factory, assignable button A on Ensemble’s Front Panel is programmed to activate Talkback� However, any of the Assignable buttons can be set to this function: 1� Open the Remote window in the Apogee Control software� 2� Under the Front Panel Assignments section, click the button under A, B, C, or D and select “Engage Talkback”�... -
Page 36: Speaker Outputs
+4dBu or -10dBV reference level� This setting is convenient for connecting Ensemble to an external monitor control devices such as a mixing console� 1� Open Apogee Control and click the device 2� Under the Main Output Format, select “Line”�... -
Page 37: How To Connect And Configure A Surround Speaker Setup
There may be cases where the perceived volume of one, two, or three speaker sets, or a speaker in a surround setup, is slightly different from the others. The output Trim controls in Apogee Control can be used to compensate for this so all speakers produce the same perceived volume levels�... -
Page 38: Clocking With External Equipment
Configure Ensemble as Clock Master 1� Open Apogee Control and click the System button to reveal the System Sidebar� 2� Click the Clock Source dropdown button and choose “Internal”� 3� When Ensemble is using its internal clock, the front panel output display will show “INT”�... -
Page 39: Configure Ensemble As Clock Slave
BNC Word Clock cable out of the external gear to Ensemble’s BNC IN port� 3� Open Apogee Control and click the System button to reveal the System Sidebar� 4� Click the button under Clock Source and select the appropriate external connection from the drop-down menu�... -
Page 40: Apogee Control Software
Apogee Ensemble Thunderbolt | User’s Guide Apogee Control Software Control of your all your Ensemble’s settings and features is available through the Apogee Control software� After installing the Software, you’ll find the Apogee Control.app in your Mac’s Applications folder. Apogee Control consists of four windows: 1�... -
Page 41: Essentials Window
Apogee Ensemble Thunderbolt | User’s Guide Essentials Window This window provides simple and compact controls for Input Channels and Monitoring� Its orientation can be changed between vertical and horizontal so that it can be placed to the side or end of your recording software�... -
Page 42: Primary Window
Apogee Ensemble Thunderbolt | User’s Guide Primary Window All features and settings of Ensemble can be controlled from the Primary Window� It is broken down into several sections: Tool Bar The Tool Bar is always visible at the top of the Primary Window� It provides the ability to show/hide the System Sidebar, Device Sidebar, Essentials Window, Front Panel &... -
Page 43: System Sidebar
Apogee Ensemble Thunderbolt | User’s Guide System Sidebar Provides System-wide settings that apply to your recording system as a whole� 1. System Status Display - Displays the status of the connected hardware� • Green - System is ready: hardware is connected and recognized, and the digital clock is locked to the Clock Source •... -
Page 44: Device Sidebar
Apogee Ensemble Thunderbolt | User’s Guide Device Sidebar The Device Sidebar provides settings that are specific to the Ensemble interface connected to the Mac. Device ID - Identifies the hardware connected to the Mac system. Clicking this button causes the displayed hardware to flash its status light for three seconds. -
Page 45: Mix View
The Mix View of the Primary Window is separated into an INPUT channel section, and a MIXER channel section� Keyboard Navigation The orange circle around either your Input Gain control or Monitor Output volume controls is called the Focus Ring� It is part of the Apogee Control software’s keyboard navigation feature�... - Page 46 Apogee Ensemble Thunderbolt | User’s Guide Channel Section This portion of the Primary Window displays Channels for Analog input, Digital input, and Playback from audio software� Channel Top Label - Indicates the channel’s source� Can be renamed by clicking the label and typing a user-customized label�...
-
Page 47: Mixer Section
The mixer section provides several Direct Monitor mixers, and a special FX Send mixer for workflows that utilize the low-latency Direct Monitoring features of your Ensemble Thunderbolt interface� 1. Mixer 1 - Signal from each channel can be sent through this mixer by raising the corresponding Mixer 1 Channel Fader�... -
Page 48: Monitor/Output Section
Apogee Ensemble Thunderbolt | User’s Guide Channel Mute button - Cut the signal routing to the mixer stereo output� Command-click to cut all channels� Channel Solo button - Mute all channels that do not have this solo button engaged in this mixer� Command-click to solo all channels�... -
Page 49: Out View
Apogee Ensemble Thunderbolt | User’s Guide Out View The Out View of the Primary Window shows the settings and level meters for the analog and digital outputs� Hardware Output Label - Indicates the analog or digital hardware output� Output Channel Level Meter - Shows the digital signal level before the D/A conversion�... - Page 50 Apogee Ensemble Thunderbolt | User’s Guide Guitar Output Analog Level- Determines whether the guitar output gets its signal directly from the Guitar input or from the computer’s audio software� • Thru - The signal from the guitar input is passed directly to the guitar output� Guitar input signal continues to also pass to the computer’s software inputs�...
-
Page 51: Front Panel & Remote Control Assignments Window
Front Panel & Remote Control Assignments Window The Front Panel & Remote Control Assignments Window provides settings to configure the optional Apogee Control hardware remote control, as well as the four Assignable buttons on Ensemble’s front panel� To open this window choose Window >... - Page 52 2, etc and setting the Control Knob to Toggle Device, it’s possible to access both interfaces’ mic pre gain setting with only a few button taps� Launch Element Control - Launch Apogee Control software or, if software is already launched, bring the app into keyboard focus�...
-
Page 53: The Following Functions Apply To The Assignable Buttons On Ensemble's Front Panel
Apogee Ensemble Thunderbolt | User’s Guide The following functions apply to the Assignable Buttons on Ensemble’s front panel None - When a button is assigned to None, it does nothing� Mute Speaker - Mute the Main speaker output� Mute Headphones 1, 2 - Mute the Headphones output�... -
Page 54: Hover Help Window
Preferences > Auto Launch - Choose this menu item to launch Apogee Control when an Ensemble or Element Thunderbolt interface is connected to the computer� Preferences > Keep Essentials Window On Top - Chose this menu item to prevent the Apogee Control Essentials window from being hidden behind other applications windows�... -
Page 55: File Menu
System Settings - Choose this menu item to open the System Settings sidebar� Device Settings - Choose this menu item to open the Device Settings sidebar� Enter Full Screen - Choose this menu item to expand Apogee Control to fill the display screen. Window Menu Help Menu Use the Search Field to search for a specific menu item. -
Page 56: Apogee Control Ios App
Apogee Ensemble Thunderbolt | User’s Guide Apogee Control iOS App The same features available in the Essentials Windows of the Apogee Control application are avialable in the Apogee Control iOS App� Here’s how it works: 1� Open the App Store app on your iPad, iPhone, or iPod Touch and search for Apogee Control�... -
Page 57: Ios App Toolbar
Mute all outputs - Engages Mute on all speaker and headphones outputs� These mutes must be manually disengaged� Analog Input Settings Provides options and controls related to the analog inputs of your Apogee Thunderbolt Interface� Input Source - Mic - XLR input is sent through the microphone preamp - Instrument - ¼”... -
Page 58: Monitor Output Settings
Apogee Ensemble Thunderbolt | User’s Guide Monitor Output Settings Provides option and controls related to the Main and Headphones outputs of your Apogee Thunderbolt interface� Output Source Selector - Selects the sound source for this output� The options are: • Playback - Sends a playback channel stereo signal directly to this output, bypassing all mixers�... -
Page 59: Reference
Apogee Ensemble Thunderbolt | User’s Guide Reference Understanding Latency What is latency? When recording with most computer-based digital audio applications, a delay between the input and output of the recording system often disturbs the timing of the musicians who are performing� This delay, known at latency, means that the musician hears the notes he produces a few milliseconds after having produced them�... -
Page 60: How Does Apogee Control Resolve Latency
Do I need the Apogee Control Mixers? The mixers in Apogee Control serves to provide a low latency listening mix while recording� Therefore if you’re using Ensemble to listen to iTunes or audio from another program, there’s no need to use the mixer�... -
Page 61: How Do I Set My Software's I/O Buffer
Buffer setting. Soft Limit Soft Limit is Apogeeʼs proprietary analog process for taming transients before A/D conversion. By gently rounding transients in a transparent manner, itʼs possible to maximize level BEFORE the A/D conversion stage and prevent unwanted distortion from clipping�... -
Page 62: Specifications
Apogee Ensemble Thunderbolt | User’s Guide Specifications System Requirements • Computer: Intel Thunderbolt™ Equipped Mac • Memory: 4GB RAM minimum, 8GB recommended • macOS 10�10 or greater • Thunderbolt cable *Thunderbolt and the Thunderbolt logo are trademarks of Intel Corporation in the U.S. and/or other countries. - Page 63 Apogee Ensemble Thunderbolt | User’s Guide Inputs, preamps, and outputs Analog Inputs 4 Combi mic/line/instrument inputs - 2 1/4” balanced analog inserts 4 XLR mic/line inputs 2 1/4” hi-z guitar/instrument inputs with Class-A JFET input stage Digital Inputs Optical IN: Supports ADAT, SMUX & S/PDIF - ADAT: 16 channels 44.1-48 kHz on 2 Toslink connectors...
-
Page 64: Additional Support
Apogee Ensemble Thunderbolt | User’s Guide General Dimensions (W x D x H) 19” X 12.125” X 1.73 Weight 11.15 lbs. Power AC IN 100-240V, 50-60 Hz, 65W MAX Additional Support For more information: • Apogee KnowledgeBase and FAQs •... -
Page 65: Warranty Information And Legal Notices
This warranty is void if Apogee determines, in its sole business judgment, the defect to be the result of abuse, neglect, alteration or attempted repair by unauthorized personnel. -
Page 66: Declarations Of Conformity
Apogee Ensemble Thunderbolt | User’s Guide serve as a reference for you and helps facilitate and expedite the return process. Apogee requires that shipments be pre-paid and insured — unless otherwise authorized in advance. IMPORTANT: ANY SHIPMENT THAT IS NOT PRE-PAID OR IS SENT WITHOUT AN RMA NUMBER WILL NOT BE ACCEPTED. - Page 67 Canada. Declaration of Conformity – CE Apogee Electronics Corporation hereby declares that the product, the Ensemble, to which this declara- tion relates, is in material conformity with the following standards or other normative documents: • EN50081-1/EN55022; 1995 •...
Need help?
Do you have a question about the Ensemble Thunderbolt and is the answer not in the manual?
Questions and answers
Apogee ensemble thunderbolt is shutting down? Tried switching cable but I also cannot recover my work as of late . Tracks are down. Lots of work being list. Help
@Louise Carr Just tried a reset …let’s see how that goes.
@Louise Carr Pic of screen showing missing tracks on just the last 4 days. Msyb