Table of Contents
Advertisement
Quick Links
Download this manual
See also:
User Manual
Advertisement
Table of Contents

Related Manuals for Apogee Quartet


Summary of Contents for Apogee Quartet
- Page 1 Apogee Quartet Apogee Quartet QuickStart Guide QuickStart Guide V1, February, 2013 V1, January, 2013...
-
Page 3: Table Of Contents
Configuring the Input! Connecting to your iPad! ................System Requirements! Install Maestro from App Store ! Connect to Headphones or Speakers! Configuring the Input! Adjusting Input & Output Levels! ..............Software Setup! ..................... Using Quartet with iOS Apps! Additional Support! .................. -
Page 5: Overview
Mac-based studio. Featuring 4 inputs and 8 outputs of Apogee’s industry-leading AD/DA conversion technology as well as 4 world-class mic preamps, Quartet bridges the gap between the 2-channel Apogee Duet and Apogee’s flagship interface, Symphony I/O. -
Page 6: Package Contents
• 2 meter USB cable • 30-pin iOS cable • Universal Power Supply with standard 3 pin-IEC cable • QuickStart Guide Software, firmware and the Quartet User’s Guide are available online only. Please register your product and download the latest installer here: http://www.apogeedigital.com/... - Page 7 Overview - Apogee Quartet QuickStart Guide...
-
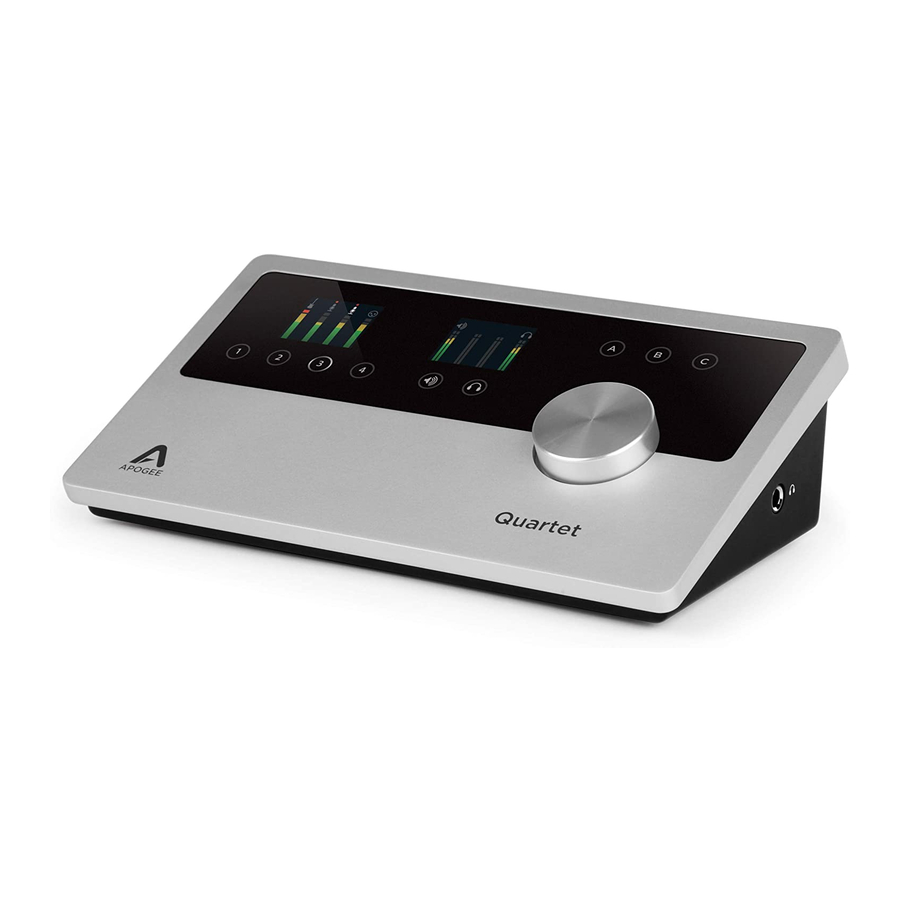
Page 8: Quartet Panel Tour
Overview - Apogee Quartet QuickStart Guide Quartet Panel Tour Controller Knob User Assignable Touchpads Input Display Output Display Input Selection Touchpads Output Selection Touchpads... - Page 9 Overview - Apogee Quartet QuickStart Guide Digital Inputs MIDI (USB) ADAT/SMUX Analog Inputs USB 2.0 Combi Mic/instrument/line Analog Outputs Word Clock OUT DC Power Headphone Output...
-
Page 10: Display And Touchpad Tour
Overview - Apogee Quartet QuickStart Guide Display and Touchpad Tour Input Display and Touchpads... - Page 11 Overview - Apogee Quartet QuickStart Guide Output Display and Touchpads...
-
Page 12: Connecting To Your Mac
Connect Quartet’s Power Supply to the DC power input on the rear panel of Quartet and the appropriate IEC cable to a wall outlet. Connect Quartet’s USB port to a USB port on your Mac using the supplied USB 2.0 cable. Go to http://www.apogeedigital.com/downloads Download the latest Quartet software installer. -
Page 13: Connect To Headphones Or Speakers
Connecting to your Mac - Apogee Quartet QuickStart Guide Choosing Quartet for Mac Sound I/O After connecting Quartet, installing the software and restarting your Mac, a dialog box will prompt you to choose Quartet for Mac sound input and output. Click Yes. -
Page 14: Configuring The Input
Connecting to your Mac - Apogee Quartet QuickStart Guide Configuring the Input Connect a microphone or instrument to one of the combo jacks on Quartet’s rear panel... - Page 15 Note: If you are using a condenser microphone that requires phantom power, select the 48V box on the Input tab of the appropriate channel in Maestro. Phantom power is indicated on Quartet’s display by a red dot above the microphone icon.
-
Page 16: Connecting To Your Ipad
Note: Firmware update must be done from a Mac running OS X 10.6.8, 10.7.4 or greater Update Firmware from Mac 1. Connect Quartet’s Power Supply to the DC power input on the rear panel of Quartet and the appropriate IEC cable to a wall outlet. -
Page 17: Install Maestro From App Store
Connecting to your iPad - Apogee Quartet QuickStart Guide Install Maestro from App Store 1. Connect Quartet to your iPad/iPhone using the provided 30-pin iOS cable. 2. On the iPad/iPhone, open Settings and choose General > About > Quartet, then choose "Find App for Accessory". -
Page 18: Connect To Headphones Or Speakers
Note: it's possible to record through the mic inputs and play back audio without installing Maestro Connect to Headphones or Speakers Connect headphones to the headphone output on the right side of Quartet. Connect Quartet’s 1/4” speaker outputs 1-2 to the inputs (balanced or... -
Page 19: Configuring The Input
Connecting to your iPad - Apogee Quartet QuickStart Guide Configuring the Input Connect a microphone or instrument to one of the combo jacks on Quartet’s rear panel... - Page 20 Connecting to your iPad - Apogee Quartet QuickStart Guide Open Apogee Maestro app, choose Quartet from the main menu and select the Input tab. Select the Analog Level setting that corresponds to the device you have connected to Quartet’s input(s). For example, if you have an XLR microphone...
- Page 21 Note: If you are using a condenser microphone that requires phantom power, select the 48V box on the Input tab of the appropriate channel in Maestro. Phantom power is indicated on Quartet’s display by a red dot above the microphone icon.
-
Page 22: Adjusting Input & Output Levels
Adjusting Input & Output Levels - Apogee Quartet QuickStart Guide Adjusting Input & Output Levels Input level To change Quartet’s input level (i.e the preamp gain of microphones and instruments): 1) Press the Touchpad corresponding to the desired 2) Turn the Controller Knob until the desired recording input. - Page 23 Adjusting Input & Output Levels - Apogee Quartet QuickStart Guide Speaker Output level To change Quartet’s speaker output level (i.e the listening level of connected speakers): 2) Turn the controller knob to the desired listening level. 1) Press the speaker output Touchpad.
- Page 24 Adjusting Input & Output Levels - Apogee Quartet QuickStart Guide Headphone Output level To change Quartet’s headphone output level (i.e the listening level of connected headphones): 1) Press the headphone output Touchpad. 2) Turn the controller knob to the desired listening level.
- Page 25 Adjusting Input & Output Levels - Apogee Quartet QuickStart Guide...
-
Page 26: Software Setup
Software Setup - Apogee Quartet QuickStart Guide Software Setup Mac OS: Using Quartet with Logic 1) Go to the Logic Pro or Logic Express menu and 2) In the Core Audio pane of the Device tab, select choose Preferences > Audio. - Page 27 Software Setup - Apogee Quartet QuickStart Guide 3) Set the I/O Buffer Size to 64. Click Apply Changes at the bottom of the Preferences window.
- Page 28 Software Setup - Apogee Quartet QuickStart Guide Mac OS: Using Quartet with Logic (continued) 4) Now close the Logic Pro Preferences window and 5) If you are recording a single microphone or select New > Empty Project > from the File Menu.
- Page 29 Software Setup - Apogee Quartet QuickStart Guide 6) Logic will now ask you to name the project and save 7) Click the Record button in the transport control at in on your hard drive. the bottom of the Logic window.
- Page 30 Software Setup - Apogee Quartet Quick Start Guide Mac OS: Using Quartet with Avid Pro Tools (9 or greater) 1) Choose Setup menu > Playback Engine. 2) Choose Quartet for Current Engine.
- Page 31 Software Setup - Apogee Quartet Quick Start Guide 3) Set the Buffer Size to 64. Click OK. 4) The following dialog box will appear. Click Yes.
- Page 32 1) Choose Live > Preferences. Click on the Audio tab. 2) Select CoreAudio in the Driver Type menu. 3) Select Quartet in both the Audio Input Device and Audio Output Device menus. 4) Set Buffer Size to 128 5) Close the Preferences window after making settings.
- Page 33 Software Setup - Apogee Quartet Quick Start Guide...
-
Page 34: Using Quartet With Ios Apps
Software Setup - Apogee Quartet Quick Start Guide Using Quartet with iOS Apps Quartet works with any iOS Core Audio compatible app on iPod Touch, iPhone or iPad. Simply download your favorite app, connect Quartet and you’re ready to go! -
Page 35: Additional Support
Additional Support For more information: • Complete Apogee Quartet User's Guide • Apogee KnowledgeBase and FAQs • Apogee Product Registration • How to contact Apogee Technical Support Visit: http://www.apogeedigital.com/support/... - Page 36 Apogee Electronics Corp. Santa Monica, CA www.apogeedigital.com Part #: 7010-0058-0160 Revision 2.0 (WEB)
Need help?
Do you have a question about the Quartet and is the answer not in the manual?
Questions and answers