Table of Contents
Advertisement
Quick Links
Advertisement
Table of Contents

Related Manuals for Apogee Boom


Summary of Contents for Apogee Boom
- Page 1 Boom User’s Guide Version 1.0...
-
Page 2: Table Of Contents
Setting Up Boom Connecting to a Mac or Windows computer Connecting to an iPad Pro (USB-C connector) Connecting to an iOS Device (Lightning connector) Configure OS to use BOOM for Audio I/O macOS Windows 10 Apple iOS Connecting Your Studio BOOM Front Panel Features Control Knob &... - Page 3 Apogee Boom User’s Guide Mixer Section Monitor/Output Section Choose Your Boom Workflow A Glossary of Importantds Workflow Concepts Monitoring Workflows Software Monitoring Direct Monitoring Working with Onboard Hardware DSP Assign to SW (Software) Inputs Configuring Your DAW Apple Logic Pro...
-
Page 4: Overview
Create your complete podcast and streaming production environment with the on-board Mixer and Loopback mode. Connect BOOM directly to your Mac, iPad Pro, or Windows laptop - No external power required to get your ideas flowing. Features ●... -
Page 5: Navigating This User's Guide
● Connect microphones, instruments, headphones, speakers and other audio hardware to Boom (link). ● Use Boom front panel Control Knob to adjust gain on the Inputs and level for the headphones and speaker outputs. The Control Knob can also be set to toggle between i/o and mute outputs. -
Page 6: In The Box
● Mac & Windows: 4GB minimum RAM, 8GB Recommended Register your Product ● Access Apogee’s expert Technical Support for free ● Receive important product update information by email ● Take the Customer Satisfaction Survey for a chance to win Apogee gear! Register Now: www.apogeedigital.com/support/register... -
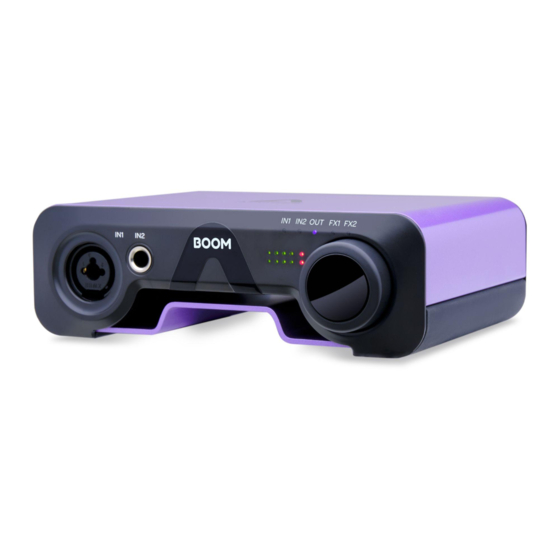
Page 7: Boom Front Panel Tour
Apogee Boom User’s Guide Boom Front Panel Tour Boom Rear Panel Tour... -
Page 8: Getting Started
To register your product and receive the Boom Installer, learn the most up-to-date information on new releases, and view Interactive tutorials, click the link below. www.apogeedigital.com/support/boom Once you’ve registered your Boom, you’ll receive an email with links to Mac and Windows versions of the Boom Installer download. macOS Installer Once downloaded, double-click the .dmg file to... -
Page 9: Windows 10 Installer
USB cable to the computer. 4. Once the “Found Boom in firmware update mode” dialog appears, release the Control knob. 5. Click “Yes” in the “Found Boom…” dialog. Once the “Firmware update complete!” dialog appears, click Ok. Boom will re-initialize. -
Page 10: Setting Up Boom
Note: the supplied USB-C to USB-C/USB-A cable includes an integrated USB-C to USB-A adaptor`. Remove the USB-A adaptor to connect to USB-C devices. Using the supplied cable, connect Boom’s USB-C port to a USB port on your Mac or Windows computer. -
Page 11: Connecting To An Ios Device (Lightning Connector)
Apogee Boom User’s Guide Connecting to an iOS Device (Lightning connector) Using the supplied USB-C to USB-C/USB-A cable, connect Boom’s USB-C port to a powered USB hub (sold separately). Connect the Apple Camera Connection Kit (sold separately) to the powered USB hub and your Lightning iOS device. -
Page 12: Configure Os To Use Boom For Audio I/O
Configure OS to use BOOM for Audio I/O macOS To choose Boom as the audio interface for Mac applications that don’t have specific audio hardware preferences, such as Safari, Spotify, Voice Memos and others: 1. Open System Preferences by choosing Apple menu > System Preferences. -
Page 13: Windows 10
6. Click the Recording tab and repeat steps 2-5 Apple iOS Apple iOS automatically chooses the most recently connected audio interface as the audio I/O device for all applications. Simply connect BOOM to your iOS device’s Lightning or USB-C port as described above. -
Page 14: Connecting Your Studio
Apogee Boom User’s Guide Connecting Your Studio On the Boom back panel, connect your studio monitors to the left and right ¼” SP (Speaker) outputs. Connect headphones to the ¼” HP (Headphone) output. If your speakers are equipped with XLR inputs, use a ¼”... - Page 15 Connect your microphone to the front panel IN1 XLR Combi jack. 1. Open Apogee Control 2 software, then set Analog IN 1 Analog Level to Mic. When using condenser mics, be sure to click 48V to engage phantom power.
- Page 16 IN1 ¼” Combi jack and the IN2 ¼” jack. 1. In Apogee Control, set Analog Level to +4 dBu or -10 dBV, based on the nominal output level of the source. As a general rule, set to +4 dBu for pro devices like mixing consoles;...
-
Page 17: Boom Front Panel Features
BOOM Front Panel Features Control Knob & Focus LEDs With Boom’s front panel Control knob, you have the most important settings right at your fingertips. Set Input gain, Speaker and headphone listening level. Tap the front panel Control knob to toggle the Control Knob Focus LEDs through this sequence: 1. -
Page 18: Front Panel Meters
● OUT - signal level of the currently active Output source (Speaker or Headphone). Route different sources to the Speaker and Headphones outputs in Apogee Control 2. When Control Knob Focus is set to OUT, the Control knob volume setting is displayed by the meters as you rotate the knob. -
Page 19: Apogee Control 2 Software
Apogee Boom User’s Guide Apogee Control 2 Software The Apogee Control 2 application provides access to all settings, including System setup, direct monitor mixing, hardware DSP and Monitor controller functionality. Primary Window The Apogee Control 2 software interface consists of the following sections:... -
Page 20: Toolbar
(i.e. under control of the software) in the Device dropdown. 3. Sample Rate - Set Boom’s sample rate. In some cases this setting may be overridden by software running on the computer (e.g. when a DAW session is open). -
Page 21: Channel Section
Apogee Boom User’s Guide Channel Section This portion of the Primary window displays channels for Analog and Playback inputs. General Settings 1. Channel View Button - click to show/hide Analog In and Playback channels. 2. Input Channel Level Meter - displays the digital signal level of the channel. The Analog IN channel levels are post A/D conversion. -
Page 22: Playback Channels
Playback Channels 8. Playback channels represent the playback signal from your audio software (DAW) outputs. Boom offers two stereo Playback inputs, which can be used to set up various workflows: ●... - Page 23 Apogee Boom User’s Guide Symphony ECS Channel Strip Window 1. EQ Section In/Out - Toggle the EQ section on or off 2. High Pass to EQ or Side Chain - toggle the high pass filter between two possible signal paths.
- Page 24 Apogee Boom User’s Guide 6. Mid Peak Q - Switch the Q (or bandwidth) of the Mid Peak band to Wide (up) or Narrow (down). 7. Mid Peak Gain - Set the gain of the Mid Peak band in the range of -15 dB to +15 dB.
-
Page 25: Mixer Section
Apogee Boom User’s Guide Mixer Section The mixer section provides a mixer for blending Analog and Playback inputs. ● Route mixer outputs to Main and headphone outputs for low latency direct monitoring while recording; ● With the Assign to SW Inputs setting, route mixer outputs directly to audio software inputs. -
Page 26: Monitor/Output Section
Apogee Boom User’s Guide Monitor/Output Section In the Monitor/Output Section, select the signals to be routed to the Main and Headphone outputs, then control their volume. Output Level Meters display the presence of signal at the outputs, useful as a diagnostic tool. -
Page 27: Choose Your Boom Workflow
Apogee Boom User’s Guide Choose Your Boom Workflow In the previous sections of this User’s Guide, the individual components of Boom have been described in detail. This section describes how these components work together to form a sophisticated and efficient audio production environment. - Page 28 Many software applications (Spotify, Youtube, for example) include audio input/output but don’t offer the critical functionality for completely supporting Boom workflows. Nevertheless, these apps can work with Boom when the OS is configured to use Boom for audio input/output, as described here.
-
Page 29: Monitoring Workflows
To configure your system for software monitoring: 1. In Apogee Control, set the Speaker and HP outputs to Playback 1-2. 2. Configure your DAW for software monitoring, as described here. 3. Set up a DAW channel for recording, then use the DAW mixer to create the desired balance... -
Page 30: Direct Monitoring
Direct monitoring lets performers hear themselves through a separate mixer running on hardware DSP and controlled in Apogee Control 2 software. The Direct mixer avoids the latency-inducing round trip through the DAW. To avoid double monitoring, the DAW must be configured so incoming audio to be recorded is NOT monitored through the DAW. -
Page 31: Working With Onboard Hardware Dsp
With the ECS Channel Strip running on onboard hardware DSP, it’s possible to add EQ, compression and saturation directly to Boom analog inputs. ECS processing is printed to the audio that’s sent to your DAW for recording and to streaming apps for online communication. -
Page 32: Assign To Sw (Software) Inputs
Apogee Boom User’s Guide Assign to SW (Software) Inputs With the Assign to SW Inputs feature, also sometimes known as Loopback, you can route the Mixer’s stereo output to software inputs 1&2, in the place of the signal from Analog inputs 1&2. This offers the possibility to use the Analog and Playback inputs, Symphony ECS processing and Mixer features as a virtual production studio for recording and streaming. -
Page 33: Configuring Your Daw
2. Choose the Provided by Driver labels by clicking on the first label, dragging your mouse down until all Boom labels are highlighted, then unclick. 3. Close the I/O labels window. 4. Select Boom inputs and outputs in any Logic Pro Channel Strip. -
Page 34: Avid Pro Tools
1. In the Pro Tools menu bar, set Options > Low Latency Monitoring. ● Uncheck Low Latency Monitoring for Software monitoring. ● Check Low Latency Monitoring for Direct monitoring. 2. In Apogee Control 2, set Mixer View in the System Settings column. ● Set to Off for Software monitoring. -
Page 35: Ableton Live
In/Out is checked. 3. In each channel, set Monitor to Auto for Software monitoring or Off for Direct monitoring. 4. In Apogee Control 2, set Main and Headphone Sources. ● Set to Playback 1-2 for Software monitoring. ● Set to Mixer for Direct monitoring. - Page 36 Apogee Boom User’s Guide To set channel Input & Output list labels: ● Choose Live > Preferences and click the Audio tab. ● Under Audio Device, click the Input Config and Output Config buttons. ● Activate inputs & outputs by clicking the numbered buttons.
-
Page 37: Troubleshooting
Apogee Boom User’s Guide Troubleshooting For more information ● Apogee KnowledgeBase and FAQs ● Informational Videos ● Apogee Product Registration ● How to contact Apogee Technical Support Please visit: www.apogeedigital.com/support... -
Page 38: Specifications
Apogee Boom User’s Guide Specifications Mic Pre: EIN: 128dB (un-weighted) @ 62dB, 150 Ohm input Max Input Level: +18dBu Input Impedance: 2.4KOhm Hi-Z: Max input level: 18dBu (active), 8dBu (passive) Input Impedance: 3.2kOhm (Pad on), 1MOhm (Pad off) A/D Conversion:... -
Page 39: Warranty Information And Legal Notices
12 months. The term of this warranty begins on the date of sale to the purchaser from an authorized Apogee dealer (proof of purchase in the form of a receipt may be required). Units returned for warranty repair to Apogee or an authorized Apogee warranty repair facility will be repaired or replaced with a functional equivalent product that is new or refurbished at the manufacturer’s option, free of charge. -
Page 40: Declarations Of Conformity
Règlement sur le matérial brouilleur du Canada. Declaration of Conformity – CE Apogee Electronics Corporation hereby declares that the product, Boom, to which this declaration relates, is in material conformity with the following standards or other normative documents: (EN50081-1/EN55022;...
Need help?
Do you have a question about the Boom and is the answer not in the manual?
Questions and answers