Table of Contents

Related Manuals for Vimar 46222.036.01


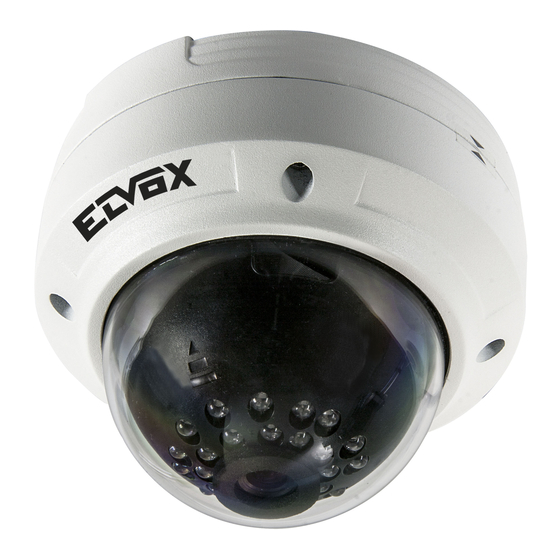
Summary of Contents for Vimar 46222.036.01
- Page 1 Manuale per il collegamento e l’uso Installation and operation manual 46222.036.01 Telecamera mini Dome IR IP 1,3 Mpx, obiettivo 3,6 mm, PoE IP IR mini Dome camera, 1,3 Mpx, 3.6 mm lens, PoE...
- Page 2 Prima di utilizzare il prodotto - Prima di utilizzare il prodotto si raccomanda vivamente di leggere il manuale e di conservarlo in un luogo sicuro per consultazione futura. - Il presente documento contiene le istruzioni per l'uso del prodotto. Non è la garanzia di qualità. Ci riserviamo il diritto di correggere errori di stampa, incongruenze con la versione più...
- Page 3 I passaggi per il collegamento sono illustrati di seguito: Fase 1: Collegare prima l'IP-CAM. Fase 2: Collegare la linea Internet all'apparecchiatura o ai dispositivi di trasferimento Internet. Fase 3: Collegare il cavo di alimentazione a una presa di rete. VIMAR group...
- Page 4 3 Specifiche: Modello 46222.036.01 Sensore di immagine 1/3"CMOS Pixel immagine 1280x960 Otturatore elettronico 1/25 s ~ 1/100000 s Diaframma automatico Diaframma fisso Telecamera Illuminazione minima 0,01 Lux F1,2 ACG ON: 0 Lux con IR Obiettivo 3,6 mm F 1,8 angolo 71°...
- Page 5 Step 1- Loosen the screws with a hexagonal screwdriver and take down the back box as shown in the following left picutre. Step 2- Paste the plotting sheet on the ceiling. Drill four holes and instert spiles in the ceiling as per the sheet. Use the screws to fix the bottomboard on the ceiling. VIMAR group...
- Page 6 Step 3 - Tighten the screws and install the back box. 2.2 Install IP-CAM to Ethernet Network The connection of digital video server is show below. Network Cabl e Router Rout er Internet Internet Network Cable Computer Network Cabl e Computer Modem M odem...
- Page 7 3 Specification Model 46222.036.01 Image sensor 1/3"CMOS Image pixels 1280x960 Electronic shutter 1/25 s ~ 1/100000 s Audo iris Fixed iris Camera Min. illumination 0,01 Lux F1,2 ACG ON: 0 Lux with IR Lens 3.6 mm F 1.8 corner 71°...
- Page 8 Viale Vicenza, 14 36063 Marostica VI - Italy 49401023A0 00 16 04 www.vimar.com...
Need help?
Do you have a question about the 46222.036.01 and is the answer not in the manual?
Questions and answers