Table of Contents
Advertisement
Advertisement
Table of Contents

Subscribe to Our Youtube Channel
Related Manuals for Hotpoint Ariston SA3540HIX


Summary of Contents for Hotpoint Ariston SA3540HIX
- Page 1 Use and Care guide www.hotpoint.eu/register...
- Page 2 ENGLISH . . . . . . . . . . . . . . . . . . . . . . . . . . . . . . . . . . . . . . . . . . . . . . . . . . . . 3...
-
Page 3: Table Of Contents
ENGLISH HEALTH & SAFETY, USE & CARE AND INSTALLATION GUIDE THANK YOU FOR PURCHASING AN HOTPOINT - ARISTON PRODUCT To receive more comprehensive help and support, please register your product at www.hotpoint.eu/register Index Health and Safety guide SAFETY INSTRUCTIONS . . . . . . . . . . . . . . . . . . . . . . . . . . . . . . . . . . . . . . . . . . . . . . . . . . . . . . . . . . . . . . . . . . . . . . . . . . . . . . . . . . 4 SAFEGUARDING THE ENVIRONMENT . -
Page 4: Health And Safety Guide
Health and Safety guide SAFETY INSTRUCTIONS IMPORTANT TO BE READ when cooking food rich in fat, oil reach of children, during and AND OBSERVED or when adding alcohol (e . g . after the installation . rum, cognac, wine) - risk of fire . After unpacking the appliance, Before using the appliance read Use oven gloves to remove pans... - Page 5 CLEANING AND it if plug is accessible, or by means of an accessible multi- MAINTENANCE pole switch installed upstream Never use steam cleaning of the socket in conformity with equipment . national electrical safety WARNING: Ensure that the standards . appliance is switched off before The rating plate is on the front replacing the lamp to avoid the...
-
Page 6: Safeguarding The Environment
SAFEGUARDING THE ENVIRONMENT DISPOSAL OF PACKAGING ENERGY SAVING TIPS For further information on the MATERIALS treatment, recovery and recycling of Only preheat the oven if specified in household electrical appliances, The packaging material is 100% the cooking table or your recipe . contact your competent local recyclable and is marked with the Use dark lacquered or enamelled... -
Page 7: Use And Care Guide
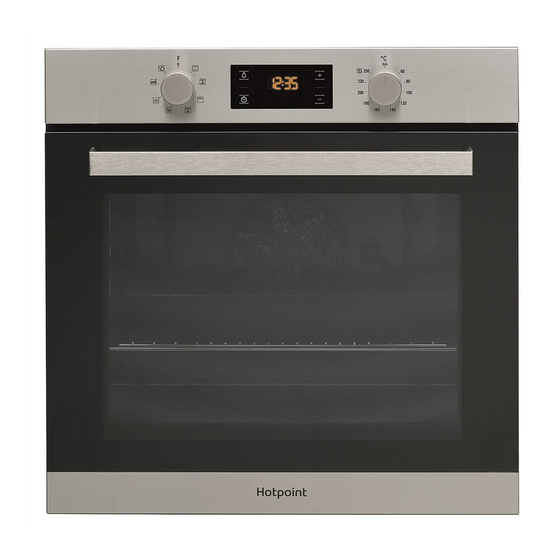
Use and Care guide PRODUCT DESCRIPTION Control panel Light Runners for accessories (the level is indicated on the wall of the cooking compartment) Door Upper heating element/grill Identification plate (do not remove) Lower heating element (not visible) Please note: The cooling fan may switch itself on every so often during cooking in order to reduce energy consumption. Once cooking is complete and the oven has been switched off, the cooling fan may continue to run for a certain period of time. -
Page 8: Control Panel
CONTROL PANEL 1. SELECTION KNOB 3. TIME SETTING 5. ADJUSTMENT BUTTONS For switching the oven on by For accessing the cooking time For changing the cooking time selecting a function . settings, delayed start and timer . For settings . Turn to the position to switch the displaying the time when the oven... -
Page 9: Accessories
ACCESSORIES WIRE SHELF BAKING TRAY Use for cooking food or as Use for cooking all bread a support for cooking pots, and pastry products, but baking pans and other also for roasts, fish en items of ovenware. Useful papillotte, etc. for grilling bread, meat, fish and vegetables. -
Page 10: Functions
FUNCTIONS CONVENTIONAL* BREAD AUTO For cooking any kind of dish on one shelf Use this function when baking bread . For only . Use the 3rd shelf . If roasting a joint of meat best results, we recommend following the recipe carefully . -
Page 11: How To Use The Oven
HOW TO USE THE OVEN Before using the appliance carefully read the Health and Safety guide. USING THE APPLIANCE FOR THE FIRST TIME SETTING THE TIME REHEAT THE OVEN A new oven may release odours that have been left You will need to set the time when you switch on the behind during manufacturing: this is completely appliance for the first time: Press until the... -
Page 12: Daily Use
DAILY USE . PROGRAMMING COOKING SELECT A FUNCTION You will need to select a function before you can start To select a function, turn the selection knob to the programming cooking . symbol for the function you require: The display will light up and an audible signal will sound . - Page 13 END OF COOKING An audible signal will sound and the display will indicate that the function has finished . Turn the selection knob to select a different function or to position “ ” to switch the oven off . Please note: If the timer is active, the display will show “END” alternately with the remaining time.
-
Page 14: Useful Tips
USEFUL TIPS HOW TO READ THE COOKING TABLE the filling . The table indicates the best function to use for any given food, to be cooked on one or more shelves at the same time . Cooking times start from the MEAT moment food is placed in the oven, excluding pre- - Use any kind of oven tray or pyrex dish suited... - Page 15 place the bread on a baking tray lined with baking parchment . - Place the dough in the (cold) oven, pour 100 ml of cold drinking water onto the bottom of the oven and activate the “Bread Auto” function . After cooking, leave the dough to stand on a wire shelf until completely cooled .
-
Page 16: Cooking Table
COOKING TABLE LEVEL AND RECIPE FUNCTION PREHEAT. TEMPERATURE (°C) COOK TIME (MIN.) ACCESSORIES 160-180 30-90 Leavened cakes 160-180 30 - 90 *** 160 – 200 35 - 90 Filled cake (cheesecake, strudel, fruit pie) 160–200 35 - 90 *** 170 - 180 15 - 45 Biscuits/tartlets 160-180... - Page 17 LEVEL AND RECIPE FUNCTION PREHEAT. TEMPERATURE (°C) COOK TIME (MIN.) ACCESSORIES Chicken/rabbit/duck 1 kg 200 - 230 50 - 100 Turkey/goose 3 kg 190 - 200 100 - 160 Baked fish/en papillote (fillet, whole) 170 - 190 30 - 50 Stuffed vegetables 180 - 200 50 - 70...
-
Page 18: Tested Recipes
TESTED RECIPES Compiled for the certification authorities in accordance with the standard IEC 60350-1 COOK TEMP. RECIPE FUNCTION PREHEAT. TIME ACCESSORIES* AND NOTES (°C) (MIN.) 30-40 Drip tray/baking tray 35-45 Drip tray/baking tray Shortbread Lev . 4: baking tray 2 - 4 30-40 Lev . -
Page 19: Cleaning
CLEANING Do not use steam cleaning Carry out the required Do not use wire wool, abrasive equipment. operations with the oven cold. scourers or abrasive/corrosive cleaning agents, as these could Use protective gloves during all Disconnect the oven from the damage the surfaces of the operations. -
Page 20: Maintenance
MAINTENANCE Use protective gloves during all Carry out the required Disconnect the oven from the operations. operations with the oven cold. power supply. REMOVING THE DOOR Open the door fully . Take a firm hold of the door with both hands – do not hold it by the handle . -
Page 21: Refitting The Door
REFITTING THE DOOR Move the door towards the oven, aligning the Try closing the door and check to make sure hooks of the hinges with their seating . that it lines up with the control panel . If it does not, repeat the steps above: The door could become damaged if it does not work properly . - Page 22 CLICK TO CLEAN - CLEANING THE GLASS To correctly reposition the inner glass, make After removing the door and resting it sure that the “R” is visible in the right-hand corner on a soft surface with the handle downwards, and the clear surface (not printed) is facing up . simultaneously press the two retaining clips and First insert the long side of the glass indicated remove the upper edge of the door by pulling it...
-
Page 23: Lowering The Upper Heating Element
REPLACING THE LIGHT Disconnect the oven from the power supply . Please note: Use 25 W/230 V type G9, T300 °C halogen lamps. Unscrew the cover from the light, replace the bulb and screw the cover back on the light . The bulb used in the product is specifically designed for domestic appliances and is not suitable for general room lighting within the home (EC Regulation 244/2009). -
Page 24: Troubleshooting
TROUBLESHOOTING Any problems or malfunctions that may occur can often be easily resolved . Before contacting the After-sales Service, check the following table to see whether you can resolve the problem yourself . If the problem persists, contact your nearest After-sales Service Centre . Read the safety instructions carefully before carrying out any of the following work PROBLEM... -
Page 25: Product Fiche
PRODUCT FICHE The product fiche with energy data of this appliance can be downloaded from the website docs.hotpoint.eu AFTER-SALES SERVICE BEFORE CONTACTING OUR AFTER- Check whether you can resolve the problem SALES SERVICE yourself using any of the measures described in the “Troubleshooting”... -
Page 26: Installation Guide
Installation guide 90°C... - Page 27 20 mm 447 mm 557 mm 97 mm 478 mm 595 mm 89° max 525 mm 570 mm 5 mm 4 mm 595 mm 549 mm min 560 mm min 560 mm 560 mm 600 mm 40 mm 560 mm 583+2 mm 40 mm 5 mm...
- Page 28 4 0 0 0 1 0 8 6 4 4 0 1 Printed in Italy...
Need help?
Do you have a question about the SA3540HIX and is the answer not in the manual?
Questions and answers