Table of Contents
Advertisement
Available languages
Available languages
Quick Links
7OFK 1039EL PX RU/HA
7OFK1039ELSPX RU/HA
English
Operating Instructions
OVEN
Contents
Operating Instructions,1
Warnings,2
Modes,10
Русскии
Руководство по эксплуатации
ДУХОВОЙ ШКАФ
Содержание
Руководство по эксплуатации,1
Предупреждения,3
Сервисное обслуживание,4
Описание изделия,5
Описание изделия,6
Установка,18
Включение и эксплуатация,20
Программы,22
Предосторожности и рекомендации,26
Техническое обслуживание и уход,27
Неисправности и методы их устранения,29
Advertisement
Table of Contents

Related Manuals for Hotpoint Ariston 7OFK 1039EL PX RU/HA


Summary of Contents for Hotpoint Ariston 7OFK 1039EL PX RU/HA
-
Page 1: Table Of Contents
7OFK 1039EL PX RU/HA 7OFK1039ELSPX RU/HA English Operating Instructions OVEN Contents Operating Instructions,1 Warnings,2 Assistance,4 Description of the appliance,5 Description of the appliance,6 Installation,7 Start-up and use,9 Modes,10 Precautions and tips,14 Maintenance and care,14 Troubleshooting,17 Русскии Руководство по эксплуатации ДУХОВОЙ ШКАФ... -
Page 2: Warnings
WARNING: Ensure that the appliance is switched off before replacing the lamp to avoid the possibility of electric shock. Warnings ! When you place the rack inside, make WARNING: The appliance and its sure that the stop is directed upwards and accessible parts become hot during use. -
Page 3: Position
духовому шкафу. Никогда не используйте паровые Предупреждения чистящие агрегаты или агрегаты под высоким давлением для чистки изделия. ВНИМАНИЕ: Данное изделие и его доступные комплектующие сильно ВНИМАНИЕ: Проверьте, чтобы изделие нагреваются в процессе эксплуатации. было выключено, перед заменой Будьте осторожны и не касайтесь лампочки... -
Page 4: Assistance
Assistance Сервисное обслуживание Warning: Внимание: The appliance is fitted with an automatic diagnostic system Изделие оснащено системой автоматическ ой which detects any malfunctions. Malfunctions are signalled диагностики, позволяющей выявить возможные through messages of the following type: “F—” followed by неисправности. Неисправности показываются на numbers. -
Page 5: Description Of The Appliance
Description of the appliance Описание изделия Overall view Общии вид 1 POSITION 1 1 ПОЛОЖЕНИЕ 1 2 POSITION 2 2 ПОЛОЖЕНИЕ 2 3 POSITION 3 3 ПОЛОЖЕНИЕ 3 4 POSITION 4 4 ПОЛОЖЕНИЕ 4 5 POSITION 5 5 ПОЛОЖЕНИЕ 5 6 GUIDES for the sliding racks 6 ВЫДВИЖНЫЕ... -
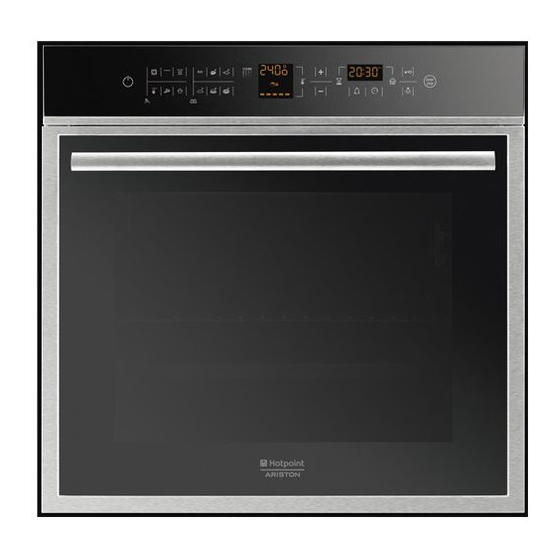
Page 6: Description Of The Appliance
Description of the appliance Описание изделия Control panel Панель управления 1. Символы ПРОГРАММ РУЧНОГО РЕЖИМА 1. MANUAL COOKING MODE Icons 2. Выбор FAST CLEAN 2. FAST CLEAN selector 3. Дисплей ТЕМПЕРАТУРЫ 3. TEMPERATURE display 4. Символ ТЕМПЕРАТУРА 4. TEMPERATURE icon 5. -
Page 7: Installation
Installation Ventilation To ensure adequate ventilation, the back panel of the cabinet must be removed. It is advisable to install the oven ! Please keep this instruction booklet in a safe place for so that it rests on two strips of wood, or on a completely future reference. -
Page 8: Electrical Connection
Electrical connection • The socket is compatible with the plug of the appliance. If the socket is incompatible with the plug, ask an Ovens equipped with a three-pole power supply cable are authorised technician to replace it. Do not use extension designed to operate with alternating current at the voltage cords or multiple sockets. -
Page 9: Start-Up And Use
Start-up and use Setting the clock ! The clock can only be set when the oven is switched off. If WARNING! The oven is the oven is in standby mode, pressing the button once will provided with a stop system display the current time setting. -
Page 10: Modes
Demo mode 6. During cooking it is always possible to: The oven can operate in the DEMO mode: all heating - change the temperature by pressing the button, elements are deactivated, and the controls remain operative. followed by the “ ” and “ ” buttons (manual modes only); To activate DEMO mode, press and release button , then - set the duration of a cooking mode (see Cooking Modes);... - Page 11 ! When mode is on, the rotisserie will stop if the door BARBECUE mode is opened. The top heating element and the rotisserie spit (where present) are activated. The high and direct temperature Automatic cooking modes of the grill is recommended for food which requires a high ! The temperature and cooking duration are pre-set values, surface temperature.
-
Page 12: Practical Cooking Advice
• Dilute the yeast in lukewarm water (approximately 35 Programming delayed cooking ! A cooking duration must be set before the cooking end degrees). • Make a small well in the mound of flour. time can be scheduled. ! For the delayed programming to work properly, the clock •... -
Page 13: Cooking Advice Table
Cooking advice table Modes Foods Weight Rack position Preheating Recommended Cooking (in kg) Temperature duration (°C) (minutes) Standard Sliding guide guide Manual rails rails Multilevel* 2 and 4 1 and 3 210-220 20-25 2 and 4 1 and 3 30-35 1 and 3 20-30 2 and 4... -
Page 14: Precautions And Tips
Precautions and tips Disposal • When disposing of packaging material: observe local legislation so that the packaging may be reused. ! This appliance has been designed and manufactured • The European Directive 2012/19/EC on Waste in compliance with international safety standards. The Electrical and Electronic Equipment (WEEE), requires following warnings are provided for safety reasons and that old household electrical appliances must not... -
Page 15: Sliding Rack Kit Assembly
! Do not touch the light bulb directly with your hands. • The inside of the oven should ideally be cleaned after each use, while it is still lukewarm. Use hot water and ! Do not use the oven lamp as/for ambient lighting. detergent, then rinse well and dry with a soft cloth. - Page 16 ! If the oven is too hot, the pyrolytic cycle may not start. Programming delayed automatic cleaning ! Programming is possible only after selecting the FAST Wait for the oven to cool down. CLEAN mode. ! The programme may only be started once the oven door 1.
-
Page 17: Troubleshooting
Troubleshooting Problem Possible cause Solution The appliance has just been Set the clock. The “Clock button” and the connected to the electricity mains digits on the display flash. or there has been a blackout. A programmed cooking mode There has been a blackout. Reprogram the cooking mode. - Page 18 Установка ! После встраивания изделия в кухонный элемент должна быть исключена возможность касания к электрическими частями. ! Важно сохранить данное руководство для его Расход электроэнергии, указанный на паспортной последующих консультации. В случае продажи, табличке изделия, был замерян для данного типа передачи...
- Page 19 ! Электрическии провод изделия не должен быть согнут Подсоединение сетевого кабеля или сжат. 1. Откройте зажимную ! Ре г у л я р н о п р о в е р я и т е с о с т о я н и е к а б ел я коробку, нажав...
- Page 20 Включение и эксплуатация Настройка часов ! Настройка часов производится только при выключенной духовке. Если духовка в режиме энергосбережения, при ВНИМАНИЕ! Духовой шк аф ук омпл е к то ва н первом нажатии кнопки показывается текущее время. системой бл окировки Вновь нажмите эту кнопку для настройки времени. решеток, позволяющей...
- Page 21 5. Звуковой сигнал и включение всех индикаторов нагрева Убирающаяся ручка означает, что фаза предварительного нагрева завершена. Некоторые модели укомплектованы убирающейся На данном этапе можно поместить в духовку продукты. ручкой, встроенной в дверцу духового шкафа. 6. В процессе приготовления в любой момент можно: Достаточно...
- Page 22 Программы для продолжительного приготовления при низкой температуре. В данном режиме можно выбрать одну из следующих температур: 40, 65, 90°C. ! Для обеспечения идеальной нежности и хрустящей корочки блюд духовка поддерживает влажность в форме водяного пара, которая обычно выделяется Программа ПИЦЦА при...
- Page 23 использовании этой программы. Если температура • Сделайте сверху булок надрезы. внутри духовки выше температуры, указанной для • Курица помещается в духовку без предварительного выбранной программы, на дисплее ТЕМПЕРАТУРЫ нагрева. показывается надпись «Hot», и начать приготовление • Включите приготовление ХЛЕБ невозможно; подождать охлаждения духовки. •...
- Page 24 При использовании противеня время выпечки 1. Нажмите кнопку и выполните операции от 1 до 3, удлиняется, что затрудняет получение хрустящей описанные для программирования продожительности. пиццы. 2. Затем нажмите кнопку и настройте время • В случае выпечки пиццы с обильной начинкой завершения...
- Page 25 Та а П а П В Ра П а Р а П а а а (°C) а а Р а а а а 210-220 П а ( а 2- а 20-25 О а 30-35 П а 2- а 2- 160-170 Б...
- Page 26 Предосторожности и • Не ставьте предметы на открытую дверцу духового шкафа. рекомендации • Н е р а з р е ш а й т е д ет я м и г р а т ь с б ы т о в ы м электроприбором.
- Page 27 Техническое обслуживание и уход Отключение электропитания Перед началом какой-либо операции по обслуживанию или чистке отсоедините изделие от сети электропитания. Чистка изделия 3. возьмитесь за дверцу руками • Причиной незначительных различий в оттенках на с двух сторон, плавно закройте фасаде духового шкафа является использование ее, но...
-
Page 28: Fast Clean
Крепление комплекта выдвижных ! Программа начнется только после закрывания дверцы духовки. направляющих Порядок запуска программы Fast Clean: П о р я д о к м о н т а ж а в ы д в и ж н ы х 1. - Page 29 Завершение пиролитической чистки Для открывания дверцы духовки необходимо дождаться выключения символа : показывает, что температура в духовке понизилась до безопасного значения. На данном этапе можно заметить налет белого пепла на дней и стенах духового шкафа: удалите его влажной губкой после полного охлаждения духовки. Если же вы...
- Page 32 195114185.00 05/2013 - XEROX FABRIANO...
Need help?
Do you have a question about the 7OFK 1039EL PX RU/HA and is the answer not in the manual?
Questions and answers