
Related Manuals for urmet domus 1093/004AHD


Summary of Contents for urmet domus 1093/004AHD
- Page 1 Mod. 1093 DS1093-162A H.264 WITH HDMI DVR AHD DVR Series 4CH Ref. 1093/004AHD 8CH Ref. 1093/008AHD 16CH Ref. 1093/016AHD USER MANUAL INSTRUCTIONS...
-
Page 2: Table Of Contents
Image recording ............................6 1.3.7 Privacy and copyright ............................ 6 Front Panel ..........................7 1.4.1 Ref. 1093/004AHD DVR Front Panel ......................7 1.4.2 Ref. 1093/008AHD DVR Front Panel ......................8 1.4.3 Ref. 1093/016AHD DVR Front Panel ......................9 Rear Panel ..........................10 1.5.1... - Page 3 4.3.1 Urmet IUVSpad and iUVStab Mobile ......................68 P2P Function .......................... 73 1093/004AHD 1093/008AHD and 1093/016AHD Specifications (Pal Format) ........75 Maximum recording time with 1000GB Hard Disk ................77 Ref. 1093/004AHD – 1093/008AHD – 1093/016AHD ............77 Record Alarm setting ..........................80 Troubleshooting .............................
-
Page 4: General Information
GENERAL INFORMATION This document describes how to install and use the URMET AHD DVR Series Ref. 1093/004AHD – Ref. 1093/008AHD - Ref. 1093/016AHD. Read this manual which contains information for correct, safe use carefully. Keep this manual at hand so that you can refer to it when needed. -
Page 5: Opening The Box
Here follow a Summarize about the most Features: Function Brief and Description Double video output with monitor, VGA virtual output port or HDMI Output; Support Real time URMET UVS Client Software and MP live surveillance and also support zoom in/out, monitoring auto sequence and PIP display. -
Page 6: Warnings
WARNINGS 1.3.1 POWER Only use the power unit provided to power the device. Check mains rating before plugging the power unit in. Do not pull the cable to unplug the device. Switch the device off before unplugging power unit. This operation must not be performed when the DVR is recording, playing or from the configuration menu. -
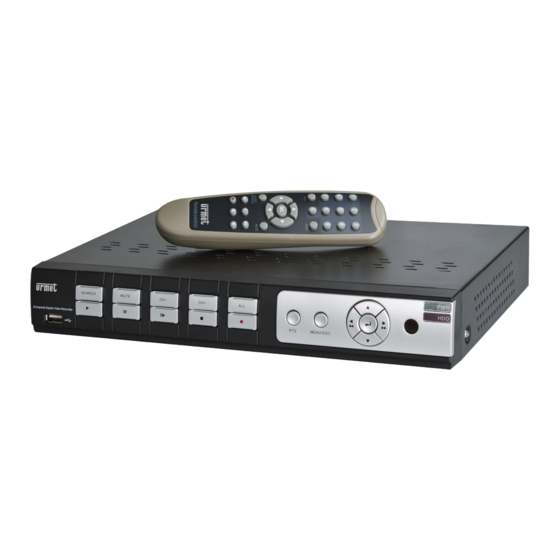
Page 7: Front Panel
FRONT PANEL 1.4.1 REF. 1093/004AHD DVR FRONT PANEL 14 15 Function Button Description The indicator will turn green to indicate that the system is correctly Power powered IR receiver This receives the IR signal from the remote control The red indicator will blink to indicate that the hard disk is being... -
Page 8: Ref. 1093/008Ahd Dvr Front Panel
1.4.2 REF. 1093/008AHD DVR FRONT PANEL 16 17 Key title Item Remark Function & Description Indicator If the “Green” indicator is on the system is getting power Power Indicator normally. IR Receiver Receives IR signal from Remote Controller When the “Red” indicator flashes it means the hard drive is HDD Indicator being read or written to. -
Page 9: Ref. 1093/016Ahd Dvr Front Panel
1.4.3 REF. 1093/016AHD DVR FRONT PANEL Key title Item Remark Indicator Function & Description Indicator Power Indicator If the “Green” indicator is on, NVR is getting power normally. If the “Red” indicator flashes, the hard drive is being read or HDD Indicator written to. -
Page 10: Rear Panel
REAR PANEL 1.5.1 REF. 1093/004AHD DVR BACK PANEL 1.5.2 REF. 1093/008AHD DVR BACK PANEL Item Physical port Connection method Connect CH1-CH4 for DVR Ref. 1093/002AHD, CH1-CH8 for DVR Ref. 1093/003AHD (Virtual) video input device Video inputs (BNC interface) Audio Inputs 4 CH audio input (RCA interface);... -
Page 11: Ref. 1093/016Ahd Dvr Back Panel
1.5.3 REF. 1093/016AHD DVR BACK PANEL Item Physical port Connection method Video inputs Connect (Virtual) video input device (BNC interface) Audio Inputs 4CH audio input (RCA interface) Audio Output Audio output (RCA interface); Connect USB mouse USB Port Connect to HDMI monitor HDMI Port Connect to VGA monitor, such as PC monitor VGA Port... -
Page 12: Ref. 1093/526-528 Dvr Back Panel
1.5.4 REF. 1093/526-528 DVR BACK PANEL Item Physical port Connection method Connect CH1-CH16 (Virtual) video input device (BNC Video inputs interface) Audio Inputs 8CH audio input CH1-CH8 (RCA interface) Connector for audio cable with audio inputs CH9-CH16 Audio Inputs (RCA) Audio Output Audio output (RCA interface);... -
Page 13: Remote Controller
REMOTE CONTROLLER Item Key title Key function Channel select 1-8; Numeric key Numeric key; Clicking numeric “0” allow you switch 9、 、 、 、 0 to GUI (Graphical user Interface) function Multiple display mode Menu Enter into Main menu/Exit Up arrow key, Volume adjust ▲... -
Page 14: Mouse Operation
MOUSE OPERATION Except using buttons of front panel or remote controller, you also can use mouse to perform system operation. TYPE Function In menu lock mode, Enter into pop-up menu and clicking any sub menu to pop up Log- in window; on menu unlock mode, enter into pop-up menu, and then clicking left key to enter into any sub menu directly. -
Page 15: System Initialization
SYSTEM INITIALIZATION After connecting the Power cable of DVR to wall outlet and pressing the Power button on the front and/or rear panel, you will enter into the system initializing screen shown as above. MONITOR SELECTION This Function allows to control the OSD Menu, switching HDMI and/or VGA Video Output. Set the HDMI/VGA Resolution to 1920x1080 and connecting both video output (i.e. -
Page 16: Live Interface And Pop-Up Menu
LIVE INTERFACE AND POP-UP MENU After finishing initialization the system will enter into <Live> screen. The Picture above is the Multi-split display defaulted by system, which is showing no video input status. Once there are video inputs, the screen will display live images from the cameras. -
Page 17: Main Menu Guide
MAIN MENU GUIDE After finishing system initialization, click right key of mouse on main interface mode to enter into Pop-up Menu. Now you could perform parameter setting and operate on Main Menu, Multi-Pics, PTZ, PIP, Rec. Search, Mute, Manual record, Start Rolling, Start Cruise and Vout Switch etc. -
Page 18: Main Menu
MAIN MENU On <Live> mode, click [Menu] button on the front panel or Remote controller to enter into Main menu interface shown as above. And also you can click [ ] icon to enter the main menu screen. In Main Menu mode, you can control device management settings, such as Display, Record, Network, Search, Device, System and Advanced setting etc. -
Page 19: Output Mode
2.4.1.2 Output mode Click [Live] to pop up the interface shown as below. Now you could perform channel sequence setting. Go to [Main menu Display Output] to enter into the output set interface shown as below. Click [LIVE-OUT] in the Video Output option and set relative parameters shown as below for Video Output. Video output: Support only Main Video Output View Setup: if this option is enabled, the user can set the channels sequence for View Mode Option. -
Page 20: Record Set
2.4.2 RECORD SET 2.4.2.1 Record parameters Go to [Main menu Record Record Para] to enter into the interface shown as below. Channel: allow you setup the channel you desired. • Record: allows you set up record status (Enable/Disable) of each channel •... -
Page 21: Schedule
2.4.2.2 Schedule Click [Main Menu Record Schedule] to enter into the interface shown as below. Channel: This option allows you select one channel you desired. It is possible to change the channel selecting “Next”. • Week: This option allows to select the week-day. It is possible to change the day selecting “Next”. •... -
Page 22: Search
2.4.3 SEARCH 2.4.3.1 Record Search Click [Main Menu Search Record Search] to enter into the interface shown as below. Channel: allows you select the channel(s) you desire to search. • Date Search: In the Video Search screen, user can search for all the records in a specific date. To execute a video •... -
Page 23: File Backup
(First Page): go to the first page on the list. When you view other pages, clicking [First] button brings you back to Page one. (Previous page): go to the previous ones of current page. Clicking [Pre] button will take you back the previous ones of current page (except the first page). -
Page 24: Media Player Backup
2.4.3.7 Media Player backup Copy one backup file to your PC. Open Playback player and click “+” icon or button to find/select the backup file, and then click [open] button. Highlight the file you have selected and click [Play] button. :Play button: click the icon to playback the backup record;... -
Page 25: Log Search
2.4.3.8 Log Search Go to [Main menu Search Log] option to enter into the Log search interface shown as below. Herein allow you preview the log information you have searched. And click [Backup] to export all the log information which is listed. - Page 26 UPnP (Universal Plug and Play) function: If router supports UPnP function and set <UPnP> to “On”, system • will automatically forward port to router. DNS Function: DNS server is generally provided by local ISP. Herein please enter the IP address of your DNS. •...
-
Page 27: Router's Port Forwarding
Set the ports on the DVR and port-forward of the same ports to the router. There are two different ways to do this: Automatic mode: If the UPnP function is supported and enabled on the router, simply enable the function also on the DVR on the bottom of the “Menu Network”... -
Page 28: Sub Stream
Input router’s IP address from IE-based browser to open the Router configuration interface shown as above; Click [Transmittal rule] option to take you to the port forwarding instructions for your router; The DVR IP address for the intranet should be <192.168.1.101>, you should forward server port and web port to this IP address respectively. - Page 29 Click [Main menu Network Mobile] to enter into the [Mobile] interface shown as Mobile Picture in 2.4.4.5 Section. User Name: indicate user name of DVR, and support numbers and characters and 1~15 bits length User password: indicate user password of DVR, and also support numbers and characters and 1~15 bits length Server port: Mobile monitoring port.
-
Page 30: Ddns Set
2.4.4.5 DDNS Set DDNS (Dynamic DNS) is a service that register a domain name and the floating IP address with the DDNS server so that the domain name can be routed to the IP address even if the IP address is changed in a dynamic IP system. User can visit a remote DVR by using DDNS on above three types (Static, DHCP and PPPoE) Select the DDNS submenu in the DVR network menu. -
Page 31: Rtsp
You can apply for a DDNS account for free at the web www.3322.org, www.changeip.com www.no-ip.com or DDNS Account for payment at the web www.dyndns.org. You can register on DDNS Service website and get a domain name, user name, and password. Server: select DDNS provider •... -
Page 32: Alarm
2.4.5 ALARM 2.4.5.1 Motion Click [Main menu Alarm Motion] to enter into the interface shown as below Channel: allow you enable/disable the motion function for any channel. Area: Click the [Setup] button to enter into area setup interface shown as below. •... - Page 33 No: allow you select one desired channel • I/O Status: allows you select the three options – NO (Normal Open), NC (Normal Close) and OFF. Set to “Normal • Open”, I/O status Alarm will be activated while sensor is ON; set to “Normal Close”, I/O status alarm will be activated while sensor is OFF;...
-
Page 34: Device
2.4.6 DEVICE 2.4.6.1 HDD Set Click [Main menu Device HDD] to enter into the interface shown as below. When DVR is connected to a HDD, the system will automatically detect if HDD is normal or not; If the cable connected to HDD is loosen or HDD is abnormal, HDD status will be shown as “No Disk”, or, If HDD need to be formatted, status will be shown as “no format”, otherwise, the HDD status will be shown as “Normal”... -
Page 35: Ptz Set
2.4.6.2 PTZ Set Click [Main Menu Device PTZ] to enter into the below window shown as below. You could select the channel you desire to control and set PTZ protocol (Pelco-D or Pelco-P), Baud Rate (1200, 2400, 4800, 9600), Data bit (8, 7, 6, 5), Stop bit (1, 2), Parity Check (None, Odd, Even, Mark, Space), Address Code and Cruise status respectively. -
Page 36: Dst Set
2.4.7.2 DST Set Enter into the interface shown as above and you are allowed to set DST status and mode. 2.4.7.3 Network Time Protocol (NTP) Service Click [Main menu System General NTP] to enter into the interface shown as below: NTP Service: Allow you enable/disable the NTP function. -
Page 37: Information
Click [Edit] button to enter into the [User Edit] interface shown as below: User name consist of eight characters, password consist of 0~8 and its fixed-length is 8 bit. Note: The user can change the own Password without Administrator’s authorization. The password must be eight characters long. -
Page 38: Advanced
Now user can check the current Device name, Device ID, Device type, Device S/N, MAC address, IE version, Hardware version, Client version, Firmware Version etc. 2.4.8 ADVANCED 2.4.8.1 Maintain Click [Main menu Advanced Maintain] to enter into the maintain interface shown as below. Default User: If this setting is set to “Admin”... -
Page 39: Exceptions
2.4.8.2 Exceptions Click [Main menu Advanced Event] to enter into the <Event> interface shown as below Event Type: support the three abnormal types: Disk No Space, Disk Error and Video Loss. • Enable Exception: allow you activate abnormal alarm. • Alarm out: allow you connect external alarm sensor. -
Page 40: Menu Lock
MENU LOCK Considering a system safety feature you can click [ ] icon to lock system interface when leaving the DVR. If you want to login to the DVR again, you would input device code and password to unlock the interface shown as below. Friendly Reminder: Administrator has full authority over Main Menu operations and has an authority to limit common user’s operation. -
Page 41: Start/Stop Cruise
START/STOP CRUISE If multiple presets are specified, the PTZ camera will automatically move to the entire preset one at a time whilst user activates [Start Cruise ] options. If you want to stop cruise, please click [ ] icon on the [Tool] column. DIGITAL ZOOM This option allows to select a channel in full screen mode and zoom in on the image in LIVE mode. -
Page 42: Plug-In Download And Installation Web Interface
PLUG-IN DOWNLOAD AND INSTALLATION WEB INTERFACE Open your web browser and input the IP address and web port of DVR, such as: http://IP Address:Web Port/ . If your computer is connected to internet, it will download and install “ActiveX” Plug-in automatically. If your computer system is Vista, you may need to setup the user authority. -
Page 43: Web Interface Dvr Accessing Via Ip Address, Url Or Urmet Ddns Account
WEB INTERFACE DVR ACCESSING VIA IP ADDRESS, URL OR URMET DDNS ACCOUNT Follow the instructions for configuring and accessing the web pages of the device on Internet Explorer. The web can be accessed in three ways: Direct access via LAN: start Internet Explorer and enter the IP address of the DVR and the HTTP port of the DVR on the address bar as follows: http://IP Address:HTTP Port (e.g. -
Page 44: Menu Bar
3.2.1 MENU BAR Menu bar include [Live], [Replay], [Configuration], [Path Configuration] and [Logout] options 3.2.2 LIVE DISPLAY After running the Web Application Manager on your local PC, system will be defaulted to enter into <Live> interface shown as above. You can click [Play] button to Open/close live images and enter into on-spot record and Capture, quad, 9-split or 16-split mode by operating the control bar on the bottom of screen. -
Page 45: Ptz Control
3.2.3 PTZ CONTROL PTZ moving Direction control: allow you control PTZ camera’s direction. And the middle button is called [Auto-cruise] button. PTZ speed control bar : Iris, Focus and Zoom control : Preset setting/clear; Start cruise /stop cruise 3.2.4 VIDEO CONTROL Adjust video Hue;... -
Page 46: Playback
PLAYBACK Click [ ] icon to enter into <playback> interface shown below. The Web Application Manager supports up to 4 channels playback simultaneously. 3.3.1 RECORD SEARCH Firstly, select one day you want to check and tick-select <synchronous Playback> and the channels you desire to playback shown as below DS1093-162A... -
Page 47: Playback Control
Secondly, select record type (Normal record, Alarm record and All) and then click < > button shown as below. On the time axis, red part stand for alarm record, yellow stand for normal record and original part stand for no record during this period. -
Page 48: Record File Clip
3.3.3 RECORD FILE CLIP After opening playback, click [ ] icon to clip the selected file; and click again to stop the clip function. Record clip file will be saved as *.264 format. 3.3.4 SNAPSHOT FUNCTION Move the mouse curse to the channel you want to capture, and click [ ] icon to capture the live images remotely. -
Page 49: Display Configuration
3.4.1 DISPLAY CONFIGURATION Unfold [Display] option to find its sub-options: Live and Privacy zone 1、Live: Allow you modify channel name, Position, Live channel, Show time and Record time. If show time is set to <disable>, current system time will not appear on the screen on Live mode; and if record time is set to <off>, system time can’t be found in the record file. -
Page 50: Network Parameters
Schedule: Detailed parameters please refer to DVR local setting. Green stand for Normal record; Yellow stands for Motion detection; Red stands for I/O triggered record. Main Stream: detailed settings please refer to DVR local setting. Herein allow user modifies the resolution, frame rate, Bit rate and audio of the record channel. - Page 51 DHCP System default <DHCP> as its network type: Set network type to “DHCP” shown as below. Relative parameters should be consistent with DVR local setting. Set network type to “PPPoE”: Its user name and password should be consistent with DVR local setting. 2、...
- Page 52 3、 Email setting: Click [Email setting] option to allow you set alarm email configuration parameters shown as below. Detailed parameters should be consistent with DVR local setting. 4、 DDNS Setting: After user applies for DDNS service shown below, you could enable <DDNS> function under any one network type mode (Static, DHCP and PPPoE).
-
Page 53: Alarm Set
Launch VLC Player from Media -> Open Network Stream and digit the following String: rtsp://Indirizzo IP:RTSP Port/live/chA_B_C where: RTSP Port is 554 (default value) • A means ch1(00), ch2(01) and so on • B means the Stream Type. Main stream (00), Sub stream (01) •... - Page 54 2、 I/O Alarm(only for Ref. 1093/016AHD): allow you configure <I/O Status>, <Alarm output>, <I/O Alarm record> and <Alarm email> etc. Details setting should be consistent with DVR local setting. DS1093-162A...
-
Page 55: Device
3.4.5 DEVICE Click <Device> to unfold its sub-options: HDD and PTZ. HDD: allow you check out HDD status and overwritten time shown below. Detail setting should be consistent with DVR local setting. PTZ Configuration: details setting should be consistent with DVR local setting. 3.4.6 SYSTEM Click <System>... -
Page 56: Advanced
Users: Allow you configure user name and password shown below. Details setting should be consistent with DVR local setting. 2、 Information: Allow you check out device name, number, type, MAC address, software version, IE version and hardware version shown below. 3.4.7 ADVANCED Click <Advance>... - Page 57 Please follow below steps to upgrade the system: Select the upgrade file’s path shown as below. Please note that the format of upgrade file is *.sw. Click <Start update>, now processing bar will display current upgrade status shown as below. 2、...
-
Page 58: Local Setting
3、 Exception: allow you configure abnormal type, buzzer output time, and alarm email and show message shown as below. Details setting should be consistent with DVR local setting. 4、 Maintain: allow you set auto system maintain for DVR remotely shown as below. Detail setting should be consistent with DVR local setting. -
Page 59: Mobile Software
MOBILE SOFTWARE Mobile Software is used for iOS Platform (iPhone, iPad) and Android Platform (Android Smartphone, Tablet). Here follow the Mobile Software Client description. IOS MOBILE About iOS Platform are available 2 App. Asee Software Mobile that use Mobile Port and iUVS Software that use Data Port. -
Page 60: Urmet Iuvs Software Mobile
4.1.2 URMET IUVS SOFTWARE MOBILE URMET iUVS is a mobile phone CCTV application developed for iOS Platform. It's compatible with the URMET H.264 New Dynamic & Video Smart, Evolution 2.0 DVR Series, HD-SDI DVR Series, NVR Boost 2.0 Series and AHD Dynamic 2.0 DVR Series for Firmware V3.1 or upper version. - Page 61 NOTE: It is needed to set the Data Port (i.e. 9000) for iUVS Software Mobile correct working. If the user sets the Mobile Port, iUVS Software Mobile cannot work for any reason. To delete a device from list, swipe the device name you want to delete, then tap the delete button next to the device name. Live video monitor Tab Live Monitor on Main Menu will bring up Live interface, which provides stream video, record, snapshot and PTZ, etc.
- Page 62 Remote Playback Tab Remote Playback on Main Menu will show the playback entry. you will be able to play one channel of remote device after 2 steps. 1. Select one channel Tab Select channel button to open device list as below, then select one channle of device in the list. 2.
-
Page 63: Android Mobile
Video snapshot On live monitoring, Tap will show up 5 label on bottom panel, then you can take snapshots by tap the labels. PTZ control PTZ is Pan-Tilt-Zoom and reflects the movement options of the camera. Tap to open PTZ mode, it will bring up PTZ control buttons on the bottom of live page. - Page 64 Enter into [Program] option and highlight [E-market] icon shown as Picture above. Enter into the [E-market] interface shown as Picture above. Click [Search] icon on the upper right corner and input “Apkinstaller” shown as Picture above, to search the Apkinstaller program. Highlight and install the program you searched shown as Pictures above.
-
Page 65: Urmet Iuvs Software Mobile
13. Setting Menu Address: Enter the IP address of the DVR Port: Enter the Mobile Port No. Of the DVR Device Name: Enter DVR name (User defined) User ID: Enter the User’s Name Password: Enter the User’s Password History: Click the [History] button to preview History record Enter the testing device infos 14. - Page 66 Add and delete device Device manager allow you add or delete device, and also modify device properties. Tab "Device Manager" on Main Menu to open this interface as below To add a new device, click "Add" button at the top right, then you can input the device name, address (IP, domain name or Device ID for Urmet DDNS Account), port, user name and password etc.
- Page 67 Open a channel Tab Cross button on one of the view window will enter channel list window, then select one channel to open on the previous window. Recording streaming You can record streaming when viewing live video. Tap and then tap channel label on the bottom panel to start recording.
-
Page 68: Tablet Device
PTZ control PTZ is Pan-Tilt-Zoom and reflects the movement options of the camera. Tap to open PTZ mode, it will bring up PTZ control buttons on the bottom of live page. You need to Maximize a camera window and open PTZ mode to control the camera. Tab Arrows on the side of camera window to control camera move side to side or up and down. - Page 69 Getting Start Download iUVSpad App from Apple Store and iUVStab App from Play Store and install it. • Connect your iPad or Tablet to the internet using 3G or WiFi. • Launch application you will brought to iUVSpad or iUVStab. •...
- Page 70 NOTE: In order to allow the correct working of iUVS Software Mobile it is needed to set the Data Port on the router in the Virtual Server Table (9000 for example). If the user doesn’t set the Data Port on router, iUVS Software Mobile could not work correctly.
- Page 71 In order to remove the device from the list deivces for iOS Platform drag on the left the device name and select the “Delete” button shown on the right (in Android Platform for deleteing the device, select the trash icon on the right and confirm).
- Page 72 Select the device on the Device list in order to display the video input available: Drag and Drop each channel (or Device in order to display all channels contemporaneously) in the grid of LIVE Preview. DS1093-162A...
-
Page 73: P2P Function
P2P FUNCTION Connect the respective required cameras to the input channel BNCs. Plug the mouse into the USB port. Connect the “VGA” and/or “HDMI” video output to the respective VGA/HDMI monitor to view the previously connected cameras. Plug the network cable into the LAN port. Power the DVR using the transformer contained in the box. - Page 74 Fill in the “Device name” and “Type -> Device ID” fields. Select the QR code near the “Device ID” string (install the app to acquire the missing QR codes, if any) and scan the QR code on the DVR case Type in the “Password”...
-
Page 75: 1093/004Ahd 1093/008Ahd And 1093/016Ahd Specifications (Pal Format)
1093/004AHD 1093/008AHD AND 1093/016AHD SPECIFICATIONS (PAL FORMAT) Characteristics Feature 1093/004AHD 1093/008AHD 1093/016AHD Compression formats Video: H.264 / Audio: 8kHz*16bit ADPCM 4-CH BNC Input/ 8-CH BNC Input/ 16-CH BNC Input/ Video Inputs/outputs 1 CH VGA Output 1 CH VGA Output 1 CH VGA Output... - Page 76 IMPORTANT NOTES Product specifications may be subject to change without prior notice. In the event of HDD replacement/addition, the operation must be carried out by qualified technical staff only or after contacting the nearest technical office. Hard Disk capacity can reach max. 4TB. Please contact the nearest technical office to get the full list of compatible HDDs.
-
Page 77: Maximum Recording Time With 1000Gb Hard Disk
MAXIMUM RECORDING TIME WITH 1000GB HARD DISK REF. 1093/004AHD – 1093/008AHD – 1093/016AHD The following resolution options can be selected on Urmet AHD DVR Series: “720P” on 1/4/8/16 AHD Channels “WD1”, ”WHD1” and “WCIF” on 1/4/8/16 Analog Channels IMPORTANT NOTES Bandwidth and HDD Duration can be highly variable depending on the scene recorded. - Page 78 1 Record Channel in WD1 (960×576) Resolution 4 Record Channels in WD1 (960×576) Resolution Variables to be set Results Variables to be set Results Bitrate Frame rate HD Time HD Time Bitrate Frame rate HD Time HD Time (in Kbps) (in fps) (hours) (in days)
- Page 79 8 Record Channels in WHD1 (960×288) Resolution 16 Record Channels in WHD1 (960×288) Resolution Variables to be set Results Variables to be set Results Bitrate Frame rate HD Time HD Time Bitrate Frame rate HD Time HD Time (in Kbps) (in fps) (hours) (in days)
-
Page 80: Record Alarm Setting
RECORD ALARM SETTING Please refer the below matrix: “ ⊥ ” stand for “only alarm but no record”; “AMR” stand for “alarm record”; “NLR” stand for “normal record”; and “NOR” stand for “ no record”. Once alarm is triggered, alarm icon will occur, and when many alarms are triggered, alarm remarks will occur on the screen. -
Page 81: Usage Maintenance
11. Q: Can we records whilst playing-back? A: Yeah, you can do it. The system support you records whilst playing-back. 12. Q: Can we erase some recorded file from DVR. A: Considering the safety factor, you can’t delete the recorded file directly from the device. When you actually erase all the recorded files, please select HDD format function. -
Page 82: Appendix: Active X Installation
APPENDIX: ACTIVE X INSTALLATION If the installation of an ActiveX component is required, follow the procedure below. Before performing the connection to the PC, activate IE protection configuration, following the procedure below: Double click the icon to open Internet Explorer browser. The following display will appear (or, however, the default page). - Page 83 Select the area “Trusted sites”. Click on “Custom Level” and check if the following items: “Initialize and script Active X controls not marked as safe” is selected as “Enable” or “ • Prompt” “Download insigne Active X controls” is selected as “Enable” or “Prompt” •...
- Page 84 The following screen will appear. It will be needed to add the Device IP Address(Example: http://192.168.36.40) in the filed “Add Web Site to the Zone”. Add the device IP address in the field click on “Add”. NOTE Do not select the item: “Require server (https:) verification for all sites in this zone”. Close the window selecting “Exit”...
Need help?
Do you have a question about the 1093/004AHD and is the answer not in the manual?
Questions and answers