Table of Contents
Advertisement
Battery:
Maximum torque:
Variable speed ranges:
Hex drive:
Head swing positions:
Head axial rotational positions:
Charger:
Charger input:
Charger output:
Universal replacement charger:
Weight:
Need Assistance?
Call us on our toll free customer support line:
1-800-689-9928
Technical questions
Replacement parts
Parts missing from package
Imported by Mastercraft Canada Toronto, Canada M4S 2B8
18 V CORDLESS SWING DRILL
PRODUCT SPECIFICATIONS
18 V, 1.5 Ah Ni-Cd
106 in-lb
0–350 & 0–1,200 RPM (no load)
1/4" magnetic
Horizontal, 22.5°, 45°, 67.5°, vertical
360° left & right in 15° increments
90–120 minute diagnostic, Class 2
120 V AC, 60 Hz
18 V DC, 1 A (maximum)
054-3103-0 (LED) or 054-3101-4 (LCD)
4 lb 6 oz (2 kg) without battery
054-1209-2
Owner's Manual
Advertisement
Table of Contents

Related Manuals for MasterCraft 054-1209-2


Summary of Contents for MasterCraft 054-1209-2
-
Page 1: Product Specifications
Weight: 4 lb 6 oz (2 kg) without battery Need Assistance? Call us on our toll free customer support line: 1-800-689-9928 Technical questions Replacement parts Parts missing from package Imported by Mastercraft Canada Toronto, Canada M4S 2B8... -
Page 2: Table Of Contents
TABLE OF CONTENTS Product specifications ………….……………………………………………………. Table of contents ……………………………………………………………………... General safety warnings …………………………………………………………….. 3–4 Eye, ear & lung protection …………………………………………………………… 3–4 Electrical safety ………………………………………………………………………. Power tool safety ……………………………………………………………………... 5–6 General safety rules ………………………………………………………………….. Work area ………………………………………………………………….………….. Electrical safety ………………………………………………………………………. Personal safety ……………………………………………………………………….. -
Page 3: General Safety Warnings
GENERAL SAFETY WARNINGS CAUTION: Before using this tool or any of its accessories, read this manual and follow all Safety Rules and Operating Instructions. This instruction manual includes the following: General Safety Rules Specific Safety Rules and Symbols ... -
Page 4: Electrical Safety
GENERAL SAFETY WARNINGS WEAR A DUST MASK THAT IS DESIGNED TO BE USED WHEN OPERATING A POWER TOOL IN A DUSTY ENVIRONMENT. WARNING: Dust that is created by power sanding, sawing, grinding, drilling, and other construction activities may contain chemicals that are known to cause cancer, birth defects, or other genetic abnormalities. -
Page 5: Power Tool Safety
POWER TOOL SAFETY GENERAL SAFETY RULES Avoid contact between the operator's body and grounded surfaces such as pipes, WARNING: Read and understand radiators, ranges, and refrigerators. There all instructions. Failure to follow all is an increased risk of electric shock if the instructions listed below may result in operator's body is grounded. -
Page 6: Use And Care Of Power Tools
POWER TOOL SAFETY PERSONAL SAFETY – cont’d Disconnect the plug from the outlet before making any adjustments, changing accessories, or storing the tool. Such Avoid accidental start-ups. Verify that the preventive safety measures reduce the risk switch is in the OFF position before of accidental start-ups. -
Page 7: Specific Safety Rules
SPECIFIC SAFETY RULES WARNING: Know your cordless Secure workpiece. Use clamps or a vise to drill. Do not plug in the charger or hold the workpiece. It is safer than using install the battery in the tool until you your hand and it frees both hands to have read and understand this operate the tool. -
Page 8: Battery & Charger Safety
WARNING: Only use the NOTE: The battery liquid is slightly acidic. diagnostic charger to charge the Mastercraft 18V Ni-Cd battery. Charging Do not incinerate the battery. It can any other batteries may damage the explode in a fire. charger and possibly cause serious injury. -
Page 9: Battery Pack Recycling
BATTERY & CHARGER SAFETY Do NOT charge batteries when the work area or the battery temperature is at or below 0° C (32° F) or above 45° C (113° F). Unplug the charger when not in use and before cleaning or maintenance. NOTE: See Pages 26 &... -
Page 10: Symbols
SYMBOLS WARNING: Some of the following symbols may appear on the cordless drill. Study these symbols and learn their meaning. Proper interpretation of these symbols will allow for more efficient and safer operation of this tool. Volts Direct current Amperes No load speed Hertz Alternating or direct... -
Page 11: Know Your Swing Drill
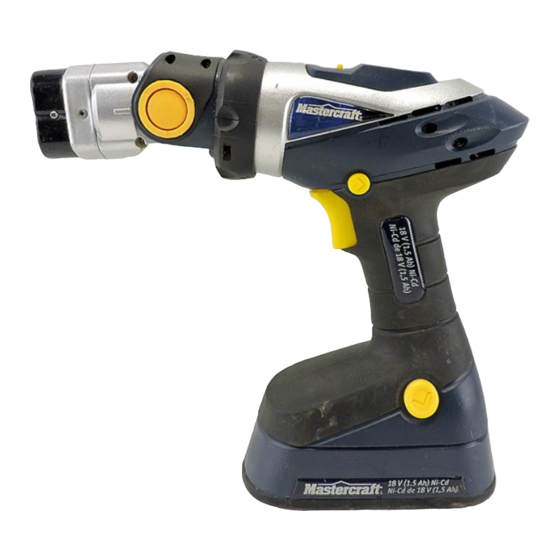
KNOW YOUR SWING DRILL Axial rotation Gear box Magnetic tray locking collar switch Spirit level Head Magnetic hex drives Air vents Forward/reverse button Swing angle Variable speed Bit retraction and locking knob trigger switch engagement control lever Battery release button Battery ACCESSORIES AVAILABLE ACCESSORIES... -
Page 12: Contents
CONTENTS WARNING: CONTENTS To avoid fire or toxic reaction, never use gasoline, naphtha, Carefully unpack the cordless drill. acetone, lacquer thinner or similar Compare the contents against the “SWING highly volatile solvents to clean the DRILL COMPONENTS” chart at right. tool. -
Page 13: Contents
CONTENTS... -
Page 14: Assembly And Operating
CHARGING THE BATTERY PACK WARNING: Use only the diagnostic charger supplied with the drill kit to charge the Mastercraft 18 V Ni-Cd battery supplied with the drill. Charging any other batteries with this charger may damage the charger, and possibly cause serious injury. -
Page 15: Charger Led Functions
ASSEMBLY AND OPERATING CHARGER LED FUNCTIONS (Fig. 3) Power ON Green The green LED will stay ON when the light light Function charger is plugged into a ”live” power — Power source. Battery partially charged Battery The red LED will flash during charging. Flashing charging Battery fully charged... -
Page 16: Installing A Battery In The Swing Drill
ASSEMBLY AND OPERATING INSTALLING A BATTERY IN THE SWING DRILL Remove the discharged battery (1) from the tool by pressing on one the battery release buttons (2) on the sides of the drill handle (3) (Fig. 4). NOTE: There is one battery release button on each side of the handle. -
Page 17: Setting The Head Swing Angle
ASSEMBLY AND OPERATING SETTING THE HEAD SWING ANGLE The swing drill allows you to set the swing angle of the head for easier drilling or driving screws in awkward locations such as inside cupboards etc. The angles have positive stops as follows: ... -
Page 18: Setting The Head Axial Rotational Angle
ASSEMBLY AND OPERATING SETTING THE HEAD AXIAL ROTATIONAL ANGLE The head can be rotated axially 360° in either direction. There are 24 positions in 15° increments. Setting the rotational angle enhances the ability to drill holes or drive screws in even the most awkward locations. -
Page 19: Forward/Reverse Switch
ASSEMBLY AND OPERATING TWO-SPEED GEAR BOX SWITCH – cont’d NOTES: Use low-speed setting for drilling large holes and for driving screws. Use high-speed setting for drilling smaller holes. Do NOT change the speed-control switch position while drill is turned ON. Damage to the gears may result. -
Page 20: Spirit Level
ASSEMBLY AND OPERATING SPIRIT LEVEL The drill is equipped with a dual reading horizontal/vertical level to assist in keeping the drill “level” while drilling horizontal and vertical holes. The horizontal level (1) is located in the top of the drill housing (Fig. 10). The vertical level (2) is located on the rear of the drill housing. -
Page 21: Removing Bits
ASSEMBLY AND OPERATING REMOVING BITS To remove a bit, simply pull it out of the magnetic hex drive. BIT RETRACTION AND ENGAGEMENT CONTROL This swing drill is equipped with a dual hex drive head that allows you to insert one drill bit into each hex drive. - Page 22 ASSEMBLY AND OPERATING WARNING For safety reasons, the operator must read the sections of this Owner’s Manual entitled “GENERAL SAFETY WARNINGS”, “POWER TOOL SAFETY”, “SPECIFIC SAFETY RULES”, “BATTERY & CHARGER SAFETY” and “SYMBOLS” before using this drill. Verify the following every time the swing drill is used: Safety glasses, safety goggles, or face shield is being worn.
-
Page 23: Drilling
ASSEMBLY AND OPERATING DRILLING When drilling into smooth, hard surfaces such as metal, use a centre punch to mark the desired hole location. This will prevent the drill bit from slipping off centre as the hole is started. A small workpiece to be drilled should be secured in a vice or with clamps to keep it from turning as the drill bit rotates (Fig. -
Page 24: Driving Screws
ASSEMBLY AND OPERATING DRILLING – cont’d Move the drill bit into the workpiece applying only enough pressure to keep the bit cutting. Do not force the drill bit or apply sideways pressure to elongate the hole. WARNING: Be prepared for binding and bit breakthrough. -
Page 25: Assembly And Operating
ASSEMBLY AND OPERATING DRIVING SCREWS – cont’d Set the two speed gear box to the low speed setting (Fig. 7). NOTES: If material is particularly soft or porous, use slower motor speeds. Only slightly squeeze the trigger switch to avoid overdriving the screw. Avoid prolonged driving of screws using lower motor speeds. -
Page 26: Maintenance
MAINTENANCE GENERAL BATTERY PACK REMOVAL AND PREPARATION FOR RECYCLING WARNING: When servicing, use only identical replacement parts. The To preserve our natural resources, please use of any other part may create a recycle or dispose of batteries properly. hazard or cause product damage. The batteries accompanying this tool may DO NOT use solvents when cleaning contain chemicals and metals that are... -
Page 27: Maintenance
MAINTENANCE NICKEL-CADMIUM BATTERY Every two months or after 30 MAINTENANCE charge/discharge cycles, whichever comes first, fully discharge your Nickel-cadmium batteries are powerful, battery. To fully discharge the battery, rugged and provide hundreds of place it in the tool that it came with charge/discharge cycles if properly and work with the tool until it nearly maintained and periodically ‘exercised’. -
Page 28: Exploded View
EXPLODED VIEW... -
Page 29: Parts List
PARTS LIST ® WARNING: When servicing, use only Mastercraft replacement parts. The use of any other parts may create a safety hazard or cause damage to the cordless drill. Any attempt to repair or replace electrical parts on this cordless drill may create a safety hazard unless repairs are performed by a qualified technician. - Page 30 PARTS LIST Key # Part # Part Name Quantity 5403290101 2-speed lever 201333 Moveable ring gear 5101820101 Planetary carrier 200072 Planetary gear 144040 Planetary carrier 5101840101 Planetary gear 201334 Fixed ring gear 221227 Clamp plate 0.5 mm 500801 Screw M3×8 504003 Spring washer 316517...
-
Page 31: Parts List
PARTS LIST Key # Part # Part Name Quantity 216050 Connecting rod 200501 Big bevel gear 511013 Opening ring 235317 Bearing block 205587 Sleeve 221296 Washers 241626 Clutch spring 205592 Sleeve 511000 Shaft ring 225358 Shield 225359 Active shield 512005 Wire ring for hole 240810 Magnetic block... -
Page 32: 3-Year Limited Warranty
3-Year Limited Warranty This Mastercraft product is guaranteed for a period of 3 years from the date of original retail purchase against defects in workmanship and materials, except for the following components: Component A: Batteries, chargers and carrying cases, which are guaranteed for a period of 2 years from the date of original retail purchase against defects in workmanship and materials;... - Page 33 Mastercraft is a superior line of products selected for their workmanship and materials. These products are designed to meet rigorous quality and performance standards, and are approved by our Quality Assurance laboratory.
Need help?
Do you have a question about the 054-1209-2 and is the answer not in the manual?
Questions and answers