Table of Contents

Related Manuals for Sunny SF-RBD4703


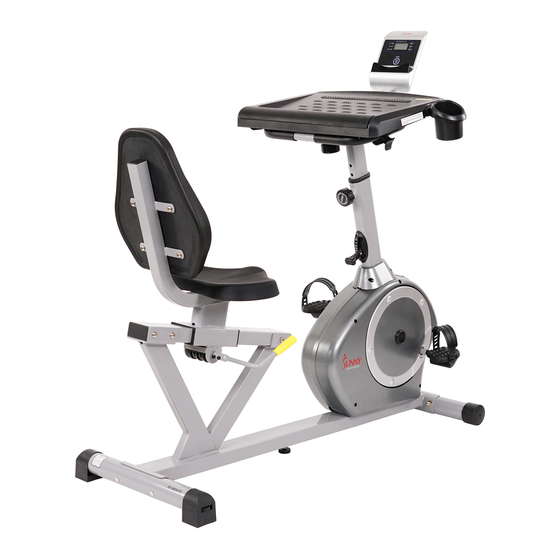
Summary of Contents for Sunny SF-RBD4703
- Page 1 CONVERTIBLE WORKS RECUMBENT BIKE SF-RBD4703 USER MANUAL IMPORTANT! Read all instructions carefully before using this product. Retain owner’s manual for future reference. For customer service, please contact: support@sunnyhealthfitness.com...
-
Page 2: Important Safety Notice
IMPORTANT SAFETY NOTICE We thank you for choosing our product. To ensure your safety and health, please use this equipment correctly. It is important to read this entire manual before assembling and using the equipment. Safe and effective use can only be assured if the equipment is assembled, maintained, and used properly. It is your responsibility to ensure that all users of the equipment are informed of all warnings and precautions. -
Page 3: Exploded Diagram
EXPLODED DIAGRAM... - Page 4 HARDWARE DRAWING & TOOLS Most of the listed assembly hardware have been packaged separately, but some hardware parts have been preassembled. In these instances, simply remove and reinstall the hardware as required.
-
Page 5: Parts List
PARTS LIST DESCRIPTION Q’TY DESCRIPTION Q’TY Main frame Wheeled end cap Seat tube Horseshoe-shaped end cap Handlebar 27L/R Pedal 1pr. Slide rail Adjustable pad Handlebar post Bushing Front stabilizer Cross pan head screw M6*10 Rear stabilizer Computer Adjustment Handle Square plug 38*38*1.5 Square neck bolt Square plug 80*40*2 □... -
Page 6: Assembly Instruction
ASSEMBLY INSTRUCTION STEP 1 1. Attach the Front Stabilizer (6) and the Rear Stabilizer (7) to the Main Frame (1) with the Square Neck Bolts (9), Arc Washers (12) and Ball Cap Nuts (11). 2. Attach the Adjustable Pad (28) to the Main Frame (1). TEP 2 Attach the Pedal (27L/R) to the Crank (40L/R). - Page 7 STEP 3 1. Attach the Slide Rail (4) to the Main Frame (1) with the Hex Pan Head Screws (14) and Washers (15) tightly. 2. Attach the Adjustment Handle (8) to the Axle (19), and secure tightly with the Hex Socket Cap Screws (22).
- Page 8 STEP 4 1. Attach the Backrest (37) to the Seat Post (2) tightly with Hex Pan Head Screws (14) and Washers (15). 2. Attach the Saddle (36) to the Seat Post (2) tightly with Hex Pan Head Screws (14) and Washers (15).
- Page 9 STEP 5 1. Insert the Handlebar Post (5) into the front tube of Main Frame (1), and secure tightly with the Spring Knob (13). 2. Insert the Handlebar (3) into the horizontal tube of Handlebar Post (5), and secure tightly with the Spring Knob (23).
- Page 10 STEP 6 1. Install the Desk (41) on the Handlebar (3). The Handlebar (3) should fit in the grooves on the bottom of the Desk (41). To secure the desk, close the clasps. See Figure A. Attach the Bottle Holder (39) to the Desk (41). 2.
- Page 11 Adjusting the Tension To adjust the tension of the bike, move the Tension Switch A. 1 is the lowest tension. 8 is the highest tension. Adjusting the Saddle Position To move the saddle forward or backward, while seated on the bike, pull the Adjustment Handle (8) towards you.
- Page 12 Moving the Bike Lift the bike by the Rear Stabilizer (7) until the wheels on the Front Stabilizer (6) touch the floor. Now you can move the bike.
-
Page 13: Exercise Computer Instructions
EXERCISE COMPUTER INSTRUCTIONS SPECIFICATIONS: TIME……………………………………………………….00:00-99:59 SPEED(SPD)..………………………………………… 0.0-99.9ML/H DISTANCE(DIST)………………………………………0.00-999.9ML CALORIE(CAL)…………………………………………0.00-9999KCAL ODOMETER(ODO)…………………………..………0.0-9999ML KEY FUNCTIONS: MODE (SELECT/RESET): This key lets you to select and lock on to a particular function you want. OPERATION PROCEDURES: 1. AUTO ON/OFF The system turns on when any key is pressed or you start pedaling. The system turns off automatically when there has been no activity and no key pressed for approximately 4 minutes.
Need help?
Do you have a question about the SF-RBD4703 and is the answer not in the manual?
Questions and answers