Table of Contents
Advertisement
Quick Links
Q
L
H
eft
anding
Standard.
Factory ships left handing operator.
NOTE: If your site requires
right handing, place the order
with your distributor as a
StrongArmPark DC with "right
handing." Handing changes can
be completed in the field, but
it requires additional time and
effort. See page 3.
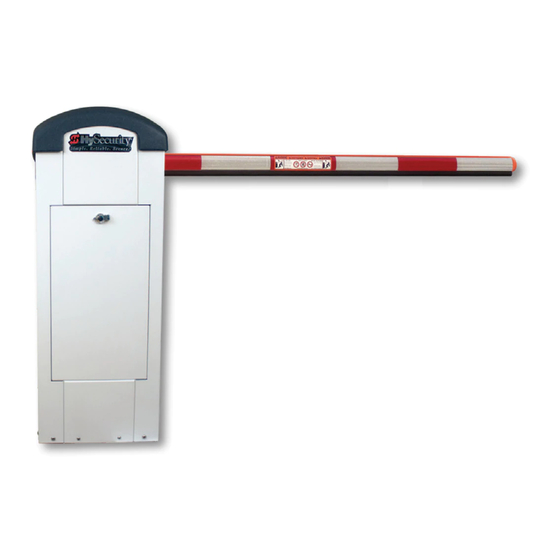
Batteries
Keyed
latch
Front access panel
StrongArmPark DC Breakaway Bracket Installation Video
To review the installation video, scan the QR code with your cell phone or click on the following link:
http://bit.ly/breakawayinstall
Uick
(L)
S
tart
Top cover
Drive Belt
cover
Breakaway
fasteners
Torque to 15 in-lb.
Each bolt is secured with an aluminum lock
washer and nylon hex nut. Torque to 15 in-lb.
See page 4.
Arm Length
Fasteners
< / = 10 ft (3 m)
2 nylon bolts
< 10 ft
1 nylon bolt
> / = 10 ft
1 steel bolt
> 10 ft
2 steel bolts*
*NOTE: Be aware, when using two steel bolts,
that the arm may bend before the nylon nuts
fail which voids the Warranty.
Smart DC Controller
Chassis
S
tepS
To retrofit StrongArmPark DC with
the breakaway bracket containing the
magnetic switch and arm light harness,
order:
MX4050 Breakaway Arm Assembly kit.
Attachment Plate
changes depending
on arm material
HyProtect™
Breakaway
Arm Mount
Applies to:
Low wind
High wind
and
Low wind
High wind
U
npack
the
End cap
Knob
Barrier Arm
Spring
assembly
(StrongArmPark DC 14)
Tensioning nuts
O
peratOr
Advertisement
Table of Contents

Subscribe to Our Youtube Channel
Related Manuals for HySecurity StrongArmPark DC


Summary of Contents for HySecurity StrongArmPark DC
- Page 1 Warranty. Smart DC Controller Front access panel Chassis StrongArmPark DC Breakaway Bracket Installation Video Tensioning nuts To review the installation video, scan the QR code with your cell phone or click on the following link: http://bit.ly/breakawayinstall...
-
Page 2: Site Planning
Code (NEC) requires a separate earth ground in addition to the required equipment ground. A local earth ground also serves to protect the electronic controls. Page 2 MX3651-01 Rev. C StrongArmPark DC Quick Start Steps www.hysecurity.com © 2017... - Page 3 The proximity of the local code conduit to the adjustment nut at the base of the spring makes it difficult to wrench-tighten. www.hysecurity.com © 2017 StrongArmPark DC Quick Start Steps MX3651-01 Rev. C Page 3...
-
Page 4: I Nstall The B Arrier A Rm
Secure clamp to drive shaft using the fasteners provided. NOTE: Follow the video to feed wire harness through chassis, assemble barrier arm, connect lighting, magnetic switch and program the gate operator. Page 4 MX3651-01 Rev. C StrongArmPark DC Quick Start Steps www.hysecurity.com © 2017... -
Page 5: T Urn P Ower Off
Warranty. The label on the high voltage cover must be changed to state 230V. Wiring of gate operators must conform to NEC CAUTION standards and comply with all local codes. www.hysecurity.com © 2017 StrongArmPark DC Quick Start Steps MX3651-01 Rev. C Page 5... - Page 6 EXIT NOTE: For breakaway magnetic on your Smart DC switch wiring, review the installation Controller. INNER instructions shipped with the ARMING breakaway arm bracket. OUTER ARMING Page 6 MX3651-01 Rev. C StrongArmPark DC Quick Start Steps www.hysecurity.com © 2017...
- Page 7 CLOSE STOP MENU RESET 9. Cycle the operator (Open/Close) NOTE: If you need to change a StrongArmPark DC 14 handing in the field, it PREV NEXT SELECT requires moving the spring’s eyebolt to the opposite physical stop lever. Refer several times.
- Page 8 • Review the Important Safety Instructions and the proper use of the barrier arm with the end user. • Position WARNING labels per UL 325. Take photos of the barrier arm installation site. Page 8 MX3651-01 Rev. C StrongArmPark DC Quick Start Steps www.hysecurity.com © 2017...
Need help?
Do you have a question about the StrongArmPark DC and is the answer not in the manual?
Questions and answers