Table of Contents
Advertisement
Quick Links
Handheld Digital Tachometer
with Dual Non-Contact, Contact Operation
Instruction Manual
Thank you for purchasing Nidec-Shimpo's Handheld High-Performance Digital
Tachometer DT-2100. For instructions on how to use this product properly and
optimally for a long period of time, please be sure to read this manual thoroughly
before use.
Safety Requirements
Be sure to observe
Before operation, maintenance and inspection, please carefully read this instruction man-
ual and follow it for proper use. Start using only after you have read about the equipment'
s functions, safety information and precautions.
This instruction manual provides three grades of safety warnings: "Danger", "Warning"
and "Caution". Each of them is an important description related to safety. Be sure to fol-
low them.
!
Danger
!
Warning
!
Caution
● Limited Warranty
・We are not responsible for damages resulting from negligence through failure to follow
the instructions set out in this manual.
・We are not responsible for damages resulting from earthquake and/or fire unrelated to
us, actions by third parties, or any other accidents, intentional or through customer neg-
ligence, as well as from accidents caused by misuse or improper use under abnormal
conditions.
・For information regarding assurance provisions, please read the attached warranty certifi-
cate.
Find Quality Products Online at:
Non-contact type
DT-210 0
This indicates the possibility of fire, severe injury,
and even death if a user disregards the instruction
and operates the unit improperly.
This indicates the possibility of severe injuries if a
user operates the unit improperly.
This indicates the possibility of minor injury or
damage if a user operates the unit improperly.
GlobalTestSupply
www.
● Enables measurement of a rotating body at a distance using
integral laser beam
● Maximum of 1000 data point storage
● The organic light emitting display (OLED) allows enhanced
viewing, even in dark locations
● Selectable meter or graphic display modes
● High accuracy measurement capability of +/-0.006%
● PC communication through USB with available software
Non-contact type digital tachometers are used to perform
measurement by applying the supplied reflection tape
to the rotating body of the object to be measured, and
projecting the laser beam (red) to the tape. In addition,
they can be used for contact type measurement by
attaching the supplied contact adapter.
■ Inspection result certificate
We skip issuance of the inspection result certificate for this product. However, at the
time of factory shipment total shipment inspection has been completed, and we have
strictly confirmed that there is no error in measurement accuracy and operation.Your
understanding is appreciated.
Before operation, maintenance and inspection, please
carefully read this instruction manual and follow it for
proper use.
After carefully reading this manual, be sure to store it in a safe
and convenient place for easy reference.
!
・Do not look into the laser beam
・Do not point the laser beam at people
・Do not allow usage by children
Do not contact the laser beam irradiation port with a rotating body
If the unit comes into contact with a rotating body,
damage may result to the laser.
D o n o t m e a s u r e u s i n g w e t o r o i l y
hands, or with loosely fitted clothing.
If hands slip during measurement, fingers or part of
the hand may get caught in the rotating equipment.
!
Be careful around installed reflective
tape.
The reflection tape may come loose during high-speed
rotation.
.com
99265A
Warning
Caution
sales@GlobalTestSupply.com
Advertisement
Table of Contents

Related Manuals for Shimpo DT-2100


Summary of Contents for Shimpo DT-2100
- Page 1 Thank you for purchasing Nidec-Shimpo's Handheld High-Performance Digital Tachometer DT-2100. For instructions on how to use this product properly and optimally for a long period of time, please be sure to read this manual thoroughly before use.
-
Page 2: Table Of Contents
INDEX 1. Part Names and Functions 2. Measurement Method 3. Measurement Display Description 4. Graph Display 5. Memory Function 5-1. Memory mode details 5-2. Memory registration in the memory group 10 6. Various Settings 6-1. Contents selection 6-2. Memory data display 6-3. -
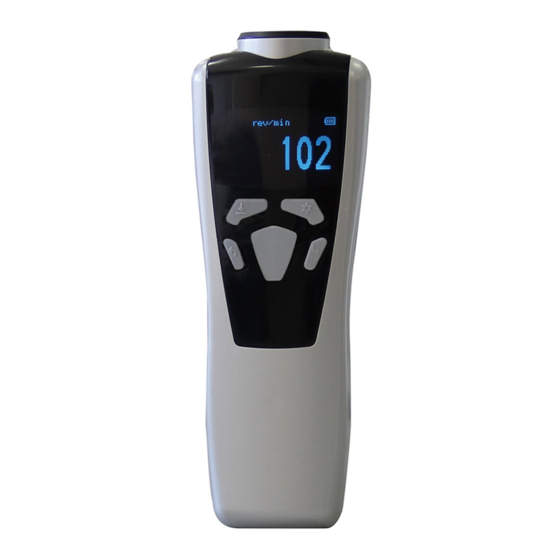
Page 3: Part Names And Functions
1. Part Names and Functions (1) Laser beam irradiation port (7) Mounting Adapter (4) Power/Measurement key (2) Display screen (3) Operation keys (8) Battery Compartment Parts name Functions (1) Laser beam Apply the reflection tape to the rotating body of the object to irradiation port be measured. - Page 4 ■ Display screen details (2) Rotation detection display (4) Unit display (3) Upper/lower limit judgment display (5) Description display (6) Battery display (1) Main display Key name (1) Main display Displays the measurement value. (2) Rotation Blinks during measurement. detection display "A"...
-
Page 5: Measurement Method
2. Measurement Method ■ Non-contact measurement Apply the refl ection tape to Point the laser beam irradiation Press the power/measurement key the object to be measured port to the object to be measured to start measurement Power/Measurement key Refl ection tape Laser beam Apply the supplied reflection tape to Point the laser beam irradiation port to... - Page 6 ■ Contact measurement Attaching the optional contact adapter enables measurement in the contact mode. Attach the contact Select the appropriate In the "5. CONTACT" setting of "3. SET_ adapter contact fitting and attach. SYSTEM" in contents selection, change to "1. Contact" or "4. Contact (Low)"*. Contact (conical) Measurement shaft pin...
-
Page 7: Measurement Display Description
3. Measurement Display Description Press the operation key 3 in the measurement mode. The measurement value description to be displayed is switched. The types of the measurement value to be displayed are as follows: Display Description Normal Description Displays the measurement value corresponding to the selected unit. Display update Updates every display update cycle. - Page 8 ■ About calculation of the average value (AVE) The average value is displayed by averaging the measurement values in the corresponding cycle every average value update cycle. Rotation speed Sampling cycle*1 Time Average value update cycle*2 Average calculation of the Average calculation of the measurement display values 1 to 6 measurement display values 7 to 12...
-
Page 9: Graph Display
4. Graph Display Using the "4. GRAPH_DISP" setting of "2. SET_USER" in contents selection enables the graph to be indicated on the display. (1) Graph_1 (Line graph) Parts name Operation (1) Various status display Various status Same as in the normal display display (2) Line graph Displays the line graph for the measurement value. -
Page 10: Memory Function
5. Memory Function The measurement value can be registered and stored in the memory during measurement. The stored data can be displayed in contents selection "1. DATA". Registration contents and methods depend on the memory mode. Set the memory mode in the "2. MEMORY_MODE" of "2. SET_USER" in contents selection. 5-1 Memory mode details (1) Continuous memory mode ・In the continuous memory mode, the measurement value continues to be registered in the memory every display update cycle. -
Page 11: Memory Registration In The Memory Group
(3) Statistics memory mode ・In the statistics memory mode, only the statistics data for the measurement value every display update cycle from memory registration start to end is registered in the memory. ・The number of data points that can be registered in the statistics memory is up to 100. ●... -
Page 12: Various Settings
6. Various Settings 6-1. Contents selection Press the operation key 2 in the measurement mode to switch the display to the contents selection mode. English Japanese Operation key Operation [選択してください] [SET_CONTENTS] Operation key 1 Select the upper item メモリ表示 DATA Press and hold for 1 second to ユーザー設定... - Page 13 (2) Memory data display/details ● Continuous memory display Select "1. DATA" in contents selection to display the memory group selection screen. (1) Memory group selection Select the memory group you want to display. English Japanese Operation key Operation Operation key 1 Select the upper item Press and hold for 1 second to move continuously Operation key 2 Select the lower item...
- Page 14 ● Each memory display Select "1. DATA" in contents selection to display the memory group selection screen. (1) Memory group selection Select the memory group you want to display. Operation key Operation Operation key 1 Select the upper item Press and hold for 1 second to move continuously Operation key 2 Select the lower item Press and hold for 1 second to...
- Page 15 ● Statistics memory display Select "1. DATA" in contents selection to display the memory group selection screen. (1) Memory group selection Select the memory group you want to display. English Japanese Operation key Operation Operation key 1 Select the upper item Press and hold for 1 second to move continuously Operation key 2 Select the lower item...
-
Page 16: User Settings
6-3. User settings (1) Operation flow Go to the user setting mode in the following operation. Measurement mode During measurement [SET_CONTENTS] [選択してください] 1. DATA メモリ表示 2. SET_USER ユーザー設定 3. SET_SYSTEM システム設定 2. User settings mode selection During measurement standby Contents selection [SET_USER] [ユーザー設定] 1. - Page 17 ● List of the user settings Main item title Sub item title Setting description Item Item Item Default Remark type number number value English Japanese English Japanese English Japanese UPPER_LIMIT 上限値 0.00000 ~ 999999 0.00000 6-digit numerical value COMPARATOR コンパレータ setting with decimal point LOWER_LIMIT 下限値...
- Page 18 (3) Detail settings for each item (3-1) Comparator setting In the "COMPARATOR" setting, set the UPPER_LIMIT and LOWER_LIMIT. Compare UPPER_LIMIT and LOWER_LIMIT with the measurement display value, and display the judgment result in the screen. ・UPPER_LIMIT ≧ Measurement display value ≧ LOWER_LIMIT : OK judgment ・UPPER_LIMIT <...
- Page 19 (3-2) Memory mode Set the memory mode. English Japanese Operation key Operation Operation key 1 Select the upper item Press and hold for 1 second to move continuously Operation key 2 Select the lower item Press and hold for 1 second to move continuously Operation key 3 Go to memory clear Operation key 4 Return to the user setting...
- Page 20 (3-3) Start memory group setting Select the memory group to start memory registration. Operation key Operation English Japanese Operation key 1 Select the upper item Press and hold for 1 second to move continuously Operation key 2 Select the lower item Press and hold for 1 second to move continuously Operation key 3 Enable the selected item, and...
- Page 21 (3-5) Setting save (1) Setting group The setting description can be saved in three patterns. The saved setting description can be read by selecting "Used". English Japanese Operation key Operation Operation key 1 Select the upper item Press and hold for 1 second to move continuously Operation key 2 Select the lower item Press and hold for 1 second...
- Page 22 (3-6) Unit The display unit of the measurement value can be selected. Operation key Operation English Japanese Operation key 1 Select the upper item Press and hold for 1 second to move continuously Operation key 2 Select the lower item Press and hold for 1 second to move continuously Operation key 3 Enable the selected item,...
-
Page 23: System Settings
6-4. System setting mode (1) Operation flow Go to the system setting mode in the following operation. Measurement mode During measurement [選択してください] メモリ表示 ユーザー設定 System setting mode selection During measurement standby システム設定 Contents selection [システム設定] オートオフ オートゼロ グラフ Go to the system settings (2) System settings - Setting item selection Select the item to set in the following item selection screen, and perform detailed settings. - Page 24 ● List of the system settings Main item title Sub item title Setting description Item Item Item Default Remark type number number value English Japanese English Japanese English Japanese 1 min 1 分 AUTO_OFF オートオフ ー 10 min 10 分 1 min ー...
- Page 25 (3) Detail settings for each item (3-1) Auto OFF Set a period of time until the power is automatically turned OFF. The power is turned OFF when the unoperated status continues for the specified auto off time. Operation key Operation English Japanese Operation key 1 Select the upper item...
- Page 26 (3-3) Graph display Set various graph settings. (1) Graph flow Set the line graph direction. This setting is enabled only for Graph_1 (line graph). English Japanese Operation key Operation Operation key 1 Select the upper item Press and hold for 1 second to move continuously Operation key 2 Select the lower item Press and hold for 1 second to...
- Page 27 (3) Graph maximum value Set the maximum value in the graph display. Operation Operation key When setting the numerical value When setting the decimal point Operation Increases the numerical key 1 value in the selected digit Return to the numerical English Japanese Press and hold for 1 second...
- Page 28 (3-4) Memory group Set the number of memory data registration sets for each memory group. (1) Setting memory group selection Select the memory group to set. English Japanese Operation key Operation Operation key 1 Select the upper item Press and hold for 1 second to move continuously Operation key 2 Select the lower item Press and hold for 1 second to...
- Page 29 ● Registration memory data deletion in each memory group When the number of memory data registration sets for each memory group has been changed, the memory data registered in the corresponding memory group needs to be deleted. Operation key Operation English Japanese Operation key 1 Select the upper item...
- Page 30 (3-7) Prescale The prescale value can be set. Prescale is a user defined mathematical correction of the values displayed. This can be helpful when a scaling of the point measured has more significant meaning to the user taking the measurement. The measurement value display of "PRE", "P.MAX", "P.MIN", "P.AVE", and "P.ACC"...
- Page 31 (3-8) Diameter Set the diameter value of the speed measurement wheel when using the speed measurement in contact measurement. *These setting contents are not applied to non-contact measurement. (1) Diameter unit Set the diameter value unit. English Japanese Operation key Operation Operation key 1 Select the upper item Press and hold for 1 second to move continuously...
- Page 32 (3-9) Distance/Pulse Set the distance value per pulse for non-contact measurement. *This setting contents are not applied to contact measurement. (1) Distance unit Set the distance value unit per pulse. English Japanese Operation key Operation Operation key 1 Select the upper item Press and hold for 1 second to move continuously Operation key 2 Select the lower item...
- Page 33 (3-10) Brightness The brightness on the screen can be set. Operation key Operation English Japanese Operation key 1 Select the upper item Press and hold for 1 second to move continuously Operation key 2 Select the lower item Press and hold for 1 second to move continuously Operation key 3 Enable the selected item, and return to the system settings...
- Page 34 (3-13) Measurement switch The operation mode of the measurement switch can be set. Operation key Operation English Japanese Operation key 1 Select the upper item Press and hold for 1 second to move continuously Operation key 2 Select the lower item Press and hold for 1 second to move continuously Operation key 3 Enable the selected item, and...
-
Page 35: Battery Replacement
7. Battery Replacement Replace batteries according to the following procedure. When the battery level becomes low Replace with new batteries Rear panel Put in two new batteries, aligning the When the battery indicator Battery cover positive and negative polarities correctly, blinks, open the battery cover and close the cover. -
Page 36: Specifications
9. Specifications Item Description Measurement system Non-contact Red laser Class2 Maximum output: 1mW Wave length: 650nm Display Organic light emitting display (OLED) (blue light emission) graphic display type Operation switch 5 points 6 to 99,999rpm: Non-contact measurement Measurement range 0.8 to 25,000rpm: Contact measurement Speed measuremen: rev/min, m/min, cm/min, inch/min, feet/min, yards/min, rev/sec, m/sec, cm/sec, inch/sec, km/h, miles/h Measurement unit...
Need help?
Do you have a question about the DT-2100 and is the answer not in the manual?
Questions and answers