Table of Contents
Advertisement
Quick Links
Advertisement
Table of Contents

Subscribe to Our Youtube Channel
Related Manuals for LDG AT-200PC


Summary of Contents for LDG AT-200PC
- Page 1 AT-200PC Automatic PC-Controlled Antenna Tuner Manual Version 1.0 --- Preliminary --- LDG Electronics 1445 Parran Road, PO Box 48 St. Leonard MD 20685-2903 USA Phone: 410-586-2177 Fax: 410-586-8475 ldg@ldgelectronics.com www.ldgelectronics.com...
-
Page 2: Table Of Contents
LDG AT-200PC Automatic Antenna Tuner Introduction Jumpstart, or “Real hams don’t read manuals!” Specifications Getting To Know Your AT-200PC Installation Hardware Installation Software Installation Operation Auto and Semi-Auto Modes Memory Tuning Operation with provided LDG software Software overview and setup. -
Page 3: Introduction
2. Connect your 50 Ohm antenna coax lead to the "Ant 1" jack on the back of your AT- 200PC. 3. Connect your AT-200PC to a source of 11 - 16 volts DC @ 750mA via the 2.5 by 5.5 mm power jack on the back (center positive). -
Page 4: Specifications
Frequency coverage: 1.8 to 54.0 MHz. • Tunes 6 to 1000 ohm loads (16 to 150 ohms on 6M), 6 to 4000 ohms with optional 4:1 Balun (LDG RBA 4-1) • For Dipoles, Verticals, Vs, Beams or and Coax Fed Antenna •... -
Page 5: Getting To Know Your At-200Pc
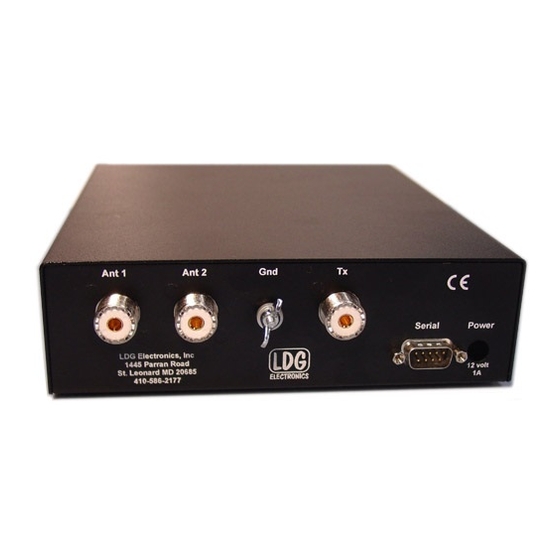
Your AT-200PC can be used with any transceiver or transmitter with coax output operating in the HF and six meter range at no more than 250 watts output (100 watts on six meters). You can set... - Page 6 On the back panel, there are six connectors: RF input (marked “Tx”, standard SO-239 socket) Antenna connector 1 (marked "Ant 1", standard SO-239 socket) Antenna connector 2 (marked "Ant 2", standard SO-239 socket) DC power in (2.5 by 5.5 mm power jack marked "Power", center positive) DB-9 serial data port marked "Serial"...
-
Page 7: Installation
PC: one for the radio and one for the tuner. Your AT-200PC is designed to use a serial port, but in case you don't have a free port, LDG provides you with a serial-to-USB adapter. This will allow you to connect your AT-200PC to a USB port instead of a serial port. - Page 8 To set serial port parameters for the USB adapter in Windows, select Start > Control Panel > System, then select the Hardware tab. Select Device Manager, then click on Ports. Double click on the USB-to-Serial Bridge, then click on the port settings tab. On that panel, you can set port speed, number of data bits, number stop bits, parity, flow control and other serial parameters.
-
Page 9: Software Installation
See the N4PY web page at www.n4py.com for more details. LDG provided software As a convenience, LDG provides a simple control program to get you started. Download the file from LDG's web site (http://www.ldgelectronics.com), saving it to your desktop. Execute this installer program and follow the installation dialog. -
Page 10: Operation
Recent advances in LDG's tuning algorithms allow your AT-200PC to tune effectively even with a varying RF signal. This means that as you change frequencies, antennas or bands, you don't have to make a separate tuning transmission; just start talking and your AT-200PC will match up in as little as 0.2 seconds. -
Page 11: Operation With Provided Ldg Software
Operation with provided LDG software LDG provides you with a simple application program to control your AT-200PC. Please note the following carefully: The provided software is "Beta" software, and may contain unknown bugs. It is provided to you as "Freeware"; it is not part of the price of the tuner. It is provided to you "as is" without warranty, and LDG provides no support for it. - Page 12 With the tuner powered up and connected to your PC via a serial port or the USB serial port adapter, select the correct serial port from the file menu: File Preferences. A menu of COM ports will appear: Click on the appropriate COM port (COM1, for example), the click "Apply". The software will connect with the tuner, then inform you that the tuner is online.
-
Page 13: Software Operation
SWR below the maximum you set, an error message will appear. Memory Tune: As you use your AT-200PC, it automatically memorizes tuning parameters for rapid recall. You can access these with the Memory Tune button. With RF present, click the Memory Tune button on the interface. - Page 14 You can similarly set the Hi and Low Z relay with the radio buttons. Frankly, you probably won't use these controls very often; your AT-200PC is very good at finding a match. These controls are included only to provide you with the maximum flexibility in using your tuner.
- Page 15 The Set menu includes: Set Inductor: Provides an alternate means to set the inductor to a specific value. Move the slider to the desired value and then click Ok. You can also set the Hi/Lo Z relay from this panel. Set Capacitor: Provides an alternate means to set the capacitor to a specific value Set Frequency: Allows you to manually set the frequency.
-
Page 16: Operation With The N4Py Rig Control Software
Preferences 3 menu. Check the box labeled "Using LDG AT-200PC Autotuner", and select the appropriate COM port from the list. This information is provided as a convenience to our users. LDG does not provide support for the N4PY or other third-party software. - Page 17 On the radio control panel, the tuner controls appear at the lower left.: 2 3 4 5 6 7 1. Auto Tnr: Enables the tuner 2. Byp: Puts the tuner in bypass mode 3. Ant1: Toggles between the two antenna ports on the tuner 4.
-
Page 18: Application Notes
MARS/CAP coverage Your AT-200PC provides continuous tuning over its specified range, not just in the ham bands. This makes it useful for MARS or CAP operation, or any other legal HF operation. Data Interface The following information describes the digital dialog that takes place between the PC and tuner. - Page 19 AT-200PC Commands No Operation, Command code 0. This is a dummy command that produces no change in the tuner. Inductor Up, Command code 1. Increases inductance value by one unit. Inductor down, Command code 2. Decreases inductance value by one unit.
- Page 20 Set SWR threshold, Command code 50 - 56. Set the threshold for a "good" tune to SWR values between 1.1 and 3.0. Tunes ending at SWR values above the threshold will not be saved to memory. Command Code SWR Threshold Reset relays, Command code 57.
- Page 21 Request tuner settings for a specified frequency, Command code 67. Parameter 1: frequency, most significant digit, Parameter 2: frequency, least significant digit. Requests the tuner to return the tuner parameters for a specified frequency. Frequency expressed as period in "tick" units of 0.8 µSec.
- Page 22 AT-200PC responses No operation, Response code 00. No Operation. Also sent to indicate AT200PC has woken up Inductor value, Response code 01. Parameter 1: Value 0-127. Present inductor value. Capacitor value, Response code 02. Parameter 1: Value 0-127. Present capacitor value.
- Page 23 Tune failed, Response code 10. Parameter 1: Reason 0-2. Indicates that the requested tuning operation failed. Parameter 1 Value: Failure Reason: 00 No RF was detected. 01 RF Carrier was lost before the tune completed. 02 The tuner was unable to bring the SWR down below the SWR Threshold.
-
Page 24: Updating Your Tuner
Updating your tuner The firmware in your tuner can be updated by running an update utility provided by LDG. This will give you access to the latest features and performance enhancements. You will download two files from the LDG web site: the updater program, and the update hex file. - Page 25 8. The loader will indicate "Done!" when the code has been successfully loaded. 9. Click OK to dismiss the "Download Succeeded" notice. 10. Click Quit to exit the loader program. 11. Power cycle the tuner by disconnecting, then reconnecting DC power; your new firmware is up and running.
-
Page 26: Troubleshooting
Troubleshooting There are two LEDs inside the tuner that can be helpful in troubleshooting. Remove the screws on the sides of the tuner, and carefully remove the top. Exercise extreme caution when using the tuner with the cover removed: high RF voltages may be present during operation. -
Page 27: Theory Of Operation
, but a little background will help you understand what your AT-200PC is doing, and how it does it. In simple DC circuits, the wire resists the current flow, converting some of it into heat. The relationship between voltage, current and resistance is described by the elegant and well-known “Ohm’s Law”, named for Georg Simon Ohm of Germany, who first discovered it in 1826. - Page 28 Simple tuners use variable capacitors and inductors; the operator adjusts them by hand while observing reflected power on the SWR meter until a minimum SWR is reached. Your LDG AT-200PC automates this process.
-
Page 29: The Ldg At-200Pc
The LDG AT-200PC In 1995 LDG pioneered a new type of automatic antenna tuner. The LDG design uses banks of fixed capacitors and inductors, switched in and out of the circuit by relays under microprocessor control. A built-in SWR sensor provides feedback; the microprocessor searches the capacitor and inductor banks, seeking the lowest possible SWR. -
Page 30: About Memory Tuning
A return form is provided on our web site for your convenience. If you need to return your AT-200PC to us for service, package it carefully, keeping in mind that we will re-use your packaging to return the unit to you. Download the return form from our web site, fill it out and return it with your tuner. -
Page 31: Feedback
Repairs average about 3 to 6 weeks. We will be glad to service your AT-200PC after the warranty period has ended. We will notify you of repair charges by phone or e-mail, and bill you after repairs are completed.
Need help?
Do you have a question about the AT-200PC and is the answer not in the manual?
Questions and answers