
Subscribe to Our Youtube Channel
Related Manuals for LDG at-100pro


Summary of Contents for LDG at-100pro
- Page 1 AT-100Pro Automatic Antenna Tuner Manual Version 1.1 LDG Electronics 1445 Parran Road, PO Box 48 St. Leonard MD 20685-2903 USA Phone: 410-586-2177 Fax: 410-586-8475 ldg@ldgelectronics.com www.ldgelectronics.com...
-
Page 2: Table Of Contents
LDG AT-100Pro Automatic Antenna Tuner Table of Contents Introduction Jumpstart, or “Real hams don’t read manuals!” Specifications An important word about power levels Getting To Know Your AT-100Pro Installation Operation Basic operation Tuning Advanced Operation Application Notes Mobile operation When to use Auto mode... -
Page 3: Jumpstart, Or "Real Hams Don't Read Manuals
2. Connect your 50 Ohm antenna coax lead to the "Ant 1" jack on the back of your AT- 100Pro. 3. Connect your AT-100Pro to a source of 11 - 16 volts DC @ 500mA via the 2.5 by 5.5 mm power jack on the back (center positive). -
Page 4: Specifications
Size: 7.5” x 5.5” x 2.0”. Weight: 1.5 pounds An important word about power levels The AT-100Pro is rated at 125 watts continuous power input at most. Many ham transmitters and transceivers, and virtually all amplifiers, output well over 125 watts. Power levels significantly exceeding specifications will definitely damage or destroy your AT-100Pro. -
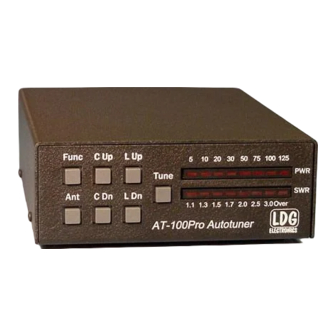
Page 5: Getting To Know Your At-100Pro
SWR: LED meter indicates SWR while tuning or transmitting There is no “Off” button; the AT-100Pro powers up as soon as you plug in an external power supply. After tuning, it automatically enters a “deep sleep” state in which it draws only a few milliamps of current, effectively off. - Page 6 The AT-100Pro has over 2,000 memories for each of two antennas, each of which stores the tuning settings for a specific frequency. When you transmit near a previously tuned frequency, you can use “Memory Tune” to reset the tuner in only a fraction of a second. The process of storing tuning data in memory is completely automatic;...
-
Page 7: Installation
Installation Your AT-100Pro tuner is intended for indoor use only; it is not water resistant. If you use it outdoors (Field Day, for example) you must protect it from rain. The AT-100Pro is designed for use with coax-fed antennas. If you wish to use it with longwires or antennas fed with a balanced transmission line (e.g., ladder line), an external balun is required;... -
Page 8: Operation
Startup Options Your AT-100Pro has three startup commands, invoked by holding down one or more keys while powering up the unit (usually by plugging in the coaxial power connector). Version display: Press and hold Func while powering up. This will display the version number of the firmware in your tuner on the LED meters. - Page 9 Menu Options Your AT-100Pro offers several options to adapt the tuner to your operations. Many functions are controlled using the Func button. Press and release this button to place the tuner in Function mode. You will see an "up arrow" display on the LED meters, indicating Function mode.
- Page 10 12.5 Watt Scale 100-Watt Scale Automatic Tuning Mode: you can set your AT-100Pro to automatically begin a tuning cycle whenever the SWR exceeds a value you set, or you can set it to semi-automatic, to tune only when you begin a tuning cycle by pressing the Tune button. The default is Auto mode. To toggle between Auto and Semi-auto modes, press and release the Func button.
- Page 11 2.0. The example below shows the threshold set to 1.7. Auto Threshold Display High/Low Impedance Toggle: You can manually set your AT-100Pro for Hi-Z or Lo-Z antennas. Press and release the Func button. While this function is rarely used, it is available for the more advanced user to temporarily set the tuner to an LC or CL configuration.
-
Page 12: Tuning
Release the Tune button; an automatic tuning cycle will begin. You will hear the relays in your AT-100Pro as they switch in and out seeking a match; they make a buzzing noise. The tuning cycle will end in a few seconds with the SWR LED meter indicating the final match. At the end of a full tuning cycle, the SWR LEDs will scan inward from both ends to indicate a successful tune to an SWR of less than 1.1. - Page 13 In this way, your AT-100Pro “learns”; the longer you use it, the more closely it adapts itself to the bands and frequencies you use. You will probably use Memory Tuning most of the time; it takes advantage of any stored tuning settings, but automatically defaults to a Full Tuning cycle if no stored data is available.
-
Page 14: Advanced Operation
Frankly, you won't use the manual adjustments very much; your AT-100Pro is very, very good at finding a match. These functions are included only to provide you with the maximum utility and flexibility. - Page 15 [2.0] Select Alternative Version Func Functions For Other Number Buttons Func+ Ant+ Reset Tune AT-100Pro Command Reference [Default settings in brackets] Peak/Avg 12/125 Watts Mtr Mode Mtr Scale Func + Key Func C Up L Up Man Store Func Hold + Key...
-
Page 16: Application Notes
(not while driving; keep your eyes on the road!). When the reading stops changing, the tuner has finished tuning. Most of the time this will happen very quickly, as the AT-100Pro tunes from memory in less than a second. -
Page 17: When To Use Peak Mode
LEDs. RF Noise The processor in your AT-100Pro creates a certain about of RF noise, which you may notice in your receiver while tuning (only if you are using a separate receiver and not a transceiver) or when information is being displayed in the LED display. This will be most noticeable when operating CW with break-in, while using the Peak power display. -
Page 18: Theory Of Operation
AT-100Pro is doing, and how it does it. In simple DC circuits, the wire resists the current flow, converting some of it into heat. The relationship between voltage, current and resistance is described by the elegant and well-known “Ohm’s Law”, named for Sir George Simon Ohm of England, who first discovered it in 1826. - Page 19 Simple tuners use variable capacitors and inductors; the operator adjusts them by hand while observing reflected power on the SWR meter until a minimum SWR is reached. Your LDG AT-100Pro automates this process.
-
Page 20: The Ldg At-100Pro
The LDG AT-100Pro In 1995 LDG pioneered a new type of automatic antenna tuner. The LDG design uses banks of fixed capacitors and inductors, switched in and out of the circuit by relays under microprocessor control. A built-in SWR sensor provides feedback; the microprocessor searches the capacitor and inductor banks, seeking the lowest possible SWR. -
Page 21: A Word About Tuning Etiquette
Be sure to use a vacant frequency to tune. With today’s crowded ham bands, this is often difficult. However, do your best to avoid interfering with other hams as you tune. Your AT-100Pro’s very short tuning cycle, as little as a fraction of a second, minimizes the impact of your tuning transmissions. -
Page 22: Firmware Upgrades
If you have an idea to improve our software or hardware, please send us a description. If we incorporate your idea in the AT-100Pro, we'll send you a free upgrade as a “thank you”. We encourage everyone who uses the AT-100Pro to contact us (card, letter or e-mail preferred) telling us how well it works for you.
Need help?
Do you have a question about the at-100pro and is the answer not in the manual?
Questions and answers