Table of Contents
Advertisement
Advertisement
Table of Contents

Subscribe to Our Youtube Channel
Related Manuals for FRIATEC FRIAMAT Prime


Summary of Contents for FRIATEC FRIAMAT Prime
- Page 1 Operating instructions Electrofusion units FRIAMAT Prime ® FRIAMAT Basic ®...
-
Page 2: Table Of Contents
Contents Page Preliminary remarks 1.1 Safety instructions and hints 1.2 Intended use Safety 2.1 Functional reliability 2.2 The operator’s obligations 2.3 Sources of danger 2.4 Mains operation 2.5 Generator operation 2.6 Extension cable 2.7 Opening the device 2.8 Safety measures at the installation site 2.9 Emergency Basic information 3.1 Layout/parts... - Page 3 5.1 Function keys explained 5.2 Display symbols explained 5.3 “Basic Settings” menu 5.4 “Info” menu 5.5 “Emergency Input” menu FRIAMAT Prime 6.1 Function keys explained 6.2 Display layout (main screen) 6.3 Function key symbols explained 6.4 Function status symbols explained 6.5 Main window symbols explained...
- Page 4 Contents Page 6.9 “Data” menu 6.9.1 Transfer 6.9.2 PDF 6.9.3 CSV 6.9.4 Delete 6.10 “Info” menu 6.11 “Formatting” menu 6.12 Fusion options 6.12.1 ID Data 6.12.1.1 Commission number 6.12.1.2 Operator pass 6.12.1.3 Serial number 6.12.1.4 Seam number 6.12.1.5 GPS 1 – 3 6.12.2 Traceability Barcodes / Pipe Number / Pipe Length 6.12.3 Info Text, Comment 1, Comment 2, Subcontractor 6.12.4 Scraper tool...
- Page 5 Contents Page 6.13.2 Fusion Sequence 6.13.2.1 Traceability 6.13.2.2 Info Text 6.13.2.3 Comment 1 6.13.2.4 Comment 2 6.13.2.5 Subcontractor 6.13.2.6 GPS Data 6.13.2.7 Seam number 6.13.2.8 Serial number 6.13.2.9 Commission number 6.13.2.10 Operators pass 6.13.2.11 Pipe Prepared? Display 6.13.3 Factory Settings 6.13.4 PIN 6.13.5 Display (Resistance) Warranty/maintenance/disposal...
-
Page 6: Preliminary Remarks
Preliminary remarks Safety instructions and hints In these operating instructions, the following symbols with warnings are used: Symbol Meaning Danger to people. WARNING! Failure to comply can result in death or serious injury. Danger to people. CAUTION! Failure to comply can result in minor or moderate injury. Danger to objects. -
Page 7: Safety
Safety Functional reliability FRIAMAT fusion units are state of the art, built in accordance with the require- ments under ISO 12176-2 and the acknowledged safety standards and fitted with the required safety devices. Prior to delivery, FRIAMAT fusion units are tested for correct and safe functioning. -
Page 8: Sources Of Danger
- Before all care and maintenance work, pull out the plug connecting the equipment. - Maintenance and repair work must be performed by authorised FRIATEC service stations only. - Supply FRIAMAT fusion units only with the operating voltage specified on the ratings plate. -
Page 9: Generator Operation
Generator operation NOTE Only those generators must be used that have been designed for industrial use on building sites. The operating instructions for the generator must be observed! The use of generators must comply with DVGW work sheet GW308, VDE 0100 Part 728, and the specifications and guidelines applying in the country of use. -
Page 10: Extension Cable
- Never open the FRIAMAT fusion unit when it is supplied with operating voltage! - FRIAMAT fusion units may be opened only by specialised personnel from an authorised FRIATEC service station! Safety measures at the installation site The connecting and fusion cables must be protected against sharp edges. Do not expose the FRIAMAT fusion unit to heavy mechanical loads. -
Page 11: Basic Information
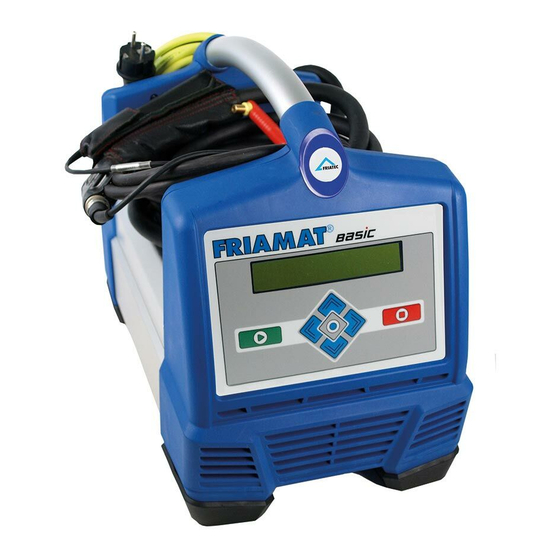
3 Front foil with display and 6 Adapter bag function keys (Fig shows 7 Power cable FRIAMAT Prime) 8 Ventilation slots (air outlet) Type plate The type plate lists the details specific to the FRIAMAT fusion unit and its unique device number. The type plate is found on the rear side of the... -
Page 12: Reader Wand
Reader wand To read in fusion barcodes and traceability barcodes, place the reader wand under a slight angle (like a pencil) in front of the barcode on the fitting. Now move the reader wand quickly over the whole label and a little beyond. Bar- codes can be read in from right to left or vice versa. -
Page 13: Protective Cap For Data Interface
The USB-A port is found directly behind the protective cap. This data inter- face functions as a service port and, on the FRIAMAT Prime, is also used to read out and transfer the fusion protocol. The protective cap for the data interface must be screwed on at all times to prevent contaminants and moisture from reaching it. -
Page 14: Signalling Devices
The volume of these signals can be set to “high” or “low” in the “Basic Settings” menu. See also Sections 5.3 and 6.2.6. Technical details Technical details* FRIAMAT Prime FRIAMAT Basic Input voltage range AC 190 V – 250 V Frequency range 44 Hz...66 Hz... - Page 15 Technical details* FRIAMAT Prime FRIAMAT Basic Operating temperature range** -20°C...+50°C** Fusion current monitoring short circuit 110 A short circuit 1.70 x IN interrupt 0.25 x IN Fusion voltage max DC 48 V Data transfer interface Service port Documentation of fusion...
-
Page 16: Automatic Activation Of Maintenance Interval
3.10 Automatic activation of maintenance interval The maintenance interval stored in the FRIAMAT fusion unit (default: 12 months, see also Section 7.2) is not activated automatically until after the first fusion. INFORMATION The leading maintenance date is always shown on the display and may differ from the details on the service label attached to the FRIAMAT fusion unit! 3.11 Transport/storage/dispatch... -
Page 17: Reading In The Barcode
4. Connect the device to the power supply (mains or generator). To do so, insert the device’s plug into the socket. 5. If necessary, use an extension cable. Make sure that the conductor cross section is adequate (see also Section 2.6). 6. -
Page 18: Starting The Fusion Procedure
5. Press the (STOP) key to acknowledge the displayed “End of fusion” with “t:” and “tc:”. On the FRIAMAT Prime, you can also confirm with the guide key . The fusion procedure has now ended, and the O . K . -
Page 19: Friamat Basic
FRIAMAT Basic Function keys explained 1 Display The FRIAMAT Basic is fitted with a two-line display. 2 START key The START key is used to start a fusion procedure, to select sub- or indi- vidual menus, and to save settings. This key is also used to confirm mes- sages on the display. -
Page 20: Display Symbols Explained
Display symbols explained Symbol Description When this symbol appears in the second display line, the direction keys ( UP/DOWN) can be used to open further menus. “Basic Settings” menu The “Basic Settings” menu lets you edit the device settings. TIME DATE * LANGUAGE * VOLUME... -
Page 21: Info" Menu
“Info” menu The “Info” menu lets you view the device details. TIME/DATE VOLTAGE/FREQUENCY TEMPERATURE DEVICE NUMBER SOFTWARE VERSION MAINTENANCE DATE Press the key. 2. Press the direction keys to open the “Info” submenu. Press the key. 4. Use the direction keys to open the menu for Time/Date, Voltage/ Frequency, Temperature, Ambient Temperature, Device Number, Software Version, Maintenance Date. -
Page 22: Friamat Prime
FRIAMAT Prime Function keys explained 1 Display The FRIAMAT Basic is fitted with a graphical maxi display. 2 Guide keys The three blue guide keys let you access the guide key symbols (see Sec- tions 5.2 and 5.3) that are shown directly at the top of the graphical maxi display. -
Page 23: Display Layout (Main Screen)
Display layout (main screen) 1 Function status symbols Symbols appear representing the functions that can be activated at this time (e.g. documentation, traceability mode). See also Section 6.4. Also shown is the next due maintenance (see also Section 6.13.1.5). 2 View ambient details Key ambient details are shown (date, time, ambient temperature, voltage, and frequency). -
Page 24: Function Key Symbols Explained
Function key symbols explained Symbol Description This opens the main menu. MENUE This opens a submenu. SELECT This confirms the information shown in the main window. This saves the entered data. SAVE This cancels an input without saving. Back to the CANCEL previous input step. -
Page 25: Function Status Symbols Explained
Traceability barcodes can be entered. Pipe numbers can be entered. Pipe lengths can be entered. Acoustic signals have been deactivated. FRIATEC memory stick has been connected. Maintenance date: the next due maintenance (in days) is shown. -
Page 26: Main Window Symbols Explained
Main window symbols explained Symbol Description A ticked box indicates that this menu item or this function has been activated. An empty box indicates that this menu item or this function has not been activated. “Basic Settings” menu The “Basic Settings” menu lets you edit the device settings. DOCUMENTATION TIME DATE... -
Page 27: Documentation
6.6.1 Documentation INFORMATION The FRIAMAT Prime is delivered with deactivated documentation! The function Documentation stores the fusion parameters. Each of these can be assigned to an commission number and/or an operator pass. The docu- mentation can be activated or deactivated in the Documentation submenu. -
Page 28: Protocol Language
6.6.5 Protocol language The “Protocol language” submenu lets you set the language for the docu- mentation. The log language can be set independently of the display language. 6.6.6 Volume The “Volume” submenu lets you set the volume to “high” or “low”. “Emergency Input”... -
Page 29: Commission Number
After an operator pass has been read in for the first time, all fusions per- formed from this time on will be stored under the code for this operator pass. The FRIAMAT Prime is reconfigured accordingly when another operator pass is read in. -
Page 30: Info Text
3. The FRIAMAT Prime is also locked automatically when an operator pass has been read in and the date changes, i.e. the FRIAMAT Prime is locked on the next day. In both of these cases (manual or automatic locking), the display shows the prompt “PLEASE ENTER VALID OPERATOR PASS!”. -
Page 31: Subcontractor
The “Subcontractor” submenu lets you decide whether additional text infor- mation can be entered for a fusion. 6.8.7 Traceability The “Traceability” submenu lets you enable the FRIAMAT Prime for reading in, processing, and storing traceability barcodes. Enabling this menu also activates the submenus “Pipe Number” and “Pipe Length”. 6.8.8 Pipe Number The “Pipe Number”... -
Page 32: Data" Menu
The “Transfer” submenu lets you read out and transfer data from the FRIAMAT Prime. You must use this to transfer data from a memory stick in the FRIAMAT Prime’s USB port (see also Section 8.1). The data are saved to an FTD file on the memory stick and can be processed with the FRIATRACE data base software on a PC or laptop. - Page 33 6.9.2 The “PDF” submenu lets you save data to a PDF file on the FRIATEC memory stick. You must use this to transfer data as a PDF file to the memory stick in the FRIAMAT Prime’s USB port (see also Section 8.1). The PDF files are written to a subdirectory on the memory stick.
-
Page 34: Delete
FAT 12 or FAT 16. A FAT 32 or partitioned USB stick (with master boot record) will cause the error message “ERROR 91” to appear on the FRIAMAT Prime. Also, the capacity of the USB stick used must not exceed 2 GB. -
Page 35: Fusion Options
6. Press the guide key to acknowledge the message “MEMORY STICK NOW FORMATTED”. NOTE Use the FRIATEC memory stick! FRIATEC accepts no warranty claims arising from the use of standard USB sticks. 6.12 Fusion options 6.12.1 ID Data INFORMATION The “ID Data”... -
Page 36: Serial Number
When one or more commission numbers have already been entered, you can choose from “EDIT”, “NEW”, and “SELECT”. = This lets you edit the commission number entered last. CHANGE = This lets you enter a new commission number. = This lets you select an commission number from the twenty SELECT commission numbers entered last. -
Page 37: Gps 1 – 3
When a seam number has already been assigned, you can choose between “CHANGE” and “NEW”. = This lets you edit the seam number entered last. CHANGE = This lets you enter a new seam number. 6.12.1.5 GPS 1 – 3 INFORMATION Data can be entered under GPS 1, GPS 2, and GPS 3 only when this has been activated (see Section 6.4.10)! -
Page 38: Traceability Barcodes / Pipe Number / Pipe Length
When GPS coordinates have already been entered, you can choose between “EDIT” and “NEW”. = This lets you edit the GPS coordinates entered last. CHANGE = This lets you enter new GPS coordinates. 6.12.2 Traceability Barcodes / Pipe Number / Pipe Length INFORMATION Traceability data can be entered only when documentation and the function “Traceability”... -
Page 39: Info Text, Comment 1, Comment 2, Subcontractor
6.12.3 Info Text, Comment 1, Comment 2, Subcontractor INFORMATION Data can be entered under INFO TEXT, COMMENT 1, COMMENT 2, and/or SUBCONTRACTOR only when these have been activated (see Section 6.4.3 to 6.4.6)! After the fusion barcode has been read in, “INFO TEXT” appears on the dis- play. -
Page 40: Supervisor
6.13 SUPERVISOR The SUPERVISOR menu lets you configure the FRIAMAT Prime properties and functions. Device functions can be enabled or locked specifically for the user, and the sequence of operations specified for the building site. A special pass (SUPERVISOR pass) is needed to configure the Supervisor menu. -
Page 41: Basic Settings
6.13.1 Basic Settings The “Basic Settings” Supervisor menu lets you edit the device settings. DOCUMENTATION TIME DATE DATA PROTECTION MAINTENANCE DATE MODE LANGUAGE EMERGENCY INPUT ENERGY DISPLAY VOLUME 1. Press the direction keys to open the “Basic Settings” submenu. 2. Press the guide key. -
Page 42: Data Protection
6.13.1.4 Data Protection The “DATA PROTECTION” submenu can be used to protect data against user deletion. Or it can let the user delete the data after they have been printed out or transferred out of the device. 6.13.1.5 Maintenance Date In the “MAINTENANCE DATA”... - Page 43 6.13.2 Fusion Sequence In the “Fusion Sequence” Supervisor menu, you can define the data that can be assigned to the fusion that is now to be started. TRACEABILITY COMMISSION NUMBER NUMBER INFO TEXT SEAM NUMBER SERIAL NUMBER OPERATORS PASS PIPE PREPARED? DISPLAY 1.
-
Page 44: Commission Number
6.13.2.5 Subcontractor Text entries can be activated or deactivated in the “SUBCONTRACTOR” sub- menu. Also, the selected settings can be locked against user access. 6.13.2.6 GPS Data Coordinate entries can be activated or deactivated in the “GPS DATA” sub- menu. Also, the selected settings can be locked against user access. 6.13.2.7 Seam number Entering seam numbers can be activated or deactivated in the... -
Page 45: Factory Settings
6.13.3 Factory Settings The “Factory Settings” Supervisor menu lets you reset all user settings to their default values (state on delivery). NOTE All settings and text entries are irretrievably lost when reset to their default values! 1. Press the direction keys to open the “Factory Settings”... -
Page 46: Display (Resistance)
In accordance with DVS 2208 Part 1 and BGV A3 (“Electrical systems and equipment”), nonstationary electrical equipment must be subjected to repeat tests at least once a year. This maintenance can be performed at FRIATEC or one of its authorised service stations (see Section 8.2). -
Page 47: Disposal
FRIAMAT fusion units fall under this European Directive and can be submitted for disposal to FRIATEC AG or one of its au- thorised service stations. -
Page 48: Error Messages / Warnings / Info
Error messages / warnings / info Irregularities during fusion cause error messages or warnings to appear on the display of the FRIAMAT fusion unit. INFORMATION On the FRIAMAT Basic, press the Menu key to view the displayed error message in plain text! INFORMATION Should the FRIAMAT fusion unit output an error message or warning that is not listed in the following and that cannot be explained or remedied despite... - Page 49 Check connection failure (e.g. power failure during conditions. fusion) or too low. Power too low Fitting’s power input is too low. Contact the FRIATEC The FRIAMAT cannot provide service hotline: such a low power. +49 (0)621 486-1533 Power exceeded The fitting’s power input...
- Page 50 Please read in a valid operator pass. Only FRIAMAT Prime: This appears when a operator pass is to be read in (e.g. device locked) and/or a different (incorrect) bar- code was read in.
-
Page 51: Annex
(welder’s name and number) are trans- ferred to the fusion log (only FRIAMAT Prime). Authorised service stations Please contact the FRIATEC AG service hotline +49 (0)621 486-1533 for service stations worldwide. Updates to these operating instructions The technical information contained in these operating instructions is exam- ined regularly for currency. - Page 52 FRIATEC Aktiengesellschaft Division Technical Plastics P.O.B. 71 02 61 · D-68222 Mannheim Telefon +49 621 486-1533 Telefax +49 621 486-2030 info-friatools@friatec.de www.friatools.com...
Need help?
Do you have a question about the FRIAMAT Prime and is the answer not in the manual?
Questions and answers