Advertisement
Quick Links
Advertisement

Related Manuals for FRIATEC FRIAMAT PRIME ECO


Summary of Contents for FRIATEC FRIAMAT PRIME ECO
- Page 1 OPERATING INSTRUCTIONS FRIAMAT PRIME ECO www.friatools.com...
-
Page 2: Table Of Contents
Contents Page 1. Preliminary remarks Safety instructions and hints Intended use 2. Safety Functional reliability The operator’s obligations Sources of danger Mains operation Generator operation Extension cable Opening the device Safety measures at the installation site Emergency 3. Basic information Layout/parts Function keys explained Display... -
Page 3: Table Of Contents
Contents Page 4. “Fusion” sequence Siting, connection, and startup Reading in the barcode Starting the fusion procedure 5. FRIAMAT prime eco “Basic settings” menu “Fusion Sequence” menu 5.2.1 “Operator pass” submenu 5.2.2 “Traceability” menu 5.2.3 “Info Data” submenu 5.2.4 “ID Data” submenu “Data”... -
Page 4: Preliminary Remarks
Preliminary remarks Safety instructions and hints In these operating instructions, the following symbols with warnings are used: Symbol Meaning Danger to people. WARNING! Failure to comply can result in death or serious injury. Danger to people. CAUTION! Failure to comply can result in minor or moderate injury. Danger to objects. -
Page 5: Safety
Safety Functional reliability FRIAMAT fusion units are state of the art, built in accordance with the require- ments under ISO 12176-2 and the acknowledged safety standards and fitted with the required safety devices. Prior to delivery, FRIAMAT fusion units are tested for correct and safe functioning. -
Page 6: Sources Of Danger
Stop using the FRIAMAT fusion unit. • Before all care and maintenance work, pull out the plug connecting the equipment. • Maintenance and repair work must be performed by authorised FRIATEC service stations only. • Supply FRIAMAT fusion units only with the operating voltage specified on the ratings plate. -
Page 7: Generator Operation
Generator operation NOTE Only those generators must be used that have been designed for industrial use on building sites. The operating instructions for the generator must be observed! The use of generators must comply with DVGW work sheet GW308, VDE 0100 Part 728, and the specifications and guidelines applying in the country of use. -
Page 8: Extension Cable
• Never open the FRIAMAT fusion unit when it is supplied with operating voltage! • FRIAMAT fusion units may be opened only by specialised personnel from an authorised FRIATEC service station! Safety measures at the installation site The connecting and fusion cables must be protected against sharp edges. -
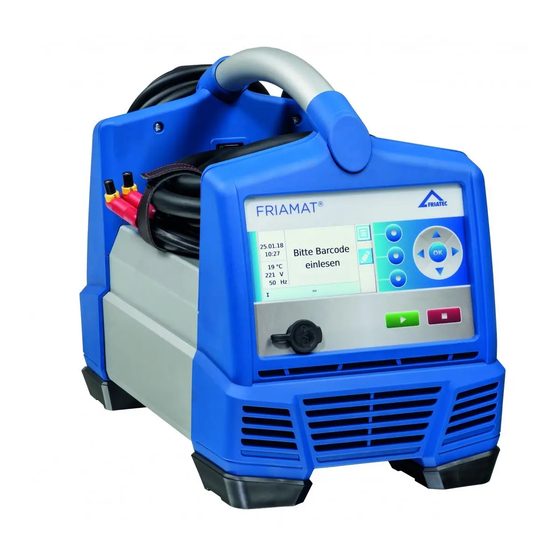
Page 9: Basic Information
Basic information Layout/parts 1 Main switch 2 Fusion cable with reader wand 5 Ventilation slots (air outlet) or barcode scanner 6 Adapter bag 3 Front foil with display 7 Power cable and function keys 8 Ventilation slots (air intake) 4 Service interfae (USB) with protective cap... -
Page 10: Function Keys Explained
Function keys explained 1 Function keys The three blue function keys let you access the function key symbols shown on the display. 2 Direction keys The direction keys (left/right/up/down) let you move the cursor through the menu structure. The selection is confirmed with OK or one of the function keys. 3 START key The START key is used to start a fusion procedure. -
Page 11: Display
Display 1 Function status symbols Symbols appear representing the functions that can be activated at this time. See also Section 3.5. Also shown is the next due maintenance (see also Section 6.2). 2 View ambient details Key ambient details are shown (date, time, ambient temperature, voltage, and frequency). -
Page 12: Function Key Symbols Explained
Function key symbols explained Symbol Designation Description Menu key This opens the main menu This lets you input a barcode manually, Input / emergency input e.g. when it cannot be read. This opens a virtual keypad. This opens the ID Data input dialog for taking ID Data key Commission number, Seam number, and GPS Data... -
Page 13: Function Status Symbols Explained
Function status symbols explained Symbol Description Documentation is active. Seam numbers can be entered. Traceability barcodes can be entered. Pipe numbers can be entered. Pipe lengths can be entered. USB has been connected. Maintenance date: Indication of the next maintenance. Type plate The type plate lists the details specific to the FRIAMAT fusion unit and its unique device number. -
Page 14: Scanner
Scanner The scanner reads in fusion barcodes and traceability barcodes without physical contact. All you need to do is aim at the barcode and press the read button. The barcode is scanned by means of a red light strip that must cross over the whole barcode, whenever possible at the centre. -
Page 15: Fan Functionality
3.11 Fan functionality How the fans function depends on the temperatures measured at the heat sink inside the FRIAMAT fusion unit. The fans switch ON automatically when the heat sink reaches a certain temperature. And this not only during, but also between fusion sessions, or after reactivation, depending on the load levels. -
Page 16: Technical Details
3.14 Technical details Technical details* FRIAMAT prime cco Input voltage range AC 190 V – 250 V Frequency range 44 Hz...66 Hz Stromaufnahme AC 16 A max. Input current 3,5 kW Generator rated output for fittings d 20 – d 160 ~ AC 2,4 kW d 180 –... -
Page 17: Automatic Activation Of Maintenance Interval
3.15 Automatic activation of maintenance interval The maintenance interval stored in the FRIAMAT fusion unit (default: 12 months, see also Section 7.2) is not activated automatically until after the first fusion. INFORMATION The leading maintenance date is always shown on the display and may differ from the details on the service label attached to the FRIAMAT fusion unit! 3.16 Transport/storage/dispatch... -
Page 18: Fusion" Sequence
“Fusion” sequence Siting, connection, and startup Before every use, you should check that the FRIAMAT fusion unit is not damaged and operates properly within the specifications. All parts must be correctly installed and all conditions fulfilled. Only then can the device operate properly. -
Page 19: Reading In The Barcode
CAUTION Only original FRIATEC fusion plugs (art. no. 624529) may be used! 9. Connect the fusion plugs to the contact pins on the fitting. 10. The fusion plugs must be attached completely to the fitting’s pins, i.e. over their whole internal contact length. - Page 20 NOTE Do not connect any other consumers during fusion! You can stop the fusion procedure at any time by pressing the STOP key. Fusion can be resumed after the fusion joint has cooled completely (and all causes of the fault have been eliminated). Observe here the processing instructions from the fitting manufacturer.
-
Page 21: Friamat Prime Eco
FRIAMAT prime eco “Basic settings” menu The function key in the main menu opens the submenu “Basic settings”. Here you can edit the device settings. Documentation Date and time * System language * Protocol language Volume 1. Press the (Menu) function key. This opens the main menu. -
Page 22: Operator Pass" Submenu
(see also Section 5.2.4). The direction keys scroll through the settings activated on the FRIAMAT prime eco. The operator pass can be used to lock the FRIAMAT prime eco as protection against unauthorised use. A locked FRIAMAT prime eco shows on its display the request “!!! PLEASE ENTER VALID OPERATOR PASS !!!”. -
Page 23: Traceability" Menu
5.2.2 “Traceability” menu The “Traceability” submenu lets you read in, process, and store traceability barcodes and data. 5.2.2.1 Traceability Active The “Traceability Active” function activates and deactivates the traceability function. In addition, the “Traceability” submenu lets you activate the functions “Pipe Number”... -
Page 24: Id Data" Submenu
5.2.4 “ID Data” submenu The “ID Data” submenu presents data that you can select and that must be assigned directly to the pending fusion: Order Number, Fusion Joint Number, and GPS Data. These data cannot be entered in this submenu. When this function is “activated”, the inputs are prompted only after the fusion barcode has been read in. -
Page 25: Transfer" Submenu
5.3.1 “Transfer” submenu The submenu “Transfer” serves to transfer the fusion data from the FRIAMAT to a USB stick. An “Export Filter” dialog lets you select the data you want to output. Filters can be configured here for the data to be output. Options: Commission Number Date Operator... -
Page 26: Delete" Submenu
INFORMATION Suitable USB sticks are commercially available FAT 32 compatible models holding up to 256 GB. The USB stick mus be formatted to FAT 32 before use. 5.3.2 “Delete” submenu The “Delete” submenu lets you delete a selection or all of the saved data. Fusion options 5.4.1 “ID Data”... - Page 27 5.4.1.2 Operator pass The main window shows the entered operator, if any, at the bottom right. If no operator pass has been activated, the window remains unchanged. The operator cannot be edited manually (via key presses). To register a new operator, you must read in a new operator pass (see Section 5.2.1).
-
Page 28: Traceability Barcodes / Pipe Number / Pipe Length
1. Press the (ID DATA) function key . 2. Use the direction keys to select “GPS 1–3”. 3. Press the (Input/Emergency Input) function key. 4. Enter each of the numbers from the fi rst to the last using the direction keys on the virtual keypad. -
Page 29: Info Data: Info Text, Comment, Subcontractor
5.4.3 Info Data: Info Text, Comment, Subcontractor After the fusion barcode has been read in, the prompt “START” appears on the display. 1. Press the (Info Data) function key. 2. Use the direction keys to select “INFO TEXT”, “COMMENT”, and/or “Subcontractor”. -
Page 30: Info" Menu
“Info” menu The (Menu) function key in the main menu opens the submenu “Info”. Here you can view the device details. Type Device number SW version HW version Maintenance Date 1. Press the (Menu) function key. This opens the main menu. 2. -
Page 31: Warranty / Maintenance / Disposal
In accordance with DVS 2208 Part 1 and BGV A3 (“Electrical systems and equipment”), nonstationary electrical equipment must be subjected to repeat tests at least once a year. This maintenance can be performed at FRIATEC or one of its authorised service stations (see Section 8.1). -
Page 32: Error Messages / Warnings / Info
Irregularities during fusion cause error messages or warnings to appear on the display of the FRIAMAT fusion unit. INFORMATION On the FRIAMAT prime eco, press the function key to view the displayed error message in plain text! INFORMATION Should the FRIAMAT fusion unit output an error message or warning that is... - Page 33 (e.g. power failure during conditions. fusion) or too low. Power too low Fitting’s power input is too Contact the FRIATEC low. The FRIAMAT cannot service hotline: provide such a low power. +49 (0) 621 - 486 1533 Power exceeded The fitting’s power input...
- Page 34 Fusion finished. Checks Checks on the fitting data and FRIAMAT preCHECK function. Voltage … V; Adjust generator, and acknowledge at STOP key. frequency … Hz Maintenance Have the device serviced by FRIATEC GmbH or an authorised service station. date exceeded...
-
Page 35: Annex
Annex Authorised service stations Please contact the FRIATEC GmbH service hotline +49 (0)621 486-1533 for service stations worldwide. Updates to these operating instructions The technical information contained in these operating instructions is examined regularly for currency. The date of the last revision is specified on every page. - Page 36 FRIATEC GmbH Technical Plastics Division P.O.B. 71 02 61 · D-68222 Mannheim Telefon +49 621 486-1533 Telefax +49 621 486-2030 info-friatools@friatec.de www.friatools.com...
Need help?
Do you have a question about the FRIAMAT PRIME ECO and is the answer not in the manual?
Questions and answers