
Related Manuals for Rae ToxiRAE Pro


Summary of Contents for Rae ToxiRAE Pro
- Page 1 ToxiRAE Pro User’s Guide For Sales & Service Contact 2650 E. 40th Ave. • Denver, CO 80205 Phone 303-320-4764 • Fax 303-322-7242 1-800-833-7958 www.geotechenv.com P/N G02-4009-000 Rev. C March 2013...
- Page 2 © Copyright 2013 RAE Systems by Honeywell...
-
Page 3: Table Of Contents
5.2. Status Indicator Icons ................... 10 6. Charging The ToxiRAE Pro ..................11 6.1. Removing The ToxiRAE Pro From The Charging Cradle ......12 6.2. Low Voltage Shutoff..................12 7. Turning The ToxiRAE Pro On ..................13 8. Turning The ToxiRAE Pro Off ..................14 9. - Page 4 17. Downloading Datalogs And Performing PC-Based Instrument Configuration and Firmware Upgrades ............ 50 18. Maintenance ........................ 51 18.1. Replacing the ToxiRAE Pro Li-Ion Battery ..........51 18.2. Proper Battery Disposal ................54 18.3. Removing And Installing The Rubber Boot ..........55 18.4.
-
Page 5: Read Before Operating
Register your product online by visiting: http://www.raesystems.com/support/product-registration By registering your product, you can: • Receive notification of product upgrades or enhancements • Be alerted to Training classes in your area • Take advantage of RAE Systems special offers and promotions... - Page 6 The ToxiRAE Pro monitor is factory-preconfigured to a 30-day calibration interval, so it will go into calibration alarm if it is not calibrated for 30 days or more.
- Page 7 Étudier le manuel d’instructions en entier avant d’utiliser, ou d’entretenir l’équipement. Le ToxiRAE Pro est configuré en usine avec une période de calibration de 30 jours, si il n’est pas calibré durant cette période , il passe en alarme.
-
Page 8: General Information
• Easy to maintain with replaceable sensor and Lithium-ion battery • Wireless or non-wireless versions are available Wireless functionality is currently offered in North America and Europe. Contact RAE Systems for availability in other regions. Contact RAE Systems for availability. -
Page 9: Specifications
ToxiRAE Pro User’s Guide 2. Specifications ToxiRAE Pro Specifications Dimensions 118 mm x 60 mm x 30 mm (4.6" x 2.4" x 1.2") Weight 220g (7.76 oz) Over 20 intelligent interchangeable field-replaceable electrochemical sensors Sensor Rechargeable Li-ion battery Battery • Operating time > 30 hours (normal operation) •... -
Page 10: Available Electrochemical Sensors For Toxirae Pro
ToxiRAE Pro User’s Guide 3. Available Electrochemical Sensors For ToxiRAE Pro The following sensors are available for use in the ToxiRAE Pro. Note: When replacing a sensor (even with the same type), the sensor may require conditioning before first use, in addition to typical warm-up time prior to normal operation. -
Page 11: Overview
ToxiRAE Pro User’s Guide 4. Overview The ToxiRAE Pro is the world’s first wireless personal monitor for toxic gases and oxygen. The ToxiRAE Pro takes worker protection to the next level by providing safety professionals wireless access to real-time instrument readings and alarm status from any location for better visibility and faster response. -
Page 12: Display Overview
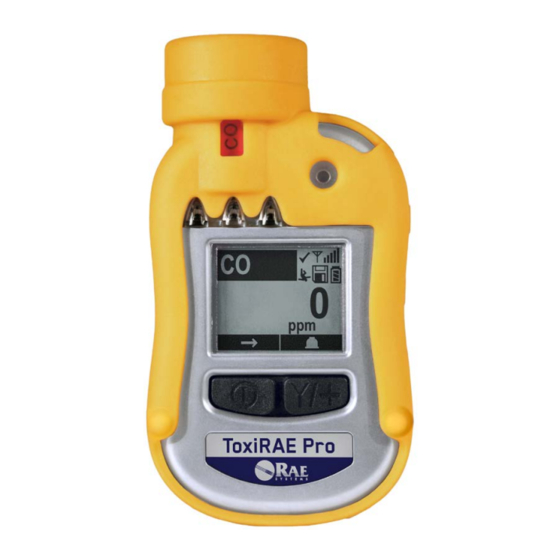
ToxiRAE Pro User’s Guide 5.1. Display Overview The LCD display provides visual feedback that includes the sensor types, readings, time, battery condition, and other functions. Calibration and bump Sensor name and “Alarm” are test up to date displayed alternately when in alarm... -
Page 13: Charging The Toxirae Pro
Always fully charge the battery before using the ToxiRAE Pro. The ToxiRAE Pro’s Li- ion battery is charged by placing the ToxiRAE Pro in its cradle. Contacts on the bottom of the ToxiRAE Pro meet the cradle’s contact pins, transferring power. -
Page 14: Removing The Toxirae Pro From The Charging Cradle
2. Plug the AC/DC adapter into the wall outlet. 3. Place the ToxiRAE Pro into the cradle and press down until it is locked in place. The ToxiRAE Pro begins charging automatically. The LED in the cradle should glow red to indicate charging. -
Page 15: Turning The Toxirae Pro On
Note: Never put tape over the alarm buzzer port to permanently mute it or otherwise limit the loudness of the buzzer. 1. When the ToxiRAE Pro turns on, the buzzer, vibration alarm, and LEDs are tested. The firmware version is shown in the display (for example, “V1.00” indicates firmware version 1.00). -
Page 16: Turning The Toxirae Pro Off
If you remove your finger from the key during the countdown, the shutoff operation is canceled and the ToxiRAE Pro continues normal operation. When you see “Unit Off,” release your finger from the [MODE] key. The ToxiRAE Pro is now off. -
Page 17: Low Battery Warnings
“Battery low! Shut off in X minutes.” The countdown to shutoff starts 10 minutes prior to automatic shutoff. 11. Dead Battery Warning & Shutoff If you turn on the ToxiRAE Pro and the battery’s charge is below its lowest threshold, the display shows this message: Battery too low! Needs charging. -
Page 18: Operating The Toxirae Pro
12.1.1. Normal Mode Normal Mode is the default mode of the ToxiRAE Pro when it is turned on. The selected sub-mode (Basic or Advanced) determines the number of screens that are accessible. -
Page 19: Basic User Mode
ToxiRAE Pro User’s Guide 12.1.2. Basic User Mode When the ToxiRAE Pro is in Basic User Mode, pressing [MODE] allows you to step through the screens in the following fashion: * If your ToxiRAE Pro is configured with an oxygen (O ) sensor, TWA and STEL are not included in the menus because neither TWA nor STEL are calculated for this sensor. -
Page 20: Advanced User Mode
[MODE] button repeatedly to highlight the Exit icon in Programming Menu and press Y to exit to the measurement screen. When the ToxiRAE Pro is in Advanced User mode, you may enter Programming without using a password. -
Page 21: Navigation In Normal Mode
Short Term Exposure Limit (STEL) data based on 15-minute STEL values, expressed in ppm or mg/m . A STEL value is only displayed after the ToxiRAE Pro has been on for 15 minutes or longer. After exiting PC Communications mode, the STEL value is reset. Peak The Peak value tells you the highest reading for the sensor since the ToxiRAE Pro was turned on. -
Page 22: Enter Communications And Stop Measurement
Before communicating with a PC running ProRAE Studio II Instrument Configuration and Data Management software (for downloading datalogs, configuring the instrument, or uploading new firmware), the ToxiRAE Pro must be set to communicate with the computer. Press [MODE] repeatedly until you reach the “Enter Communications and stop measurement?”... - Page 23 ToxiRAE Pro User’s Guide When you have successfully entered Programming Mode, the following screen appears: Note: The password can only be changed by connecting the instrument to a PC running ProRAE Studio II software. Follow the instructions in ProRAE Studio II to change it.
-
Page 24: Navigating Programming Menus
Zero At Start LCD Contrast * STEL and TWA are not included in the menus on a ToxiRAE Pro equipped with an O sensor. Note: There is also an “Exit” icon. It has only one function. When you select it, the... -
Page 25: Calibration
ToxiRAE Pro User’s Guide Once you enter Programming, the LCD displays the first menu, Calibration. Each subsequent menu is accessed by pressing [MODE] repeatedly until the desired menu is displayed. To enter a submenu of a menu, press [Y/+]. 12.5.1. Calibration Two types of calibration are available: Zero (fresh air) and Span. - Page 26 2. Press [Y/+] to exit the Low Alarm submenu and advance to STEL Alarm submenu. STEL Alarm Set the STEL Alarm as follows (except if the ToxiRAE Pro has an O sensor; then there is no STEL Alarm): 1. In the STEL Alarm submenu, press [Y/+] repeatedly to select a desired number.
- Page 27 ToxiRAE Pro goes into alarm. Important! If you program the ToxiRAE Pro so that no alarms are activated in an alarm condition, you may put yourself or your workers at risk of being exposed to a hazardous...
- Page 28 When the Man Down feature is on and there is no gas alarm, the ToxiRAE Pro senses that it is motionless for the amount of time set in the “Motionless Time” parameter. If the instrument is not moved during that time, then a pre-alarm is activated to alert the user, and shows the “Are...
-
Page 29: Datalog
• If the person presses [MODE] during the countdown, answering the “Are You OK?” question with “No,” the Man Down alarm starts. If the ToxiRAE Pro’s wireless connectivity is enabled, a Man Down message is also sent to remote observers. - Page 30 ToxiRAE Pro User’s Guide You are taken to the next submenu, Interval. Interval Intervals are shown in seconds. The default value is 60 seconds. The maximum interval is 3600 seconds, and the minimum is 1 second. 1. Press [Y/+] repeatedly to select a desired number. Numbers increase from 0 to 9.
- Page 31 ToxiRAE Pro User’s Guide Datalog Type The instrument has two datalog types: Auto Collects datalog information when the instrument is sampling until the datalog memory is full. Manual Datalogging occurs only when you manually initiate datalogging (see below for details).
-
Page 32: Monitor Setup
ToxiRAE Pro User’s Guide 12.5.4. Monitor Setup Wireless There are seven Wireless parameters: • Radio On/Off • PAN ID • Channel • Join Network • Interval • Off Network Alarm • Factory Reset Radio On/Off This turns the wireless modem on or off. - Page 33 ToxiRAE Pro User’s Guide To save your new PAN ID and exit, press [MODE] repeatedly until “OK” is highlighted. Then press [Y/+]. It says, “Applying settings…” and then “Settings applied successfully!” to indicate they have been registered. The menu now advances automatically to “Channel.”...
- Page 34 Off Netwk Alarm When this is enabled, the unit goes into alarm whenever an active network connection is lost. This informs you that connectivity has been broken between the ToxiRAE Pro and the EchoView Host. 1. Choose “On” or “Off” by pressing [MODE] until your choice is highlighted. (the dark circle in the “radio button”...
- Page 35 To save your new User ID and exit, press [MODE] repeatedly until “OK” is highlighted. Then press [Y/+]. User Mode The ToxiRAE Pro has two user modes: Basic Basic users can only see and use a basic set of functions.
- Page 36 ToxiRAE Pro User’s Guide Date The Date is expressed as Month/Day/Year, with two digits for each (MM/DD/YY). The left-most digit is highlighted to indicate it is selected when you enter the Date submenu. 1. Press [Y/+] repeatedly to select a desired number. Numbers increase from 0 to 9.
- Page 37 ToxiRAE Pro User’s Guide Temp. Unit The display unit of the internal temperature sensor can be switched between Fahrenheit and Celsius. To change the Temp. Unit: 1. Press [MODE] to step from one option to the other. The highlighted option changes each time you press [MODE].
-
Page 38: Exit (Exit Programming Mode)
ToxiRAE Pro screen: If Policy Enforcement is enabled, then after startup the ToxiRAE Pro displays a screen that informs the user that the instrument requires either a bump test or a calibration. If both are required, then they are shown in sequence. - Page 39 ToxiRAE Pro User’s Guide To program a ToxiRAE Pro via an AutoRAE 2 Cradle, you need ProRAE Studio II Instrument Configuration and Data Management Software, the AutoRAE 2 Cradle connected to a power source, and a USB PC communications cable.
- Page 40 8. In ProRAE Studio II, the AutoRAE 2 Cradle is shown, including its Serial Number, under “Online”: 9. Expand the view to show the ToxiRAE Pro in the AutoRAE 2 Cradle by clicking the “+” to the left of the image of the AutoRAE 2 Cradle: 10.
- Page 41 ToxiRAE Pro User’s Guide 12. In the menu that now appears on the left side, click “Policy Enforcement.” It is highlighted, and the Policy Enforcement pane is shown: For “Must Calibrate” and “Must Bump,” you have the options of no enforcement or enforcement (including “Can’t Bypass,”...
-
Page 42: Toxirae Pro Desktop Cradle Or Travel Charger
ToxiRAE Pro User’s Guide These are the screens that are shown on a ToxiRAE Pro after startup if “Can Bypass” is selected: If “Can’t Bypass” is selected, the display looks like this, and only allows the options of performing the test or shutting down: 13.1.2. - Page 43 ToxiRAE Pro User’s Guide The Policy Enforcement pane is shown: You can select “Must Calibrate” and/or “Must Bump” and then set whether the user must perform the selected operation in order to use the instrument. 15. Once you have made your selections in ProRAE Studio II, you must upload the changes to the instrument.
-
Page 44: Deactivating Policy Enforcement
13.2.2. ToxiRAE Pro Desktop Cradle Or Travel Charger If the ToxiRAE Pro screen displays the message that it must be bump tested or calibrated, and if the option to bypass bump testing or calibration is not available, you should shut... -
Page 45: Bump Testing & Calibrating The Toxirae Pro
14.1. Bump Testing & Calibrating With An AutoRAE 2™ Bump testing and calibrating a ToxiRAE Pro can be done with an AutoRAE 2 Automatic Test And Calibration Station. Follow all instructions in the AutoRAE 2 User’s Guide for successful bump testing or calibration. -
Page 46: Calibration Adapter
The ToxiRAE Pro is a diffusion monitor and must be calibrated using a fixed-flow regulator with a flow rate between 0.5 and 1.0 liters per minute. The ToxiRAE Pro is supplied with a special calibration adapter that covers the gas inlet. If the local air has impurities that might interfere with zero (fresh air) calibration, the calibration adapter and a cylinder of clean zero air should be used. -
Page 47: Zero Calibration
If you do not know the password, do not enter anything. Just press [MODE] repeatedly to highlight OK, and then press [Y/+]. Note: If the ToxiRAE Pro is in Programming Mode and you do not press a key within 60 seconds, it exits Programming Mode and re-enters Normal Mode. -
Page 48: Span Calibration
ToxiRAE Pro User’s Guide 1. At the Calibration screen, press [Y/+]. 2. “Zero Calib” is highlighted. Make sure the ToxiRAE Pro is in clean air. Otherwise attach a cylinder of zero gas to the Calibration Adapter installed on the instrument. -
Page 49: Changing Span Gas Concentration
10% of the span gas concentration). Important! After calibration is complete, you must remove the Calibration Adapter from the ToxiRAE Pro. If the Calibration Adapter is attached during normal operation, inconsistent and lower-than-normal readings will occur because of decreased concentration of the gas being monitored. -
Page 50: Diagnostic Mode
Diagnostic Mode, refer to the ToxiRAE Pro Service Guide. The ToxiRAE Pro’s Diagnostic Mode can only be accessed at startup time. In Diagnostic Mode, ToxiRAE Pro displays readings in raw counts instead of units such as parts per million (ppm). -
Page 51: Alarm Signal Summary
Neg > STEL > TWA > Cal Failed > Bump Failed > Cal Required > Bump Required > Offline > Bat * If your ToxiRAE Pro is configured with an oxygen (O ) sensor, alarms for TWA and STEL are not included because neither TWA nor STEL are calculated for this sensor. -
Page 52: Downloading Datalogs And Performing Pc-Based Instrument Configuration And Firmware Upgrades
2. Use the supplied PC Communications Cable (USB to mini-USB cable) to connect the Cradle to a PC. 3. Turn on the ToxiRAE Pro. Make sure it is running in Normal mode (with the main measurement screen with its reading showing). -
Page 53: Maintenance
18.1. Replacing the ToxiRAE Pro Li-Ion Battery Caution: Turn off the ToxiRAE Pro before removing or replacing the battery. 1. If the rubber boot is on the ToxiRAE Pro, remove it (refer to page 55 for details). 2. Remove the cap by unscrewing it. - Page 54 5. Remove the four screws on the back of the instrument by turning them counterclockwise. 5. Hold the ToxiRAE Pro down and separate the rear cover from the front by pulling from the top and tilting it open without disconnecting the ribbon cable connecting the two halves.
- Page 55 Note: Incorrectly tightening the screws may compromise the instrument’s IP rating. 11. Inspect the filter in the top cap and replace if necessary. Screw on the top cap. Important! Charge the battery completely before using the ToxiRAE Pro, and check the calibration before placing the instrument in service.
-
Page 56: Proper Battery Disposal
Information For information on sensor specifications, cross-sensitivities, and calibration information, refer to RAE Systems Technical Note TN-114: Sensor Specifications And Cross- Sensitivities (available for free download from www.raesystems.com). All specifications presented in this Technical Note reflect the performance of standalone sensors. Actual sensor characteristics may differ when the sensor is installed in different instruments. -
Page 57: Removing And Installing The Rubber Boot
ToxiRAE Pro User’s Guide 18.3. Removing And Installing The Rubber Boot The protective rubber boot on the ToxiRAE Pro must be removed before the sensor top cap or back of the instrument can be removed. When removing the boot, follow these steps outlined here. -
Page 58: Filter Replacement
ToxiRAE Pro User’s Guide 18.4. Filter Replacement A filter is permanently attached inside the ToxiRAE Pro’s top cap, which helps to keep debris and moisture out. This filter should be inspected periodically, and the cap and rubber insert should be inspected for damage. If the filter is dirty or the cap shows signs of damage, replace the entire instrument cap assembly, including the cap and filter (part number G02-0307-003, package of three). -
Page 59: Replacing The Sensor
Sensor indexing 3. Place the sensor module into the ToxiRAE Pro. Make sure the indexing keys are aligned (the sensor can only go in one way) and that it is seated firmly. 4. Carefully place the cap back onto the ToxiRAE Pro by screwing it on. -
Page 60: Cleaning The Exterior
Visually inspect the contacts at the base of the ToxiRAE Pro and on the charging cradle to make sure they are clean. If they are not, wipe them with a soft, dry cloth. Never use solvents or cleaners. -
Page 61: Troubleshooting
ToxiRAE Pro User’s Guide 19. Troubleshooting Problem Possible Reasons & Solutions Cannot turn on power Reasons: Depleted battery. Defective battery. Solutions: Replace battery. Lost password Solutions: Use ProRAE Studio II software to change the password. Call Technical Support at +1 408-752-0723 or... -
Page 62: Technical Support
ToxiRAE Pro User’s Guide 20. Technical Support To contact RAE Systems Technical Support Team: Monday through Friday, 7:00AM to 5:00PM Pacific (US) Time Phone (toll-free): +1 888-723-4800 Phone: +1 408-952-8461 Email: tech@raesystems.com 21. RAE Systems Contacts RAE Systems by Honeywell World Headquarters 3775 N. - Page 63 ToxiRAE Pro User’s Guide Mobile: +44 7841362693 Email: raeuk@raeeurope.com RAE Systems France ZI des Ayats 679390 MILLERY France Phone: +33 4 78 46 16 65 Fax: +33 4 78 46 25 98 Email: info-france@raeeurope.com Web: www.raesystems.fr RAE BeNeLux BV Hoofdweg 34C...
- Page 64 ToxiRAE Pro User’s Guide RAE Systems (Hong Kong) Ltd. Room 8, 6/F, Hong Leong Plaza 33 Lok Yip Road Fanling, N.T, Hong Kong Phone: +852.2669.0828 Fax: +852.2669.0803 Email: hksales@raesystems.com RAE Systems Japan 403 Plaza Ochanomizu Bldg. 2-1 Surugadai Kanda Chiyoda-Ku...
-
Page 65: Appendix A: Regulatory Information
Warning: Substitution of components may impair intrinsic safety. ToxiRAE Pro Marking The ToxiRAE Pro is certified according to the IECEx scheme, ATEX and CSA for US and Canada as protected by intrinsic safety. The ToxiRAE Pro is marked with the following information: RAE SYSTEMS 3775 N. - Page 66 Hazardous Areas classified by Divisions ToxiRAE Pro is intended to be used in hazardous areas classified for Class I Div. 1 or 2, within the temperature range of -20º C to +55º C, where gases of explosion groups A, B, C or D and temperature code T4 may be present.
- Page 67 ToxiRAE Pro User’s Guide Year of manufacture To identify the year of manufacture, refer to the serial number of the instrument. The second to last digit in the serial number indicates the year of manufacture. For example, “M” indicates the manufacturing year is 2010.
- Page 68 RAE Systems by Honeywell World Headquarters 3775 N. First St. San Jose, CA 95134-1708 USA Phone: 408.952.8200 Fax: 408.952.8480 E-mail: customerserv@raesystems.com Web Site: www.raesystems.com P/N G02-4009-000 Rev. C March 2013...
Need help?
Do you have a question about the ToxiRAE Pro and is the answer not in the manual?
Questions and answers
display screen is darken
The display screen on the Rae Pro may be dark because the LCD contrast setting is too low. You can adjust the contrast from 1 to 100 by pressing and holding [Y/+].
This answer is automatically generated