Advertisement
Quick Links
Download this manual
See also:
User Manual
QRAE 3
Diffusion & Pumped
QuickStart Guide
RAE Systems by Honeywell
3775 N. First St.
San Jose, CA 95134-1708 USA
Phone: 408-952-8200
Fax: 408-952-8480
Email: RAE-tech@honeywell.com
www.raesystems.com
Charging The QRAE 3 (non-ATEX/IECEx)
Always fully charge the battery before use. Contacts on
the bottom of the QRAE 3 meet the Travel Charger's
contact pins, transferring power. Make sure the charger
and QRAE 3 are firmly attached. Then connect the AC
Adapter's barrel plug to the charger, and plug its
transformer into an AC outlet. While charging, the
LED on the Travel Charger glows red. When the
battery is fully charged, the LED glows green.
AC adapter
barrel plug
The QRAE 3 User's Guide must be carefully read by all
individuals who have or will have the responsibility of
using, maintaining, or servicing this product. The product
will perform as designed only if it is used, maintained, and
serviced in accordance with the manufacturer's instructions.
Never operate the monitor when the rear cover is re-
moved. Remove rear cover, sensors, and/or battery only
in an area known to be non-hazardous. Never use the
instrument with the calibration adapter installed, as this
can cause distorted readings, a potential safety threat.
Barrier Box For ATEX/IECEx Use
For ATEX/IECEx applications, plug the cord from
the Barrier Box (P/N M02-3011-000) into the
Travel Charger, and then plug the power adapter
into the Barrier Box.
Clip Travel Charger
Non-ATEX/IECEx:
Onto QRAE 3
Power supply
plugged directly into
Travel Charger.
QRAE 3
Travel
Charger
Charging
status LED
4.
WARNINGS
Read Before Operating
CAUTION!
ATEX/IECEx:
Barrier Box between
power supply and
Travel Charger.
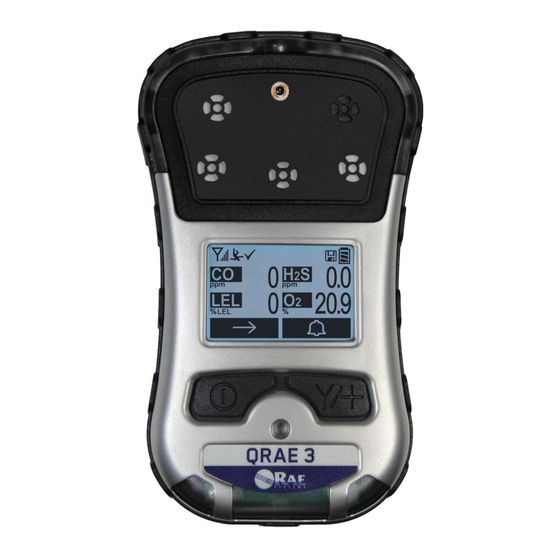
User Interface
The QRAE 3's user interface consists of the
display and two keys, [MODE] and [Y/+]. The
flippable LCD displays information such as monitored
threats, real-time readings and measurement units,
alarm type (when in alarm, including cal. overdue),
battery status, datalog (if on), and radio and connection
quality (if available).
2.
Turning The QRAE 3 On
With the instrument turned off, press and hold the
[MODE] key until the audible alarm stops, and then
release. During startup, the battery, buzzer, vibra-
tion alarm, and LEDs are tested, and then the
QRAE 3 performs self-testing of its other func-
tions. When the main measurement screen appears,
the QRAE 3 is ready for calibration or use.
Note: If the battery is completely empty, then the
display briefly shows the message "Battery
Discharged!" and the QRAE 3 shuts off. You should
charge or replace the battery before turning it on again.
Note: If "Zero At Start," "Must Calibrate" or
"Must Bump" is set, you will be prompted to
perform the appropriate calibration before using the
instrument.
5.
3.
6.
Advertisement

Subscribe to Our Youtube Channel
Related Manuals for Rae QRAE 3


Summary of Contents for Rae QRAE 3
-
Page 1: Quickstart Guide
Read Before Operating The QRAE 3’s user interface consists of the Diffusion & Pumped The QRAE 3 User’s Guide must be carefully read by all QuickStart Guide display and two keys, [MODE] and [Y/+]. The individuals who have or will have the responsibility of flippable LCD displays information such as monitored using, maintaining, or servicing this product. - Page 2 Turning The QRAE 3 Off Calibration Calibrate the QRAE 3 using a fixed-flow regulator (flow Make sure all sensors have warmed up before Press and hold [MODE]. A 5-second countdown to shut- attempting any calibration. If a sensor’s reading rate between 0.5 and 1.0 liters per minute): off begins.
- Page 3 “Wireless.” In order to save time while the off-network alarm. operating the QRAE 3 in a network, it is best to 6. When you are done with the settings, press The QRAE 3 multi-gas detector must be [MODE] until “Exit”...
Need help?
Do you have a question about the QRAE 3 and is the answer not in the manual?
Questions and answers