Table of Contents
Advertisement
Quick Links
Advertisement
Table of Contents

Subscribe to Our Youtube Channel
Related Manuals for Extech Instruments DT500


Summary of Contents for Extech Instruments DT500
- Page 1 User Guide Laser Distance Finder Extech DT500 ...
-
Page 2: Safety Instructions
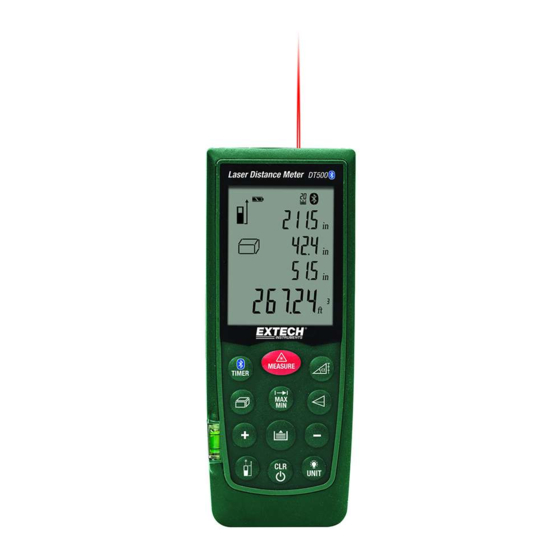
Introduction Congratulations on your purchase of the Extech Model DT500 Laser Distance Finder. This meter measures Distance up to 70m (230’) and calculates Area and Volume. In addition, the DT500 includes a laser pointer for accurate targeting. This meter is shipped fully tested and calibrated and, with proper use, will provide years of reliable service. Please visit our website (www.extech.com) to check for the latest version of this User Guide, Product Updates, and ... -
Page 3: Front Panel
Descriptions Front Panel 1. LCD display area 2. Keypad 3. Level 4. Measure button 5. Laser Pointer 6. Sensor Testing Beam Rear Panel Laser warning label Battery compartment latch Battery compartment Positioning bracket Tripod mount DT500-en-GB_v1.5 7/16... -
Page 4: Display Description
Display Description Laser Continuous mode is active Reference level ‐ front Reference level ‐ rear Reference level ‐ tripod Reference level – end piece Area/Volume measurement functions Variable indirect measurement functions: Single Pythagorean measurement Double Pythagorean measurement Double Pythagorean (Partial Height) Tilt measurement Stake‐out function Battery status Single distance measurement Continuous measurement and MAX/MIN Instrument Error message Memory Bluetooth icon Time Tilt Display Line 1 Display Line 2 Display Line 3 Display Line 4 (Summary line) DT500-en-GB_v1.5 7/16... -
Page 5: Keypad Description
Keypad Description Bluetooth/Timer Button Power ON / Measure Button /Laser on‐off Tilt/Stake‐out Button Area‐Volume Button MAX‐MIN Single/Continuous Measurement Button Indirect Measurement Button Add Button Memory Store‐Recall Button Subtract button Measurement Reference Button CLEAR / Power OFF Button Backlight / Unit Button Note: A measurement button is also located on the right side of the instrument DT500-en-GB_v1.5 7/16... -
Page 6: Measurement Considerations
Preparation for Measurements 1. Press the MEAS button to switch the meter ON. The unit automatically switches OFF after three (3) minutes of inactivity. Press and hold the CLR button to switch the unit OFF manually. 2. Press the CLR button to cancel the last action performed or clear the last data displayed on the screen. 3. Press CLR and Measure button simultaneously while in Storage mode to clear all of the data stored in memory. 4. Press and hold the UNIT button to change the unit of measure (ft = feet, in = inches, m = meters, and ‘ “ (feet and inches). 5. Press Unit button quickly to turn the backlight on or off. 6. Use the reference button to select the Top or Bottom distance reference. In the Top mode (2), the displayed reading will represent the distance from the top of the meter to the target. In the Bottom mode (1), the displayed reading will represent the distance from the bottom of the meter to the target. This is the default mode. For measuring from a Tripod, corner or edge, refer to the Tripod and Positioning Bracket sections. DT500-en-GB_v1.5 7/16... -
Page 7: Single Distance Measurement
Laser pointer switches OFF after the measurement is taken. 3. The reading will remain on the display. Continuous Distance Measurement Press the MEAS button to switch the meter ON. Press and Hold the MEAS button for 3 seconds to begin a continuous measurement session. The meter will beep and the continuous laser display icon will appear (as shown in the Display Description section of this guide). Each subsequent press of the MEAS button takes a new distance measurement. Switch the Continuous mode ON/OFF by pressing and holding the MEAS button for 3 seconds. MAX‐MIN Continuous Measurement ‘Tracking’ Mode This mode of operation is useful for determining the shortest and longest distances from a given point. The meter can be moved to various targets while the display updates every half second on the third display line. The MIN and MAX values are displayed dynamically on the first and second display lines. Press the MEAS button to switch the meter ON. Press and Hold the MAX/MIN button for 3 seconds to begin a continuous measurement session. The meter will beep, the laser pointer will stay in continuous mode, and the continuous laser display icon will appear (as shown in the Display Description section of this guide). The meter will beep with each new measurement update (approx. every one half second). The MIN reading will be indicated and will update each time a lower reading (lower than the currently displayed reading) is encountered. The MAX reading will be indicated and will update each time a higher reading is encountered. The actual reading will be indicated on the bottom display line. To exit this mode of operation, momentarily press the MEAS button. Note that the meter exits to the normal mode of operation after approx. 100 measurements in continuous mode. DT500-en-GB_v1.5 7/16... -
Page 8: Adding / Subtracting Measurements
Read the sum or difference of the two readings on display line 4. Press CLR to cancel the last step. Press MAX/MIN to return to single distance measurement. Area Calculation The DT500 allows the user to compute the area of a room. Press the MEAS button to turn the meter ON; wait several seconds and the Laser pointer will switch ON. Press the button firmly once. A parallelogram will appear with its length side flashing indicating that a Length measurement is to be taken. Aim the meter and press MEAS to take the room length measurement. Press the MEAS again to switch the Laser Pointer back ON. The parallelogram will now appear with its Width side flashing indicating that a Width measurement is to be taken. Press MEAS to take the room width measurement. Lines 1, 2, and 4 will now show the Length, Width, and Area (in ft or m ) respectively. Note that the laser pointer will switch off automatically if too much time is taken between the steps above. If this occurs, simply press the MEAS button to switch the Laser pointer back ON and then continue following the steps. Volume Calculation The DT500 allows the user to compute room Volume. Press the MEAS button to switch the meter ON. Wait several seconds and the Laser pointer will automatically switch ON. Press the button firmly twice (allow a second or so between presses). A cube shape will appear with its Length side flashing indicating that a Length measurement is to be taken. Press MEAS to take the room Length measurement. The cube’s Width side will now be flashing indicating that a Width measurement is to be taken. Press MEAS to switch the Laser pointer ON again. Press MEAS again to take the room Width measurement. DT500-en-GB_v1.5 7/16... - Page 9 The cube’s Height side will now be flashing indicating that a Height measurement is to be taken. Press MEAS to switch the Laser pointer ON again. 10. Press MEAS to take the room Height measurement. 11. Lines 1, 2, and 3 will now show the Length, Width, and Height respectively. Line 4 will 3 or display the Volume in cubic feet or meters (ft ). Indirect Measurements (Using Two Measurements) The DT500 can measure the vertical height from Point 1 to Point 2 with the operator taking the measurement from Point X. This is accomplished using two measurements. Press the MEAS button to switch the meter ON. Press the button once. Wait several seconds and the Laser pointer will automatically switch ON. A right triangle shape will appear with its diagonal line flashing. From exactly Point X, aim the instrument at Point 1 and press MEAS. One reading is now complete and the bottom line of the right triangle will begin flashing. From Point X, align the meter as horizontal as possible and aim for Point 2 and then press MEAS. The laser pointer will switch ON. Press MEAS again to take the second measurement. The second measurement is now complete. The lower summary display line indicates the vertical distance from Point 1 to Point 2. DT500-en-GB_v1.5 7/16...
- Page 10 Indirect Measurements (Using Three Measurements) The DT500 can measure height in two segments by taking three measurements. The operator stands at Point X. The first measurement is Point X to 1, the second measurement is a horizontal line from Point X to 2, and the third measurement is from Point X to 3. Press the MEAS button to switch the meter ON. Wait several seconds and the Laser pointer will switch ON. Press the button two times. The double triangle icon will appear with its bottom diagonal line flashing. From Point X aim the instrument at Point 1 and press MEAS. One reading is now complete and the middle line of the double triangle will begin flashing. Press MEAS again to turn on the laser pointer to prepare for the next measurement. From Point X, aim the instrument horizontally at a Point 2 and press MEAS. The second reading is now complete and the top diagonal line of the double triangle will begin flashing. Press MEAS to turn on the laser pointer and prepare for the third measurement. From Point X, aim the instrument at Point 3 and press MEAS. The third measurement is now complete. The distance from Point 1 to Point 3 will now be indicated on the bottom summary display line. DT500-en-GB_v1.5 7/16...
- Page 11 Storing and Recalling Readings (Historical Storage) The DT500 stores up to twenty (20) readings in memory for later recall. Take a reading as previously described. With the reading displayed, press the Store‐Recall Memory button. The reading will be stored in location 1 and the memory location number 01 will be indicated at the top of the LCD. Take another reading and press the Store‐Recall Memory button. This new reading will be stored in location 1 and the previous reading from location 1 will be moved to location 2. When all twenty locations have been filled the meter begins overwriting the existing readings. To recall the stored readings, press the Store‐Recall button. The memory location number indicated at the top of the display will increment and the display will show the stored data for the selected memory location. Note that the + and – buttons can also be used to scroll through the stored reading memory locations. To clear all readings, enter the memory mode using the Store‐Recall Memory button and then press and hold both the CLR and the Memory buttons until the displayed memory location reading value switches to zero. Taking a measurement using a Tripod Press and hold the reference button to switch the tripod reference On or Off. The tripod arrow indicator will appear on the display (see #4 in Display description). Your measurements will now be referenced to the center of the tripod mounting hole. Positioning Bracket – Edge and corner measurements The unit can be adapted for multiple measuring situations. Place the Reference to measure from the Bottom edge. To measure from an edge, fold out the positioning bracket until it locks into place. Place the positioning bracket flat against the edge surface. DT500-en-GB_v1.5 7/16...
-
Page 12: Bluetooth Communications
To measure from a corner, open the positioning bracket until it locks into place. Push the bracket to the left to fold it out fully. Place the bottom edge of the extended positioning bracket into the corner. Timer Delay (Self‐Triggering) Press the Timer button quickly to set a 5 second time delay. To set a different time delay value, press the Timer button momentarily and then quickly press and hold it. The display will rapidly scroll through the timer selections (maximum of 60 seconds). The + and ‐ buttons can also be used to change the time delay value. Press MEAS button and a countdown will be begin (e.g. 59, 58, 57...). The last 2 seconds will flash and beep quicker. After the last beep the measurement is taken and the value is displayed. Bluetooth Communications Press and hold Bluetooth/Timer button until the Bluetooth symbol is displayed. Use the App (ExView DT500) installed from the Apple APP STORE on an iOS device to read the measurements. While the initial connection between the iOS device or PC, and the DT500 is being established, a prompt for a pin code is displayed. Enter pin code ‘0000’ into the iOS device or PC to view the measurements. The Bluetooth switches OFF as soon as the unit is powered OFF. To turn off manually, press and hold the Bluetooth/Timer button until the Bluetooth symbol disappears. The operation of this ExView DT500 software is covered in a booklet provided with the meter. The title of the manual is Meterbox iLDM User Manual. DT500-en-GB_v1.5 7/16... -
Page 13: Tilt Measurement
Tilt Measurement The inclination sensor measures tilts up to ±65°. Press the Tilt/Stakeout button once. The triangular tilt symbol will appear on the display. The tilt angle value will show on line 1 of the display in degrees ( ). Press the MEAS button to take the measurement and view the calculation for the inclination and the distance. Note that during the tilt measurement the meter face must be pointing straight up or be held within a horizontal tilt limit of ±10 . The distance ‘L’ is displayed in the summary display line 4. The distance of lines a and b are calculated by α and L and are displayed in lines 2 and 3 respectively. DT500-en-GB_v1.5 7/16... -
Page 14: Stake-Out Function
Stake‐out Function The stake‐out function allows you to setup two separate distances (see a and b in diagram) that can be used independently to mark defined measured lengths (for example in wood frame construction). Press the MEAS button to switch the meter ON. Set the measurement reference to front or rear Press and hold the Tilt/Stakeout button until the meter beeps and the stakeout symbol appears in the display as shown in the display description section of this guide. The value for “a” will flash. Use the + and – buttons, set the value of your "a" stakeout distance. Once the desired value has been obtained press the Memory Store‐Recall button to save the value. The “b” value will now flash. Use the + and – buttons, set the value of your “b” stake out distance. Once the desired value has been obtained press the Memory Store‐Recall button to save the "b" value. Press the Memory Store‐recall button to toggle from “a” or “b” to select what dimension you want to use. Place the meter in position and Press the MEAS button to start the laser measurement. The display will show the current measuring distance in the summary line. When the meter is moved slowly along the stakeout line the displayed distance will decrease or increase. The arrows in the display indicate which direction the meter needs to be moved to match the distance programmed (a or b). Also line 4 will display a + or – sign indicating which way to move the meter to match the programmed distance. The meter will beep more rapidly at a distance of 0.1m from the matching dimension. 10. As soon as the stakeout point is reached the beep changes and the intermediate line begins flashing. You can now mark your location. 11. Exit the function by pressing MEAS and CLR buttons simultaneously. DT500-en-GB_v1.5 7/16... -
Page 15: Maintenance
Never dispose of batteries in a fire. Batteries may explode or leak. Never mix battery types. Always install new batteries of the same type. Never dispose of used batteries or rechargeable batteries in household waste. As consumers, users are legally required to take used batteries to appropriate collection sites, the retail store where the batteries were purchased, or wherever batteries are sold. Disposal: Do not dispose of this instrument in household waste. The user is obligated to take end‐of‐life devices to a designated collection point for the disposal of electrical and electronic equipment. DT500-en-GB_v1.5 7/16... -
Page 16: Other Considerations
Care Do not immerse the instrument in water. Wipe off dirt with a damp, soft cloth. Do not use aggressive cleaning agents, solvents, abrasives, or such solutions. Handle the instrument as you would a telescope or camera. Display Error Codes For any error codes, cycle power to the instrument to see if the error clears. If the error persists after several power cycles, following the directives below. Note that a ‘wrench’ icon appears with error code displays. 204 – Calculation Error (retry the procedure) 208 – Received signal too weak. Measurement time is too long. Distance >50m (Use target plate) 209 – Received signal too strong (Target too reflective, use a target plate) 252 – High Temperature (Cool down the instrument) 253 – Low Temperature (Warm up the instrument) 255 – Hardware error (Return the instrument for service) DT500-en-GB_v1.5 7/16... -
Page 17: General Specifications
Auto Instrument Switch‐off After 3 minutes Dust/Splash Proof IP 54 Operating conditions 0 to 40°C (32 to 104°F) Storage conditions ‐10 to 60°C (14 to 140°F) Dimensions 135 x 53 x 30mm (5.3 x 2.1 x 1.2”) Weight 160g (5.6 oz.) Recommended use indoor use only Range Specifications Distance Range 0.05 to 70m (2” to 230’); Use a target plate >50m (164’) Resolution 0.001 inches, feet, or meters Accuracy (up to 10m) ±1.5mm (± 0.06”) Range of Bluetooth 10m (32.8’) Displayed Calculation Ranges Length 99.99m (99’ 11”) Area 999.99m (999.99 sq. ft) Volume 999.99m (999.99 cu. ft) Copyright © 2014‐2016 FLIR Systems, Inc. All rights reserved including the right of reproduction in whole or in part in any form ISO‐9001 Certified www.extech.com DT500-en-GB_v1.5 7/16...
Need help?
Do you have a question about the DT500 and is the answer not in the manual?
Questions and answers