Table of Contents

Related Manuals for Extech Instruments ExStik DO600


Summary of Contents for Extech Instruments ExStik DO600
- Page 1 UserManual ® ExStik DO600 DissolvedOxygenMeter RECALL Dissolved Oxygen DO600 ...
-
Page 2: Meter Description
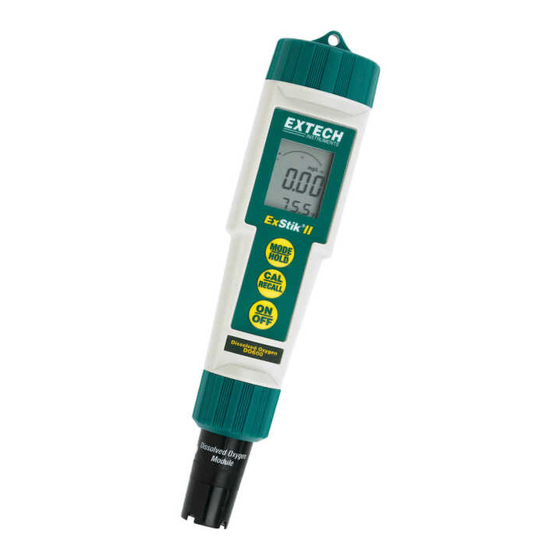
Introduction ® CongratulationsonyourpurchaseoftheExStik DO600dissolvedoxygen/temperaturemeter whichsimultaneouslydisplaysdissolvedoxygenandtemperature.Unitsofmeasureare% saturation,mg/lorppmfordissolvedoxygen,and°Cor°Ffortemperature.Advancedfeatures includeDataHold,25‐pointmemory,autopoweroff,automatictemperaturecompensation, salinityandaltitudecompensation.Thismeterisshippedfullytestedandcalibratedand,with properuse,willprovideyearsofreliableservice.Pleasevisitourwebsite(www.extech.com)to checkforthelatestversionofthisUserGuide,ProductUpdates,andCustomerSupport. MeterDescription FrontPanelDescription 1. Batterycompartmentcover 2. LCDDisplay 3. MODE/HOLDbutton 4. CAL/RECALLbutton 5. ON/OFFbutton RECALL 6. ElectrodeRetainingCollar 7. DissolvedOxygenSensor Dissolved Oxygen DO600 8. BondedMembraneCapassembly 9. Membrane&Cathode (Note:TheElectrodestoragecapisnotshown) Electrode Bottom View ... -
Page 3: Operation
Operation PreparetheElectrode Theelectrodeisshipped“dry”andrequiresfillingwiththesuppliedelectrolytesolutionbefore use.Themembraneshouldbeinplaceanddoesnotneedreplacement.Followtheprocedureat theendofthisguideforfillingthebondedcap. NOTE:Makesurethattherearenoairbubblesintheelectrodebeforeuse. PoweringtheExStik® ® TheExStik usesfour(4)CR2032LithiumIonBatteries.PresstheON/OFFbuttontoturnthe meteronoroff.Ifthebatteriesareweak,the‘BAT’indicatorappearsontheLCD.Theauto ® powerofffeatureshutstheExStik offautomaticallyafterapproximately10minutesof inactivity.Theautopowerofffeaturemaybetemporarilydisabledforconvenienceorfor extendedpolarizationtime. StartupPolarizationPeriod ® WhentheExStik ispoweredupforthefirsttime,theelectroderequirespolarization.Inorder forthistooccurathreeminute(approx.)polarizationperiodmustelapsebeforemeasurements canbemade. Whenthemeterisleftpoweredon,aspecialcircuitisincludedinthismeterwhichmaintainsa verysmallbiasingcurrenttotheelectrodeforaperiodofsevendays.Thiskeepstheelectrode polarizedandenablestheusertomakeimmediatemeasurementswithoutwaitingforthe electrodetore‐polarize. EachtimetheExStik®isturnedon,thepolarizationtimerisresetandthe7‐daypolarization periodisinitiated.Asmallasteriskatthebottomrightcornerofthedisplayisusedtoindicate thatthepolarizationtimercircuitisactiveevenwhenthemeterisoff. Turn‐OnDiagnostics WhenthemeteristurnedONtheLCDdisplays“SELF”and“CAL”whilethemeterrunsa diagnosticroutine. DuringthistimethemeterisrecallingtheUserCalibrationdata,performingselfdiagnostics &initializingthecircuitry. Afterthisfunctioniscomplete,themeterproceedstothenormalmeasurementmode. TheDO600shouldbecalibrateddailyformeasurementaccuracy. DO600-en-GB_V7.4 12/16... - Page 4 Calibration Calibrationshouldbeperformedonadailybasis. TurnthemeterON PressandholdtheMODE/HOLDbuttonuntil%isdisplayedontheLCD. Ifthemeterhasnotbeenusedforseven(7)daysorlonger,allowtheelectrodetofully polarize.Thismaytake2‐3minutes. Placetheelectrodecapontotheelectrode.Thespongecontainedinthecapshouldbeonly moistened(notsoaked)with(distilledwater)orcleantapwater.Besurethattheelectrode membraneiscleananddryorthecalibrationwillbeincorrect.Thereneedstobeanairgap betweenthemembraneandthesponge.Nevertouchthemembrane,asskinoilwillaffect theelectroderesponse. WaituntilthereadingstabilizesthenpressandholdtheCAL/RECALLbuttonuntilCALis showninthelowerdisplay.Thereadingswillblink“101.7”and“SA”willappear. Whenthecalibrationiscomplete“End”willappearandthenthemeterwillreturntothe normalmeasurementmode.Turnoffthemeter. Note:The“SA”willnotappearifthecalibrationfails. Optional’zerooxygen’calibration(improvesmeasurementaccuracyforveryloworveryhighDO measurements): Placetheelectrodeinazerooxygencalibrationsolution,suchas5%sodiumsulfite,waitfor stabilityandpresstheCAL/RECALLbuttonuntilCALisshownintheinthelowerdisplay.Stabilityin azerosolutionmaytakemanyminutes,dependingonelectrodehistory. Note:SodiumSulfitecanbecomedepositedontheelectrodeandonthe“coined”surfaceofthe electroderetainingcollar.ThepresenceoftheSodiumSulfitewillnegativelyaffectfutureDO measurementsuntilsuchatimewhereALLofitisremovedfromtheelectrode. OptionalElectronicZerocalibration. IftheDO600isnotmakingstablemeasurementsoryouarereplacingtheelectrodewithanew assembly,performthisZerocalibration. Turnoffthemeter,removetheelectrodebyunscrewingtheretainingringandpulloffthe electrode. TurnonthemeterandwaitfortheSelfcalibrationtocomplete. SettheModeto%. PressandHoldtheCALbuttonuntilCALappearsonthedisplay.Whenthecalcyclecompletes,the displayshouldread0.0%. Turnoffthemeter. Re‐attachtheelectrode.PerformtheelectrodecapcalibrationfromStep5. DO600-en-GB_V7.4 12/16...
-
Page 5: Measurement Units
Measurements Covertheelectrodewiththeelectrodecap.Thespongecontainedinthecapshouldbe moistened(notsoaked)with(distilledwater)orcleantapwater. PressingtheON/OFFbuttonturnsthemeterONorOFF.WhenturnedON,themeter’s displayswitchesonandtheSelfCalibrationutilityruns(seeabove). Ifthisisthefirsttimethemeterispoweredup,waitapprox.3minutesfortheprobeto polarize(pleasedisableauto‐poweroff;Instructionsfordisablingauto‐poweroffare providedinalatersection).Formoredetails,pleasereadtheS tartup Polarization Period paragraphearlierinthismanualbeforecontinuing. SelectthedesiredunitsofmeasurebypressingandholdingtheMODE/HOLDbuttonuntil theproperunitsareshowninthedisplay.Removetheelectrodecoverandplacethe electrodeinthesampletobemeasured.Stirtheelectrodeinthesampletoremoveany trappedairbubblesfromthemembranesurface.Donotsubmersetheelectrodetothe pointthatthesampleliquidreachesthemeter’selectrodecollar. Allowthemetertimetosettletothefinalmeasurementvalue. Note:Thelargerthedifferenceintemperaturebetweentheelectrodeandthesolutionthe longeritwilltakeforthereadingtostabilize.Stabilizationtimecanvaryfromthirty(30) secondstofive(5)minutes. MeasurementUnits Themetercanbesettomeasureeither%saturation,mg/l,orpartspermillion(ppm). Tochangethemode: PressandholdtheMODE/HOLDbuttonfor2secondsandthedisplaywillbegintoscroll throughthedifferentunitsofmeasure: %saturation;D.O.inmg/l;D.O.inppm(partspermillion) Whenthedesiredunitsaredisplayed,releasetheMODE/HOLDbuttonandtheunitwill returntonormaloperatingmode. Note:The“HOLD”functioncannotbeonwhenchangingthemeasurementfunction.If“HOLD” isdisplayedinthelowerleftcornerofthedisplay,brieflypresstheMODE/HOLDbuttontoturn itoff. TemperatureUnits(ºF/ºC) WiththeunitOFF,pressandholdtheCAL/RECALLbutton. WiththeCAL/RECALLbuttondepressed,momentarilypresstheON/OFFbuttontoturnthe unitON. TheCAL/RECALLbuttoncanbereleasedwhen‘SelfCal’isshowninthedisplay. SalinityCompensation WiththeunitON,momentarilypresstheCAL/RECALLbuttontwiceinquicksuccession (‘SAL’isshowninthelowertemperaturedisplay). MomentarypresstheMODE/HOLDbutton.EachpressoftheMODE/HOLDbuttonincreases... -
Page 6: AltitudeCompensation
AltitudeCompensation WiththeunitON,momentarilypresstheCAL/RECALLbuttontwiceinquicksuccession (‘SAL’isshowninthelowertemperaturedisplay. PressandholdCAL/RECALLagainfor2secondstoentertheAltitudeMode(‘Ald’willbe showninthelowertemperaturedisplay). Thefactorydefaultvalueissealevel.EachpressoftheMODE/HOLDbuttonincreasesthe compensationby1000ft.Themaximumvalueis20presses(20,000ftabovesealevel). MomentarilypresstheCAL/RECALLbuttontosavethecompensationsettingandreturnto thenormalmeasurementmode. Auto‐PowerOFFFeature Theautopowerofffeatureautomaticallyshutsthemeteroff10minutesafterthemostrecent buttonpress.Todisablethisfeature,refertotheDisableAuto‐PowerOFFsection. DisableAuto‐PowerOFFFeature WiththeunitON,momentarilypresstheCAL/RECALLbutton,thenquicklypressandholdboth theMODE/HOLDandON/OFFbuttonsuntil‘off’isdisplayed.TorestoretheAutoPowerOff Feature(autopowerOFFenable)simplyturnthemeteroffandonagainusingtheON/OFF button. LowBatteryIndication Whenthebatteryvoltagefallsbelowtheoperatingthreshold,‘BAT’willappearonthedisplay. RefertotheMaintenancesectionforbatteryreplacementinformation. StoringReadings PresstheMODE/HOLDbuttontostoreareading.Thestoragelocationnumberwillbe displayedonthelowerdisplay,whilethemaindisplayshowsthestoredreading.Themeter willentertheHOLDmodeandthe“HOLD”indicatorwillappearontheLCD. PresstheMODE/HOLDbuttonagaintoexittheHOLDmodeandreturntonormal operation.ThenexttimeMODE/HOLDismomentarilypressedanotherreadingisstored andsoon. Ifmorethan25readingsarestored,previouslystoredreadings(startingwithreading number1)areoverwritten. RecallingStoredReadings MomentarilypresstheCAL/RECALLbuttonandthenwithin4secondsmomentarilypress theMODE/HOLD.Thelaststoreddatapointlocationwillbedisplayed(1to25).Eachtime theMODE/HOLDbuttonismomentarilypressedthenextmostrecentlystoreddatapoint willbedisplayed. Afterthelastdatapointstoredisdisplayed,pressingtheMODE/HOLDbuttonagainreturns thedisplaytothebeginningofthelist. PressingtheCAL/RECALLbuttonatanytimestopsthedataretrievalprocessandreturnsthe metertothenormalmeasurementmode. DO600-en-GB_V7.4 12/16... -
Page 7: MembraneMaintenance
ClearingStoredReadings WiththeunitONpressandholdtheON/OFFbuttonfor4seconds When“clr”isshowninthemaindisplaythememoryiscleared. MeasurementandDisplayConsiderations TheDO600usesapolarographicsensor,whichconsumesoxygenatthesensingsurface. Thisrequiresaconstantmovementofthesampleacrossthemembranetomaintaina constantdissolvedoxygenlevel.Itisrecommendedthattheprobebemovedinthesample asthemeasurementismade,orifinalaboratoryenvironment,thesamplebestirredusing astirplate. IfyouaremeasuringDOinasmallcontainer,theprobewillconsumeoxygenasitis measuringandthemeasurementvaluewillcontinuetogolower. Iftheunitappearstobelocked(displayfrozen).ItispossiblethattheDataHoldmodehas beeninadvertentlyaccessedbyapressoftheMODE/HOLDbutton(HOLDwillbedisplayed inthebottomleftoftheLCD).SimplypresstheMODE/HOLDbuttonagainorturnthe meteroffandbackonagain. Ifthemeterdoeslatchupandnobuttonpressesreviveit,removethebatteriesandrestart. Formaximumaccuracy,allowsufficienttimeforthetemperatureoftheprobetoreachthe temperatureofthesamplebeforetakingareading.Thiswillbeindicatedbyastable temperaturereadingonthedisplay. MembraneMaintenance Firstuse Whenyoufirstgotouseanewmeter,youwillneedtoremovethemembranecapand replaceitwithanewcapfilledwithrefillsolution. PleaseNote:Theinstallationofabondedcapcausesthemembranetobetightlystreched overthecathode.Onceabondedcapisremovedreinstallationisnotpossibleasthe membranewillnolongerbeproperlystrechedoverthecathode. Storage Thespongecontainedintheprotectiveelectrodecapshouldbeonlymoistened(notsoaked) with(distilledwater)orcleantapwater. DO600-en-GB_V7.4 12/16... -
Page 8: Maintenance
Maintenance BatteryReplacement Twistoffthebatterycompartmentcover. Holdingthebatteryhousinginplacewithafinger,pulloutthebatterycarrierusingthetwo smalltabs. Replacethefour(4)CR2032batteriesobservingproperpolarity. Replacethebatterycarrier,reattachthebatterycompartmentcapandtightensecurely. Neverdisposeofusedbatteriesorrechargeablebatteriesinhouseholdwaste. Asconsumers,usersarelegallyrequiredtotakeusedbatteriestoappropriate collectionsites,theretailstorewherethebatterieswerepurchased,orwherever batteriesaresold. Disposal:Donotdisposeofthisinstrumentinhouseholdwaste.Theuseris obligatedtotakeend‐of‐lifedevicestoadesignatedcollectionpointforthedisposal ofelectricalandelectronicequipment. OtherBatterySafetyReminders o Neverdisposeofbatteriesinafire.Batteriesmayexplodeorleak. o Nevermixbatterytypes.Alwaysinstallnewbatteriesofthesametype. ElectrodeReplacement Toremovetheelectrode,firstturntheinstrumentOFFandthenunscrewandremovethe electroderetainingcollar.(turnthecollarcounter‐clockwisetoremove). Gentlyrocktheelectrodefromsidetoside,pullingitawayfromthemeteruntilit disconnects. Toattachanelectrode,alignthepositioning“keys”ontheelectrodeandthemainbody housingandthencarefullypushtheelectrodeintothemetersocketuntilitisfullyseated. Tightentheelectroderetainingcollarfirmlyenoughtosealtheelectrodewiththemeter. DO600-en-GB_V7.4 12/16... - Page 9 DOBondedMembraneCapreplacement ImportantNote:Donottouchthemembraneasskinoilswillinterferewiththeoxygen permeabilityrateofthemembrane.Usecautionwhenreplacingthebondedcap. Itisrecommendedthattheelectroderemainattachedtothemeterduringthis replacementprocess. Toremovethebondedcapfromtheelectrode,unscrewthecapfirmlyandcarefully counter‐clockwisefromtheelectrode(seediagrambelow). Discardtheusedcap.PleaseNote:Theinstallationofabondedcapcausesthemembrane tobetightlystrechedoverthecathode.Onceabondedcapisremovedreinstallationisnot possibleasthemembranewillnolongerbeproperlystrechedoverthecathode. RinsetheoldelectrolytesolutionfromtheCathodeandAnodebeforecontinuing. UsethesuppliedPolishingPaper(SeeAccessoriestable)toclean,polish,shine,and/or removescratchesfromthecathode.Besuretomoistentheclothbeforepolishingthe cathode.Donotover‐polishthesensitivegoldcathode. Setthenewreplacementbondedcaponaflatsurface.Leavethecapinthisposition throughoutthereplacementprocess. Fillthebondedcapwiththeelectrolytesolutionuptothebottomofthethreadsonthe insideofthecap. Tapthesideofthebondedcaptohelpjarfreeanytrappedairbubblesfromtheelectrolyte solution. Keepingthecapinafixedpositiononaflatsurface,carefullyinserttheelectrodeintothe newbondedcapbyfirstdippingandremovingtheelectrodeseveraltimesfromthecap. Witheachdip,pushtheelectrodeprogressivelydeeperintothebondedcap.Finally,screw theelectrodeslowlyontothebondedcap(clockwise)untilfullytightened.Thedippingand removaltechniqueminimizestheintroductionofairbubblesintotheelectrolytesolution. Airbubblesintheelectrolytecancompromisemeasurements. 10. Duringthetighteningofthebondedcap,excesselectrolytesolutionwillleakout,thisis normalanddesireablesinceitminimizestheintroductionofairpockets.Cleanoffthe excesselectrolytebeforeuse. Electrode Anode BONDED CAP ...
-
Page 10: Specifications
Specifications Display 2000count,Dualfunction3½digitLCDwithBargraph, Displaysize:24mmx20mm Sensor Polarographictype Membrane Bondedmembranecapwiththreadedfitting OperatingTemp.Range 0to50°C(32to122°F) ATCRange 0to50°C(32to122°F) SalinityCompensation 0to50pptin1ppt(partperthousand)increments Altitudecompensation 6000m(0to20,000ft)in300m(1000ft)increments MeasurementStorage 25tagged(numbered)datasetswithrecall BatteryPower Four(4)CR2032buttonbatteries LowBatteryIndication ‘BAT’appearsontheLCD AutoPowerOff After10minutesofinactivity(APOoverrideavailable) Dimensions/Weight 36x173x41mm(1.4x6.8x1.6”);110g(3.8oz) Measurement Range Resolution Accuracy %Saturation 0to200.0% 0.1% ±2.0%FS(fullscale) 0to20.00mg/l 0.01mg/l ±2%FS DissolvedOxygen Concentration... -
Page 11: Troubleshooting Guide
Appendices TroubleshootingGuide Symptom PossibleCauses Action Unitwillnotpoweron ‐Batteriesnotinplace ‐ReplaceBatteries ‐Deadbatteries ‐ReplaceBatteries ‐Batterypolarityincorrect ‐Reorient/Replace Batteries “BAT”indicatorshownon ‐Batteriesareweak ‐ReplaceBatteries display UnstableReadings ‐Insufficientelectrolytein ‐Replaceelectrolyte,and probe(Airbubblespresent membranecapassembly. whenprobeisinverted.) ‐Electrolyteisdepleted Readingsdriftdown ‐Insufficientstirring(the ‐Moveprobeinsampleor probeconsumesoxygenat stirsample themeasuringsurface, requiringconstantsample movementacross membrane) SlowResponse ‐Dirtyordamaged ‐Replaceelectrolyteand membrane membranecap Electrodecannotbe ‐Depletedelectrolyte... - Page 12 OperationalMatrixfortheModelDO600 Function/ Power Mode RequiredButtonPressSequence Comments Resulting Status Setting Action On/Off Any Any MomentarypressoftheON/OFFbutton WaterSaturated On Any PlaceElectrodeinCalibrationCap AirCalibration Press&holdCAL/RECALLbuttonfor2seconds ZeroCalibration PlaceElectrodeinZeroSolution,waitforstabilityPress Alsoworkswithprobe On Any &holdCAL/RECALLbuttonfor2seconds removed(Calatzerocurrent) StoreReading Storesandholdsreading On Any MomentarypressoftheMODE/HOLDbutton “HOLD”displayed HoldRelease WhileIn On Hold MomentarypressoftheMODE/HOLDbutton ...
- Page 13 Re‐orderandAccessoriesInformation PartNumber Description DO600 ExStikIIDissolvedOxygenMeter DO600‐K ExStikIIDissolvedOxygenMeterKit–containsDO600,DO603,EX050 cable,andweight,andCA895case DO605 ReplacementProbe,ExStikIIDissolvedOxygenMeter DO603 MembraneKitforDO600 Contains:6MembraneCaps,15mLKCLFillingSolution,Polishing Paper EX010 ExtensionCable3feet(1Meter)&ProbeWeight EX050 ExtensionCable16feet(5Meter)&ProbeWeight DO610 ExStikIIDO/pH/ConductivityMeterKit Contains:EC500pH/Conductivity/Salinity/TDSExStikIIMeter,DO600 DissolvedOxygenExStikIIMeter,SingleusepHbufferpouches4,7, and10pH,SampleCupswithCap,WeightedBaseforSampleCups,and Batteries,allpackedinaCarryingCase CA895 SmallSoftVinylPouchwithBeltLoopforExStikandExStikII Copyright©2014‐2016FLIRSystems,Inc. Allrightsreservedincludingtherightofreproductioninwholeorinpartinanyform ISO-9001 Certified www.extech.com DO600-en-GB_V7.4 12/16...
Need help?
Do you have a question about the ExStik DO600 and is the answer not in the manual?
Questions and answers