
Related Manuals for Extech Instruments DO210


Summary of Contents for Extech Instruments DO210
- Page 1 User Guide Dissolved Oxygen Meter Model DO210 ...
-
Page 2: Meter Description
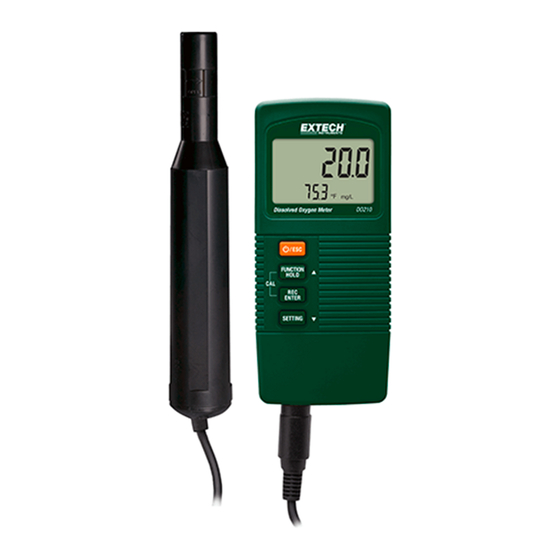
Introduction Thank you for choosing the Extech Dissolved Oxygen / Temperature Meter which simultaneously displays Dissolved Oxygen and Temperature or Oxygen in air and Temperature. Units of measure are mg/l for Dissolved Oxygen, % for Oxygen in air, and F for temperature. Oxygen is measured with a remote sensor that also contains a thermistor for measuring air temperature. Advanced features include altitude and % salt compensation, data hold, auto shut off, and Min/Max recording. Meter Description Main display digits for measurements and programming values Temperature reading Power/Escape button Function/Hold/Up arrow button Record/Enter button Setting/Down arrow button Battery Compartment (on back) Probe connecting cable Probe DO210-en-GB_v1.2 11/14 GlobalTestSupply www. .com nd Quality Products Online at: sales@GlobalTestSupply.co... -
Page 3: Getting Started
Getting Started Note: The dissolved oxygen probe assembly may be shipped from the factory dry. If the probe does not contain electrolyte solution, refer to the Electrolyte Replacement section below for information on adding the electrolyte solution prior to initial use. Filling the Electrolyte Container Prior to Initial Use Unscrew and remove the electrolyte container from the tip of the probe. Fill the electrolyte container with new electrolyte. Screw the electrolyte container back onto the electrode holder and probe handle. Excess Electrolyte may be forced out through the threads. Wipe clean. Lightly tap the probe to remove air bubbles. Calibration For first time use or after long periods of non‐use, calibrate the instrument using the procedure below. The procedure should be performed in an open, well‐ventilated area. Connect the oxygen probe plug to the probe input socket. Switch ON the meter by pressing the Power/ESC button. The lower display should indicate the %O2 unit symbol and a temperature value. The upper display will begin fluctuating. Wait approximately 3 minutes for the upper display to stabilize. Press the HOLD button and the display will show the HOLD icon. Press the REC button. The display will show "CAL" flashing and the meter display will begin counting down from 30 to zero; the meter will then display the END icon. The upper display will show a value approximately 20.9 or 20.8 (typical concentration of oxygen in air). DO210-en-GB_v1.2 11/14 GlobalTestSupply www. .com nd Quality Products Online at: sales@GlobalTestSupply.co... -
Page 4: Temperature Measurements
Oxygen in Air (%O2) Measurements Measurement Preparation Before taking measurements, perform the calibration described earlier if necessary. Taking Measurements Press and hold the Function button for at least 2 seconds to change from mg/L to %O2 if necessary. For oxygen in air measurements be sure to select %O2. Hold the probe in the area under test and wait until the display stabilizes. Temperature Measurements The lower display will indicate the temperature of a measured solution or the temperature of the air (depending on what type of measurement the user is performing). To change the temperature unit of measure F follow the procedure below or refer to the Settings mode section: Press and hold the Setting button for 5 seconds (until a beep is heard) to access the Setting mode Press the Setting button momentarily two more times Use the UP arrow button to select C or F temperature units Press ENTER to save the setting and press ESC to return to the normal mode of operation Data Hold Press the Hold key to freeze the displayed value. The LCD will display HOLD along with the held reading. Press the Hold key again to release the data hold function. DO210-en-GB_v1.2 11/14 GlobalTestSupply www. .com nd Quality Products Online at: sales@GlobalTestSupply.co... -
Page 5: Settings Mode
Press the REC button again and the display will show REC MIN and the minimum value will be displayed. To release the held MAX or MIN reading, press the HOLD button while either the REC MAX or REC MIN icons are visible; now only the REC icon will be visible. The meter is now continuing to monitor the highest (MAX) and lowest (MIN) readings but is displaying real time measurements. To view the MAX and MIN values again use the REC button as described earlier. To exit the Record mode, press and hold the REC button for at least 2 seconds. The display will return to the normal operating mode. Settings Mode Before accessing the Settings mode ensure that the meter is not in the HOLD or MIN/MAX Recording modes. To use the Settings mode: Press and hold the SETTING button for at least 5 seconds (until a beep is heard) Use the SETTING button to scroll through the Settings options The options are: HIGH Altitude compensation adjustment SALt % Salt adjustment °C/°F Temperature unit selection OFF Auto power off management Refer to the following sections for detailed instructions on programming the Setting mode parameters DO210-en-GB_v1.2 11/14 GlobalTestSupply www. .com nd Quality Products Online at: sales@GlobalTestSupply.co... - Page 6 % Salt Adjustment Continuing from the previous section in the Settings mode: When the LCD shows SALt at the lower left, press the ENTER button The SALt symbol will flash and the display will show the salt compensation value on the upper, large LCD digits ▲ ▼ Use the and buttons to adjust the display to the desired % SALt value Press ENTER to save the data and to step to the next parameter (or press ESC to return to the normal mode of operation) The % salt value can be adjusted from 0 to 39% salt (%weight). When the meter is powered OFF the salt value will revert to 0% salt. Temperature Units Selection Continuing from the previous section in the Settings mode: When C or F is displayed, press the ▲ button to select the desired units. Press ENTER to save the selection and to step to the next parameter (or press ESC to return to the normal mode of operation). Auto Power OFF Enable/Disable Continuing from the previous section in the Settings mode: When OFF YES or OFF NO is displayed, use the ▲ button to select YES or NO. YES: Auto power OFF enabled (meter will automatically switch off after 10 minutes of inactivity; NO: Auto power OFF disabled. Press ENTER to save the selection and to return to the normal operating mode. DO210-en-GB_v1.2 11/14 GlobalTestSupply www. .com nd Quality Products Online at: sales@GlobalTestSupply.co...
-
Page 7: Battery Replacement
Battery Replacement The 9V battery that powers the instrument requires replacing when the battery icon flashes on the display. To replace the battery follow the steps below: Disconnect the probe from the instrument. Open the rear battery compartment using a screwdriver to remove the two Phillips head screws that secure the compartment. Carefully remove the old battery from the compartment lid chamber and gently unsnap the battery’s terminals from the wired (red/black) connectors. Install a new 9V battery by snapping the battery terminals onto the wired connectors (observing correct polarity) and inserting the battery into the compartment lid chamber. Install the compartment lid chamber into the meter housing and secure with the two screws. Never dispose of used batteries or rechargeable batteries in household waste. As consumers, users are legally required to take used batteries to appropriate collection sites, the retail store where the batteries were purchased, or wherever batteries are sold. Disposal: Do not dispose of this instrument in household waste. The user is obligated to take end‐of‐life devices to a designated collection point for the disposal of electrical and electronic equipment. DO210-en-GB_v1.2 11/14 GlobalTestSupply www. .com nd Quality Products Online at: sales@GlobalTestSupply.co... -
Page 8: Replacement Procedure
Probe Head Replacement The probe head (on the tip of the probe) holds a thin Teflon® membrane and an electrolyte container. Calibration errors or reading errors could indicate loss of electrolyte or a dirty/damaged membrane. The membrane is very delicate and can easily be damaged if it comes in contact with solid objects. Replacement probe heads are available from an Extech distributor. Replacement procedure 1. Unscrew the probe head and empty the old electrolyte from the container. 2. Fill the new probe head/electrolyte container with electrolyte. 3. Screw the probe head onto the probe handle. Excess electrolyte may be forced out through the threads. Wipe clean. 4. Lightly tap the probe to remove any air bubbles. Probe handle Temperature sensor Probe Head DO210-en-GB_v1.2 11/14 GlobalTestSupply www. .com nd Quality Products Online at: sales@GlobalTestSupply.co... -
Page 9: General Specifications
+ 0.7% O Temperature 32 to 122 F F/C ±1.5 F (probe only) 0 to 50 C + 0.8 C Compensation Temperature (automatic) 0 to 50 C (32 to 122 F) adjustments Salt 0 to 39% Altitude 0 to 3900 meters Copyright © 2014 FLIR Systems, Inc. All rights reserved including the right of reproduction in whole or in part in any form www.extech.com DO210-en-GB_v1.2 11/14 GlobalTestSupply www. .com nd Quality Products Online at: sales@GlobalTestSupply.co...
Need help?
Do you have a question about the DO210 and is the answer not in the manual?
Questions and answers