Table of Contents
Advertisement
Quick Links
Advertisement
Table of Contents

Related Manuals for Extech Instruments DT40M


Summary of Contents for Extech Instruments DT40M
- Page 1 USER MANUAL Laser Distance Meter MODELS DT40M, DT60M, and DT100M...
-
Page 2: Table Of Contents
Contents Introduction ..................3 Safety Instructions ................. 3 Descriptions ................... 4 Measurement Preparation ..............6 Programming Menu ................8 Distance Measurements ................. 8 Area Measurements ................10 Volume Measurements ................. 12 Indirect Measurements (Pythagorean) ........... 13 Stakeout Function ................16 20-point Datalogger ................ -
Page 3: Introduction
Introduction Thank you for selecting the Extech Laser Distance Meter. This meter measures distance up to 40m (131.2’) for DT40M, 60m (197’) for DT60M, or 100m (328.1’) for DT100M and calculates Area, Volume, and Indirect readings using the Pythagorean Theorem (a ). -
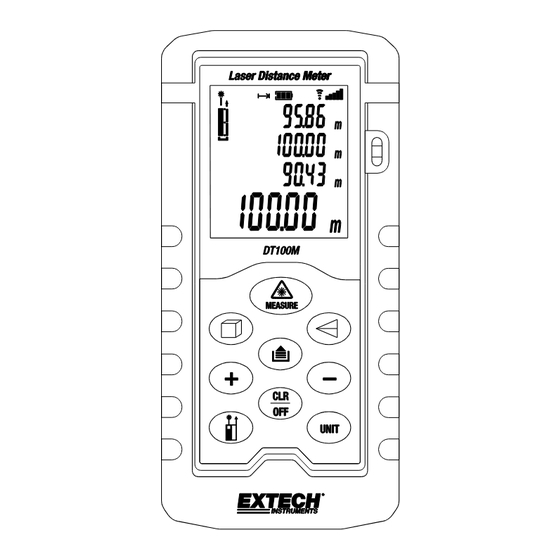
Page 4: Descriptions
Descriptions Meter 1. LCD display area 2. Keypad 3. Level 4. Laser Pointer 5. Sensor Beam Note: Battery compartment on back of meter Display Description 1. Length measurement mode 2. Battery status 3. Datalogger icon and memory location (1~20) 4. Signal strength icons 5. - Page 5 Keypad Description Short press: Power ON Short press: Laser ON (can be set to default ON) Short press: Single distance measurement Long press: Continuous measurement mode Short press: Datalogger mode (press CLR to exit) Long press: Open program menu Short press: Clear display; Long press: Power OFF Short press: Area/Volume mode Long press to 1 beep: Stakeout mode...
-
Page 6: Measurement Preparation
Measurement Preparation Measurement Considerations 1. For best results, choose a target that is flat, hard and smooth 2. Use a section of cardboard or similar material if the target size needs to be increased 3. For distance measurements, this device performs best indoors. - Page 7 permeable surfaces. Aiming at high gloss surfaces may deflect the laser beam and lead to measurement errors. For non- reflective and dark surfaces, the measuring time may increase. Preparing for Measurements 1. Press the MEAS key to switch the meter ON. 2.
-
Page 8: Programming Menu
Programming Menu 1. Long press to open the programming menu 2. Use the MEAS button to step through the options 3. Use the (+) and (-) keys to make changes 4. Use the MEAS button to exit the menu 5. See table below for the program options For distance measurements: Set Laser to default ON/OFF. - Page 9 5. The reading will remain on the display until it is cleared with the CLR key (short press) or until the meter is powered OFF. Continuous Distance Measurements (with MAX-MIN) This mode of operation is useful for determining the shortest and longest distances from a given point.
-
Page 10: Area Measurements
7. To stop measuring, short press MEASURE. Use the CLR key to delete measurement displays. 8. Note that the meter exits to the normal mode of operation after approx. 100 measurements in continuous mode. Adding / Subtracting Distance Measurements To display the sum or difference of two distance measurements: 1. - Page 11 2. Press the key firmly once. 3. A parallelogram will appear with its length side flashing indicating that a Length measurement is to be taken. 4. Press MEASURE to turn Laser ON, if it is not already ON. 5. Aim the meter and press MEASURE to take the room length measurement.
-
Page 12: Volume Measurements
Auxiliary displays will show the two individual Area calculations. Volume Measurements Volume Calculations Compute room Volume: Press the MEASURE key to switch the meter ON. Press the key firmly twice. A cube shape will appear with its Length flashing indicating that a Length measurement is to be taken. Press MEASURE to turn Laser ON, if it is not already ON. -
Page 13: Indirect Measurements (Pythagorean)
Adding/Subtracting Volume Calculations After completing a Volume calculation (see previous section), with the resulsts displayed , short press the (+) key for the ‘summing’ mode or the (-) key for the ‘difference’ mode. Perform another Volume calculation as explained in the previous section. - Page 14 Press MEASURE to turn Laser ON, if it is not already ON. From Point X, align the meter as horizontal as possible and aim for Point 2 and then press MEASURE. The measurements are now complete. The primary display line (bottom) indicates the vertical distance from Point 1 to Point 2.
- Page 15 and the bottom diagonal line of the double triangle will begin flashing. 8. Press MEASURE to turn Laser ON, if it is not already ON. 9. From Point X, aim the instrument at Point 3 and press MEASURE. The third measurement is now complete. 10.
-
Page 16: Stakeout Function
Pythagorean Theorem, the calculated height will be displayed in the primary display (bottom); otherwise an error message will appear. Notes: Ensure that the measurements are made from the same point. Ensure that the right-angle measurement is made perpendicular to the measured surface. Stakeout Function The stakeout function allows you to set up two separate distances (A and B in diagram below) that can be used independently to... -
Page 17: 20-Point Datalogger
5. The “B” value will now flash. Use the + and – keys to adjust a digit and the MEASURE key to move from digit to digit. 6. Once the desired value for “B” has been set, press start measuring and marking. 7. -
Page 18: Maintenance
3. To view stored readings, press to enter the datalogger mode and use +/- keys to scroll. The memory location number appears at the top of the LCD and the readings appear in the usual primary and auxiliary display lines. 4. - Page 19 and maintain the instrument lenses in the same manner as for professional camera lenses with high quality lens wipes. Battery Installation/Replacement When the low battery symbol appears on the display or when the display does not switch ON, replace the batteries. 1.
-
Page 20: Display Error Codes
Display Error Codes For any error, cycle power to see if the error clears. If the error persists after several power cycles, refer to the information below. Display Reason Action required Calculation error Re-test Weak signal reception Use target plate Measurement time-out Hardware failure Return for service... -
Page 21: Technical Specifications
Technical Specifications Distance ranges DT40M: 0.05 ~ 40m (2” ~ 131.2’) DT60M: 0.05 ~ 60m (2” ~ 197’) DT100M: 0.05 ~ 100m (2” ~ 328.1’) Area calculation range 999.99m (999.99 sq. ft.) Volume calculation range 999.99m (999.99 cu. ft.) Volume...
Need help?
Do you have a question about the DT40M and is the answer not in the manual?
Questions and answers