
Related Manuals for Gravely ZT Xl Bagger


Summary of Contents for Gravely ZT Xl Bagger
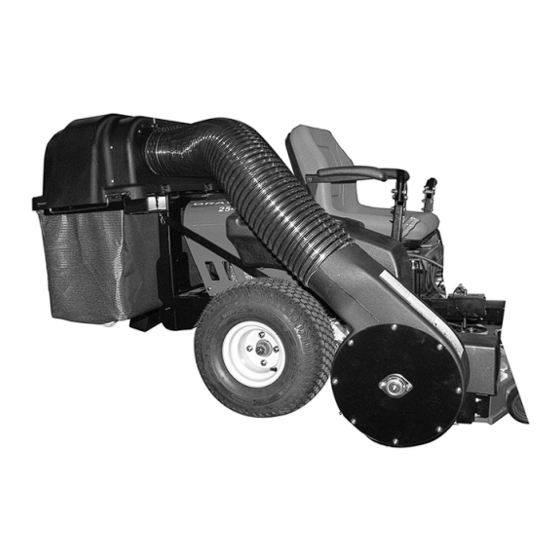
- Page 1 ZT XL and Zoom XL Bagger Owner/Operator & Parts Manual Model 815022 03374600B 1/12 Printed in USA...
-
Page 2: Table Of Contents
THE MANUAL PRODUCT REGISTRATION Before operation of unit, carefully and completely read The Ariens/Gravely dealer must register the product at this Manual and the unit’s Owner/Operator Manual. The the time of purchase. Registering the product will help the contents will provide you with an understanding of safety... -
Page 3: Safety
3. Review control functions and operation of the unit. www.ariens.com on the internet. To locate your nearest Do not operate unit unless all controls function as Gravely Dealer, go to www.gravely.com on the internet. described in this manual. 4. Review recommended lubrication, maintenance and adjustments. -
Page 4: Safety Rules
Figure 2 OEe001 3. WARNING! Keep children and others away from unit while operating. OL4140 Do not operate mower unless guards are in OL4430 5. HOT SURFACES operating position or bagger is attached. DO NOT touch parts which are hot from operation. - Page 5 Always be aware of maximum sweep of bagger when NEVER operate unit after or during the use of turning. Always allow adequate clearance between medication, drugs or alcohol. Safe operation requires bagger, personnel and other objects when turning. your complete and unimpaired attention at all times. As grass catcher fills, be alert to changing unit stability DO NOT wear loose clothing or jewelry and tie back hair and control.
- Page 6 Dust, smoke, fog, etc. can reduce vision and cause an Use a slow speed. Tires may lose traction on slopes accident. Mow only in daylight or good artificial light. even though the brakes are functioning properly. Avoid slippery surfaces. Always be sure of your footing. Do not bypass transmission when on a slope.
- Page 7 Reverse connections may result in sparks which can ALWAYS block wheels and know all jack stands are cause serious injury. Always connect positive (+) lead of strong and secure and will hold weight of unit during charger to positive (+) terminal, and negative (-) lead to maintenance.
-
Page 8: Assembly
ASSEMBLY Item Description Qty Ariens P/N WARNING: AVOID INJURY. Read and Bag Frame 00663200 understand the entire Safety section before Strap, XL Bagger 03373151 proceeding. Clevis Pin 3/8” x 3/4” 06814800 UNPACKING UNIT 1/2” Nylon Locknut 06500010 IMPORTANT: Remove contents from carton carefully. Rear Mounting Plate 03373051 Place cover assembly on a flat piece of cardboard to... - Page 9 48-, 54-Inch Decks 42-Inch Decks OEe009 Figure 3 GB – 9...
- Page 10 Install Counterweights WARNING: ALWAYS install counterweights before operating unit with bagger attached. ALWAYS remove counterweights when bagger is removed from unit. 1. Remove mounting hardware from footrest (figure 4). NOTE: The hex bolt and washers will be reused when installing the bagger. Remove Footrest Remove Mounting Hardware Figure 4...
- Page 11 INSTALL SHEAVE AND SHEAVE ADAPTER Save this hex bolt to run (FIGURE 6 AND 7) the mower without the bagger installed. WARNING: Keep discharge chute, wing knobs and belt covers for re-installation when the bagger kit is removed. Washer 1. Remove the wing knobs and discharge chute from Right Mower unit.
-
Page 12: Install Blower Assembly
INSTALL BLOWER ASSEMBLY Install Bagger Mounting Bracket and Bagger Baffle, and Blower Assembly 1. Install the blower bracket (item 42) to blower and idler assembly (item 1) with four 1/4” x 1" hex bolts (item 15), 9/32” x 5/8” flat steel washers (item 16), and 1/4”... - Page 13 INSTALL V-BELT AND BELT COVER MODIFY BELT COVER – 54-INCH DECKS NOTE: Skip to Install Belt Cover if installing a bagger kit Install V-Belt (Figure 9) on a 42- or 48-inch deck. NOTE: Three V-belts (item 20) are supplied with the 1.
- Page 14 Install Belt Cover – 48- and 54-Inch Decks 42-Inch Mower Decks 1. Install the 5/16” x 2-3/4” standoff (item 19) on mower deck with a 5/16” nylon locknut (item 39). 2. Install 48-, 54-inch belt cover (item 5) on blower and idler assembly (item 1) with two 3/8"...
- Page 15 Figure 13 4. Install the cover assembly on the rear bagger mount by placing the shaft on the cover assembly in Figure 14 the slots on the mounting bracket. Rotate the assembly up against the bracket and secure with INSTALL BAG ON FRAME (FIGURE 15) 3/8"...
- Page 16 Thread bag frame (item 26) through sleeve in mesh bag (item 24). MAKE SURE the heat resistant side (smooth side) faces the unit. Figure 16 INSTALL HOSE Trim Hose (Figure 17) Install 3/8 x 1/2 x 3 plastic tube NOTE: Different size decks require different hose (item 25) on each end of frame and lengths.
-
Page 17: Removal
Thumb Latch Figure 18 REMOVAL 7. Remove sheave adapter and 4" sheave (see WARNING: AVOID INJURY. Read and figure 7 on page 11). understand the entire Safety section before 8. Install washer and the original hex bolt on right proceeding. mower deck spindle (see figure 6 on page 11). -
Page 18: Operation
Airflow Airflow 1. Check bagger parts for wear, deterioration, or Restricted Unrestricted damage. Replace ONLY with Ariens/Gravely original service parts before operating. 2. Make sure counterweights are installed. 3. Ensure all hardware is tight. Airflow 4. Remove any grass buildup from bagger parts. - Page 19 EMPTYING MESH BAGS If bagger stops picking up grass clippings, the mesh bags may be full. WARNING: NEVER open cover assembly while the engine is running and the PTO is engaged. ALWAYS shut off engine prior to emptying mesh bags. To empty mesh bags: 1.
-
Page 20: Maintenance
Store in a clean, dry area. Ensure all fasteners are properly tightened. Inspect Ariens/Gravely Dealers will provide any service or moving parts for damage and wear. adjustments which may be required to keep your unit Touch up all rusted or chipped painted surfaces. -
Page 21: Specifications
SPECIFICATIONS Model Number 815022 Description ZT XL and Zoom XL Bagger Serial Number 000101 and up Added Length to 6-3/8in. Unit – Front (16.2 cm) Added Length to 22-1/4 in. Unit – Rear (56.5 cm) Added Width to 12 in. (30.5 cm) Unit GB –... -
Page 22: Parts List
PARTS LIST SAFETY DECALS Item Part No. Qty. Description 05359700 Bagger Cover Decal 07731400 Mower Pan Danger Decal 07742300 Warning Decal 08088200 Grass Pump Caution Decal 07754100 Decal, Hot Surface GB – 22... - Page 23 NOTES GB – 23...
- Page 24 BLOWER ASSEMBLY TO MOWER DECK (48-, 54-INCH MOWER DECKS) GB – 24...
- Page 25 BLOWER ASSEMBLY TO MOWER DECK (48-, 54-INCH MOWER DECKS) (CONT.) Item Part No. Qty. Description 51514700 Housing, Blower 07531700 Knob, Wing .312-18 06439300 Washer, Flat, Steel.38 x 1.50 x .062 51511600 Belt Cover, with Decal 05948700 Bolt, Hex .38-16 x 1.00 – Grade 5 06308800 Washer, Lock .38 07216300...
- Page 26 BLOWER ASSEMBLY TO MOWER DECK (42-INCH MOWER DECKS) GB – 26...
- Page 27 BLOWER ASSEMBLY TO MOWER DECK (42-INCH MOWER DECKS) (CONT.) Item Part No. Qty. Description 51514700 Housing, Blower 06439300 Washer, Flat, Steel.38 x 1.50 x .062 07531700 Knob, Wing .312-18 01974800 Belt Cover, 42-Inch Decks 05980600 Bolt, Hex .38-16 x 1.75 – Grade 8 00169600 Sheave, 4.00 Diameter 00169800...
-
Page 28: Blower Assembly
BLOWER ASSEMBLY OEe006 GB – 28... - Page 29 BLOWER ASSEMBLY (CONT.) Item Part No. Qty. Description 51514700 Housing, Blower 05900008 Bolt, Hex .25-20 x .50 Epoxy 00169951 Plate, Skid 06543500 Nut, Locking-Top-Flange .25-20 03720951 Plate, Mounting Bolt Reinforcing 00168051 Plate, Bearing Mount 06114400 Screw, Machine .25-20 x .75 06500012 Nut, .25-20 Nyloc Flange 06446300...
- Page 30 BAGGER COVER ASSEMBLY GB – 30...
- Page 31 BAGGER COVER ASSEMBLY (CONT.) Item Part No. Qty. Description 06802500 Rivet, Pop .187 x .402 61556800 Cover, Bagger with Decal 06807600 Rivet, Pop .187 x .375 00548400 Retainer, .38 Push-On 06714800 Pin, Hair 06436200 Washer-Flat-Steel .046 x .812 x .065 00292600 Prop Rod, Bagger 07534100...
- Page 32 COUNTERWEIGHT ASSEMBLY Item Part No. Qty. Description 05962200 Bolt, Hex .50-13 x 5.00 Grade 5 00172000 Counterweight 06215700 Bolt, Round Head Square Neck, .312-18 x .75 Grade 5 05963300 Bolt, Hex .38-16 x 2.00 Grade 5 05948700 Bolt, Hex .38-16 x 1.00 Grade 5 06441700 Washer, Flat Steel .390 x 1.50 x .125 03374351...
-
Page 33: Warranty
• Perform the maintenance and adjustments explained in the owner's manual. • Promptly notify Ariens or an authorized Ariens, Gravely or Countax service representative of the need for warranty service. • Transport the product to and from the place of warranty service at owner's expense. - Page 34 Exclusions - Items Not Covered by This Warranty • Parts that are not genuine Ariens, Gravely or Countax service parts are not covered by this warranty and may void the warranty. • Damages resulting from the installation or use of any part, accessory, or attachment which is not approved by the Ariens Company for use with product(s) identified herein are not covered by this warranty.
- Page 36 655 West Ryan Street Brillion, WI 54110 920-756-4688 Fax 920-756-2407 www.ariens.com or www.gravely.com...
Need help?
Do you have a question about the ZT Xl Bagger and is the answer not in the manual?
Questions and answers