Table of Contents
Advertisement
USER MANUAL
Please make sure you remember your PIN (password), without it there
is no way to access the data on the drive.
If you are having difficulty using your diskAshur DT
drive please contact our technical department
2
by email - support@istorage-uk.com or by phone on +44 (0) 20 8991 6260.
#1
www.istorage-uk.com
Advertisement
Table of Contents

Related Manuals for iStorage diskAshur DT2


Summary of Contents for iStorage diskAshur DT2
-
Page 1: User Manual
Please make sure you remember your PIN (password), without it there is no way to access the data on the drive. If you are having difficulty using your diskAshur DT drive please contact our technical department by email - support@istorage-uk.com or by phone on +44 (0) 20 8991 6260. www.istorage-uk.com... - Page 2 Copyright © iStorage, Inc 2017. All rights reserved. Windows is a registered trademark of Microsoft Corporation. All other trademarks and copyrights referred to are the property of their respective owners. Distribution of modified versions of this document is prohibited without the explicit permission of the copyright holder.
-
Page 3: Table Of Contents
29. Hibernating, Suspending or Logging off from the Operating System ........24 30. How to check Firmware in Admin Mode ..................24 31. How to check Firmware in User Mode ..................25 32. Technical Support ........................26 33. Warranty and RMA information ....................26 www.istorage-uk.com... -
Page 4: Introduction
In plain and simple terms, without the PIN there’s no way in! Box Contents 1. diskAshur DT Drive 2. USB Cable 3. Universal Mains Adapter 4. Quick Start Guide www.istorage-uk.com... -
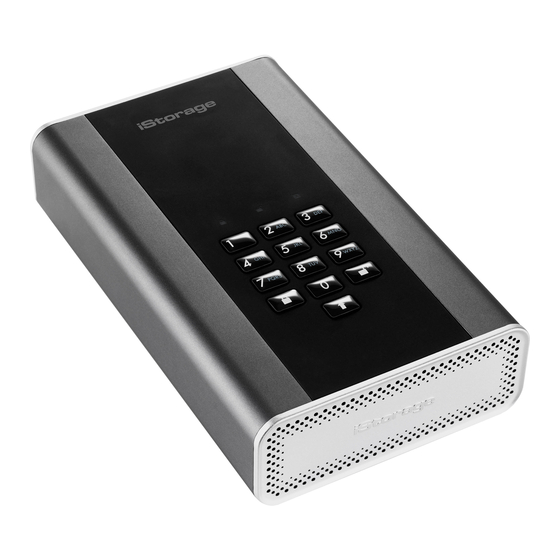
Page 5: Diskashur Dt Layout
To create a PIN using additional combinations, press and hold down the SHIFT button whilst entering your 7-15 digit PIN. e.g. SHIFT + 26756498. To lock diskAshur DT and return it to Standby State ( ) press the “Lock” button. www.istorage-uk.com... -
Page 6: Connecting Your Diskashur Dt
USB port on your computer. 4. Turn the power switch on the back of the diskAshur DT to the ON position. 5. The LED indicator light should turn RED, indicating that the drive is now ready to use. DC 12V USB 3.1 www.istorage-uk.com... -
Page 7: Diskashur Dt Led States
LED will remain on and in a solid state. It can be locked down immediately by pressing the “LOCK” button once or by clicking the ‘Safely Remove Hardware/Eject’ icon within your operating system. To ensure no data is corrupted, we recommend using ‘Safely Remove Hardware/Eject’. www.istorage-uk.com... -
Page 8: Unlocking The Diskashur Dt
BLUE for 1 second and then to the unlocked state, a solid GREEN LED. 5. If correct PIN is entered, the drive displays as “iStorage diskAshur DT USB Device” under “Computer Management/De- vice Manager”. In an unlocked state (GREEN LED), there are two possible behaviours for the LED indicators, shown in the table below. -
Page 9: Changing The Admin Pin
• For “password” you would press the following keys: 7 (pqrs) 2 (abc) 7 (pqrs) 7 (pqrs) 9 (wxyz) 6 (mno) 7 (pqrs) 3 (def) • For “istorage” you would press: 4 (ghi) 7 (pqrs) 8 (tuv) 6 (mno) 7 (pqrs) 2 (abc) 4 (ghi) 3 (def) Using this method, long and easy to remember PINs can be created. -
Page 10: Adding A New User Pin In Admin Mode
LED will change to blinking buttons and release Blinking LED will change to solid 2. Press and hold down “SHIFT + 3” buttons again. LED and then to a solid BLUE LED indicating the User PIN was successfully deleted www.istorage-uk.com... -
Page 11: Set Read-Only In Admin Mode
GREEN and solid BLUE LEDs GREEN LED will rapidly blink for several seconds and then changes to a solid BLUE 3. Re-enter the PIN and press the “UNLOCK” button to indicate the Self-Destruct PIN has been successfully configured www.istorage-uk.com... -
Page 12: How To Delete The Self-Destruct Pin
Self-Destruct mechanism is activated. The diskAshur DT will need to be reset (see ‘How to perform a complete reset’ Section 25, on page 16) first in order to create an Admin PIN with full Admin privileges including the ability to create a User PIN. www.istorage-uk.com... -
Page 13: How To Create An Admin Pin After A Brute Force Attack Or Reset
20 for 20 minutes 99 for 99 minutes Blinking GREEN BLUE LEDs will change to 3. Press the “SHIFT” button a solid GREEN for a second and then finally to a solid BLUE LED indicating the Auto-Lock time out is successfully configured www.istorage-uk.com... -
Page 14: Turn Off The Unattended Auto-Lock Clock
BLUE LEDs Blinking GREEN and solid BLUE LEDs will 3. Re-enter New User PIN and press the “UNLOCK” switch to a rapidly blinking GREEN LED and button then to a solid GREEN LED indicating successful User PIN change www.istorage-uk.com... -
Page 15: Set Read-Only In User Mode
Note: 1. This setting is activated the next time the drive is unlocked. 2. If a User set the drive as Read-Only, Admin can override it by setting the drive as Read/Write in Admin mode. 3. If Admin set the drive as Read-Only, the User cannot set the drive as Read/Write www.istorage-uk.com... -
Page 16: Brute Force Protection
Important: After a complete reset a new Admin PIN must be created, refer to Section 17 on page 13 on ‘How to Create an Admin PIN after a Brute Force attack or Reset’, the diskAshur DT will also need to be partitioned and formatted before any new data can be added to the drive. www.istorage-uk.com... -
Page 17: Initialising And Formatting The Diskashur Dt
In the Computer Manage window, click Disk Management. In the Disk Management window, the diskAshur DT recognised as an unknown device that is uninitialised and unallocated. Note: If the Initialise Disk Wizard window opens, click Cancel. Right-click Unknown Disk, and then select Initialise Disk. www.istorage-uk.com... - Page 18 11. Assign a drive letter or path and click Next. 12. Create a volume label, select Perform a quick format, and then click Next. 13. Click Finish. 14. Wait until the format process is complete. The diskAshur DT will be recognised and it is available for use. www.istorage-uk.com...
-
Page 19: Diskashur Dt Setup For Mac Os
1. Select diskAshur DT from the list of drives and volumes. Each drive in the list will display its capacity, manufacturer, and product name, such as ‘iStorage diskAshur DT Media’ or 232.9 diskAshur DT 2. Click the ‘Erase’ button (figure 1). - Page 20 (figure 4). We recommend using ‘GUID Partition Map’ on drives larger than 2TB. figure 3 figure 4 5. Click the ‘Erase’ button. Disk Utility will unmount the volume from the desktop, erase it, and then remount it on the desktop. www.istorage-uk.com...
-
Page 21: Setup For Linux (Ubuntu 14.04)
2. Click to select the drive (6.0 TB Hard Disk) under ‘Devices’. Next click on the gears icon under ‘Volumes’ and then click on ‘Format’. 3. Select ‘Compatible with all systems and devices(FAT)’ for the ‘Type’ option. And enter a name for the drive, e.g: diskAshur DT . Then, click the ‘Format’ button. www.istorage-uk.com... - Page 22 4. Click ‘Format’ again. 5. The drive will start to be formatted. 6. After the format process is finished, click to mount the drive to Ubuntu. www.istorage-uk.com...
- Page 23 Linux (Ubuntu 14.04) It is strongly recommended to right click your drive icon and then click ‘Safely remove’ in the OS to eject (lock) your diskAshur DT , especially after data has been copied or deleted from the drive. www.istorage-uk.com...
-
Page 24: Hibernating, Suspending Or Logging Off From The Operating System
For example, if the firmware revision number is ‘1.2’, the LED will blink once (1) and the GREEN LED will blink two (2) times. Once the sequence has ended the RED, GREEN & BLUE LED’s will blink together once and then return to a solid BLUE LED. www.istorage-uk.com... -
Page 25: How To Check Firmware In User Mode
For example, if the firmware revision number is ‘1.2’, the LED will blink once (1) and the GREEN LED will blink two (2) times. Once the sequence has ended the RED, GREEN & BLUE LED’s will blink together once and then return to a solid BLUE LED. www.istorage-uk.com... -
Page 26: Technical Support
DAMAGED OR RENDERED DEFECTIVE: 1. AS A RESULT OF ACCIDENT, MISUSE, NEGLECT, ABUSE OR FAILURE AND/OR INABILITY TO FOLLOW THE WRITTEN INSTRUCTIONS PROVIDED IN THIS INSTRUCTION GUIDE: 2. BY THE USE OF PARTS NOT MANUFACTURED OR SOLD BY ISTORAGE; 3. BY MODIFICATION OF THE PRODUCT; OR 4. AS A RESULT OF SERVICE, ALTERNATION OR REPAIR BY ANYONE OTHER THAN ISTORAGE AND SHALL BE VOID. - Page 27 © iStorage, 2017. All rights reserved. iStorage Limited, iStorage House, 13 Alperton Lane Perivale, Middlesex. UB6 8DH, England Tel: +44 (0) 20 8991 6260 | Fax: +44 (0) 20 8991 6277 e-mail: info@istorage-uk.com | web: www.istorage-uk.com www.istorage-uk.com...
Need help?
Do you have a question about the diskAshur DT2 and is the answer not in the manual?
Questions and answers