Outdoor GreatRoom Company WP-1616 Installation Instructions Manual
Hide thumbs
Also See for WP-1616:
- Installation instructions manual (8 pages) ,
- Installation instructions manual (12 pages)
Advertisement
Quick Links
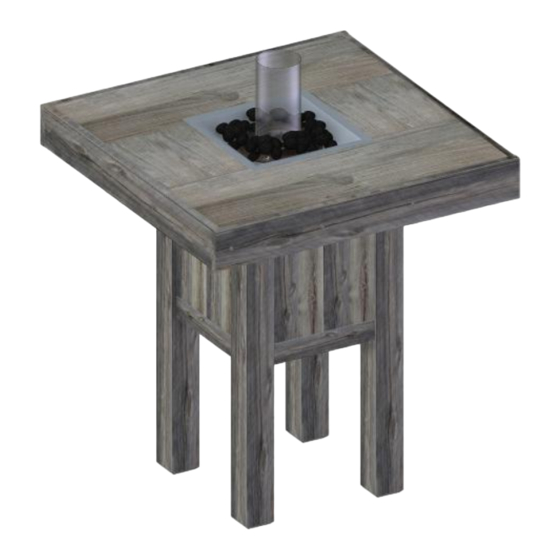
The Westport Fire Pit Table
Installation Instructions for WP-1616 and WP-INT
IMPORTANT
Please consult your Crystal Fire Manual or INT-EZ manual for detailed instructions and
important information related to the burner installation including: lighting and operating
instructions, safety information, and proper tightening of connections with two wrenches.
DO NOT ATTEMPT TO INSTALL CRYSTAL FIRE BURNER OR INTRIGUE WITHOUT FIRST
CONSULTING THE PROPER MANUAL
2
Advertisement

Related Manuals for Outdoor GreatRoom Company WP-1616


Summary of Contents for Outdoor GreatRoom Company WP-1616
- Page 1 IMPORTANT Please consult your Crystal Fire Manual or INT-EZ manual for detailed instructions and important information related to the burner installation including: lighting and operating instructions, safety information, and proper tightening of connections with two wrenches. DO NOT ATTEMPT TO INSTALL CRYSTAL FIRE BURNER OR INTRIGUE WITHOUT FIRST CONSULTING THE PROPER MANUAL The Westport Fire Pit Table Installation Instructions for WP-1616 and WP-INT...
- Page 2 Contents Included With Your Fire Pit Required Tools……………………………………………….2 Included with your Fire Pit……………………………..3 Fire Pit Assembly Instructions…………………………4 Burner Installation WP-1616.………………………5-7 Position Your Propane Tank……………………………8 Glass Installation…………………………………………….9 INT-EZ and Trim CF-1616-PTR Burner Burner Installation WP-INT……………………..10-11 Warranty Information…………………………………..12 Required Tools Utility Knife • To cut and remove packaging Two Open Ended Wrenches • To secure gas connections WP-TILETOP Leather Gloves • To protect hands from glass and sharp edges during installation WP-BASE One AAA Battery (WP-1616) or 2 D-Cell • Batteries (WP-INT) Required for Electric Spark igniter installation Power Drill with Philips head bit • To attach mounting brackets to secure tile top to base. Philips screw driver • Top Attachment Bracket (2) Self-tapping Philips Head Screws (8) To attach control panel for WP-INT At least Two people are required for this •...
- Page 3 Fire Pit Assembly Instructions Burner Installation (WP-1616) Carefully remove product from packaging. Make sure Read and understand your Crystal Fire owner’s manual before that all parts are included and undamaged. Ensure you beginning burner hookups or using the device. have the proper tools for assembly. Do not use Teflon tape or pipe sealant on flare fittings. Place WP-BASE into the final location where you want your fire pit. Attach Natural Gas supply line or included black rubber Place WP-TILETOP onto WP-BASE. Position the top so propane hose/regulator (depending on gas type) to that the base is centered in the opening. control valve. • Propane or Natural Gas input Natural gas supply line as specified by local building codes TIGHTEN CONNECTIONS SECURELY WITH TWO WRENCHES Ensure all connections are secure and leak free before using fire pit. Using a power drill and Self Tapping Philips Head Lay the burner upside down on a flat, soft surface to Screws provided, attach Top Attachment Brackets to avoid scratching the metal trim. Ensure the correct secure WP-TILETOP to WP-BASE as shown in the figure orifice is installed for the fuel type you are using (see below. Secure each attachment bracket using 4 screws. Crystal Fire user manual included with burner for orifice sizing information). Attach the included metal Mounting Bracket Locations flex hose to the burner.
- Page 4 TIGHTEN CONNECTIONS SECURELY WITH TWO WRENCHES Install Sparker box into control panel as shown Ensure all connections are secure and leak free before using fire pit. below. Insert AAA Battery with Positive (+) end facing out. To ensure sparker box is working Remove access door to fire pit and orient the burner in correctly, press button and listen for sparking the Fire Pit as shown below. behind the sparker box. Sparker Electrode Control Panel Side Connect sparker wire and ground wire from burner to sparker box as shown below. Ensure good contact between connections. Test sparking Door Side system by pressing the button and listening/watching for the spark between the electrode and sparking tab at the burner surface. Consult the troubleshooting section of the Crystal Attach Flex Line from burner to control valve as shown Fire Manual if spark is weak, intermittent, or not below. present. TIGHTEN CONNECTION SECURELY WITH WRENCH • Metal flex line to burner After installing igniter and making gas connections, verify that gas ONLY connections are tight and that no leaks are present using a solution of soapy water or a commercially available leak-check solution.
- Page 5 Glass Installation Position Your Tank (If Applicable) Scatter all the included glass beads evenly onto burner • surface. DO NOT OPERATE CRYSTAL FIRE BURNER WITHOUT INCLUDED GLASS MEDIA OR OTHER APPROVED FIRE MEDIA IMPORTANT Please consult your Crystal Fire instruction manual for detailed instructions and important information related to burner installation, Open the access door and connect the propane • including: lighting and operating instructions, safety information, and hose/regulator to the propane tank and hand tighten proper tightening of connections with two wrenches. (DO NOT USE A WRENCH). Insert the propane tank by tipping at a 45 degree angle • DO NOT ATTEMPT TO INSTALL CF-1616 CRYSTAL FIRE BURNER as shown in the picture in order to fit tank into access WITHOUT FIRST CONSULTING THE CRYSTAL FIRE OWNER’S MANUAL. door opening. Tip tank upright into final position once inside the fire • pit. WARNING Ensure the tank is seated properly and stays vertical • during operation and while not in use. After consulting the manual and following instructions, remember: before Ensure that no hoses, wires or anything else is kinked • operating, all gas connections must be fully checked for leaks or touching the bottom of the burner...
- Page 6 Burner Installation (WP-INT) Make wire connections from burner to control panel: Use spade connectors provided to connect the wires from the intrigue (Brown) to the Read and understand your INT-EZ owner’s manual before wires from the control panel (Black). beginning burner installation or using the device. Remove existing control panel from base: Use a Philips head screw driver to remove the 4 screws. Wires form INT-EZ Wires from control panel Replace existing control panel with intrigue control panel: Use a Philips head screw driver to replace the Drop INT-EZ and trim into fire pit. Orient the INT-EZ four screws in the four corners of the control Base so that the access door is easily accessible. panel. Assemble INT-EZ with burner trim. Refer to INT-EZ manual before attempting to install. Intrigue Access door Westport Access door IMPORTANT Please consult your INT-EZ instruction manual for detailed instructions Carefully install tumbled lava rock; be careful not to damage the glass cylinder and important information related to burner installation, including: when installing lava rock. lighting and operating instructions, and safety information. Warranty: Fire pit tables are covered DO NOT ATTEMPT TO INSTALL INT-EZ BURNER WITHOUT FIRST under a 1- year manufacturer’s CONSULTING THE INT-EZ OWNER’S MANUAL. warranty. Please visit...
- Page 7 Thank you for purchasing an Outdoor GreatRoom Company product! This fire pit was made with pride in the USA. 14400 Southcross Drive West • Suite 100 • Burnsville, MN 55306 Toll Free: 1-866-303-4028 • Sales@OutdoorRooms.com...
Need help?
Do you have a question about the WP-1616 and is the answer not in the manual?
Questions and answers