
Subscribe to Our Youtube Channel
Related Manuals for Outdoor GreatRoom Company BRON52-K


Summary of Contents for Outdoor GreatRoom Company BRON52-K
- Page 1 Bronson Fire Pit Installation Instructions for Bronson Pit Table BRON52-K outdoorrooms.com...
-
Page 2: Table Of Contents
IMPORTANT Please consult your Crystal Fire® Plus instruction manual for detailed instructions and important information related to the burner installation including: lighting and operating instructions, safety information, and proper tightening of connections with two wrenches. DO NOT ATTEMPT TO INSTALL CRYSTAL FIRE® PLUS BURNER WITHOUT CONSULTING THE CRYSTAL FIRE®... -
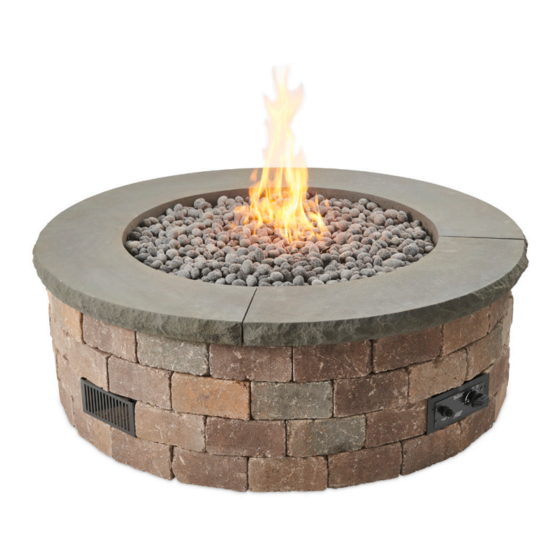
Page 3: About Your Fire Table
1. ABOUT YOUR FIRE TABLE A. REQUIRED TOOLS • Utility Knife To cut and remove packaging • 2 Open Ended Wrenches To secure gas connections • Phillips Screw Driver (Do not use a drill to assemble) For assembly • One AAA Battery (Not Included) Required for electric spark igniter installation B. -
Page 4: Setting Up Your Burner
SETTING UP YOUR BURNER ATTENTION Read and understand your Crystal Fire® Plus owner’s manual before beginning burner hookups or using the device. DO NOT USE TEFLON TAPE OR PIPE DOPE ON FLARE FITTINGS. IMPORTANT Please consult your Crystal Fire® Plus instruction manual for detailed instructions and important information related to the burner installation including: lighting and operating instructions, safety information, and proper tightening of connections with two wrenches. -
Page 5: Assembly Instructions
ASSEMBLY INSTRUCTIONS WARNING Exposed edges may be rough, use leather gloves when removing packaging and handling the bricks. A. UNPACKING Do not discard any packaging until assembly is complete and unit is tested. Keep all included manuals in a safe place for future reference. Keep bricks stacked until ready to be placed. - Page 6 Continue on to second row of bricks. This layer will contain the 2 vent blocks (included in kit) and the control panel block (included in kit). Follow diagram shown below for layout pattern. LAYER 2 VENT BLOCK VENT BLOCK CONTROL PANEL BLOCK FRONT Continue on to third row of bricks.
- Page 7 Unpack burner. Before installing the burner into the burner plate, remove the 24 inch flex line between burner oriface and valve and connect included 34 inch flex line. Use 2 wrenches to tighten and perform leak test. Set burner into burner plate. Position burner plate in center of fire pit and then pull plate so that end is slightly off edge.
-
Page 8: Cf-Sparker Assembly
C. CF-SPARKER ASSEMBLY • Locate CF-SPARKER inside of Crystal Fire® Plus burner box. • Remove CF-SPARKER cap and hex nut. Insert AAA battery (not included) with + end out. • Install CF-SPARKER into control panel as shown below. CF-SPARKER must be installed BEFORE control valve. -
Page 9: Thermocouple Installation
E. THERMOCOUPLE INSTALLATION • Refer to Crystal Fire® Plus instruction manual for detailed attachment of thermocouple. • Attach thermocouple to burner valve as shown below. DETAIL A SCALE 0.800 DETAIL B SCALE 0.800 C. ELECTRODE INSTALLATION • Plug both BLACK wires hanging from the burner into the back of the CF-SPARKER. -
Page 10: Finishing Fire Pit
CAPSTONE FRONT FRONT OPTIONAL CAPSTONE SETUP: The BRON52-K has an optional captone. The capstone can be place on top of layer 3 (replacing the brick of layer 4) or on top of layer 4. When using the optional capstone ensure that the burner plate is one layer below the capstone. -
Page 11: Fire Media Installation
C. FIRE MEDIA INSTALLATION • Scatter all included glass beads, lava rock, or other approved fire media evenly across entire burner surface. WARNING DO NOT OPERATE CRYSTAL FIRE® PLUS BURNER WITHOUT INCLUDED GLASS BEADS OR OTHER APPROVED FIRE MEDIA. outdoorrooms.com... -
Page 12: Operating Instructions
OPERATING INSTRUCTIONS IMPORTANT Before operating your BRON52, ensure all gas connections are properly tightened and thoroughly leak checked. Refer to the Crystal Fire® Plus manual for information on proper leak checking and other critical safety information. WARNING FIRE OR EXPLOSION HAZARD If you do not follow these instructions exactly, a fire or explosion may result causing property damage, personal injury, or loss of life. -
Page 13: Warnings
6. WARNINGS IMPORTANT Please consult your Crystal Fire® Plus instruction manual for detailed instructions and important information related to the burner installation including: lighting and operating instructions, safety information, and proper tightening of connections with two wrenches. DO NOT ATTEMPT TO INSTALL CRYSTAL FIRE® PLUS BURNER WITHOUT FIRST CONSULTING THE CRYSTAL FIRE®... -
Page 14: Warrenties
7. WARRENTIES PRODUCT CATEGORY WARRANTY INFORMATION Limited lifetime warranty on all stainless steel burners installed in a residential setting, and 5 years on all stainless steel burners installed in a commercial setting. GAS FIRE PIT TABLES/CRYSTAL One year warranty on ignition & elec- FIRE®... - Page 16 Thank you for purchasing an Outdoor GreatRoom Company product! This fire pit was made with pride in the USA. Warranty: Fire pit tables are covered under a 1 year manufacturer’s warranty. Please visit http://www.outdoorrooms.com/product-registration to register your product. 14400 Southcross Drive West • Suite 100 • Burnsville, MN 55306 Toll Free: 1-866-303-4028 •...
Need help?
Do you have a question about the BRON52-K and is the answer not in the manual?
Questions and answers