Flashforge Finder User Manual
Desktop 3d printer
Hide thumbs
Also See for Finder:
- User manual (88 pages) ,
- Quick start manual (28 pages) ,
- Start up and instruction manual (25 pages)

Related Manuals for Flashforge Finder


Summary of Contents for Flashforge Finder
- Page 1 User Guide Finder Desktop 3D Printer Finder User Guide| www.ff3dp.com V2.0 20151013...
- Page 2 Finder User Guide| www.ff3dp.com...
-
Page 3: Table Of Contents
Content Acknowledgment..................1 Commitment....................2 Introduction....................3 About 3D Printing..................4 Chapter 1. Set up Your Finder..............6 1.1.Unpacking Your Finder..............6 1.2 About Your Finder...............10 1.3 Hardware Assembly..............13 1.4 Loading and Unloading Filament..........15 1.5 Leveling the Build Plate..............17 Chapter 2 About Flashprint............... 18 2.1 Downloading and Installing Flashprint........ -
Page 4: Acknowledgment
Corporation. Even if you are familiar with earlier Flashforge machines or 3D printing technology, we still recommend that you read through this guide, as there is lots of important information about the Finder for you to get a better 3D experience. Following this guide will ensure your successful first print journey. -
Page 5: Commitment
Flashforge is committing to providing the best 3D printers and best service to each clients and customers. If you can imagine it, you can make it. Together with Flashforge team, let’s turn the sky into limit. Finder User Guide| www.ff3dp.com... -
Page 6: Introduction
This User Guide includes four chapters. In the first chapter, you will learn how to get set-up the Finder for the first print. In the second chapter, you will learn the ins and outs of FlashPrint software. -
Page 7: About 3D Printing
The Technique Fused Deposition Modeling(FDM) is the most common method of 3D printing. It is also the method that the Finder uses. It works by melting plastic material called filament onto a print surface in high temperature. filament solidifies... - Page 8 FlashForge Finder. Using FlashPrint, you can prepare stl. files to be g. or gx. files for printing. Then the files can be transferred to your Finder via USB cable, USB stick or Wi-Fi. 3. Making the Print:...
-
Page 9: Chapter 1. Set Up Your Finder
3D printer and so excited to start the print journey with us. After 15-minute reading and learning, we believe you can making your first 3D object definitely on your own. When you set up your Finder 3D printer, remember that it was built and packaged carefully at the Flashforge Factory. - Page 10 3. Remove the side protective foam sheets, you will see the Finder in a transparent bag. Then remove the bag to unveil the Finder. 4. On the top foam sheet, you can see one Quick Start Guide, one 4GB USB stick, three Allen wrenches (M1.5, 2...
- Page 11 Discard the blue tape that holds the flat cable in place . 6. Take the protective foam for filament out of the Finder. You will see a spool of PLA filament (Assign random color)inside.
- Page 12 8. Move the build plate up. Remove the protective foam and take the power cable and USB cable out . 9. Congratulations! You have unpacked your Finder. Next, let’s go to the overview and accessories of Finder. 1.2 About Finder Finder User Guide| www.ff3dp.com...
-
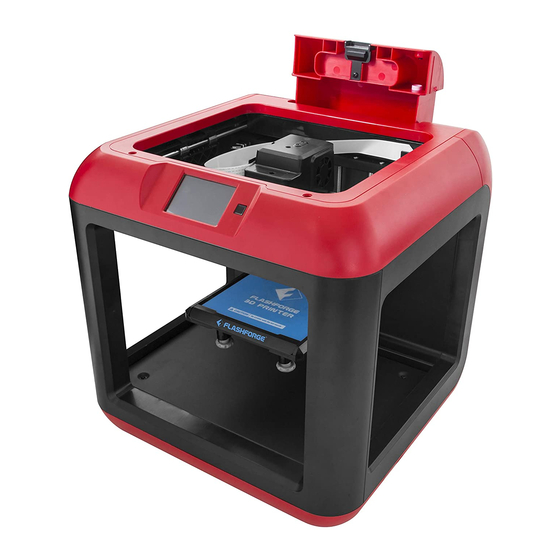
Page 13: About Your Finder
1.2 About Your Finder Views: 1. Touch screen panel 2. Power switch 3. Nozzle 4. Z-axis guide rod 5.Build plate 6. Leveling nut 7. Filament cartridge 9. Filament intake 10. X-axis guide rod 11. Spring presser 12. USB cable input 13. USB stick input 14. - Page 14 Accessory Box PLA Filament Power Cable USB Cable Filament Guide Tube Quick Start Guide USB stick Allen Wrench(M1.5/M2.0/M2.5) Screwdriver Finder User Guide| www.ff3dp.com...
- Page 15 Accessory Introduction Polylactic acid filament. PLA is a renewable bilplastic. PLA Filament Finder PLA is the source material from which you make objects on the Finder. Power Cable A cable that allows the Finder to connect with power USB Cable A cable that allows the Finder to communicate with a computer using the USB interface on the computer.
-
Page 16: Hardware Assembly
1.3 Hardware Assembly Your Finder has been installed before leaving factory, you can start up the Finder for printing after mounting the filament spool and completing leveling.. Installing the Filament 1. Remove the filament cartridge in the rear of Finder, where you will place the filament spool. - Page 17 Finder and plug the power cord into an electrical outlet. 2. Locate the USB cable and plug one end into the Finder and the other into your personal computer. The Finder supports USB 2.0. Finder User Guide| www.ff3dp.com...
-
Page 18: Loading And Unloading Filament
4. After a few moments, you should see a thin string of Flashforge filament come out of the extruder nozzle. Note: Your Finder will sound a warning when the filament is running out, you should feed your Finder with filament in time Finder User Guide| www.ff3dp.com... - Page 19 Note: Do not pull out the filament with force as it will damage the gears. If the melted filament has cooled down in the extruder, please repeat the steps above. Finder User Guide| www.ff3dp.com...
-
Page 20: Leveling The Build Plate
The distance between the plate and the nozzle increases while tightening the nuts. On the contrary, the distance reduces. 1. Tap [Tools] - [Level] on your Finder touch screen. Please wait while the extruder and platform finish initial movements. Screw three nuts under the platform anticlockwise until you can’t tighten them any more, then... - Page 21 [OK] to second point leveling. If still not, please follow the prompts to adjust again till you see [OK] button. 5. Repeat steps 2 through 4 above to complete second and third points leveling and then Tap [Finish] to exit. Finder User Guide| www.ff3dp.com...
-
Page 22: Chapter 2 About Flashprint
! After starting Flashprint, you need to select the target machine type first. When you start Flashprint, a dialog box will pop up. Just need to select Flashforge Finder in the machine type list and click [OK]. You can also change the machine type via clicking [Print]--[Machine type]. Please see graphic below: Finder User Guide| www.ff3dp.com... - Page 23 2.2.2 Flashprint Menus Load one or multiple files. Enter the support edit mode View FlashPrint home screen from one of six viewing angles. Finder User Guide| www.ff3dp.com...
- Page 24 Scale the size of your object Select right or left extruder you want to print with Print it directly with your Finder or export to your SD card. 2.2.3 Loading a File You can load a model file or Gcode file into your Flashprint by the following six methods: Method 1: Click the Load icon on the main interface.
- Page 25 2.2.4 Mouse Action 2.2.4.1 Left-click Left-click on the target model to select the model. Hold down the Ctrl key and left-click the target models to select multiply models. Model looks much brighter when selected. Finder User Guide| www.ff3dp.com...
- Page 26 Method 1: Hold down the left mouse button and drag. Method 2: Hold down the middle mouse button and drag. Method 3: Hold down the Shift key, hold down the right mouse button and drag. Finder User Guide| www.ff3dp.com...
- Page 27 Method 2: Click the [View] button on the left, click it again and you will see the viewing options, you can click [Reset]. 2.2.5.6 Show Model Outline Click [View]--[Show Model Outline], it will highlight the yellow border of the object Finder User Guide| www.ff3dp.com...
- Page 28 Users shall click [Center] and [On Platform] after the location adjustment to ensure the model(s) be within the build area and on the build platform. If a specified position is needed, only to click [On Platform]. Finder User Guide| www.ff3dp.com...
- Page 29 Note: If the [Uniform Scaling] radio button is clicked, it will scale the model in equal proportion when changing value in any positioning of the model. Otherwise it will only change the value of the corresponding positioning. Finder User Guide| www.ff3dp.com...
- Page 30 2.2.6.4.4 Duplicate Select the object and duplicate the object through the following two methods: Method 1: Click [Edit]--[Duplicate] Method 2: Press the shortcut Ctrl+D 2.2.6.4.5 Delete Select the object and delete the object through the following two Finder User Guide| www.ff3dp.com...
- Page 31 Surface to Platform) 2.2.6.4.7 Auto Layout All Click [Edit]--[Auto Layout All] after loading one or more than one models, all models will be placed automatically as automatic placement rule. Finder User Guide| www.ff3dp.com...
- Page 32 If the model already had support, the existing supports will be deleted and new supports will be generated. 2.2.7.2 Clear Supports Click [Clear Supports], all supports will be deleted. The operation can be repealed via clicking [Undo] or pressing the shortcut key Ctrl+Z. Finder User Guide| www.ff3dp.com...
- Page 33 Supports will be deleted once clicking the [Delete] button. Move the cursor to the supports needed deleting, current supports and its child node support will be highlighted, click the left mouse button to delete these highlighted support. Finder User Guide| www.ff3dp.com...
- Page 34 2.2.8 New Project Click [File]--[New Project] can build a blank project. If there is an unsaved modification on previous project, then will inform you whether Finder User Guide| www.ff3dp.com...
- Page 35 .obj. For .stl and .boj, models are integrated as one(include support part). If load it again, only the position of the model was saved, not included the printing parameters. 2.2.10 Printing 2.2.10.1 Select Machine Type Finder User Guide| www.ff3dp.com...
- Page 36 You need to slice the model before printing(printable file is generated by slicing the model). The following is operation process. 2.2.10.3.1.1 Steps Step 1: Click [Print]--[Print] or click the Print icon on main interface, dialog of slicing parameters will show up. Finder User Guide| www.ff3dp.com...
- Page 37 PLA printing, an extra solution “Hyper” is available. Click [More options] to set for layer, shell, infill, speed, temperature. Different resolution solution is corresponding to different defaults, click [Restore Defaults] to back to default setting. Finder User Guide| www.ff3dp.com...
- Page 38 Travel Speed is to control the moving speed of the extruder under non-printing Status during work. for PLA printing, 100 is recommended. Finder User Guide| www.ff3dp.com...
- Page 39 Step 2: Click the [Print] button on up right corner. 2.2.10.3.3 Pause and Abort Printing Once a print job starts, click the machine icon ( on the bottom right, a status box will pop up. Finder User Guide| www.ff3dp.com...
- Page 40 Note: The machine icon on the bottom right displays the connection status: Connected Disconnected Method 1: USB Connection a. Connect your Finder with your PC via an USB cable. b. Turn on your Finder and start Flashprint. c.Click [Print]--[Connect Machine], then select USB in the Finder User Guide| www.ff3dp.com...
- Page 41 Click [WIFI Set], user can select AP or STA mode. ·STA Mode In STA mode, your PC and Finder shall share the signal from the same router. Under STA Mode, you need to set up the SSID(Router WIFI), Password(Password of Router WIFI). Click [Save] and [Reboot] successively.
- Page 42 Note: The fail of STA setup may be caused by the weakness of the WIFI signal, 2.2.11.2 Disconnect Finder Click [Print]--[Disconnect] to disconnect your PC and Finder. 2.2.11.3 Control Panel After connecting PC with Finder, click [Tools]--[Control Panel] to open the control panel. Finder User Guide| www.ff3dp.com...
- Page 43 Click Z-, build plate will move downward a specified distance. (Specified distance refers to the move distance you set in Jog Mode. 2.2.11.3.1.3 Stop: Click the [stop] button to abort the current movement. Finder User Guide| www.ff3dp.com...
- Page 44 2.2.11.3.1.7. X/Y Speed and Z Speed: Set the move speed of extruder/ build platform. 2.2.11.3.2. Limit Switch In order to protect your Finder, three limit switches are equipped to control the maximum position, and the three limit switches corresponding to X/Y/Z axis limit switch. It has two status: 2.2.11.3.2.1 Not Triggered:...
- Page 45 2.2.11.3.4. LED Color: Allows users to change the LED color of Finder. 2.2.11.3.5. Extruder Controls You can set the value of “Motor Speed(RPM)”, which can control the rotation speed of filament feeding wheel. The motor rotation time can be controlled via setting the value of “Extruder Duration”.Generally we...
- Page 46 [OK] in the firmware updating box. After confirming the printer is in free state, the software will automatically update the firmware. 2.2.11.5 On Board Preferences When the computer and printer are in connection, click [Tools]--[On Board Preferences], you can check the printer name, extruder quantity etc. Finder User Guide| www.ff3dp.com...
- Page 47 64 - bit system, dpinst_x86.exe for 32- bit system, users can choose which they need) 2.2.12 Others 2.2.12.1 Preferences Click [File]--[Preferences], you can choose language and if needs detecting update when start 2.2.12.1.1 Language The software supports six languages, that is Chinese(simplified Chinese Finder User Guide| www.ff3dp.com...
- Page 48 ·Manual Update Click [Help]--[Check for Update] to detect the available updates online. 2.2.12.1.5 Check Flashprint Information Click [Help]--[About Flashprint], the software information box will pop up. The contents include the current software version and copyright information. Finder User Guide| www.ff3dp.com...
-
Page 49: Chapter 3. First Print
The steps of how to generate a Gcode file: 1.Double-click the icon of Flashprint to start the software. 2.Click[Print]--[Machine Type] to select Flashforge Finder 3.Click the Load icon to load a .stl model file and the object will display on the build area. Finder User Guide| www.ff3dp.com... - Page 50 5.Click [Edit]--[Surface to Platform] to make your model perfectly positioned on the build area. Click [Back] and double-click the Move icon again, then click [On the Platform] [Center] to ensure the model be on the platform. Finder User Guide| www.ff3dp.com...
- Page 51 Note: If the object is appropriately positioned, please skip this step. 6.Click the Supports icon on the top, and click [Auto Supports], your Flashprint will automatically generate supports for the object. 7. Click [OK] to preview the model with supports. Finder User Guide| www.ff3dp.com...
- Page 52 .fpp file. It is suggested that you click [No] to exit. 9.Click the Print icon and a dialog box will pop up. You need to prepare all the setups for your print job. Finder User Guide| www.ff3dp.com...
- Page 53 2.10.3. 10.Click [OK] to select the path to save the Gcode file. You can rename the file as you like and save it as a .g or .gx file, click [Save] to generate a Gcode file. Finder User Guide| www.ff3dp.com...
- Page 54 Note: .gx files are available for preview while the .g files are not. They are displaying as follows: .g Files .gx Files Finder User Guide| www.ff3dp.com...
-
Page 55: Interface Menus
3.2 Interface Menus Before introducing the connection methods, let me give you a brief introduction of Finder’s interfaces. Print Read the print file from ◆The local memory card ◆The USB stick Return arrow Select the target print file among the list ◆Print: To begin printing... - Page 56 Tap the [Start] button to heat up to the setting temperature. The default temperature is 230℃. Tap the temperature display bar to set the temperature. To set the preheat temperature. Tap [Yes] to save the setting while tap [No] to cancel the setting. Finder User Guide| www.ff3dp.com...
- Page 57 ◆X+: The extruder moves to the zero points, that is, to the right direction ◆X-: The extruder moves to the direction opposite to the X+. ◆Z+: The build plate elevates. ◆Z-: The build plate descends. ◆Return arrow Finder User Guide| www.ff3dp.com...
- Page 58 To tap the “+” on the touch screen to adjust the touch screen. WIFI: ◆Reset: Reset the WIFI ◆ Turn on WIFI: Turn on the WIFI, release the WIFI hotspot and set the WIFI on computer ◆Return arrow Finder User Guide| www.ff3dp.com...
- Page 59 When the extruder stops, tap “Z-/Z+” to adjust the distance between nozzle and build plate. Status: It displays the real-time status of the extruder temperature, fan and filament. About: It displays the basic information about the device. Finder User Guide| www.ff3dp.com...
-
Page 60: Printing Methods
3.3.1 Print from Computer(USB Connection) 1. Connect Finder with computer via an USB 2.0 cable 2. Turn on the Finder. Make sure that the build plate has been leveled and filament has been loaded. (Referred to 1.4 Loading and Unloading Filament 1.5 Leveling the Build... - Page 61 Set], user can select AP or STA mode. 3.3.3.1 Print in STA Mode 1. Turn on the WIFI of Finder and connect your PC with Finder via the WIFI. 2. “Finder” continuous signal will be found available on the network list.
- Page 62 4.Select WIFI mode as STA mode, and then complete the corresponding setups, you can change the SSID(the WIFI’s name) and the password, select [Enable] in DHCP auto get IP, then click [Save]. The following interface will appear. Finder User Guide| www.ff3dp.com...
- Page 63 [Connect]. After a successful connection, you can see the connection status on the right bottom. Flashprint will start to transfer the .gcode file to your Finder and heat the nozzle up for the print job. Finder User Guide| www.ff3dp.com...
- Page 64 3.3.3.2 Print in AP Mode 1. Turn on the WIFI of Finder and connect your PC with Finder via the WIFI. Finder User Guide| www.ff3dp.com...
- Page 65 2. “Finder” continuous signal will be found available on the network list. 4. Once your PC is connected with your Finder. Open the Internet browser and enter “10.10.100.254” and enter the default user name(admin) and password(admin). 3. You will enter the WIFI setting panel, it displays as follows:...
- Page 66 [Connect]. After a successful connection, you can see the connection status on the right bottom. Flashprint will start to transfer the .gcode file to your Finder and heat the nozzle up for the print job. Finder User Guide| www.ff3dp.com...
- Page 67 Finder User Guide| www.ff3dp.com...
-
Page 68: Chapter 4: Other Information
Chapter 4: Other Information 4.1.Supports and Service Flashforge team is on standby and ready to help you with any challenges. If the issues or questions are not covered in this User Guide, you can seek for solutions on our office website or contact us via telephone. -
Page 69: References
Z axis 0.0025mm; XY axis 0.011mm Filament Diameter 1.75mm Nozzle Diameter 0.4mm Build Speed 24CC/hr Software FlashPrint Support Formats stl、obj Windows Mac OS Device Size 420*420*420mm Weight 10.75Kg AC Input 100-240V, 50-60Hz, 100W Connectivity USB cable、USB stick、WIFI Finder User Guide| www.ff3dp.com... - Page 70 Build Plate: The glass surface on which the Finder builds an object. Build Platform: The metal frame that supports Finder’s build plate. Build Plate Tape: The blue tape that covers Finder’s build plate so that the object can adhere to the build plate well.
Need help?
Do you have a question about the Finder and is the answer not in the manual?
Questions and answers