Epson BrightLink 697Ui User Manual
Wireless full hd 3lcd ultra short-throw interactive display
Hide thumbs
Also See for BrightLink 697Ui:
- Setup manual (43 pages) ,
- Installation manual (90 pages) ,
- Installation manual (97 pages)
Table of Contents
Advertisement
Quick Links
Advertisement
Table of Contents

Related Manuals for Epson BrightLink 697Ui


Summary of Contents for Epson BrightLink 697Ui
- Page 1 ® BrightLink 697Ui User's Guide...
-
Page 3: Table Of Contents
Contents BrightLink 697Ui User's Guide ......................... 13 Introduction to Your Projector ......................... 14 Projector Features..........................14 Product Box Contents........................16 Additional Components ........................ 18 Optional Equipment and Replacement Parts................. 19 Warranty and Registration Information ..................20 Notations Used in the Documentation ....................21 Where to Go for Additional Information .................... - Page 4 Connecting to a Computer for Pen Use or USB Mouse Control ..........44 Connecting a Computer to the Control Pad................45 Connecting to a Computer for Sound..................47 Connecting to Video Sources ......................48 Connecting to an HDMI Video Source ..................48 Connecting to an MHL-Compatible Device ................
- Page 5 Wireless LAN Menu Settings ....................81 Selecting Wireless Network Settings in Windows................83 Selecting Wireless Network Settings on Mac ................83 Setting Up Wireless Network Security ................... 84 Wireless Network Projection from a Mobile Device or Windows Computer (Screen Mirroring) ..85 Screen Mirroring Restrictions ......................
- Page 6 Remote Control Operation ....................... 120 Using the Remote Control as a Wireless Mouse ................. 121 Using the Remote Control as a Pointer..................122 Selecting an Image Source ......................123 Projection Modes ..........................126 Changing the Projection Mode Using the Remote Control ............126 Changing the Projection Mode Using the Menus.................
- Page 7 Stopping Video Action Temporarily ....................156 Zooming Into and Out of Images ...................... 157 Scheduling Projector Events ......................158 Saving a Scheduled Event......................158 Viewing Scheduled Events ......................159 Editing a Scheduled Event......................160 Projector Security Features......................161 Password Security Types ......................162 Setting a Password .........................
- Page 8 Touch Unit Safety Instructions..................... 195 Calibrating for Finger Touch Interactivity ..................197 Using Finger Touch Operations....................200 Using BrightLink with a Computer ....................202 Adjusting the Pen Operation Area ....................203 Easy Interactive Tools ......................... 206 Connecting to a Remote Computer ..................... 206 Remote Desktop System Requirements .................
- Page 9 Sharing the Whiteboard....................... 246 Starting a Shared Whiteboard Session ................... 246 Connecting to a Shared Whiteboard from a Computer or Other Device........250 Supported Web Browsers for Sharing a Whiteboard............... 250 Web Browser Toolbars ......................251 Connecting to a Shared Whiteboard from a Projector............. 253 Using BrightLink Without a Computer ....................
- Page 10 Replacing the Air Filter......................307 Projector Lamp Maintenance....................... 310 Replacing the Lamp ........................ 310 Resetting the Lamp Timer....................... 314 Replacing the Remote Control Batteries ..................315 Replacing the Hard Pen Tips....................... 317 Replacing the Soft Pen Tips ......................319 Transporting the Projector........................ 322 Solving Problems ............................
- Page 11 Solutions When the Image Contains Static During Network Projection ........340 Solutions When You Cannot Connect Using Screen Mirroring............ 341 Solutions When the Image or Sound Contains Static When Using Screen Mirroring....341 Solving Interactive Problems......................342 Solutions When "Error Occurred in the Easy Interactive Function" Message Appears....342 Solutions When the Interactive Pens Do Not Work..............
- Page 12 Restriction of Use ........................363 List of Safety Symbols (corresponding to IEC60950-1 A2)............... 363 FCC Compliance Statement......................367 Open Source Software License......................368 Binding Arbitration and Class Waiver ....................578 Trademarks ............................581 Copyright Notice..........................582 A Note Concerning Responsible Use of Copyrighted Materials........... 582 Copyright Attribution ........................
-
Page 13: Brightlink 697Ui User's Guide
BrightLink 697Ui User's Guide Welcome to the BrightLink 697Ui User's Guide. For a printable PDF copy of this guide, click here. -
Page 14: Introduction To Your Projector
Where to Go for Additional Information Additional Projector Software and Manuals Projector Part Locations Projector Features The BrightLink 697Ui projector includes these special features: Unique interactive functions • Annotation with or without a computer • Annotation with two pens at the same time •... - Page 15 • EasyMP Multi PC Projection software for projecting up to four images from network computers or devices using Epson iProjection • Projection from iOS or Android devices with the included wireless LAN module and free Epson iProjection app; visit epson.com/iprojection (U.S.) or...
-
Page 16: Product Box Contents
• Support for Crestron RoomView network monitoring systems • Network message broadcast system to project timely messages to all networked projectors (Windows only) Product Box Contents Additional Components Optional Equipment and Replacement Parts Warranty and Registration Information Parent topic: Introduction to Your Projector Product Box Contents Save all the packaging in case you need to ship the projector. - Page 17 Make sure your projector box included all of these parts: Projector Remote control Remote control batteries (2 AA alkaline) Interactive pens and replacement pen tips (4 soft tips, 2 hard tips) Control Pad Pen stand 16.4 ft (5 m) USB cables (2)
-
Page 18: Additional Components
This allows you to mirror your smartphone or tablet screens, watch movies, and more. Contact your device manufacturer for compatible adapter options. Unless listed as available from Epson in this table, see your local computer or electronics dealer for purchase information. -
Page 19: Optional Equipment And Replacement Parts
Optional Equipment and Replacement Parts You can purchase screens, other optional accessories, and replacement parts from an Epson authorized reseller. To find the nearest reseller, call 800-GO-EPSON (800-463-7766) in the U.S. or 800-807-7766 in Canada. Or you can purchase online at epsonstore.com... -
Page 20: Warranty And Registration Information
In addition, Epson offers free Extra Care Road Service. In the unlikely event of an equipment failure, you won’t have to wait for your unit to be repaired. Instead, Epson will ship you a replacement unit anywhere in the United States, Canada, or Puerto Rico. See the Extra Care Road Service brochure for details. -
Page 21: Notations Used In The Documentation
• If you still need help after checking this manual and any other sources listed here, you can use the Epson PrivateLine Support service to get help fast. For details, see "Where to Get Help". Parent topic:... - Page 22 You can install the projector software programs listed here and view their manuals for instructions on using them. Note: If you still need help after checking this manual and the sources listed here, you can use the Epson PrivateLine Support service to get help fast. For details, see "Where to Get Help". Projector software Manual...
-
Page 23: Projector Part Locations
Projector Part Locations Check the projector part illustrations to learn about the parts on your projector. Projector Parts - Front/Side Projector Parts - Top/Side Projector Parts - Back Panel Projector Parts - Base Projector Parts - Control Panel Projector Parts - Pen Stand Projector Parts - Remote Control Projector Parts - Control Pad Projector Parts - Touch Unit... -
Page 24: Projector Parts - Front/Side
Projector Parts - Front/Side Remote control receiver Status lights Speaker Lamp cover Lamp cover screw Exhaust vent Cable cover screws... -
Page 25: Projector Parts - Top/Side
Cable cover Parent topic: Projector Part Locations Projector Parts - Top/Side Air filter cover latch Wireless LAN light Obstacle sensors... -
Page 26: Projector Parts - Back Panel
Remote receiver Projection window Interactive pen receiver Control panel Security cable installation slot Air filter cover Air intake vent (air filter) Focus lever Parent topic: Projector Part Locations Related references Projector Light Status Projector Parts - Back Panel... - Page 27 Monitor Out port Video port Audio port for use with the Video port Audio Out port Audio port for use with the Computer port Power inlet HDMI 1/MHL port HDMI 2 port DVI-D Out port Network (LAN) port USB-B port for computer connection USB-A port for USB memory device or document camera USB-A port for USB memory device or document camera Computer port...
-
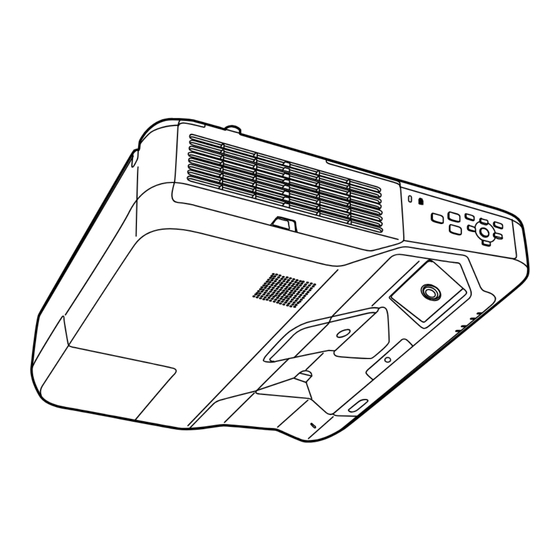
Page 28: Projector Parts - Base
Projector Parts - Base Ceiling mount holes (5) Rear foot holes (2) Security cable attachment point Wall mounting plate holes (4) Illumination sensor Front foot hole Parent topic: Projector Part Locations... -
Page 29: Projector Parts - Control Panel
Projector Parts - Control Panel Source Search button (searches for connected video sources) (Enter) button (selects options) Vertical keystone adjustment buttons (display the adjustment screen and adjust screen shape) and arrow buttons Esc button (cancels/exits functions) W/T (Wide/Tele) buttons (adjust projected image size), horizontal keystone adjustment buttons (adjust screen shape), and arrow buttons Menu button (accesses projector menu system) Home button (accesses projector Home screen) -
Page 30: Projector Parts - Pen Stand
Projector Parts - Pen Stand Front cover Pen tip storage area Pen storage area Battery storage area Wall mounting holes Parent topic: Projector Part Locations... -
Page 31: Projector Parts - Remote Control
Projector Parts - Remote Control... - Page 32 Power button HDMI button (cycles through connected HDMI sources) Computer button Numeric buttons Auto button (automatically adjusts position, tracking, and sync settings) Aspect button (selects the image aspect ratio) Num button (when held down, switches numeric buttons to number function) Menu button (accesses projector menu system) Arrow buttons (move through on-screen options and control wireless mouse functions) Enter button (selects options and controls wireless mouse functions)
-
Page 33: Projector Parts - Control Pad
LAN button (connects to a network source) Source Search button (searches for connected sources) Remote control emitter Parent topic: Projector Part Locations Projector Parts - Control Pad Cable path (upper) Cable path (rear) Installation screw holes (4) Power button Whiteboard button (switches to whiteboard mode) Source Search button (searches for connected sources) USB-B port for connecting a computer (on bottom of control pad) -
Page 34: Projector Parts - Touch Unit
USB-A port for connecting a USB memory device Ports beneath the top cover • Remote port for connecting the remote control cable to power the Control Pad • USB-A port for connecting a computer to the projector through the Control Pad •... - Page 35 Dial cover Touch unit (TCH) port Security cable installation slot Adjustment dials Power light Mounting holes Rear Laser diffusion ports Installation magnets Parent topic: Projector Part Locations...
-
Page 36: Setting Up The Projector
Setting Up the Projector Follow the instructions in these sections to set up your projector for use. Projector Placement Removing and Attaching the Cable Cover Projector Connections Installing Batteries in the Remote Control Installing Batteries in the Pens Projector Placement Your ultra-short throw projector is designed to be installed on a wall (with a wall mount) or vertically on a table (with a table mount) to create an interactive tabletop workspace. -
Page 37: Projector Setup And Installation Options
Projector Setup and Installation Options You can set up or install your projector in the following ways: Mounted on the wall or ceiling Mounted vertically on a table to create an interactive workspace Mounted on the wall or ceiling and projecting from behind a translucent screen (interactive features not supported) - Page 38 Front projection from a table or portable cart (finger touch not supported) Rear projection from a table or portable cart behind a translucent screen (interactive features not supported) Wherever you set up the projector, make sure to position it squarely in front of the screen, not at an angle.
-
Page 39: Projection Distance
Refer to the tables in the Installation Guide included with your mount to determine approximately how far to place the projector from the screen based on the size of the projected image. (Conversion figures may have been rounded up or down.) You can also use the projector Throw Distance Calculator at epson.com/support (U.S.) or epson.ca/support (Canada). -
Page 40: Projector Connections
1. Use a screwdriver to remove both of the cable cover screws. 2. Slide off the cable cover. To attach the cable cover, slide it into position and tighten the screws with a screwdriver. Parent topic: Setting Up the Projector Projector Connections See these sections to connect the projector to a variety of projection sources. -
Page 41: Connecting To Computer Sources
Caution: If you will use the projector at altitudes above 4921 feet (1500 m), turn on High Altitude Mode to ensure the projector's internal temperature is regulated properly. Connecting to Computer Sources Connecting to Video Sources Connecting External Output Devices Connecting to External USB Devices Connecting to a Document Camera Connecting a Printer to the Control Pad... - Page 42 • Windows 10/Windows 8.x: Click EPSON_PJ_UD in the upper right-corner, then select Run EMP_UDSE.exe in the dialog box that appears to install the Epson USB Display software. • Windows 7/Windows Vista: Select Run EMP_UDSE.exe in the dialog box that appears to install the Epson USB Display software.
-
Page 43: Connecting To A Computer For Vga Video
Related tasks Connecting to a Computer for Pen Use or USB Mouse Control Connecting to a Computer for VGA Video You can connect the projector to your computer using a VGA computer cable. Note: To connect a Mac that includes only a Mini DisplayPort, Thunderbolt port, or Mini-DVI port for video output, you need to obtain an adapter that allows you to connect to the projector's VGA video port. -
Page 44: Connecting To A Computer For Pen Use Or Usb Mouse Control
1. Connect the HDMI cable to your computer's HDMI output port. 2. Connect the other end to one of the projector's HDMI ports. Note: The projector converts the digital audio signal sent from your computer into a mono analog signal for the internal speaker or a stereo analog signal if you are connecting to external speakers. -
Page 45: Connecting A Computer To The Control Pad
1. Connect the USB cable to your projector's USB-B port. 2. Connect the other end to any available USB port on your computer. If you want to use the remote control as a wireless mouse, you need to change the USB Type B setting in the projector's Extended menu. - Page 46 5. To use USB Display, do one of the following: • Windows 10/Windows 8.x: Click EPSON_PJ_UD in the upper right-corner, then select Run EMP_UDSe.exe in the dialog box that appears to install the Epson USB Display software.
-
Page 47: Connecting To A Computer For Sound
• Mac: The USB Display setup folder appears on your screen. Select USB Display Installer and follow the on-screen instructions to install the Epson USB Display software. Follow any on-screen instructions. You need to install this software only the first time you connect the projector to the computer. -
Page 48: Connecting To Video Sources
Connecting to Video Sources Follow the instructions in these sections to connect video devices to the projector. Connecting to an HDMI Video Source Connecting to an MHL-Compatible Device Connecting to a Component Video Source Connecting to a Composite Video Source Connecting to a Video Source for Sound Parent topic: Projector Connections... -
Page 49: Connecting To An Mhl-Compatible Device
Then select the audio port you connected to as the HDMI1 Audio Output or HDMI2 Audio Output setting in the Extended menu. Parent topic: Connecting to Video Sources Related references Projector Setup Settings - Extended Menu Connecting to an MHL-Compatible Device If you have an MHL-compatible smartphone or tablet, you can connect it to the projector using either an MHL cable or an HDMI cable with a device-compatible MHL adapter. -
Page 50: Connecting To A Component Video Source
Connecting to a Component Video Source If your video source has component video ports, you can connect it to the projector using an optional component-to-VGA video cable. Depending on your component ports, you may need to use an adapter cable along with a component video cable. 1. -
Page 51: Connecting To A Video Source For Sound
2. Connect the other end to the projector's Video port. Parent topic: Connecting to Video Sources Connecting to a Video Source for Sound You can play sound through the projector's speaker system if your video source has audio output ports. If you are projecting video using the Video or a Computer port, connect the projector to the video source using an optional stereo mini-jack audio cable. -
Page 52: Connecting External Output Devices
2. Connect the other end of the cable to the projector's Audio port that corresponds to the port you are using for video. Parent topic: Connecting to Video Sources Connecting External Output Devices See these sections to connect the projector to external output devices. Connecting to an External Computer Monitor Connecting to an External DVI Monitor or Projector Connecting to External Speakers... -
Page 53: Connecting To An External Dvi Monitor Or Projector
2. Connect the external monitor's cable to your projector's Monitor Out port. Note: Content you draw using the interactive features is not displayed on an external monitor unless you draw it using Easy Interactive Tools. Parent topic: Connecting External Output Devices Connecting to an External DVI Monitor or Projector If your external monitor or projector uses a DVI-D connector, you can connect it to the projector's DVI-D Out port. -
Page 54: Connecting To External Speakers
3. Connect the other end to your monitor or projector's DVI-D port. 4. Select the image source you want to display on the DVI monitor or projector as the A/V Settings > DVI Output setting in the projector's Extended menu. Note: Refresh speed may vary depending on the DVI Output setting. -
Page 55: Connecting To External Usb Devices
4. Connect the stereo mini-jack end of the cable to your projector's Audio Out port. Parent topic: Connecting External Output Devices Related references Projector Setup Settings - Extended Menu Connecting to External USB Devices Follow the instructions in these sections to connect external USB devices to the projector. USB Device Projection Connecting a USB Device or Camera to the Projector Connecting a USB Device to the Control Pad... -
Page 56: Connecting A Usb Device Or Camera To The Projector
• Digital camera or smartphone • USB hard drive • Multimedia storage viewer Note: Digital cameras or smartphones must be USB-mounted devices, not TWAIN-compliant devices, and must be USB Mass Storage Class-compliant. Note: USB hard drives must meet these requirements: •... -
Page 57: Connecting A Usb Device To The Control Pad
2. Connect the USB cable (or USB flash drive) to the projector's USB-A port. Note: Do not connect a USB hub or a USB cable longer than 10 feet (3 m), or the device may not operate correctly. 3. Connect the other end of the cable (if applicable) to your device. Parent topic: Connecting to External USB Devices Related tasks... - Page 58 2. Connect a USB cable to the USB-A port on the projector and to the USB-B port on the control pad. 3. Connect the USB cable for the device (or USB flash drive ) to the USB-A port on the bottom of the control pad.
-
Page 59: Selecting The Connected Usb Source
USB-A port and to the document camera's USB Type B port. • For the Epson DC-11 document camera, connect it to the projector's Computer or Video port and to the corresponding port on the document camera. See the document camera manual for details. -
Page 60: Connecting A Printer To The Control Pad
Projector Connections Connecting a Printer to the Control Pad You can connect an Epson printer or all-in-one device to the Printer port on the control pad and use it to print your projected and annotated content from the whiteboard. Note: Make sure the printer meets the control command requirements. -
Page 61: Connecting Multiple Projectors Of The Same Model
2. Connect another USB cable to the Printer port on the control pad. Make sure the cable is no longer than 16.4 ft (5 m). 3. Connect the other end of the cable to the USB type B port on the printer. Note: You can connect a wireless printer by selecting Network as the Whiteboard Settings >... - Page 62 1. Connect one end of the cable to the SYNC In port on one projector, and connect the other end to the SYNC Out port on the other projector. Note: If you are connecting three or more projectors, connect the projectors in a chain as shown. 2.
-
Page 63: Installing Batteries In The Remote Control
Installing Batteries in the Remote Control The remote control uses the two AA batteries that came with the projector. Caution: Use only the type of batteries specified in this manual. Do not install batteries of different types, or mix new and old batteries. 1. -
Page 64: Installing Batteries In The Pens
3. Replace the battery cover and press it down until it clicks into place. Warning: Dispose of used batteries according to local regulations. Do not expose batteries to heat or flame. Keep batteries out of the reach of children; they are choking hazards and are very dangerous if swallowed. - Page 65 2. Insert the battery with the + and – ends facing as shown. 3. Replace the battery cover and press it down until it clicks into place. Warning: Dispose of used batteries according to local regulations. Do not expose batteries to heat or flame.
-
Page 66: Using The Projector On A Network
Note: If your projector is connected via a LAN cable to a network that includes a wireless access point, you can connect to the projector wirelessly through the access point using the Epson network software. Connecting to a Wired Network... -
Page 67: Selecting Wired Network Settings
1. Connect one end of the network cable to your network hub, switch, or router. 2. Connect the other end of the cable to the projector's LAN port. Parent topic: Wired Network Projection Selecting Wired Network Settings Before you can project from computers on your network, you must select the network settings for the projector using its menu system. - Page 68 3. Select the Network menu and press Enter. 4. Select Network Configuration and press Enter. 5. Select the Basic menu and press Enter. 6. Select the following basic options as necessary: • Projector Name lets you enter a name up to 16 alphanumeric characters long to identify the projector over the network.
- Page 69 • Moderator Password lets you enter a password up to 4 numbers long for accessing the projector as a moderator using EasyMP Multi PC Projection or the Epson iProjection app. (No default password.) • Projector Keyword lets you turn on a security password to prevent access to the projector by anyone not in the room with it.
-
Page 70: Wireless Network Projection
Note: If your projector is connected via a LAN cable to a network that includes a wireless access point, you can connect to the projector wirelessly through the access point using the Epson network software. Installing the Wireless LAN Module... -
Page 71: Installing The Wireless Lan Module
Optional Equipment and Replacement Parts Installing the Wireless LAN Module To use the projector over a wireless network, install the Epson 802.11b/g/n wireless module in the projector. Do not install any other type of wireless module. Caution: Never remove the module while its indicator light is blue or flashing, or while you are projecting wirelessly. - Page 72 2. Unscrew and remove the cable cover if it is attached (screwdriver not included).
-
Page 73: Connecting Directly To A Smartphone Or Tablet
You can display a QR code on the screen and use it to connect a single smartphone or tablet to your projector with the Epson iProjection app. 1. Download the latest version of Epson iProjection from the App Store or Google Play and install it on your smartphone or tablet. - Page 74 3. Select the Network menu and press Enter. 4. Select Network Configuration and press Enter. 5. Select the Wireless LAN menu and press Enter. 6. Select Connection Mode and press Enter. 7. Select Quick and press Enter, then press Enter again. 8.
-
Page 75: Using Quick Wireless Connection (Windows)
12. Use the QR code reader feature to read the QR code and connect your device to the projector. Your smartphone or tablet is now connected to your projector. Visit epson.com/iprojection (U.S.) or epson.ca/iprojection (Canada) for information on controlling your projector with the Epson iProjection app. Parent topic: Wireless Network Projection Using Quick Wireless Connection (Windows) You can create a Quick Wireless Connection USB Key to quickly connect the projector to a Windows computer wirelessly. - Page 76 1. Create a Quick Wireless Connection USB Key with a USB flash drive and the EasyMP Multi PC Projection software. Note: See the EasyMP Multi PC Projection Operation Guide for instructions. 2. Turn on the projector. 3. Insert the USB key into the projector's USB-A port.
- Page 77 Note: If the control pad is connected to the projector, you can connect the USB key to the USB-A port on the control pad instead. You see a projected message that the network information update is complete. 4. Remove the USB key. 5.
-
Page 78: Selecting Wireless Network Settings Manually
8. When you finish projecting wirelessly, select the Safely Remove Hardware option in the Windows taskbar, then remove the USB key from your computer. Note: You can share the USB key with other computers without disconnecting your computer. You may need to restart your computer to reactivate your wireless LAN connection. Parent topic: Wireless Network Projection Selecting Wireless Network Settings Manually... - Page 79 PJLink protocol for projector control. • Remote Password lets you enter a password up to 8 alphanumeric characters long for accessing the Remote or Basic Control screen in the Epson Web Control. (Default user name is EPSONREMOTE; default password is guest.) •...
- Page 80 • Display LAN Info lets you select how the projector displays network information. You can select an option to display a QR code that lets you quickly connect your iOS or Android devices using the Epson iProjection app. Note: Use the displayed keyboard to enter the name, passwords and keyword. Press the arrow buttons on the remote control to highlight characters and press Enter to select them.
-
Page 81: Wireless Lan Menu Settings
Wireless LAN Menu Settings Setting Options Description Connection Mode Quick Selects the type of wireless connection: Advanced Quick: lets you directly connect to multiple devices and computers using the projector's wireless network. For computers, use Easy MP Multi PC Projection to use this mode. - Page 82 Setting Options Description Security Open Selects the type of security used on the wireless network WPA2-PSK WPA2-PSK: uses WPA2 security WPA/WPA2-PSK with AES for encryption. Use the WPA2-EAP Passphrase value to establish a connection from a computer WPA/WPA2-EAP WPA/WPA2-PSK: uses WPA personal mode;...
-
Page 83: Selecting Wireless Network Settings In Windows
Setting Options Description Channel In Quick connection mode, selects the frequency band (channel) used by the wireless 11ch IP Settings DHCP (On or Off) Selects DHCP if your network assigns IP addresses IP Address automatically, or turns off DHCP Subnet Mask so you can enter the network's IP address, subnet mask, and Gateway Address... -
Page 84: Setting Up Wireless Network Security
2. Make sure AirPort is turned on, then do one of the following: • If your projector is set up on an existing network (Advanced mode), select the network name (SSID). • If your projector is configured for Quick mode, select the projector's SSID. Parent topic: Wireless Network Projection Setting Up Wireless Network Security... -
Page 85: Wireless Network Projection From A Mobile Device Or Windows Computer (Screen Mirroring)
4. Select Network Configuration and press Enter. 5. Select the Wireless LAN menu and press Enter. 6. Select the Security setting and press Enter. 7. Select the security settings for your network. 8. When you finished, select Complete and follow the on-screen instructions to save your settings and exit the menus. - Page 86 1. Press the Menu button. 2. Select the Network menu and press Enter. 3. Select On as the Screen Mirroring setting. 4. Select Screen Mirroring Settings and press Enter. 5. To enter a name for the projector, select Display Name. You can enter up to 32 alphanumeric characters.
-
Page 87: Connecting For Screen Mirroring With A Windows 8.X/Windows 10 Computer
9. Select Display and select these settings as necessary • Display PIN Code selects whether the PIN code is displayed on the projected image while projecting from sources other than the Screen Mirroring source or not. • Display Device Name selects whether the connected device name is displayed on the projected image while projecting from sources other than the Screen Mirroring source or not. -
Page 88: Connecting For Screen Mirroring With Miracast
Connecting for Screen Mirroring with Miracast If your mobile device supports Miracast, you can connect it to the projector wirelessly and project images and sound. 1. Select the Screen Mirroring settings on your projector as necessary. 2. Press the LAN button on the remote control to switch to the Screen Mirroring source. You see the Screen Mirroring standby screen. - Page 89 2. Select the Network menu and press Enter. 3. Select Network Configuration and press Enter. 4. Select the Notifications menu and press Enter. 5. Turn on Mail Notification. 6. Enter the IP address for the SMTP Server setting. Note: To enter the IP address using the numeric keys on the remote control, press and hold the Num button.
-
Page 90: Network Projector E-Mail Alert Messages
• The email address entered as the From setting • Epson Projector on the subject line • The name of the projector experiencing a problem • The IP address of the affected projector •... - Page 91 4. Select the Notifications menu and press Enter. 5. Turn on the SNMP setting. 6. Enter up to two IP addresses to receive SNMP notifications as the Trap IP Address setting, using 0 to 255 for each address field. Note: To enter the IP address using the numeric keys on the remote control, press and hold the Num button.
- Page 92 7. Select the Others menu and press Enter. 8. If you want to use the Secure HTTP protocol to encrypt communication when using Web Control, turn on the Secure HTTP setting and import the web server certificate using the Web Server Cert. setting.
-
Page 93: Controlling A Networked Projector Using A Web Browser
Controlling a Networked Projector Using a Web Browser Once you have connected your projector to your network, you can select projector settings and control projection using a compatible web browser. This lets you access the projector remotely. Note: The web setup and control features support Microsoft Internet Explorer 9.0 or later, and Safari on networks that do not use a proxy server for connection. - Page 94 A/V Mute button control Page up and Page down button controls Searches for sources Selects the Whiteboard source Selects the network source Volume button controls Displays a QR code for connecting with iOS or Android devices using the Epson iProjection Displays closed captions...
-
Page 95: Creating An Address Book
7. Select the icon corresponding to the projector function you want to control. Parent topic: Using the Projector on a Network Creating an Address Book When sending e-mails from whiteboard mode, you can choose e-mail addresses from an address book . You can create the address book by loading a text file of up to 999 addresses through the web control page. -
Page 96: Crestron Roomview Support
Crestron RoomView lets you control and monitor your projector using a web browser. Note: You cannot use the Epson Web Control feature or the Message Broadcasting plug-in for EasyMP Monitor when you use Crestron RoomView. - Page 97 4. Select the Others menu and press Enter. 5. Set the Crestron RoomView setting to On to allow the projector to be detected. Note: Enabling Crestron RoomView disables the Epson Message Broadcasting feature in the EasyMP Monitor software. 6. When you finish selecting settings, select Complete and follow the on-screen instructions to save your settings and exit the menus.
-
Page 98: Controlling A Networked Projector Using Crestron Roomview
Controlling a Networked Projector Using Crestron RoomView Once you have set up your projector to use Crestron RoomView, you can control and monitor projection using a compatible web browser. 1. Start your web browser on a computer connected to the network. 2. -
Page 99: Registering A Digital Certificate On The Projector
Parent topic: Crestron RoomView Support Registering a Digital Certificate on the Projector Follow the instructions here if you need to install a digital certificate on the projector to provide security for your presentation files. Importing a Web Server Certificate Using the Projector Menus Registering Digital Certificates from a Web Browser Digital Certificate Types Parent topic:... -
Page 100: Registering Digital Certificates From A Web Browser
4. Select the Network Configuration setting and press Enter. 5. Select the Others menu and press Enter. 6. Select On as the Secure HTTP setting. 7. Select the Web Server Cert. setting and press Enter. 8. Select Register and press Enter. 9. - Page 101 4. Type the projector's IP address into the browser's address box and press the computer's Enter key. You see the Web Control screen and a prompt to enter a user ID and password. 5. Enter the following information in uppercase or lowercase letters, exactly as shown: •...
-
Page 102: Digital Certificate Types
Digital Certificate Types You can register these types of digital certificates. Client Certificate (PEAP-TLS/EAP-TLS) Specification Description Format PKCS#12 Extension PFX/P12 Encryption Hashes MD5/SHA-1/SHA-256/SHA-384/SHA-512 Key length 512/1024/2048/4096 bit Password Up to 32 alphanumeric characters; required Server Certificate (PEAP/PEAP-TLS/EAP-TLS/EAP-Fast) Specification Description Format X509v3 Extension DER/CER/PEM... - Page 103 Specification Description Common name Network host name Organization Optional Password Up to 32 alphanumeric characters; required Parent topic: Registering a Digital Certificate on the Projector...
-
Page 104: Using Basic Projector Features
Using Basic Projector Features Follow the instructions in these sections to use your projector's basic features. Turning On the Projector Turning Off the Projector Selecting the Language for the Projector Menus Image Shape Resizing the Image with the Wide and Tele Buttons Adjusting the Image Position Focusing the Image Remote Control Operation... - Page 105 1. Connect the power cord to the projector's power inlet. 2. Plug the power cord into an electrical outlet. Note: With Direct Power On turned on, the projector turns on as soon as you plug it in. The projector's On/Standby light turns blue. This indicates that the projector is receiving power. 3.
-
Page 106: Using The Home Screen
• Insert a DVD or other video media and press the play button, if necessary. • Press the Source Search button on the projector or remote control to detect the video source. • Press the button for the video source on the remote control. •... - Page 107 2. Press the arrow buttons on the remote control or control panel to navigate the screen, and press Enter to select an option. Describes the function of the selection Displays the whiteboard source Shares the whiteboard Starts a remote desktop connection Displays a QR code for device connection Displays the on-screen help Hides the Home screen...
-
Page 108: Turning Off The Projector
2. Press the power button again. (To leave it on, press any other button.) The projector beeps twice, the lamp turns off, and the Status light turns off. Note: With Epson's Instant Off technology, there is no cool-down period so you can pack up the projector for transport right away (if necessary). - Page 109 Caution: Do not turn the projector on immediately after turning it off. Turning the projector on and off frequently may shorten the life of the lamp. 3. To transport or store the projector, make sure the Status light is off, then unplug the power cord. Caution: To avoid damaging the projector or lamp, never unplug the power cord when the Status light is on or flashing.
-
Page 110: Selecting The Language For The Projector Menus
Selecting the Language for the Projector Menus If you want to view the projector's menus and messages in another language, you can change the Language setting. 1. Turn on the projector. 2. Press the Menu button. 3. Select the Extended menu and press Enter. 4. -
Page 111: Correcting Image Shape With The Keystone Buttons
Correcting Image Shape with Arc Correction Parent topic: Using Basic Projector Features Correcting Image Shape with the Keystone Buttons You can use the projector's keystone correction buttons to correct the shape of an image that is unevenly rectangular on the sides. Note: You can use the keystone buttons to correct the image up to ±... - Page 112 3. Press a keystone button on the projector's control panel to adjust the image shape. Note: The horizontal keystone adjustment buttons are labeled W and T. After correction, your image is slightly smaller. Note: If the projector is installed out of reach, you can also correct the image shape with the remote control using the H/V-Keystone settings in the projector menus.
-
Page 113: Correcting Image Shape With Quick Corner
Related references Projector Feature Settings - Settings Menu Correcting Image Shape with Quick Corner You can use the projector's Quick Corner setting to correct the shape and size of an image that is unevenly rectangular on all sides. Note: Adjusting the Quick Corner setting may affect interactive pen and finger touch calibration. 1. -
Page 114: Correcting Image Shape With Arc Correction
4. Select the Geometry Correction setting and press Enter. 5. Select the Quick Corner setting and press Enter. Then press Enter again. You see the Quick Corner adjustment screen: Note: To reset your adjustments, press and hold the Esc button for at least 2 seconds to display a reset screen. - Page 115 1. Turn on the projector and display an image. Note: You can display a pattern to aid in adjusting the projected image using the Settings menu. 2. Press the Menu button. 3. Select the Settings menu and press Enter. 4. Select the Geometry Correction setting and press Enter. 5.
-
Page 116: Resizing The Image With The Wide And Tele Buttons
You see the Arc Correction adjustment screen: Note: To reset your adjustments, press the Esc button for at least 2 seconds to display a reset screen, and select Yes. 6. Use the arrow buttons on the projector or the remote control to select the corner or side of the image you want to adjust. -
Page 117: Adjusting The Image Position
3. To reduce the image size, press the T (Tele) button. After you adjust the image size, the Image Shift screen is displayed automatically for adjusting the image position. Note: If the projector is installed out of reach, you can also adjust the image size with the remote control using the Zoom setting in the projector menus. -
Page 118: Focusing The Image
1. Turn on the projector and display an image. 2. Adjust the image size using the W (Wide) and T (Tele) buttons. After you adjust the image size, the Image Shift screen is displayed automatically. 3. Use the arrow buttons on the projector or remote control to adjust the image position. Note: You can also use the Settings menu to adjust the Image Shift setting. - Page 119 2. Slide the air filter cover latch and open the air filter cover. 3. Raise or lower the focus lever to sharpen the image. Parent topic: Using Basic Projector Features Related references Projector Feature Settings - Settings Menu...
-
Page 120: Remote Control Operation
Remote Control Operation The remote control lets you control the projector from almost anywhere in the room, up to 19.7 feet (6 m) away. You can point it at the screen or board, or the front or back of the projector. Make sure that you aim the remote control at the projector's receivers within the angles listed here. -
Page 121: Using The Remote Control As A Wireless Mouse
Using the Remote Control as a Wireless Mouse Using the Remote Control as a Pointer Parent topic: Using Basic Projector Features Using the Remote Control as a Wireless Mouse You can use the projector's remote control as a wireless mouse so you can control projection at a distance from the computer. -
Page 122: Using The Remote Control As A Pointer
• To move the cursor on the screen, use the arrow buttons. • To left-click, press the button once (press it twice to double-click). • To right-click, press the Esc button. • To drag-and-drop, hold the button as you move the cursor with the arrow buttons, then release button at the destination. -
Page 123: Selecting An Image Source
3. Press Esc to clear the pointer from the screen. Parent topic: Remote Control Operation Related references Projector Feature Settings - Settings Menu Selecting an Image Source If you connected multiple image sources to the projector, such as a computer and DVD player, you may want to switch from one image source to the other. - Page 124 3. Do one of the following: • Press the Source Search button on the projector, remote control, or control pad until you see the image from the source you want.
- Page 125 • Press the button for the source you want on the remote control. If there is more than one port for that source, press the button again to cycle through the sources. HDMI and MHL sources Computer port source (Computer port) Network source (LAN and Screen Mirroring) Whiteboard source (toggles between the whiteboard and the previously selected source) •...
-
Page 126: Projection Modes
Related references Projector Setup Settings - Extended Menu Related tasks Using the Home Screen Projection Modes Depending on how you positioned the projector, you may need to change the projection mode so your images project correctly. • Front lets you project from a table in front of the screen. •... -
Page 127: Changing The Projection Mode Using The Menus
2. Hold down the A/V Mute button on the remote control for five seconds. The image disappears briefly and reappears flipped top-to-bottom. 3. To change projection back to the original mode, hold down the A/V Mute button for five seconds again. -
Page 128: Image Aspect Ratio
5. Select a projection mode and press Enter. 6. Press Menu or Esc to exit the menus. Parent topic: Projection Modes Image Aspect Ratio The projector can display images in different width-to-height ratios called aspect ratios. Normally the input signal from your video source determines the image's aspect ratio. However, for certain images you can change the aspect ratio to fit your screen by pressing a button on the remote control. -
Page 129: Available Image Aspect Ratios
3. To cycle through the available aspect ratios for your input signal, press the Aspect button repeatedly. Note: To remove black bars when projecting from a computer, set the Resolution setting to Wide or Normal in the Signal menu, depending on your computer's resolution. Parent topic: Image Aspect Ratio Related references... -
Page 130: Color Mode
Color Mode The projector offers different Color Modes to provide optimum brightness, contrast, and color for a variety of viewing environments and image types. You can select a mode designed to match your image and environment, or experiment with the available modes. If you always want to use a particular color mode for a certain video input source, you can select it using the projector menus. -
Page 131: Available Color Modes
Available Color Modes You can set the projector to use these Color Modes, depending on the input source you are using: Color Mode Description Presentation Best for color presentations in a bright room Dynamic Best for video games in a bright room Cinema Best for movies projected in a dark room with natural tone images sRGB... -
Page 132: Controlling The Volume With The Volume Buttons
3. Select the Image menu and press Enter. 4. Select the Auto Iris setting and select High Speed. Note: You can turn Auto Iris on or off for each Color Mode that supports the feature. You cannot change the Auto Iris setting when you are using a Closed Caption setting. 5. -
Page 133: Projecting A Pc Free Presentation
2. To lower or raise the volume, press the Volume buttons on the remote control. A volume gauge appears on the screen. 3. To set the volume to a specific level for an input source, use the projector menus. Parent topic: Using Basic Projector Features Projecting a PC Free Presentation You can use your projector's PC Free feature whenever you connect a USB device that contains... -
Page 134: Starting A Pc Free Slide Show
File type and Details extension Image (.jpg) Make sure the file is not: • CMYK format • Progressive format • Highly compressed • Above 8192 × 8192 resolution Image (.bmp) Make sure the file resolution is not above 1280 × 800 Image (.gif ) Make sure the file is not: •... - Page 135 1. Press the Source Search button on the projector, remote control, or Control Pad, or tap the Source Select icon on the whiteboard. 2. Select the USB1 source. The PC Free screen appears. Note: If the Select Drive screen appears, press the arrow buttons to select the drive and press Enter.
-
Page 136: Starting A Pc Free Pdf File Presentation
4. Do one of the following: • To display an individual image, press the arrow buttons to highlight the image and press Enter. (Press the Esc button to return to the file list screen.) • To display a slide show of all the images in a folder, press the arrow buttons to highlight the Slideshow option at the bottom of the screen and press Enter. - Page 137 The PC Free screen appears. 2. Do the following as necessary to locate your files: • If you need to display files inside a subfolder on your device, press the arrow buttons to highlight the folder and press the Enter button. •...
-
Page 138: Starting A Pc Free Movie Presentation
• To display a menu of pages to select from, press the Esc button. Then press the left or right arrow button to select a page and press Enter. • To enlarge the view of a page to fit the screen, press Enter. Press Enter again to return to standard size display. - Page 139 The PC Free screen appears. 2. Do the following as necessary to locate your files: • If you need to display files inside a subfolder on your device, press the arrow buttons to highlight the folder and press the Enter button. •...
-
Page 140: Pc Free Display Options
PC Free Display Options You can select these display options when using the projector's PC Free feature. Setting Options Description Display Order Name Order Displays files in name order Date Order Displays files in date order Sort Order In Ascending Sorts files in first-to-last order In Descending Sorts files in last-to-first order... - Page 141 Setting Options Description Effect Wipe Transitions between images with a wipe effect Dissolve Transitions between images with a dissolve effect Random Transitions between images using a random variety of effects Parent topic: Projecting a PC Free Presentation...
-
Page 142: Adjusting Projector Features
Adjusting Projector Features Follow the instructions in these sections to use your projector's feature adjustments. Projecting Two Images Simultaneously Using Multiple Projectors (Duolink) Shutting Off the Picture and Sound Temporarily Stopping Video Action Temporarily Zooming Into and Out of Images Scheduling Projector Events Projector Security Features Creating a User Pattern to Display... -
Page 143: Projecting Two Images Simultaneously
Projecting Two Images Simultaneously You can use the split screen feature to simultaneously project two images from different image sources next to each other. You can control the split screen feature using the remote control, the projector menus, or the interactive function. Note: While you use the split screen feature, other projector features may not be available and some settings may be automatically applied to both images. - Page 144 1. Press the Split button on the remote control. The currently selected input source moves to the left side of the screen. 2. Press the Menu button. You see this screen: 3. To select an input source for the other image, select the Source setting, press Enter, select the input source, select Execute, and press Enter.
-
Page 145: Input Sources For Split Screen Projection
6. To choose the audio you want to hear, select the Audio Source setting, press Enter, select an audio option, press Enter, and press Menu to exit. 7. To exit the split screen feature, press the Split or Esc button. Input Sources for Split Screen Projection Parent topic: Adjusting Projector Features... -
Page 146: Projector Identification System For Multiple Projector Control
Adjusting Color Uniformity Adjusting the Lamp's Brightness Matching the Image Colors Adjusting RGBCMY Parent topic: Adjusting Projector Features Projector Identification System for Multiple Projector Control You can operate multiple projectors using one remote control for more elaborate presentations. To do this, you assign an identification number to each projector and to the remote control. -
Page 147: Setting The Remote Control Id
4. Select Projector ID and press Enter. 5. Press the arrow buttons on the remote control to select the identification number you want to use for the projector. Then press Enter. Repeat these steps for all the other projectors you want to operate from one remote control. Note: If you don't know the projector's ID, aim the remote control at the projector and press the ID button to temporarily display the projector's ID on the screen. -
Page 148: Adjusting Color Uniformity
3. Aim the remote control at that projector. 4. Hold down the ID button on the remote control while you press the numeric button that matches the projector's ID. Then release the buttons. 5. Press the ID button on the remote control to check if the ID-setting process worked. You see a message displayed by the projector. - Page 149 1. Press the Menu button on the remote or control panel, select the Extended menu, and press Enter. 2. Select the Multi-Projection setting and press Enter. 3. Select the Color Uniformity setting and press Enter. 4. Select On as the Color Uniformity setting and press Enter, then press Esc. 5.
-
Page 150: Adjusting The Lamp's Brightness
8. Select the area you want to adjust and press Enter. 9. Select Red, Green, or Blue and press the left arrow button to weaken the color tone or the right arrow button to strengthen the color tone. Note: The adjustment screen changes each time you press Enter. 10. - Page 151 2. Press the Menu button. 3. Select the ECO menu and press Enter. 4. Select Normal for the Power Consumption setting and press Esc. 5. Select the Extended menu and press Enter. 6. Select the Multi-Projection setting and press Enter.
-
Page 152: Matching The Image Colors
7. Select the Brightness Level setting and press Enter. 8. Select a brightness level and press Enter. 9. Press Esc to return to the previous screen. Parent topic: Using Multiple Projectors (Duolink) Matching the Image Colors You can match the display quality of multiple projectors that will project next to one another. 1. - Page 153 3. Select the Multi-Projection setting and press Enter. 4. Select the Color Matching setting and press Enter. 5. Select the Adjustment Level setting and press Enter. You see this screen: 6. Press the left or right arrow buttons to select a value for the Adjustment Level setting. Note: There are six adjustment levels ranging from white to black and you can adjust each level individually.
-
Page 154: Adjusting Rgbcmy
Adjusting RGBCMY You can adjust the Hue, Saturation, and Brightness settings for R (red), G (green), B (blue), C (cyan), M (magenta), and Y (yellow) color components. Turn on all the projectors and select the RGBCMY setting in each projector's Extended menu so that the color tone on the combined screen becomes entirely even. - Page 155 4. Select the RGBCMY setting and press Enter. 5. Select the color you want to adjust and press Enter. You see this screen: • To adjust the overall hue of the color, adjust the Hue setting. • To adjust the overall vividness of the color, adjust the Saturation setting. •...
-
Page 156: Shutting Off The Picture And Sound Temporarily
Shutting Off the Picture and Sound Temporarily You can temporarily turn off the projected picture and sound if you want to redirect your audience's attention during a presentation. Any sound or video action continues to run, however, so you cannot resume projection at the point that you stopped it. -
Page 157: Zooming Into And Out Of Images
2. To restart the video action in progress, press Freeze again. Parent topic: Adjusting Projector Features Zooming Into and Out of Images You can draw attention to parts of a presentation by zooming into a portion of the image and enlarging it on the screen. -
Page 158: Scheduling Projector Events
• To return to the original image size, press Esc. Parent topic: Adjusting Projector Features Scheduling Projector Events You can save a projector command, such as turning the projector on or off or switching input sources, as an "event". You can schedule when you want the projector to automatically execute the command. Note: The Schedule Protection setting in the Password Protection menu must be turned off to schedule an event. -
Page 159: Viewing Scheduled Events
4. Select the Schedule menu and press Enter. 5. Select Add New and press Enter. You see a screen like this: 6. In the Event Settings section, select the events you want to have occur. (Select No Change for events that you do not want to occur.) 7. -
Page 160: Editing A Scheduled Event
4. Select Schedule and press Enter. You see a screen like this: Colored boxes on the calendar indicate the following: One-time event Repeating event Communication is on or off Event is invalid 5. To view an event, press the left and right arrow buttons on the remote to select a day. The screen displays the details of the events scheduled for that day. -
Page 161: Projector Security Features
You see a screen like this: 4. Press the left or right arrow buttons to highlight the date on the calendar containing the scheduled event you want to edit. 5. Press the up or down arrow buttons to highlight the event you want to edit, and press Esc. 6. -
Page 162: Password Security Types
• Security cabling to physically cable the projector in place. Password Security Types Locking the Projector's Buttons Installing a Security Cable Parent topic: Adjusting Projector Features Password Security Types You can set up these types of password security using one shared password: •... - Page 163 1. Hold down the Freeze button on the remote control for about five seconds or until you see this menu. 2. Press the down arrow to select Password and press Enter. You see the prompt "Change the password?". 3. Select Yes and press Enter. 4.
-
Page 164: Selecting Password Security Types
7. Make a note of the password and keep it in a safe place in case you forget it. Parent topic: Password Security Types Selecting Password Security Types After setting a password, you see this menu, allowing you to select the password security types you want to use. -
Page 165: Entering A Password To Use The Projector
Parent topic: Password Security Types Entering a Password to Use the Projector If a password is set up and a Power On Protection password is enabled, you see a prompt to enter a password whenever you turn on the projector. You must enter the correct password to use the projector. -
Page 166: Saving A User's Logo Image To Display
• If you continue to enter an incorrect password many times in succession, the projector displays a request code and a message to contact Epson Support. Do not attempt to enter the password again. When you contact Epson Support, provide the displayed request code and proof of ownership for assistance in unlocking the projector. - Page 167 2. Press the Menu button, select the Extended menu, and press Enter. 3. Select the User's Logo setting and press Enter. You see a prompt asking if you want to use the displayed image as a user's logo. 4. Select Yes and press Enter. You see a selection box overlaying your image.
- Page 168 You see the User's Logo zoom factor menu. 7. Select a zoom percentage and press Enter. You see a prompt asking if you want to save the image as the User's Logo. 8. Select Yes and press Enter. You see a completion message. 9.
-
Page 169: Locking The Projector's Buttons
Locking the Projector's Buttons You can lock the buttons on the projector's control panel to prevent anyone from using the projector. You can lock all the buttons or all the buttons except the power button. 1. Press the Menu button. 2. -
Page 170: Installing A Security Cable
Parent topic: Locking the Projector's Buttons Related references Projector Feature Settings - Settings Menu Installing a Security Cable You can install two types of security cables on the projector to deter theft. • Use the security slot on the projector to attach a Kensington lock. See your local computer or electronics dealer for purchase information. -
Page 171: Copying Menu Settings Between Projectors
2. Press the Menu button, select the Settings menu, and press Enter. 3. Select the Pattern setting and press Enter. 4. Select the User Pattern setting and press Enter. You see a prompt asking if you want to use the displayed image as a User Pattern. Note: When you select User Pattern, adjustments such as Keystone, E-Zoom, Aspect, Adjust Zoom, or Image Shift are temporarily canceled. -
Page 172: Saving Settings To A Usb Flash Drive
Correction settings. Any saved User's Logo setting on the projector will transfer to the other projector. Caution: If the copy process fails due to a power failure, communication error, or for any other reason, Epson will not be responsible for any repair costs incurred. The following settings will not transfer between projectors: •... -
Page 173: Transferring Settings From A Usb Flash Drive
2. Insert the flash drive into the USB-A port. Note: Connect the flash drive directly to the projector. Do not use a hub or your settings may not be saved correctly. 3. Press and hold the Esc button on the control panel or remote control as you connect the power cord to the projector's power inlet. -
Page 174: Saving Settings To A Computer
Do not adjust image settings on a projector until after you transfer settings to it. Otherwise, you may have to repeat your adjustments. 1. Turn off the projector and unplug the power cord from the projector's power inlet. 2. Insert the flash drive into the USB-A port. Note: Connect the flash drive directly to the projector. - Page 175 Your computer must be running one of the following operating systems: • Windows Vista • Windows 7 • Windows 8.x • Windows 10 • OS X 10.7.x • OS X 10.8.x • OS X 10.9.x • OS X 10.10.x • OS X 10.11.x •...
-
Page 176: Transferring Settings From A Computer
The projector shows up as a removable disk on your computer. 6. Open the removable disk and copy the pjconfdata.bin file to your computer. 7. Once the file has copied, do one of the following: • Windows: Open the My Computer, Computer, or Windows Explorer utility. Right-click the name of your projector (listed as a removable disk) and select Eject. - Page 177 2. Connect a USB cable to your projector's USB-B port. 3. Connect the other end to any available USB port on your computer. 4. Press and hold the Menu button on the control panel or remote control as you connect the power cord to the projector's power inlet.
- Page 178 Parent topic: Copying Menu Settings Between Projectors...
-
Page 179: Using The Interactive Features
Using the Interactive Features Follow the instructions in these sections to use your projector's interactive features. Interactive Modes Using the Interactive Pens Using Finger Touch Interactivity Using BrightLink with a Computer Windows Pen Input and Ink Tools Whiteboard Mode Using BrightLink Without a Computer Splitting the Interactive Screen Using Interactive Features with Two Projectors Interactive Modes... -
Page 180: Using The Projected Screen As A Whiteboard (Built-In Whiteboard Mode)
Controlling Computer Features from a Projected Screen (PC Interactive Mode) Parent topic: Using the Interactive Features Using the Projected Screen as a Whiteboard (Built-in Whiteboard Mode) You can use the interactive pens or your finger to write or draw on the projection surface just as you would on a chalkboard or dry erase board. -
Page 181: Drawing On A Projected Image (Built-In Annotation Mode)
3. To close the main toolbar, select the icon at the bottom of the toolbar. Note: If you want to hide the toolbar automatically after drawing, select the icon at the bottom of the toolbar. 4. To show or hide the projection control toolbar, select the arrow. - Page 182 You see the main toolbar on the side and the projection control toolbar on the bottom of the projected image. 3. To move the main toolbar to the other side of the screen, tap the arrow on the opposite side of the screen.
-
Page 183: Controlling Computer Features From A Projected Screen (Pc Interactive Mode)
You can navigate, select, and interact with your computer programs from the projected screen using the interactive pens or your finger just as you would a mouse. Note: Mac users need to install the Easy Interactive Driver before using PC Interactive mode. Go to epson.com/support (U.S.) or epson.ca/support (Canada) and select your projector. - Page 184 3. Press the Menu button on the remote control, select the Extended menu, and press the Enter button. 4. Select the USB Type B setting and press the Enter button. 5. Select one of the following: • Easy Interactive Function to use PC Interactive mode. •...
-
Page 185: Pc Interactive Mode System Requirements
6. Press the Esc button to exit the USB Type B menu. 7. Select the Easy Interactive Function setting and press the Enter button. 8. Select one of the following as the Pen Operation Mode depending on the operating system your computer is using: •... -
Page 186: Using The Interactive Pens
Note: Easy Interactive Driver must be installed and running to use Easy Interactive Tools on a Mac. Requirement Windows Operating system Windows Vista SP2 Ultimate, Enterprise, OS X 10.7.x, 10.8.x, 10.9.x, 10.10.x, Business, Home Premium, and Home 10.11.x; macOS 10.12.x Basic (32-bit) (QuickTime 7.7 or later required) Windows 8.x, Pro, Enterprise, Windows... - Page 187 Note: The pen turns off automatically after 15 seconds of inactivity. Hold the pen to turn the pen back on. Pen tip Battery light Function button Attachment for optional strap or cord Battery cover • To turn on the pen, move the pen. Note: If you press the function button, the battery light flashes briefly, then turns off.
- Page 188 • For best performance, hold the pen perpendicular to the board, as shown below. Do not cover the black section near the tip of the pen. • To write or draw on the projection surface in built-in annotation mode or built-in whiteboard mode, do the following: •...
-
Page 189: Pen Calibration
• To use the pen as a mouse in PC Interactive mode, do the following: • To left-click, tap the board with the pen tip. • To double-click, tap twice. • To right-click, press the button on the side or press and hold the pen on the screen (Windows). •... -
Page 190: Calibrating Automatically
• Using the Image Shift feature • Moving the projector Note: Move any pen you are not using away from the projection screen while calibrating. Calibrating Automatically Calibrating Manually Parent topic: Using the Interactive Pens Calibrating Automatically You do not need the pens or a computer for Auto Calibration. Note: You can start Auto Calibration by pressing the User button on the remote control or by pressing the Menu button on the remote control as described here. - Page 191 2. Select the Easy Interactive Function setting and press Enter. 3. Select Auto Calibration and press Enter. 4. Adjust the image focus, if necessary. 5. Press Enter to select Yes. A pattern appears then disappears, and the system is calibrated. If you see a message that calibration failed, you need to calibrate manually.
-
Page 192: Calibrating Manually
Parent topic: Pen Calibration Related tasks Calibrating Manually Calibrating Manually If the cursor location and pen position do not match after auto calibration, you can calibrate manually. 1. Press the Menu button, select the Extended menu, and press Enter. 2. Select the Easy Interactive Function setting and press Enter. - Page 193 3. Select Manual Calibration and press Enter. 4. Adjust the image focus, if necessary. 5. Press Enter to select Yes. A flashing green circle appears in the upper left corner of your projected image. 6. Touch the center of the circle with the tip of the pen. The circle disappears, and you see another circle below the first one.
- Page 194 Note: For the most accurate calibration, make sure you touch the center of the circle. Note: Make sure you are not blocking the signal between the pen and the interactive receiver (next to the projection window on the projector). 7. Touch the center of the next circle, then repeat. When you get to the bottom of the column, the next circle appears at the top of a new column.
-
Page 195: Using Finger Touch Interactivity
Using Finger Touch Interactivity You can use your finger to perform the same functions as the interactive pens when you install the Touch Unit. Note: See the Touch Unit and Control Pad Installation Guide for detailed instructions on installing the Touch Unit and calibrating for finger touch interactivity. - Page 196 • Do not look into the laser diffusion ports on the back of the Touch Unit. The laser can damage your eyes. Extra care should be taken when children are present. • Do not allow the laser light from the Touch Unit to pass through or be reflected by any optical devices, such as a magnifying glass or mirror.
-
Page 197: Calibrating For Finger Touch Interactivity
Calibrating for Finger Touch Interactivity Finger touch calibration coordinates the positioning of your finger with the location of the cursor. Note: Make sure you have calibrated the pens, installed the Touch Unit, performed angle adjustment, and turned it on before calibrating for finger touch interactivity. 1. - Page 198 3. Select Touch Unit Setup and press Enter. 4. Select Touch Calibration and press Enter. The following screen appears: Note: If Touch Calibration is disabled, make sure Power is set to On. 5. Adjust the image focus, if necessary. 6. Press Enter to select Yes.
- Page 199 A flashing green circle appears in the upper left corner of your projected image. 7. Touch and hold the center of the circle with your finger until the circle disappears and another circle appears, then release it. The circle disappears, and you see another circle below the first one. Note: For the most accurate calibration, make sure you touch the center of the circle with the tip of your finger.
-
Page 200: Using Finger Touch Operations
When you get to the bottom of a column, the next circle appears at the top of a new column. Note: If you make a mistake, press the Esc button on the remote control to go back to the previous circle. - Page 201 The blue light on the Touch Unit remains lit. Note: If the blue light does not turn on, press the Menu button on the remote control and make sure the Extended > Easy Interactive Function > Touch Unit Setup > Power setting is set to On. 3.
-
Page 202: Using Brightlink With A Computer
• To right-click, press the board with your finger for about 3 seconds. • To click and drag, press on and drag an item with your finger. • To scroll, drag your finger on the screen. 8. If your operating system supports these functions, you can also do the following: •... -
Page 203: Adjusting The Pen Operation Area
Note: See the online Easy Interactive Tools Operation Guide for detailed information. • Save and print your annotations • Use the Tablet PC input panel in Windows 10, Windows 8.x, Windows 7, or Windows Vista • Use Ink Tools for annotation in Microsoft Office (2003 or later) applications •... - Page 204 3. Select the Easy Interactive Function setting and press Enter. 4. Set the Pen Mode setting to PC Interactive.
- Page 205 5. Select Advanced in the PC Interactive section and press Enter. 6. Select Manual Adj. Pen Area and press Enter. You see this screen: Note: Make sure Auto Adjust Pen Area is set to Off. 7. Press Enter to select Yes. The mouse pointer moves toward the top left corner.
-
Page 206: Easy Interactive Tools
9. When the mouse pointer stops at the bottom right corner of the image, touch the tip of the pointer with the interactive pen. Parent topic: Using BrightLink with a Computer Easy Interactive Tools Your projector came with a CD containing the Easy Interactive Tools software for use with a computer. Easy Interactive Tools lets you use your interactive pen or finger to draw, save, and interact with projected content from your computer. - Page 207 • Hear sound from the projector • Use RD Gateway, RemoteFX, USB redirection, or audio transfer Note: Make sure your computer is configured to be controlled remotely. See your computer manual for details. 1. Connect your projector to a wired or wireless network. 2.
- Page 208 You see the Remote Desktop screen. Remote computer IP address or host name Remote computer user name Remote computer password Speed/Quality priority selector 3. Enter the IP address or fully qualified domain name (FQDN) of the remote computer. You can enter up to 64 alphanumeric characters.
-
Page 209: Remote Desktop System Requirements
6. Select Connect. You see the remote computer's screen image through the LAN source. You can select the default Address, User name, and Password settings using the Remote Desktop Setup setting in the Network menu. Remote Desktop System Requirements Parent topic: Using BrightLink with a Computer Related concepts Wired Network Projection... -
Page 210: Enabling Windows Pen Input And Ink Tools
the interactive features to be available on your network. See the EasyMP Multi PC Projection Operation Guide for instructions on setting up your computer for network projection. Enabling Windows Pen Input and Ink Tools Using Windows Pen Input and Ink Tools Parent topic: Using the Interactive Features Enabling Windows Pen Input and Ink Tools... -
Page 211: Using Windows Pen Input And Ink Tools
2. Select the Easy Interactive Function setting and press Enter. 3. Select Pen Operation Mode and press Enter. 4. Select Windows/Mac Mode and press Enter. Parent topic: Windows Pen Input and Ink Tools Using Windows Pen Input and Ink Tools If you are using Windows 10, Windows 8.x, Windows 7, or Windows Vista, you can add handwritten input to your work and convert it to text. -
Page 212: Whiteboard Mode
• To open the Tablet PC input panel in Windows 7 or Windows Vista, select > All Programs > Accessories > Tablet PC > Tablet PC Input Panel. You can write in the box using the interactive pen or your finger, and select from a variety of options to edit and convert the text. -
Page 213: Using The Whiteboard Toolbars
Zooming Images in Whiteboard Mode Inserting and Working With Images Using the Shapes Tool Selecting Line Width and Color Whiteboard Projector Control Toolbar Selecting Whiteboard Settings Scanning an Image into a Whiteboard Page Selecting a Networked Device Source Saving Pages in Whiteboard Mode Printing Whiteboard Pages Emailing Whiteboard Pages Sharing the Whiteboard... -
Page 214: The Main Whiteboard Toolbar
5. To show or hide the projection control toolbar, select the arrow. Note: You can also show or hide the projection control toolbar by setting the Extended > Display > Projector Control setting to On or Off. Parent topic: Whiteboard Mode The Main Whiteboard Toolbar The main whiteboard toolbar lets you draw, write, and insert images and shapes. - Page 215 Shows or hides the toolbar. You can move the tabs up or down to reposition the toolbar. Splits the screen to display the whiteboard and another source. To switch to the other source, tap and drag the icon all the way across the screen. You can reposition the tabs by moving them up and down.
- Page 216 Inserts a circle, square, triangle, or other shape. You can select the line width and color. Captures the selected area as an image and pastes the captured image. Tap and drag on the screen to select the area, then lift the pen to paste the image. Turns the pen into a draggable pointer and displays it on the whiteboard screen and all connected devices.
- Page 217 Red pen (fine point on left, thick on right) Blue pen (fine point on left, thick on right) Eraser (thin width on left, thick on right) Clears all annotations Hides the toolbar after each annotation Closes the toolbar Follow these guidelines when using the whiteboard toolbar: •...
-
Page 218: Selecting Background Templates
Selecting Background Templates In whiteboard mode, you can insert horizontal lines, a graph-paper grid, or another background template and place it on your whiteboard pages. You can select from 10 pre-installed patterns or add up to 10 custom templates. 1. In whiteboard mode, select the Template tool on the bottom toolbar. -
Page 219: Inserting And Working With Images
• Press and drag on the screen to pan around the enlarged area. 3. When splitting the screen, do the following as necessary: • Select the icon to display the entire whiteboard. • Select the icon to display the entire whiteboard vertically. Parent topic: Whiteboard Mode Inserting and Working With Images... -
Page 220: Using The Shapes Tool
• Copy copies the image on the whiteboard. Touch a location on the screen to paste a copy of the image. • Paste creates a new copy of the image. Drag the image to the desired location. • Auto Crop removes any black borders around the selected image •... - Page 221 Displays the Home screen. Shares drawing contents across multiple devices and projects the shared drawing contents from other projectors Performs one of the following: • Save: saves the current drawing content and returns whiteboard mode to its default status • New meeting: clears the current drawing and returns whiteboard mode to its default status Opens a .jpg, .png, .ewf, or .pdf file from a USB drive or network folder.
- Page 222 Displays a list of page thumbnails. A blue frame indicates the current page and a yellow frame indicates the displayed area. You can perform the following actions: • To display a page, tap the page thumbnail. • To scroll the display, flick or drag a thumbnail. •...
-
Page 223: Selecting Whiteboard Settings
Shares the projected image to participants using EasyMP Multi PC Projection or Epson iProjection Changes the image source using a displayed list (To close the image source list, select the icon again, or tap on the X icon.) Zooms into and out of the image... -
Page 224: Selecting Basic Whiteboard Settings And Policies
Selecting Basic Whiteboard Settings and Policies Selecting Whiteboard Print Settings Selecting Settings for Saving Whiteboard Pages Selecting Settings for Emailing Whiteboard Pages Selecting Settings for a Directory Server Parent topic: Whiteboard Mode Related tasks Setting a Password Selecting Password Security Types Selecting Basic Whiteboard Settings and Policies You can select the whiteboard features you want to use and control the way whiteboard pages are saved in the projector. - Page 225 4. Select the Basic menu and press Enter. 5. Select the following options as necessary: • Pen Button Function selects the operation performed by the button on the side of the interactive • Default Touch Action lets you select the default action when you switch to whiteboard mode •...
- Page 226 6. Select the Policy menu and press Enter. 7. Select the following policy options as necessary: • Policy Setting options let you disable capturing, printing, scanning, USB storage, PC connections, network storage, emailing, or sharing from the projector. All features are enabled by default.
-
Page 227: Selecting Whiteboard Print Settings
Selecting Whiteboard Print Settings You can select the default settings for printing whiteboard pages from the projector. 1. Press the Menu button. 2. Select the Extended menu and press Enter. 3. Select Whiteboard Settings and press Enter. 4. Select Print and press Enter. -
Page 228: Selecting Settings For Saving Whiteboard Pages
• Default Printer lets you select either USB or Network as the printer connection. You can change this setting when you print in whiteboard mode, but not in annotation mode. Note: Selecting USB will also enable scanning from Epson All-in-One printers. • Quality lets you select the default print quality. - Page 229 2. Select the Extended menu and press Enter. 3. Select Whiteboard Settings and press Enter. 4. Select the Save menu and press Enter. 5. Select the following options as necessary: • Default Save Location lets you select the default location for saving whiteboard pages. Select USB to save them on a USB flash drive or Network to save them on a network folder.
-
Page 230: Selecting Settings For Emailing Whiteboard Pages
• Always apply password lets you require that whiteboard files must be saved as password- protected PDF or EWF files. • CIFS Server lets you set the CIFS server's IP address or fully qualified domain name (FQDN). You can enter up to 63 alphanumeric characters. Note: You cannot use the following characters: "... - Page 231 2. Select the Extended menu and press Enter. 3. Select Whiteboard Settings and press Enter. 4. Select the Mail menu and press Enter. 5. Select the following options for emailing as necessary: • From lets you enter the email address to be displayed to the sender. You can enter up to 64 alphanumeric characters.
-
Page 232: Selecting Settings For A Directory Server
• Default e-mail address lets you enter an optional address for testing. You can enter up to 64 alphanumeric characters. Do not use spaces or the following symbols: " ( ) , : ; < > [ \ ] • Disallow Address Input controls whether you can enter email addresses manually. When enabled, you can only choose email addresses from an address book or directory service. - Page 233 2. Select the Extended menu and press Enter. 3. Select Whiteboard Settings and press Enter. 4. Select Directory and press Enter. 5. Select the following options as necessary: • Enable Directory Access specifies whether to search a directory server for user names and email addresses.
- Page 234 • Search Base DN lets you enter the DN (Distinguished Name) where the search for user names and email addresses should start. You can enter up to 63 alphanumeric characters. Do not use a colon (":") or spaces. This field is case-sensitive. Note: Make sure you specify the OU (Organizational Unit) and DC (Domain Component) as necessary, with OU first in this format: OU=accounts,DC=example,DC=com.
-
Page 235: Scanning An Image Into A Whiteboard Page
Scanning an Image into a Whiteboard Page You can scan a document or image into a new page in whiteboard mode using a supported Epson all-in- one printer connected to the control pad or to your network. You cannot scan with the following: •... - Page 236 You see the Scan screen: 3. Select the scan settings as necessary. 4. When you are ready to scan, select Scan. After a moment, your document or image appears on the projected screen. Multi-page documents appear on multiple whiteboard pages. Whiteboard Scan Settings Parent topic: Whiteboard Mode...
-
Page 237: Whiteboard Scan Settings
You can project an image from up to 50 devices connected to the projector via a network. You can select the image source from computers running EasyMP Multi PC Projection or Epson iProjection, and smartphones or tablets running Epson iProjection. - Page 238 You see an image source list: 2. Select Participant List. You see a list of available devices. The icon next to a user name indicates the currently selected source. 3. Select the user name for the device from which you want to project. Note: Select Refresh to update the user list.
-
Page 239: Saving Pages In Whiteboard Mode
• Connect to multiple projectors • Hear sound from the projector • Project an image using EasyMP Multi PC Projection or Epson iProjection Note: You cannot access the Participant List screen when connection to multiple projectors by using EasyMP Multi PC Projection and projecting the same image (mirroring). - Page 240 You see a screen like the following: 2. Select one of the following as the destination where you want to save your file and select OK: • USB Storage or Network Folder to save to a connected USB storage device or network folder •...
-
Page 241: Printing Whiteboard Pages
4. To enter a file name, select the File Name text box, use the on-screen keyboard to enter a file name, and select OK. 5. Select the file format. If you choose PDF or EWF (Epson Whiteboard Format), you can encrypt the file and add a password. If you choose EWF, you can reopen the file later and continue editing. - Page 242 You see a screen like the following: 2. Select any of the print settings as necessary. 3. When you are ready, select Print.
-
Page 243: Whiteboard Print Settings
Whiteboard Print Settings Parent topic: Whiteboard Mode Whiteboard Print Settings Note: Depending on the connected printer, not all settings may be available. Setting Options Description Number of Copies — Selects the number of copies to print Color Color Selects whether to print using color or not Monochrome Range... -
Page 244: Emailing Whiteboard Pages
Setting Options Description Collate — Separates each set of pages when printing multiple copies Duplex Printing — Prints on both sides of the paper Pages per sheet — Prints multiple reduced whiteboard pages on each sheet of paper Parent topic: Printing Whiteboard Pages Emailing Whiteboard Pages If your projector is set up on a network and configured to use an email server, you can email your... - Page 245 You see a screen like the following: 3. Tap the E-mail Address text box, enter the recipient's email address using the on-screen keyboard, and select OK. Note: If you imported an address book or set up a directory service, you can select up to 50 email addresses by selecting the address book icon.
-
Page 246: Sharing The Whiteboard
6. Select the file format for the email attachment. If you choose PDF or EWF (Epson Whiteboard Format), you can encrypt the file and add a password. 7. Select one of the following under Range: • All to attach all the pages in the current whiteboard session (PDF or EWF format) •... - Page 247 The projector displays the whiteboard. 2. Select the share icon on the projector control toolbar. You see the following screen: 3. Select Start sharing this whiteboard.
- Page 248 You see a screen like this: 4. Users connecting to the shared whiteboard must enter the displayed PIN code. To customize the PIN code, tap the PIN code text box and enter a 7-digit code using the on-screen keyboard. Note: You cannot change the PIN code until you start a new whiteboard sharing session. 5.
- Page 249 6. Select the Start button. The Whiteboard Sharing screen is displayed. 7. Select the following as necessary: • Change Sharing Mode to change the permissions for connected users • Send Invitation to send email invitations with a link to the shared whiteboard 8.
-
Page 250: Connecting To A Shared Whiteboard From A Computer Or Other Device
Parent topic: Sharing the Whiteboard Related concepts Wired Network Projection Wireless Network Projection Connecting to a Shared Whiteboard from a Computer or Other Device You can connect to a shared whiteboard from a computer or device on the same network using a supported web browser. -
Page 251: Web Browser Toolbars
Operating system Browser version OS X 10.7 or later, or macOS Safari 6, 7, or 8 10.12.x iOS 7.0 or later Android Android OS 4.0 or later standard browser Chrome OS Chrome browser Note: The available drawing range narrows depending on the screen size of the device. Parent topic: Sharing the Whiteboard Web Browser Toolbars... - Page 252 Tool icon Description Selects a pen for drawing Selects a translucent highlighter pen for drawing Selects a shape to place on the screen Selects the eraser tool so you can click on content and select OK to delete it; you cannot delete partially drawn content Selects an object or image Selects the line thickness for the current pen or shape...
-
Page 253: Connecting To A Shared Whiteboard From A Projector
Tool icon Description Selects a background for the whiteboard page Controls which whiteboard page is displayed on the shared whiteboard : Synchronizes the page with the shared whiteboard. When you edit the page, the change is reflected on the shared whiteboard. : Displays a page that differs from the shared whiteboard. - Page 254 You see the following screen: 4. Select Connect to another whiteboard. You see a screen like this:...
-
Page 255: Using Brightlink Without A Computer
5. Enter the IP address and PIN code for the projector you want to connect to in the Address and PIN Code text boxes using the on-screen keyboard. Note: To display addresses for the last ten projector connections, select the icon next to the address field. - Page 256 3. To display the toolbar, select one of the arrows. Note: You can use the pen or your finger to move the arrows up or down. 4. To close the toolbar, select the icon at the bottom of the toolbar. Note: If you want to hide the toolbar automatically after drawing, select the icon at the bottom of the toolbar.
-
Page 257: Built-In Tools For Use Without A Computer
Built-in Tools for Use Without a Computer The built-in annotation toolbar is embedded in the projector and allows you to draw and write on the projected screen. Shows or hides the toolbar. You can move the arrows up or down to reposition the toolbar. - Page 258 Switches to computer interactive mode. • Select , then select to switch to computer interactive mode • Select , then select to switch back to built-in annotation mode If the icon is not displayed, set the Pen Mode Icon setting to On in the projector's Extended menu.
- Page 259 Writes or draws free-form lines with a transparent highlighter pen Black pen (fine point on left, thick on right) Red pen (fine point on left, thick on right) Blue pen (fine point on left, thick on right) Eraser (thin width on left, thick on right) Clears all annotations Hides the toolbar after each annotation Closes the toolbar...
-
Page 260: Changing Pen Width And Color Using The Built-In Toolbar
Changing Pen Width and Color Using the Built-in Toolbar When you use the custom pen or highlighter tools, you can select different colors and line widths. You can also select the Black, Red, or Blue pen on the toolbar, and select the small circle on the left of the pen for a thin line, or the large circle on the right for a thick line. - Page 261 Saves the projected image to a connected USB storage device Shares the projected image using EasyMP Multi PC Projection or Epson iProjection Changes the image source using a displayed list. Zooms into and out of the image Turns off the picture and sound...
-
Page 262: Splitting The Interactive Screen
Splitting the Interactive Screen You can split the screen and project from two sources at the same time. You can annotate and interact with both sources. Note: If you make adjustments such as Brightness, Contrast, Color Saturation, Tint, Sharpness, Noise Reduction, and Deinterlacing, they are only applied to the image on the left. Default adjustments are made to the image on the right. - Page 263 2. Select the two sources you want to display, keeping the following in mind: • Not all combinations of sources are valid. • If you want to write on a blank screen, select any unused source. • Unused sources display the color selected in the Display Background setting. •...
-
Page 264: Selecting Interactive Split Screen Settings
• Auto Iris Selecting Interactive Split Screen Settings Parent topic: Using the Interactive Features Related references Projector Setup Settings - Extended Menu Selecting Interactive Split Screen Settings You can select split screen projection settings using the projector control toolbar. 1. Select the Split icon on the projector control toolbar. -
Page 265: Using Interactive Features With Two Projectors
3. Do any of the following as necessary: • To make one image larger than the other, select a Screen Size setting. • To use the interactive pen as a mouse with a computer source, select a Target Pen Mode setting. •... - Page 266 You see a screen like this: 2. Press the icon. You see a screen like this: 3. Set the Use this single projector ssetting to On.
- Page 267 You can now use the interactive features on the current projector only. When the projector turns off, the Use this single projector setting returns to Off. Parent topic: Using Interactive Features with Two Projectors...
-
Page 268: Adjusting The Menu Settings
Adjusting the Menu Settings Follow the instructions in these sections to access the projector menu system and change projector settings. Using the Projector's Menus Image Quality Settings - Image Menu Input Signal Settings - Signal Menu Projector Feature Settings - Settings Menu Projector Setup Settings - Extended Menu Projector Network Settings - Network Menu Projector Setup Settings - ECO Menu... - Page 269 You see the menu screen displaying the Image menu settings. 2. Press the up or down arrow button to move through the menus listed on the left. The settings for each menu are displayed on the right. Note: The available settings depend on the current input source. 3.
-
Page 270: Image Quality Settings - Image Menu
Image Quality Settings - Image Menu Settings on the Image menu let you adjust the quality of your image for the input source you are currently using. The available settings depend on the currently selected input source. To change settings for an input source, make sure the source is connected and select that source. Setting Options Description... - Page 271 Setting Options Description Color Temp. (color temperature) Color Temp. Sets the overall color tone; lower values tint the image red, and Customized higher values tint the image blue Color Temp.: sets the color temperature according to the selected color mode Customized: adjusts the individual RGB components of the offset and gain...
-
Page 272: Input Signal Settings - Signal Menu
Note: The Brightness setting does not affect lamp brightness. To change the lamp brightness mode, use the Power Consumption setting. Parent topic: Adjusting the Menu Settings Related references Available Color Modes Projector Setup Settings - ECO Menu Related tasks Changing the Color Mode Turning On Auto Iris Input Signal Settings - Signal Menu Normally the projector detects and optimizes the input signal settings automatically. - Page 273 Setting Options Description Resolution Auto Sets the input signal resolution if not detected automatically using the Auto Wide option Normal Aspect See the list of available Sets the aspect ratio (width-to-height aspect ratios ratio) for the selected input source Overscan Auto Changes the projected image ratio to make the edges visible by a selectable...
- Page 274 Setting Options Description Advanced HDMI Video Range HDMI Video Range: sets the video range to match the setting of the device Input Signal connected to the HDMI input port Video Signal • Auto: detects the video range automatically • Normal: normally for images from a device other than a computer;...
-
Page 275: Projector Feature Settings - Settings Menu
Projector Feature Settings - Settings Menu Options on the Settings menu let you customize various projector features. Setting Options Description Geometry Correction H/V Keystone Adjusts image shape to rectangular (horizontally and Quick Corner vertically) Arc Correction H/V Keystone: lets you manually correct horizontal and vertical sides Quick Corner: select to correct... - Page 276 Setting Options Description Split Screen — Divides the viewing area horizontally and displays two images side-by-side; while in Split Screen mode, press Menu to display the Split Screen options or Esc to cancel split screen display Zoom Varying levels available Adjusts the size of the projected image Image Shift...
- Page 277 Setting Options Description Lock Setting Control Panel Lock Controls projector button locking to secure the projector Full Lock: locks all buttons Partial Lock: locks all buttons except the power button Off: no buttons locked Pointer Shape Three shapes available Changes the shape of the remote control pointer feature Remote Receiver Front/Rear...
- Page 278 Setting Options Description Pattern Pattern Display Selects various pattern display options Pattern Type Pattern Display: lets you display User Pattern the selected pattern type on the Test Pattern screen to aid in presentation Pattern Type: selects the type of grid or line pattern to display User Pattern: captures a projected screen and saves it as a pattern for display...
-
Page 279: Projector Setup Settings - Extended Menu
Projector Setup Settings - Extended Menu Settings on the Extended menu let you customize various projector setup features that control its operation. Easy Interactive Function Settings Setting Options Description General Easy Interactive Function settings... - Page 280 Setting Options Description Auto Calibration — Start calibration for the interactive pens Manual Calibration Touch Unit Setup Installation Pattern Select settings for the Touch Unit Power Installation Pattern: displays reference points to help you Angle Adjustment determine the installation position Touch Calibration of the Touch Unit Power: turns on the Touch Unit...
- Page 281 Setting Options Description Advanced Distance of Projectors Selects various settings for interactive features Sync of Projectors Distance of Projectors, Sync of Multi-Projection Projectors, Multi-Projection, Wired Sync Mode and Wired Sync Mode: let you adjust features for using multiple Preset Pen Thickness projectors of the same model in Eraser Size the same room...
- Page 282 Setting Options Description Enable Right Click Lets you use a long pen press or finger press as a right-click operation when using mouse mode Advanced Pen Tip Button Select pen operation and adjustment options Auto Adjust Pen Area Pen Tip Button: assign either Manual Adj.
- Page 283 Setting Options Description Home Screen Home Screen Auto Disp. Adjusts settings on the Home Screen Custom Setting L1 Home Screen Auto Disp.: Custom Setting L2 controls whether the Home Custom Setting L3 screen displays automatically when the projector is turned on Custom Setting R1 Custom Setting L1 through Custom Setting R2...
- Page 284 Setting Options Description Display Messages Selects various display options Display Background Messages: controls whether messages are displayed on the Startup Screen screen A/V Mute Display Background: selects Color Uniformity the screen color or logo to display when no signal is Toolbars received Pen Mode Icon...
- Page 285 Setting Options Description User's Logo —– Creates a screen that the projector displays to identify itself and enhance security Projection Front Selects the way the projector faces the screen so the image is Front/Upside Down oriented correctly Rear Rear Upside Down Operation Direct Power On Selects various operation options...
- Page 286 Setting Options Description A/V Settings A/V Output Selects the following when the projector is in standby mode Audio Output (turned off): HDMI1 Audio Output A/V Output: the Always On HDMI2 Audio Output setting lets the projector output audio and video signals even DVI Output while it is standby mode;...
- Page 287 Setting Options Description USB Type B Easy Interactive Function Selects what happens when you connect your computer to the USB Display/Easy Interactive projector's USB-B port Function Easy Interactive Function: lets Wireless Mouse/USB Display you use the interactive pens or your finger with your computer USB Display/Easy Interactive Function: lets you display your computer's image through the...
- Page 288 Setting Options Description Multi-Projection Multi-Projection Selects the following when you use multiple projectors: Projector ID Multi-Projection: matches the Color Mode display settings of multiple Color Uniformity projectors Brightness Level Projector ID: assigns an ID for the projector when you use Color Matching multiple projectors RGBCMY...
- Page 289 Note: You cannot reset the following settings using the Reset option in the Extended menu: • Easy Interactive Function • Toolbars • Pen Mode Icon • Projector Control • User's Logo • Projection • High Altitude Mode • Auto Source Search •...
-
Page 290: Projector Network Settings - Network Menu
Turning On the Projector Using the Home Screen Selecting the Language for the Projector Menus Changing the Projection Mode Using the Menus Connecting to a Computer for Pen Use or USB Mouse Control Projector Network Settings - Network Menu Settings on the Network menu let you view network information and set up the projector for monitoring and control over a network. - Page 291 Setting Options Description Screen Mirroring Settings Display Name Display Name: sets the name shown when screen mirroring devices search Operation Mode for the projector Basic Operation Mode: controls the • Wireless LAN Sys. available settings for Screen Mirroring • Adjust Image Quality Wireless LAN Sys.: sets the communication method between the •...
- Page 292 Setting Options Description Net. Info - Wireless LAN Connection mode Displays wireless network status and details Wireless LAN Sys. Antenna level Projector Name SSID DHCP IP Address Subnet Mask Gateway Address MAC Address Region Code Net. Info - Wired LAN Projector Name Displays wired network status and details...
-
Page 293: Projector Setup Settings - Eco Menu
Setting Options Description Network Configuration Accesses additional network Configures your network settings menus Parent topic: Adjusting the Menu Settings Related concepts Wired Network Projection Wireless Network Projection Related references Wireless LAN Menu Settings Projector Setup Settings - ECO Menu Settings on the ECO menu let you customize projector functions to save power. When you select a power-saving setting, a leaf icon appears next to the menu item. - Page 294 Setting Options Description Power Consumption Auto Selects the brightness mode of the projector lamp Normal Auto: allows the projector to sense the optimum lamp brightness and adjust the lamp brightness accordingly Normal: sets maximum lamp brightness ECO: reduces lamp brightness and fan noise, and saves power and lamp life Light Optimizer...
-
Page 295: Projector Information Display - Info Menu
Setting Options Description ECO Display Displays a leaf icon in the bottom left corner of the projected screen to indicate the power-saving status when the lamp brightness changes Parent topic: Adjusting the Menu Settings Related references Projector Lamp Specifications Projector Information Display - Info Menu You can display information about the projector and input sources by viewing the Info menu. -
Page 296: Event Id Code List
Lamp Hours Displays the number of hours (H) the lamp has been used in Normal and ECO Power Consumption modes; if the information is displayed in yellow, obtain a genuine Epson replacement lamp soon Source Displays the name of the port to which the current input source is... - Page 297 Event ID code Cause and solution 0020 A screen mirroring communication error has occurred. Turn the projector off and on again, or restart the network software. 0026 0032 0036 0037 0038 0021 Failed to start Screen Mirroring. Turn the projector off and on again. 0022 Unstable screen mirroring communication.
- Page 298 The internal storage is recovered when the projector is turned on and all of the Whiteboard Settings menu items are returned to the default settings. The template information, address book, and shared whiteboard connection logs saved in the internal storage are deleted. If that does not solve the problem, contact Epson for help.
-
Page 299: Projector Reset Options - Reset Menu
Event ID code Cause and solution 0BFF An error has occurred in the whiteboard function. Restart the projector. Parent topic: Projector Information Display - Info Menu Related references Projector Network Settings - Network Menu Related tasks Setting Up Wireless Network Security Projector Reset Options - Reset Menu You can reset most of the projector settings to their default values using the Reset All Config option on the Reset menu. - Page 300 • Language • Network menu items • Lamp Hours • Password • Zoom • Image Shift • Date & Time • Color Uniformity • Color Matching Parent topic: Adjusting the Menu Settings...
-
Page 301: Maintaining And Transporting The Projector
The only parts you should replace are the lamp, air filter, pen batteries and tips, and remote control batteries. If any other part needs replacing, contact Epson or an authorized Epson servicer. Warning: Before cleaning any part of the projector, turn it off and unplug the power cord. Never open any cover on the projector, except as specifically explained in this manual. -
Page 302: Cleaning The Obstacle Sensor
• To remove stubborn smudges, moisten a soft, lint-free cloth with lens cleaner and gently wipe the projection window. Warning: Do not use a lens cleaner that contains flammable gas. The high heat generated by the projector lamp may cause a fire. Caution: Do not use canned air, or the gases may leave a flammable residue. -
Page 303: Cleaning The Projector Case
Filter maintenance intervals will depend on the environment. If regular maintenance is not performed, your Epson projector will notify you when the temperature inside the projector has reached a high level. Do not wait until this warning appears to maintain your projector filter as prolonged exposure to high temperatures may reduce the life of your projector or lamp. - Page 304 1. Turn off the projector and unplug the power cord. 2. Slide the air filter cover latch and open the air filter cover.
- Page 305 3. Pull the air filter out of the projector. 4. Tap each side of the filter 4 to 5 times to shake off any excess dust. Do this outside the room or away from the projector. Caution: Do not use excessive force when tapping the air filter, or it may crack and become unusable.
- Page 306 canned air; the gases may leave a residue, or push dust and debris into the projector's optics or other sensitive areas. 5. Vacuum the front of the air filter (the side with the tabs) to remove any remaining dust. Note: If dust is difficult to remove or the air filter is damaged, replace the air filter. 6.
-
Page 307: Replacing The Air Filter
7. Close the air filter cover. Parent topic: Air Filter and Vent Maintenance Related tasks Turning Off the Projector Replacing the Air Filter You need to replace the air filter in the following situations: • After cleaning the air filter, you see a message telling you to clean or replace it •... - Page 308 2. Slide the air filter cover latch and open the air filter cover.
- Page 309 3. Pull the air filter out of the projector. Note: Air filters contain polypropylene. Dispose of used air filters according to local regulations. 4. Place the new air filter in the projector as shown.
-
Page 310: Projector Lamp Maintenance
5. Close the air filter cover. Parent topic: Air Filter and Vent Maintenance Related tasks Turning Off the Projector Projector Lamp Maintenance The projector keeps track of the number of hours the lamp is used and displays this information in the projector's menu system. - Page 311 3. Use the screwdriver included with the replacement lamp to loosen the screw securing the lamp cover. 4. Slide off the lamp cover. Note: If the projector is suspended from a wall or ceiling, remove the lamp cover carefully and support it with your hand.
- Page 312 5. Loosen the screws securing the lamp to the projector. The screws do not come all the way out. 6. Lift up the lamp handle and gently pull the lamp out of the projector. Note: The lamp(s) in this product contain mercury. Please consult your state and local regulations regarding disposal or recycling.
- Page 313 7. Gently insert the new lamp into the projector along the guide rail. If it does not fit easily, make sure it is facing the right way. Press the handle down. Caution: Do not touch any glass on the lamp assembly to avoid premature lamp failure. 8.
-
Page 314: Resetting The Lamp Timer
9. Replace the lamp cover and tighten the screw to secure it. Note: Be sure the lamp cover is securely installed or the lamp will not come on. Reset the lamp timer to zero to keep track of the new lamp’s usage. Parent topic: Projector Lamp Maintenance Related tasks... -
Page 315: Replacing The Remote Control Batteries
3. Select the Reset menu and press Enter. 4. Select Reset Lamp Hours and press Enter. You see a prompt asking if you want to reset the lamp hours. 5. Select Yes and press Enter. 6. Press Menu or Esc to exit the menus. Parent topic: Projector Lamp Maintenance Replacing the Remote Control Batteries... - Page 316 1. Remove the battery cover as shown. 2. Remove the old batteries. Warning: If the battery fluid has leaked, wipe it away with a soft cloth and avoid getting the fluid on your hands. If it gets on your hands, wash them immediately to avoid injury. 3.
-
Page 317: Replacing The Hard Pen Tips
4. Replace the battery cover and press it down until it clicks into place. Warning: Dispose of used batteries according to local regulations. Do not expose batteries to heat or flame. Keep batteries out of the reach of children; they are choking hazards and are very dangerous if swallowed. - Page 318 1. Twist off the tip of the pen to remove it.
-
Page 319: Replacing The Soft Pen Tips
2. Twist on the new tip. Parent topic: Projector Maintenance Replacing the Soft Pen Tips If the pen tips become damaged or no longer work correctly, you can replace them. - Page 320 1. Twist off the tip of the pen to remove it. 2. Remove the soft tip.
- Page 321 3. Insert the new tip. 4. Twist on the pen tip. Parent topic: Projector Maintenance...
-
Page 322: Transporting The Projector
• When shipping the projector for repairs, place it in its original packing materials, if possible, or use equivalent materials with cushioning around the projector. Mark the box "Fragile." Note: Epson shall not be liable for any damages incurred during transportation. Parent topic:... -
Page 323: Solving Problems
• The Help option on the Home screen can display information about common problems, if the projector is operating. • The solutions in this manual can help you solve many problems. If none of these solutions help, you can contact Epson for technical support. Parent topic: Solving Problems... -
Page 324: Projector Light Status
Turning Off the Projector Projector Light Status The lights on the projector indicate the projector status and let you know when a problem occurs. Check the status and color of the lights and look for a solution in the table here. On/Standby light Status light Lamp light... - Page 325 • Clean or replace the air filter. • If operating the projector at high altitude, turn on High Altitude Mode. • If the problem persists, unplug the projector and contact Epson for help.
- Page 326 Epson for help. Flashing blue Flashing Flashing Auto Iris error. Turn the projector off, orange orange unplug it, and contact Epson for help. Flashing blue Orange Orange Power error. Turn the projector off, unplug it, and contact Epson for help. Flashing blue Flashing Internal projector error.
-
Page 327: Using The Projector Help Displays
If the problem persists, turn the projector off, unplug it, and contact Epson for help Note: If the lights display a pattern not listed in the table above, turn the projector off, unplug it, and contact Epson for help. Parent topic: Solving Problems Related references... -
Page 328: Solving Image Or Sound Problems
6. Press the up and down arrow buttons to highlight the problem you want to solve. 7. Press Enter to view the solutions. 8. When you are finished, do one of the following: • To select another problem to solve, press Esc. •... -
Page 329: Solutions When Image Is Incorrect Using The Usb Display Function
• Adjust the Brightness setting or select the Normal Power Consumption setting. • Check the Display setting to make sure Messages is set to On. • If the projector does not respond when you press the control panel buttons, the buttons may be locked. -
Page 330: Solutions When "No Signal" Message Appears
• If the mouse cursor flickers, select Make the movement of the mouse pointer smooth in the Epson USB Display Settings program on your computer. • Turn off the Transfer layered window setting in the Epson USB Display Settings program on your computer. -
Page 331: Displaying From A Pc Laptop
Related tasks Selecting an Image Source Related topics Connecting to Computer Sources Connecting to Video Sources Displaying From a PC Laptop If you see the "No Signal" message when you display from a PC laptop, you need to set up the laptop to display on an external monitor. -
Page 332: Solutions When Only A Partial Image Appears
• Make sure the computer's display resolution does not exceed the projector's resolution and frequency limit. If necessary, select a different display resolution for your computer. (See your computer manual for details.) • As a test, try setting the computer's display resolution to the lowest possible setting, and then gradually increase it as necessary. -
Page 333: Solutions When The Image Is Not Rectangular
Solutions When the Image is Not Rectangular If the projected image is not evenly rectangular, try the following solutions: • If the projector is not mounted on the wall or ceiling, place it directly in front of the center of the screen, facing it squarely, if possible. -
Page 334: Solutions When The Image Is Fuzzy Or Blurry
• If you connected an extension power cable, try projecting without it to see if it caused interference in the signal. • If you are using the USB Display function, turn off the Transfer layered window setting in the Epson USB Display Settings program on your computer. -
Page 335: Solutions When The Image Brightness Or Colors Are Incorrect
Related references Image Quality Settings - Image Menu Input Signal Settings - Signal Menu Related tasks Focusing the Image Solutions When the Image Brightness or Colors are Incorrect If the projected image is too dark or light, or the colors are incorrect, try the following solutions: •... -
Page 336: Solutions To Sound Problems
• If you are using the USB Display function, turn on the Output audio from the projector setting in the Epson USB Display Settings program on your computer. • If you are using a Mac and you do not hear sound from an HDMI source, make sure your Mac supports audio through the HDMI port. -
Page 337: Solving Projector Or Remote Control Operation Problems
• If the power button on the remote control does not turn on the projector, check its batteries and make sure the Remote Receiver setting is turned on in the projector's menu, if available. • The power cord may be defective. Disconnect the cord and contact Epson. • Temporarily remove the Ethernet cable and see if the problem continues. -
Page 338: Solutions To Problems With The Remote Control
• If you have entered an incorrect password too many times and see a message displaying a request code, write down the code and contact Epson. Do not attempt to enter the password again. Provide the request code and proof of ownership for assistance in unlocking the projector. -
Page 339: Solving Network Problems
• If you set a Remote password (in Epson Web Control) and forgot the user ID or password, try entering the following: • User ID: EPSONREMOTE • Default password: guest • If you lose the remote control, you cannot enter a password. Order a new one from Epson. -
Page 340: Solutions When Network Alert E-Mails Are Not Received
Solutions When Network Alert E-Mails are Not Received If you do not receive an e-mail alerting you to problems with a projector over the network, try the following solutions: • Make sure the projector is turned on and connected to the network correctly. (If an error shut down the projector, it cannot send an e-mail.) •... -
Page 341: Solutions When You Cannot Connect Using Screen Mirroring
• If the wireless connection is slow or your projected image contains noise, check for interference from other equipment, such as a Bluetooth device or microwave. Move the interfering device farther away or expand your wireless bandwidth. • If the connection speed declines, reduce the number of connected devices. Parent topic: Solving Network Problems Solutions When You Cannot Connect Using Screen Mirroring... -
Page 342: Solving Interactive Problems
Parent topic: Solving Problems Solutions When "Error Occurred in the Easy Interactive Function" Message Appears If the "Error occurred in the Easy Interactive Function" message appears, contact Epson for help. Parent topic: Solving Interactive Problems Solutions When the Interactive Pens Do Not Work If the interactive pens do not work, try the following solutions: •... -
Page 343: Solutions When The Interactive Pen Position Is Not Accurate
• Make sure the cable cover is in place to keep cables from blocking the signal. • Make sure the pen battery has enough power. Press the button on the side of the pen to check remaining battery power. Try replacing the battery. •... -
Page 344: Solutions When Manual Calibration Does Not Work
• For the best performance, connect your computer to the projector using a VGA or HDMI cable for display and the USB cable for interactivity. • If you are using USB Display in Windows, you may need to disable Windows Aero in the Epson USB Display Settings program on your computer. -
Page 345: Solutions When The Interactive Pens Cause Interference Or Unwanted Effects
• Set the Extended > Easy Interactive Function > Hovering setting to Off. Parent topic: Solving Interactive Problems Related tasks Using the Pens Solutions When the Interactive Pens Cause Interference or Unwanted Effects If the pens are causing interference or unwanted effects, try the following solutions: •... -
Page 346: Solutions For Problems With Capturing, Printing, Saving, Or Scanning
• Connect only one printer or multifunction device at a time, and make sure the device is supported by the projector. Scanning and USB printing are only supported by Epson multifunction devices. • If you are having trouble printing or scanning, make sure the printer is not out of ink, jammed, or in any other error state. -
Page 347: Solutions When Inking Does Not Appear In Microsoft Office
Related tasks Connecting a Printer to the Control Pad Solutions When Inking Does Not Appear in Microsoft Office If Start Inking does not appear on the Review tab in your Microsoft Office application, change the Pen Operation Mode setting. Parent topic: Solving Interactive Problems Related references Projector Setup Settings - Extended Menu... -
Page 348: Where To Get Help
Epson with your questions. Speak to a Support Representative To use the Epson PrivateLine Support service, call (800) 637-7661. This service is available for the duration of your warranty period. You may also speak with a projector support specialist by dialing (562) 276-4394 (U.S.) or (905) 709-3839 (Canada). - Page 349 Related references Projector Light Status...
-
Page 350: Technical Specifications
Technical Specifications These sections list the technical specifications of your projector. General Projector Specifications Projector Lamp Specifications Interactive Pen Specifications Touch Unit Specifications Remote Control Specifications Projector Dimension Specifications Projector Electrical Specifications Projector Environmental Specifications USB Display System Requirements Projector Safety and Approvals Specifications Supported Video Display Formats General Projector Specifications Type of display... -
Page 351: Projector Lamp Specifications
USB Type B port compatibility USB 2.0 compliant for USB display, external mouse or keyboard control, interactive, or saving data file to PC via USB cable USB Type A port compatibility Two 2.0 compliant ports for USB memory device, printer, Epson document camera, firmware update, or copying menu settings... -
Page 352: Interactive Pen Specifications
Lamp life Normal Power Consumption mode: Up to about 5000 hours ECO Power Consumption mode: Up to about 10000 hours Note: Turn off this product when not in use to prolong the life of the projector. Lamp life will vary depending upon mode selected, environmental conditions, and usage. -
Page 353: Projector Dimension Specifications
Parent topic: Technical Specifications Projector Dimension Specifications Height (excluding feet) 5.1 inches (130 mm) Width 18.7 inches (474 mm) Depth 17.6 inches (447 mm) Weight 18.7 lb (8.5 kg) Parent topic: Technical Specifications Projector Electrical Specifications Rated frequency 50/60 Hz Power supply 100 to 240 VAC ±10% 4.8 to 2.1 A... -
Page 354: Projector Environmental Specifications
Projector Environmental Specifications Temperature Operating - Single projector: Up to 7500 ft (2286 m): 41 to 104 °F (5 to 40 °C) 7500 ft (2286 m) to 9843 ft (3000 m): 41 to 95 °F (5 to 35 °C) Operating - Multiple projectors: Up to 7500 ft (2286 m): 41 to 95 °F (5 to 35 °C) 7500 ft (2286 m) to 9843 ft (3000 m): 41 to 86 °F (5 to 30 °C) Storage:... -
Page 355: Projector Safety And Approvals Specifications
Requirement Windows Operating system Windows Vista Ultimate, Enterprise, OS X 10.7.x (32- and 64-bit), 10.8.x, Business, Home Premium, and Home 10.9.x, 10.10.x, 10.11.x (64-bit), and Basic (32-bit) macOS 10.12.x Windows 7 Ultimate, Enterprise, Professional, and Home Premium (32- and 64-bit); Home Basic and Starter (32- bit) Windows 8.x, Pro, and Enterprise (32- and 64-bit) -
Page 356: Supported Video Display Formats
For best results, your computer's monitor port or video card resolution should be set to display in the projector's native resolution. However, your projector includes Epson's SizeWise chip that supports other computer display resolutions, so your image will be resized to fit automatically. - Page 357 Display format Refresh rate (in Hz) Resolution (in pixels) Component video SDTV (480i/480p) 720 × 480 SDTV (576i/576p) 720 × 576 HDTV (720p) 50/60 1280 × 720 HDTV (1080i) 50/60 1920 × 1080 HDMI input signals 640 × 480 SVGA 800 ×...
- Page 358 Display format Refresh rate (in Hz) Resolution (in pixels) SDTV (480i/480p) 720 × 480 SDTV (576i/576p) 720 × 576 HDTV (720p) 50/60 1280 × 720 HDTV (1080i) 50/60 1920 × 1080 HDTV (1080p) 24/30 1920 × 1080 * Wide resolution only Parent topic: Technical Specifications...
-
Page 359: Notices
Open Source Software License Binding Arbitration and Class Waiver Trademarks Copyright Notice Recycling Epson offers a recycling program for end of life products. Please go to this site for information on how to return your products for proper disposal. Parent topic:... -
Page 360: Important Safety Instructions
Important Safety Instructions Follow these safety instructions when setting up and using the projector: • Do not look into the lens when the projector is on. The bright light can damage your eyes. Avoid standing in front of the projector so the bright light does not shine into your eyes. •... - Page 361 setting up the projector near a wall, leave at least 7.9 inches (20 cm) of space between the wall and the projector. • Do not operate the projector in a closed-in cabinet unless proper ventilation is provided. • Never allow objects of any kind to enter any openings in the projector. Do not leave objects, especially flammable objects, near the projector.
- Page 362 41 to 104 °F (5 to 40 °C) at an altitude of 7500 feet (2286 m) or less, or 41 to 95 °F (5 to 35 °C) at an altitude of 7503 to 9842 feet (2287 m to 3000 m) When using multiple projectors at the same time: 41 to 95 °F (5 to 35 °C) at an altitude of 7500 feet (2286 m) or less, or 41 to 86 °F (5 to 30 °C) at an altitude of 7503 to 9842 feet (2287 m to 3000 m)
-
Page 363: Restriction Of Use
Note: The lamp(s) in this product contain mercury. Please consult your state and local regulations regarding disposal or recycling. Do not put in the trash. WARNING: The cords included with this product contain chemicals, including lead, known to the State of California to cause birth defects or other reproductive harm. - Page 364 Symbol Approved Standards Description IEC60417 Stand-by No.5009 To identify the switch or switch position by means of which part of the equipment is switched on in order to bring it into the stand-by condition. ISO7000 Caution No.0434B, To identify general caution when using the product.
- Page 365 Symbol Approved Standards Description IEC60417 Battery, general No.5001B On battery powered equipment. To identify a device for instance a cover for the battery compartment, or the connector terminals. IEC60417 Positioning of cell No.5002 To identify the battery holder itself and to identify the positioning of the cell(s) inside the battery holder.
- Page 366 Symbol Approved Standards Description IEC60417 Class II equipment No.5172 To identify equipment meeting the safety requirements specified for Class II equipment according to IEC 61140. ISO 3864 General prohibition To identify actions or operations that are prohibited. ISO 3864 Contact prohibition To indicate injury that could occur due to touching a specific part of the equipment.
-
Page 367: Fcc Compliance Statement
Symbol Approved Standards Description ISO3864 Caution, movable parts IEC60417 To indicate that you must keep away from movable parts according to No. 5057 protection standards. Parent topic: Notices FCC Compliance Statement For United States Users This equipment has been tested and found to comply with the limits for a Class B digital device, pursuant to Part 15 of the FCC Rules. -
Page 368: Open Source Software License
We provide the source code of the GPL Programs until five (5) years after the discontinuation of same model of this projector product. If you desire to receive the source code of the GPL Programs, contact Epson. These GPL Programs are WITHOUT ANY WARRANTY; without even the implied warranty of MERCHANTABILITY AND FITNESS FOR A PARTICULAR PURPOSE. - Page 369 • bash • bc • busybox • coreutils • cpio • dbus-1 • dosfstools • e2fsprogs • ed • ethtool • fbset • findutils • flashrom • fuse-utils • fuser • gawk • gawk-common • grep • init-ifupdown • initscripts •...
- Page 370 • libcap2 • libpam • libpci3 • logrotate • mingetty • net-tools • netbase • nfs-utils-client • procps • psmisc • pstree • sed • sysklogd • sysvinit • sysvinit-inittab • sysvinit-pidof • tar • time • udev • udev-cache •...
- Page 371 • xserver-nodm-init • xtscal • linux-2.6.32 (BrightLink Pro 1460Ui) • u-boot-2011.06 (BrightLink Pro 1460Ui) • busybox-1.19.4 (BrightLink Pro 1460Ui) • wireless_tools.29 (BrightLink Pro 1460Ui) • backports-3.10.4-1 (BrightLink Pro 1460Ui) • wifi driver (BrightLink Pro 1460Ui) The GNU General Public License Version 2 is as follows. You also can see the GNU General Public License Version 2 at http://www.gnu.org/licenses/.
- Page 372 We protect your rights with two steps: (1) copyright the software, and (2) offer you this license which gives you legal permission to copy, distribute and/or modify the software. Also, for each author's protection and ours, we want to make certain that everyone understands that there is no warranty for this free software.
- Page 373 b) You must cause any work that you distribute or publish, that in whole or in part contains or is derived from the Program or any part thereof, to be licensed as a whole at no charge to all third parties under the terms of this License.
- Page 374 associated interface definition files, plus the scripts used to control compilation and installation of the executable. However, as a special exception, the source code distributed need not include anything that is normally distributed (in either source or binary form) with the major components (compiler, kernel, and so on) of the operating system on which the executable runs, unless that component itself accompanies the executable.
- Page 375 made generous contributions to the wide range of software distributed through that system in reliance on consistent application of that system; it is up to the author/donor to decide if he or she is willing to distribute software through any other system and a licensee cannot impose that choice. This section is intended to make thoroughly clear what is believed to be a consequence of the rest of this License.
- Page 376 DATA BEING RENDERED INACCURATE OR LOSSES SUSTAINED BY YOU OR THIRD PARTIES OR A FAILURE OF THE PROGRAM TO OPERATE WITH ANY OTHER PROGRAMS), EVEN IF SUCH HOLDER OR OTHER PARTY HAS BEEN ADVISED OF THE POSSIBILITY OF SUCH DAMAGES. END OF TERMS AND CONDITIONS How to Apply These Terms to Your New Programs If you develop a new program, and you want it to be of the greatest possible use to the public, the best...
- Page 377 We provide the source code of the LGPL Programs until five (5) years after the discontinuation of same model of this projector product. If you desire to receive the source code of the LGPL Programs, please contact Epson. These LGPL Programs are WITHOUT ANY WARRANTY; without even the implied warranty of MERCHANTABILITY AND FITNESS FOR A PARTICULAR PURPOSE.
- Page 378 • eglibc-gconv • eglibc-gconv-utf-16 • libacl1 • libattr1 • libblkid1 • libc6 • libcairo2 • libe2p2 • libext2fs2 • libfuse2 • libgcrypt11 • libglib-2.0-0 • libgpg-error0 • libkmod2 • libmount1 • libqtcore4 • libqtdbus4 • libqtgui4 • libqtnetwork4 • libqtopengl4 •...
- Page 379 • libusb-0.1-4 • libusb-1.0-0 • locale-base-en-us.utf8 • qt4-plugin-imageformat-gif • qt4-x11-free • tslib-conf • libiconv-1.14 (BrightLink Pro 1460Ui) The GNU Lesser General Public License Version 2 is as follows. You also can see the GNU Lesser General Public License Version 2 at http://www.gnu.org/licenses/. GNU LIBRARY GENERAL PUBLIC LICENSE Version 2, June 1991 Copyright (C) 1991 Free Software Foundation, Inc.
- Page 380 source code. If you link a program with the library, you must provide complete object files to the recipients so that they can relink them with the library, after making changes to the library and recompiling it. And you must show them these terms so they know their rights. Our method of protecting your rights has two steps: (1) copyright the library, and (2) offer you this license which gives you legal permission to copy, distribute and/or modify the library.
- Page 381 TERMS AND CONDITIONS FOR COPYING, DISTRIBUTION AND MODIFICATION 0. This License Agreement applies to any software library which contains a notice placed by the copyright holder or other authorized party saying it may be distributed under the terms of this Library General Public License (also called "this License").
- Page 382 must make a good faith effort to ensure that, in the event an application does not supply such function or table, the facility still operates, and performs whatever part of its purpose remains meaningful. (For example, a function in a library to compute square roots has a purpose that is entirely well-defined independent of the application.
- Page 383 5. A program that contains no derivative of any portion of the Library, but is designed to work with the Library by being compiled or linked with it, is called a "work that uses the Library". Such a work, in isolation, is not a derivative work of the Library, and therefore falls outside the scope of this License.
- Page 384 c) If distribution of the work is made by offering access to copy from a designated place, offer equivalent access to copy the above specified materials from the same place. d) Verify that the user has already received a copy of these materials or that you have already sent this user a copy.
- Page 385 11. If, as a consequence of a court judgment or allegation of patent infringement or for any other reason (not limited to patent issues), conditions are imposed on you (whether by court order, agreement or otherwise) that contradict the conditions of this License, they do not excuse you from the conditions of this License.
- Page 386 NO WARRANTY 15. BECAUSE THE LIBRARY IS LICENSED FREE OF CHARGE, THERE IS NO WARRANTY FOR THE LIBRARY, TO THE EXTENT PERMITTED BY APPLICABLE LAW. EXCEPT WHEN OTHERWISE STATED IN WRITING THE COPYRIGHT HOLDERS AND/OR OTHER PARTIES PROVIDE THE LIBRARY "AS IS" WITHOUT WARRANTY OF ANY KIND, EITHER EXPRESSED OR IMPLIED, INCLUDING, BUT NOT LIMITED TO, THE IMPLIED WARRANTIES OF MERCHANTABILITY AND FITNESS FOR A PARTICULAR PURPOSE.
- Page 387 You should have received a copy of the GNU Library General Public License along with this library; if not, write to the Free Software Foundation, Inc., 51 Franklin St, Fifth Floor, Boston, MA 02110-1301, USA. Also add information on how to contact you by electronic and paper mail. You should also get your employer (if you work as a programmer) or your school, if any, to sign a "copyright disclaimer"...
- Page 388 To protect your rights, we need to make restrictions that forbid distributors to deny you these rights or to ask you to surrender these rights. These restrictions translate to certain responsibilities for you if you distribute copies of the library or if you modify it. For example, if you distribute copies of the library, whether gratis or for a fee, you must give the recipients all the rights that we gave you.
- Page 389 In other cases, permission to use a particular library in non-free programs enables a greater number of people to use a large body of free software. For example, permission to use the GNU C Library in non- free programs enables many more people to use the whole GNU operating system, as well as its variant, the GNU/Linux operating system.
- Page 390 You may charge a fee for the physical act of transferring a copy, and you may at your option offer warranty protection in exchange for a fee. 2. You may modify your copy or copies of the Library or any portion of it, thus forming a work based on the Library, and copy and distribute such modifications or work under the terms of Section 1 above, provided that you also meet all of these conditions: a) The modified work must itself be a software library.
- Page 391 Once this change is made in a given copy, it is irreversible for that copy, so the ordinary GNU General Public License applies to all subsequent copies and derivative works made from that copy. This option is useful when you wish to copy part of the code of the Library into a program that is not a library.
- Page 392 during execution displays copyright notices, you must include the copyright notice for the Library among them, as well as a reference directing the user to the copy of this License. Also, you must do one of these things: a) Accompany the work with the complete corresponding machine-readable source code for the Library including whatever changes were used in the work (which must be distributed under Sections 1 and 2 above);...
- Page 393 b) Give prominent notice with the combined library of the fact that part of it is a work based on the Library, and explaining where to find the accompanying uncombined form of the same work. 8. You may not copy, modify, sublicense, link with, or distribute the Library except as expressly provided under this License.
- Page 394 12. If the distribution and/or use of the Library is restricted in certain countries either by patents or by copyrighted interfaces, the original copyright holder who places the Library under this License may add an explicit geographical distribution limitation excluding those countries, so that distribution is permitted only in or among countries not thus excluded.
- Page 395 How to Apply These Terms to Your New Libraries If you develop a new library, and you want it to be of the greatest possible use to the public, we recommend making it free software that everyone can redistribute and change. You can do so by permitting redistribution under these terms (or, alternatively, under the terms of the ordinary General Public License).
- Page 396 List of libjpeg programs • libjpeg-6b • libjpeg-8b (BrightLink Pro 1460Ui) License terms of conditions of each program which are provided by owner of the copyright to the "libjpeg" are as follows. Copyright (C) 1994-1997, Thomas G. Lane. This file is part of the Independent JPEG Group's software. For conditions of distribution and use, see the accompanying README file.
- Page 397 These conditions apply to any software derived from or based on the IJG code, not just to the unmodified library. If you use our work, you ought to acknowledge us. Permission is NOT granted for the use of any IJG author's name or company name in advertising or publicity relating to this software or products derived from it.
- Page 398 List of libpng programs • libpng-1.2.49 • libpng-1.6.3 • libpng-1.2.44 (BrightLink Pro 1460Ui) License terms of conditions of each program which are provided by owner of the copyright to the "libpng" are as follows. This copy of the libpng notices is provided for your convenience. In case of any discrepancy between this copy and the notices in the file png.h that is included in the libpng distribution, the latter shall prevail.
- Page 399 libpng versions 0.89, June 1996, through 0.96, May 1997, are Copyright (c) 1996, 1997 Andreas Dilger Distributed according to the same disclaimer and license as libpng-0.88, with the following individuals added to the list of Contributing Authors: John Bowler Kevin Bracey Sam Bushell Magnus Holmgren Greg Roelofs...
- Page 400 A "png_get_copyright" function is available, for convenient use in "about" boxes and the like: printf("%s",png_get_copyright(NULL)); Also, the PNG logo (in PNG format, of course) is supplied in the files "pngbar.png" and "pngbar.jpg (88x31) and "pngnow.png" (98x31). Libpng is OSI Certified Open Source Software. OSI Certified Open Source is a certification mark of the Open Source Initiative.
- Page 401 2. Altered source versions must be plainly marked as such, and must not be misrepresented as being the original software. 3. This notice may not be removed or altered from any source distribution. Jean-loup Gailly jloup@gzip.org Mark Adler madler@alumni.caltech.edu If you use the zlib library in a product, we would appreciate *not* receiving lengthy legal documents to sign.
- Page 402 DISCLAIMER This software is provided 'as is' with no explicit or implied warranties in respect of its properties, including, but not limited to, correctness and/or fitness for purpose. newlib This projector product includes the open source software program "newlib" which applies the terms and conditions provided by owner of the copyright to the "newlib".
- Page 403 * Redistributions in binary form must reproduce the above copyright notice, this list of conditions and the following disclaimer in the documentation and/or other materials provided with the distribution. * Neither the name of the University nor the names of its contributors may be used to endorse or promote products derived from this software without specific prior written permission.
- Page 404 ANY OF ITS ENTITIES BE LIABLE FOR ANY SPECIAL, INDIRECT OR CONSEQUENTIAL DAMAGES OR ANY DAMAGES WHATSOEVER RESULTING FROM LOSS OF USE, DATA OR PROFITS, WHETHER IN AN ACTION OF CONTRACT, NEGLIGENCE OR OTHER TORTIOUS ACTION, ARISING OUT OF OR IN CONNECTION WITH THE USE OR PERFORMANCE OF THIS SOFTWARE. (4) Advanced Micro Devices Copyright 1989, 1990 Advanced Micro Devices, Inc.
- Page 405 Developed at SunPro, a Sun Microsystems, Inc. business. Permission to use, copy, modify, and distribute this software is freely granted, provided that this notice is preserved. (8) Hewlett Packard (c) Copyright 1986 HEWLETT-PACKARD COMPANY To anyone who acknowledges that this file is provided "AS IS" without any express or implied warranty: permission to use, copy, modify, and distribute this file for any purpose is hereby granted without fee, provided that the above copyright notice and this notice appears in all copies, and that the name of Hewlett-Packard Company not be used in advertising or publicity pertaining to distribution of the...
- Page 406 OR BUSINESS INTERRUPTION) HOWEVER CAUSED AND ON ANY THEORY OF LIABILITY, WHETHER IN CONTRACT, STRICT LIABILITY, OR TORT (INCLUDING NEGLIGENCE OR OTHERWISE) ARISING IN ANY WAY OUT OF THE USE OF THIS SOFTWARE, EVEN IF ADVISED OF THE POSSIBILITY OF SUCH DAMAGE. (12) SuperH, Inc.
- Page 407 THIS SOFTWARE IS PROVIDED BY KTH AND ITS CONTRIBUTORS "AS IS" AND ANY EXPRESS OR IMPLIED WARRANTIES, INCLUDING, BUT NOT LIMITED TO, THE IMPLIED WARRANTIES OF MERCHANTABILITY AND FITNESS FOR A PARTICULAR PURPOSE ARE DISCLAIMED. IN NO EVENT SHALL KTH OR ITS CONTRIBUTORS BE LIABLE FOR ANY DIRECT, INDIRECT, INCIDENTAL, SPECIAL, EXEMPLARY, OR CONSEQUENTIAL DAMAGES (INCLUDING, BUT NOT LIMITED TO, PROCUREMENT OF SUBSTITUTE GOODS OR SERVICES;...
- Page 408 1. Redistributions of source code must retain the above copyright notice, this list of conditions and the following disclaimer. 2. Redistributions in binary form must reproduce the above copyright notice, this list of conditions and the following disclaimer in the documentation and/or other materials provided with the distribution. THIS SOFTWARE IS PROVIDED BY THE AUTHOR "AS IS"...
- Page 409 Copyright (c) 1984,2000 S.L. Moshier Permission to use, copy, modify, and distribute this software for any purpose without fee is hereby granted, provided that this entire notice is included in all copies of any software which is or includes a copy or modification of this software and in all copies of the supporting documentation for such software.
- Page 410 2. Redistributions in binary form must reproduce the above copyright notice, this list of conditions and the following disclaimer in the documentation and/or other materials provided with the distribution. 3. The name of the author may not be used to endorse or promote products derived from this software without specific prior written permission.
- Page 411 IN NO EVENT SHALL INTEL BE LIABLE FOR ANY LOSS OF USE, LOSS OF BUSINESS, LOSS OF PROFITS, INDIRECT, INCIDENTAL, SPECIAL OR CONSEQUENTIAL DAMAGES OF ANY KIND. IN NO EVENT SHALL INTEL'S TOTAL LIABILITY EXCEED THE SUM PAID TO INTEL FOR THE PRODUCT LICENSED HEREUNDER.
- Page 412 WARRANTIES OF MERCHANTABILITY AND FITNESS FOR A PARTICULAR PURPOSE ARE DISCLAIMED. IN NO EVENT SHALL THE AUTHOR OR CONTRIBUTORS BE LIABLE FOR ANY DIRECT, INDIRECT, INCIDENTAL, SPECIAL, EXEMPLARY, OR CONSEQUENTIAL DAMAGES (INCLUDING, BUT NOT LIMITED TO, PROCUREMENT OF SUBSTITUTE GOODS OR SERVICES; LOSS OF USE, DATA, OR PROFITS;...
- Page 413 1. Redistributions of source code must retain the above copyright notice, this list of conditions and the following disclaimer. 2. Redistributions in binary form must reproduce the above copyright notice, this list of conditions and the following disclaimer in the documentation and/or other materials provided with the distribution. THIS SOFTWARE IS PROVIDED BY THE AUTHOR "AS IS"...
- Page 414 All rights reserved. Redistribution and use in source and binary forms, with or without modification, are permitted provided that the following conditions are met: 1. Redistributions of source code must retain the above copyright notice, this list of conditions and the following disclaimer.
- Page 415 (35) - ARM Ltd (arm and thumb variant targets only) Copyright (c) 2009 ARM Ltd All rights reserved. Redistribution and use in source and binary forms, with or without modification, are permitted provided that the following conditions are met: 1. Redistributions of source code must retain the above copyright notice, this list of conditions and the following disclaimer.
- Page 416 MERCHANTABILITY AND FITNESS FOR A PARTICULAR PURPOSE ARE DISCLAIMED. IN NO EVENT SHALL CODESOURCERY BE LIABLE FOR ANY DIRECT, INDIRECT, INCIDENTAL, SPECIAL, EXEMPLARY, OR CONSEQUENTIAL DAMAGES (INCLUDING, BUT NOT LIMITED TO, PROCUREMENT OF SUBSTITUTE GOODS OR SERVICES; LOSS OF USE, DATA, OR PROFITS; OR BUSINESS INTERRUPTION) HOWEVER CAUSED AND ON ANY THEORY OF LIABILITY, WHETHER IN CONTRACT, STRICT LIABILITY, OR TORT (INCLUDING NEGLIGENCE OR OTHERWISE) ARISING IN ANY WAY OUT OF THE USE OF THIS SOFTWARE, EVEN IF ADVISED...
- Page 417 The "MIT License" are WITHOUT ANY WARRANTY; without even the implied warranty of MERCHANTABILITY AND FITNESS FOR A PARTICULAR PURPOSE. License terms of conditions of each program which are provided by owner of the copyright to the "MIT License" are as follows. •...
- Page 418 The above copyright notice and this permission notice shall be included in all copies or substantial portions of the Software. THE SOFTWARE IS PROVIDED "AS IS", WITHOUT WARRANTY OF ANY KIND, EXPRESS OR IMPLIED, INCLUDING BUT NOT LIMITED TO THE WARRANTIES OF MERCHANTABILITY, FIT- NESS FOR A PARTICULAR PURPOSE AND NONINFRINGEMENT.
- Page 419 The above copyright notice and this permission notice shall be included in all copies or substantial portions of the Software. THE SOFTWARE IS PROVIDED "AS IS", WITHOUT WARRANTY OF ANY KIND, EXPRESS OR IMPLIED, INCLUDING BUT NOT LIMITED TO THE WARRANTIES OF MERCHANTABILITY, FITNESS FOR A PARTICULAR PURPOSE AND NONINFRINGEMENT.
- Page 420 • libgl-mesa • libglapi0 • mesa • mesa-driver-i915 • mesa-driver-i965 Copyright (C) 1999-2007 Brian Paul All Rights Reserved. Permission is hereby granted, free of charge, to any person obtaining a copy of this software and associated documentation files (the "Software"), to deal in the Software without restriction, including without limitatio the rights to use, copy, modify, merge, publish, distribute, sublicense, and/or sell copies of the Software, and to permit persons to whom the Software is furnished to do so, subject to the following conditions:...
- Page 421 FOR A PARTICULAR PURPOSE AND NONINFRINGEMENT. IN NO EVENT SHALL PRECISION INSIGHT AND/OR ITS SUPPLIERS BE LIABLE FOR ANY CLAIM, DAMAGES OR OTHER LIABILITY, WHETHER IN AN ACTION OF CONTRACT, TORT OR OTHERWISE, ARISING FROM, OUT OF OR IN CONNECTION WITH THE SOFTWARE OR THE USE OR OTHER DEALINGS IN THE SOFTWARE. •...
- Page 422 WHETHER IN AN ACTION OF CONTRACT, TORT OR OTHERWISE, ARISING FROM, OUT OF OR IN CONNECTION WITH THE SOFTWARE OR THE USE OR OTHER DEALINGS IN THE SOFTWARE. • libfontenc1 Copyright (c) 1998-2001 by Juliusz Chroboczek Permission is hereby granted, free of charge, to any person obtaining a copy of this software and associated documentation files (the "Software"), to deal in the Software without restriction, including without limitation the rights to use, copy, modify, merge, publish, distribute, sublicense, and/or sell copies of the Software, and to permit persons to whom the Software is furnished to do so, subject to the...
- Page 423 • libncursesw5 • libtinfo5 • ncurses • ncurses-terminfo-base /***************************************************************************** * Copyright (c) 1999-2004,2005 Free Software Foundation, Inc. * Permission is hereby granted, free of charge, to any person obtaining a copy of this software and associated documentation files (the "Software"), to deal in the Software without restriction, including without limitation the rights to use, copy, modify, merge, publish, distribute, distribute with modifications, sublicense, and/or sell copies of the Software, and to permit persons to whom the Software is furnished to do so, subject to the following conditions:...
- Page 424 The above copyright notice and this permission notice shall be included in all copies or substantial portions of the Software. THE SOFTWARE IS PROVIDED "AS IS", WITHOUT WARRANTY OF ANY KIND, EXPRESS OR IMPLIED, INCLUDING BUT NOT LIMITED TO THE WARRANTIES OF MERCHANTABILITY, FITNESS FOR A PARTICULAR PURPOSE AND NONINFRINGEMENT.
- Page 425 Copyright (c) 2009, 2012 Samuel Thibault Permission to use, copy, modify, and distribute this software for any purpose with or without fee is hereby granted, provided that the above copyright notice and this permission notice appear in all copies. THE SOFTWARE IS PROVIDED "AS IS" AND THE AUTHOR DISCLAIMS ALL WARRANTIES WITH REGARD TO THIS SOFTWARE INCLUDING ALL IMPLIED WARRANTIES OF MERCHANTABILITY AND FITNESS.
- Page 426 of the Software, and to permit persons to whom the Software is furnished to do so, subject to the following conditions: The above copyright notice and this permission notice shall be included in all copies or substantial portions of the Software. THE SOFTWARE IS PROVIDED "AS IS", WITHOUT WARRANTY OF ANY KIND, EXPRESS OR IMPLIED, INCLUDING BUT NOT LIMITED TO THE WARRANTIES OF MERCHANTABILITY, FITNESS FOR A PARTICULAR PURPOSE AND NONINFRINGEMENT.
- Page 427 * Copyright 2009, 2010 Nokia Corporation * Permission is hereby granted, free of charge, to any person obtaining a copy of this software and associated documentation files (the "Software"), to deal in the Software without restriction, including without limitation the rights to use, copy, modify, merge, publish, distribute, sublicense, and/or sell copies of the Software, and to permit persons to whom the Software is furnished to do so, subject to the following conditions: * The above copyright notice and this permission notice (including the next paragraph) shall be included...
- Page 428 * Permission to use, copy, modify, and distribute this software and its documentation for any purpose is hereby granted, provided that the names of M.I.T. and the M.I.T. S.I.P.B. not be used in advertising or publicity pertaining to distribution of the software without specific, written prior permission. M.I.T. and the M.I.T.
- Page 429 OF CONTRACT, TORT OR OTHERWISE, ARISING FROM, OUT OF OR IN CONNECTION WITH THE SOFTWARE OR THE USE OR OTHER DEALINGS IN THE SOFTWARE. Except as contained in this notice, the name of The Open Group shall not be used in advertising or otherwise to promote the sale, use or other dealings in this Software without prior written authorization from The Open Group.
- Page 430 Copyright 1984-1994, 1998 The Open Group Permission to use, copy, modify, distribute, and sell this software and its documentation for any purpose is hereby granted without fee, provided that the above copyright notice appear in all copies and that both that copyright notice and this permission notice appear in supporting documentation.
- Page 431 Copyright 1985, 1986, 1987, 1988, 1989, 1990, 1991 by Digital Equipment Corporation Portions Copyright 1990, 1991 by Tektronix, Inc. Permission to use, copy, modify and distribute this documentation for any purpose and without fee is hereby granted, provided that the above copyright notice appears in all copies and that both that copyright notice and this permission notice appear in all copies, and that the names of Digital and Tektronix not be used in in advertising or publicity pertaining to this documentation without specific, written prior permission.
- Page 432 1. This copyright, permission, and disclaimer notice is reproduced in all copies of this software and any modification thereof and in supporting documentation; 2. Any color-handling application which displays TekHVC color cooordinates identifies these as TekHVC color coordinates in any interface that displays these coordinates and in any associated documentation; 3.
- Page 433 OF CONTRACT, NEGLIGENCE OR OTHER TORTIOUS ACTION, ARISING OUT OF OR IN CONNECTION WITH THE USE OR PERFORMANCE OF THIS SOFTWARE. ---------------------------------------- Copyright 1990, 1991, 1992, 1993, 1994 by FUJITSU LIMITED Permission to use, copy, modify, distribute, and sell this software and its documentation for any purpose is hereby granted without fee, provided that the above copyright notice appear in all copies and that both that copyright notice and this permission notice appear in supporting documentation, and that the name of FUJITSU LIMITED not be used in advertising or publicity pertaining to distribution of the software...
- Page 434 Copyright 1990, 1991 by OMRON Corporation Permission to use, copy, modify, distribute, and sell this software and its documentation for any purpose is hereby granted without fee, provided that the above copyright notice appear in all copies and that both that copyright notice and this permission notice appear in supporting documentation, and that the name OMRON not be used in advertising or publicity pertaining to distribution of the software without specific, written prior permission.
- Page 435 LIABLE FOR ANY SPECIAL, INDIRECT OR CONSEQUENTIAL DAMAGES OR ANY DAMAGES WHATSOEVER RESULTING FROM LOSS OF USE, DATA OR PROFITS, WHETHER IN AN ACTION OF CONTRACT, NEGLIGENCE OR OTHER TORTIOUS ACTION, ARISING OUT OF OR IN CONNECTION WITH THE USE OR PERFORMANCE OF THIS SOFTWARE. ---------------------------------------- Copyright 1991 by the Open Software Foundation Permission to use, copy, modify, distribute, and sell this software and its documentation for any purpose...
- Page 436 ---------------------------------------- Copyright (c) 1993, 1995 by Silicon Graphics Computer Systems, Inc. Permission to use, copy, modify, and distribute this software and its documentation for any purpose and without fee is hereby granted, provided that the above copyright notice appear in all copies and that both that copyright notice and this permission notice appear in supporting documentation, and that the name of Silicon Graphics not be used in advertising or publicity pertaining to distribution of the software without specific prior written permission.
- Page 437 Copyright 1994 by Sony Corporation Permission to use, copy, modify, distribute and sell this software and its documentation for any purpose is hereby granted without fee, provided that the above copyright notice appear in all copies and that both that copyright notice and this permission notice appear in supporting documentation, and that the name of FUJITSU LIMITED, Fujitsu Open Systems Solutions, Inc.
- Page 438 that copyright notice and this permission notice appear in supporting documentation, and that the names of SunSoft, Inc. and Bruno Haible not be used in advertising or publicity pertaining to distribution of the software without specific, written prior permission. SunSoft, Inc. and Bruno Haible make no representations about the suitability of this software for any purpose.
- Page 439 Wyse not be used in advertising or publicity pertaining to distribution of the software without specific, written prior permission. WYSE DISCLAIMS ALL WARRANTIES WITH REGARD TO THIS SOFTWARE, INCLUDING ALL IMPLIED WARRANTIES OF MERCHANTABILITY AND FITNESS, IN NO EVENT SHALL DIGITAL BE LIABLE FOR ANY SPECIAL, INDIRECT OR CONSEQUENTIAL DAMAGES OR ANY DAMAGES WHATSOEVER RESULTING FROM LOSS OF USE, DATA OR PROFITS, WHETHER IN AN ACTION OF CONTRACT, NEGLIGENCE OR OTHER TORTIOUS ACTION, ARISING OUT OF OR IN...
- Page 440 FUJITSU LIMITED AND FUJITSU OPEN SYSTEMS SOLUTIONS, INC. DISCLAIMS ALL WARRANTIES WITH REGARD TO THIS SOFTWARE, INCLUDING ALL IMPLIED WARRANTIES OF MERCHANTABILITY AND FITNESS, IN NO EVENT SHALL FUJITSU OPEN SYSTEMS SOLUTIONS, INC. AND FUJITSU LIMITED BE LIABLE FOR ANY SPECIAL, INDIRECT OR CONSEQUENTIAL DAMAGES OR ANY DAMAGES WHATSOEVER RESULTING FROM LOSS OF USE, DATA OR PROFITS, WHETHER IN AN ACTION OF CONTRACT, NEGLIGENCE OR OTHER TORTIOUS ACTION, ARISING OUT OF OR IN CONNECTION WITH THE USE OR PERFORMANCE OF THIS...
- Page 441 OUT OF OR IN CONNECTION WITH THE SOFTWARE OR THE USE OR OTHER DEALINGS IN THE SOFTWARE. Except as contained in this notice, the name of the X Consortium or of the XFree86 Project shall not be used in advertising or otherwise to promote the sale, use or other dealings in this Software without prior written authorization from the X Consortium and the XFree86 Project.
- Page 442 DIGITAL AND WYSE DISCLAIM ALL WARRANTIES WITH REGARD TO THIS SOFTWARE, INCLUDING ALL IMPLIED WARRANTIES OF MERCHANTABILITY AND FITNESS, IN NO EVENT SHALL DIGITAL OR WYSE BE LIABLE FOR ANY SPECIAL, INDIRECT OR CONSEQUENTIAL DAMAGES OR ANY DAMAGES WHATSOEVER RESULTING FROM LOSS OF USE, DATA OR PROFITS, WHETHER IN AN ACTION OF CONTRACT, NEGLIGENCE OR OTHER TORTIOUS ACTION, ARISING OUT OF OR IN CONNECTION WITH THE USE OR PERFORMANCE OF THIS SOFTWARE.
- Page 443 CONSORTIUM BE LIABLE FOR ANY CLAIM, DAMAGES OR OTHER LIABILITY, WHETHER IN AN ACTION OF CONTRACT, TORT OR OTHERWISE, ARISING FROM, OUT OF OR IN CONNECTION WITH THE SOFTWARE OR THE USE OR OTHER DEALINGS IN THE SOFTWARE. ---------------------------------------- (c) Copyright 1996 by Sebastien Marineau and Holger Veit <marineau@genie.uottawa.ca>...
- Page 444 advertising or publicity pertaining to distribution of the software without specific, written prior permission. OMRON, NTT Software, NTT, Open Software Foundation, and Sony Corporation make no representations about the suitability of this software for any purpose. It is provided "as is" without express or implied warranty.
- Page 445 DAMAGES OR ANY DAMAGES WHATSOEVER RESULTING FROM LOSS OF USE, DATA OR PROFITS, WHETHER IN AN ACTION OF CONTRACT, NEGLIGENCE OR OTHER TORTIOUS ACTION, ARISING OUT OF OR IN CONNECTION WITH THE USE OR PERFORMANCE OF THIS SOFTWARE. ---------------------------------------- Copyright (c) 2007-2009, Troy D. Hanson All rights reserved.
- Page 446 Copyright IBM Corporation 1993 All Rights Reserved License to use, copy, modify, and distribute this software and its documentation for any purpose and without fee is hereby granted, provided that the above copyright notice appear in all copies and that both that copyright notice and this permission notice appear in supporting documentation, and that the name of IBM not be used in advertising or publicity pertaining to distribution of the software without specific, written prior permission.
- Page 447 The above copyright notice and this permission notice shall be included in all copies or substantial portions of the Software. THE SOFTWARE IS PROVIDED "AS IS", WITHOUT WARRANTY OF ANY KIND, EXPRESS OR IMPLIED, INCLUDING BUT NOT LIMITED TO THE WARRANTIES OF MERCHANTABILITY, FITNESS FOR A PARTICULAR PURPOSE AND NONINFRINGEMENT.
- Page 448 All Rights Reserved. Permission is hereby granted, free of charge, to any person obtaining a copy of this software and associated documentation files (the "Software"), to deal in the Software without restriction, including without limitation the rights to use, copy, modify, merge, publish, distribute, sublicense, and/or sell copies of the Software, and to permit persons to whom the Software is furnished to do so, subject to the following conditions: The above copyright notice and this permission notice shall be included in all copies or substantial...
- Page 449 of the Software, and to permit persons to whom the Software is furnished to do so, subject to the following conditions: The above copyright notice and this permission notice (including the next paragraph) shall be included in all copies or substantial portions of the Software. THE SOFTWARE IS PROVIDED "AS IS", WITHOUT WARRANTY OF ANY KIND, EXPRESS OR IMPLIED, INCLUDING BUT NOT LIMITED TO THE WARRANTIES OF MERCHANTABILITY, FITNESS FOR A PARTICULAR PURPOSE AND NONINFRINGEMENT.
- Page 450 SHALL KEITH PACKARD BE LIABLE FOR ANY SPECIAL, INDIRECT OR CONSEQUENTIAL DAMAGES OR ANY DAMAGES WHATSOEVER RESULTING FROM LOSS OF USE, DATA OR PROFITS, WHETHER IN AN ACTION OF CONTRACT, NEGLIGENCE OR OTHER TORTIOUS ACTION, ARISING OUT OF OR IN CONNECTION WITH THE USE OR PERFORMANCE OF THIS SOFTWARE.
- Page 451 Except as contained in this notice, the name of The Open Group shall not be used in advertising or otherwise to promote the sale, use or other dealings in this Software without prior written authorization from The Open Group. Copyright (c) 1996 Digital Equipment Corporation, Maynard, Massachusetts. Permission is hereby granted, free of charge, to any person obtaining a copy of this software and associated documentation files (the "Software"), to deal in the Software without restriction, including without limitation the rights to use, copy, modify, merge, publish, distribute, sublicense, and/or sell copies...
- Page 452 Permission to use, copy, modify, distribute, and sell this software and its documentation for any purpose is hereby granted without fee, provided that the above copyright notice appear in all copies and that both that copyright notice and this permission notice appear in supporting documentation, and that the name of NCD.
- Page 453 Copyright (c) 1994, 1995 Hewlett-Packard Company Permission is hereby granted, free of charge, to any person obtaining a copy of this software and associated documentation files (the "Software"), to deal in the Software without restriction, including without limitation the rights to use, copy, modify, merge, publish, distribute, sublicense, and/or sell copies of the Software, and to permit persons to whom the Software is furnished to do so, subject to the following conditions: The above copyright notice and this permission notice shall be included in all copies or substantial...
- Page 454 WHETHER IN AN ACTION OF CONTRACT, TORT OR OTHERWISE, ARISING FROM, OUT OF OR IN CONNECTION WITH THE SOFTWARE OR THE USE OR OTHER DEALINGS IN THE SOFTWARE. Copyright (c) 1989 X Consortium, Inc. and Digital Equipment Corporation. Copyright (c) 1992 X Consortium, Inc. and Intergraph Corporation. Copyright (c) 1993 X Consortium, Inc.
- Page 455 THE SOFTWARE IS PROVIDED "AS IS", WITHOUT WARRANTY OF ANY KIND, EXPRESS OR IMPLIED, INCLUDING BUT NOT LIMITED TO THE WARRANTIES OF MERCHANTABILITY, FITNESS FOR A PARTICULAR PURPOSE AND NONINFRINGEMENT. IN NO EVENT SHALL THE AUTHORS OR COPYRIGHT HOLDERS BE LIABLE FOR ANY CLAIM, DAMAGES OR OTHER LIABILITY, WHETHER IN AN ACTION OF CONTRACT, TORT OR OTHERWISE, ARISING FROM, OUT OF OR IN CONNECTION WITH THE SOFTWARE OR THE USE OR OTHER DEALINGS IN THE SOFTWARE.
- Page 456 PROFITS, WHETHER IN AN ACTION OF CONTRACT, NEGLIGENCE OR OTHER TORTIOUS ACTION, ARISING OUT OF OR IN CONNECTION WITH THE USE OR PERFORMANCE OF THIS SOFTWARE. Copyright © 2007 Red Hat, Inc Copyright (c) 2008, 2009, Oracle and/or its affiliates. All rights reserved. Permission is hereby granted, free of charge, to any person obtaining a copy of this software and associated documentation files (the "Software"), to deal in the Software without restriction, including without limitation the rights to use, copy, modify, merge, publish, distribute, sublicense, and/or sell copies...
- Page 457 FOR A PARTICULAR PURPOSE AND NONINFRINGEMENT. IN NO EVENT SHALL THE AUTHORS OR COPYRIGHT HOLDERS BE LIABLE FOR ANY CLAIM, DAMAGES OR OTHER LIABILITY, WHETHER IN AN ACTION OF CONTRACT, TORT OR OTHERWISE, ARISING FROM, OUT OF OR IN CONNECTION WITH THE SOFTWARE OR THE USE OR OTHER DEALINGS IN THE SOFTWARE. Copyright 1990, 1998 The Open Group Permission to use, copy, modify, distribute, and sell this software and its documentation for any purpose is hereby granted without fee, provided that the above copyright notice appear in all copies and that both...
- Page 458 of SuSE not be used in advertising or publicity pertaining to distribution of the software without specific, written prior permission. SuSE makes no representations about the suitability of this software for any purpose. It is provided "as is" without express or implied warranty. SuSE DISCLAIMS ALL WARRANTIES WITH REGARD TO THIS SOFTWARE, INCLUDING ALL IMPLIED WARRANTIES OF MERCHANTABILITY AND FITNESS, IN NO EVENT SHALL SuSE BE LIABLE FOR ANY SPECIAL, INDIRECT OR CONSEQUENTIAL DAMAGES OR ANY DAMAGES...
- Page 459 [Note: clause 3 in the following license, the "advertising clause", was rescinded by Berkeley in 1999. See <ftp://ftp.cs.berkeley.edu/pub/4bsd/README.Impt.License.Change>] Copyright (c) 1991, 1993 The Regents of the University of California. All rights reserved. Redistribution and use in source and binary forms, with or without modification, are permitted provided that the following conditions are met: 1.
- Page 460 DISCLAIMED. IN NO EVENT SHALL THE AUTHOR OR CONTRIBUTORS BE LIABLE FOR ANY DIRECT, INDIRECT, INCIDENTAL, SPECIAL, EXEMPLARY, OR CONSEQUENTIAL DAMAGES (INCLUDING, BUT NOT LIMITED TO, PROCUREMENT OF SUBSTITUTE GOODS OR SERVICES; LOSS OF USE, DATA, OR PROFITS; OR BUSINESS INTERRUPTION) HOWEVER CAUSED AND ON ANY THEORY OF LIABILITY, WHETHER IN CONTRACT, STRICT LIABILITY, OR TORT (INCLUDING NEGLIGENCE OR OTHERWISE) ARISING IN ANY WAY OUT OF THE USE OF THIS SOFTWARE, EVEN IF ADVISED OF THE POSSIBILITY OF SUCH DAMAGE.
- Page 461 Copyright 1989 by Hewlett-Packard Company, Palo Alto, California. All Rights Reserved Permission to use, copy, modify, and distribute this software and its documentation for any purpose and without fee is hereby granted, provided that the above copyright notice appear in all copies and that both that copyright notice and this permission notice appear in supporting documentation, and that the name of Hewlett-Packard not be used in advertising or publicity pertaining to distribution of the software without specific, written prior permission.
- Page 462 The above copyright notice and this permission notice (including the next paragraph) shall be included in all copies or substantial portions of the Software. THE SOFTWARE IS PROVIDED "AS IS", WITHOUT WARRANTY OF ANY KIND, EXPRESS OR IMPLIED, INCLUDING BUT NOT LIMITED TO THE WARRANTIES OF MERCHANTABILITY, FITNESS FOR A PARTICULAR PURPOSE AND NONINFRINGEMENT.
- Page 463 Except as contained in this notice, the name of The Open Group shall not be used in advertising or otherwise to promote the sale, use or other dealings in this Software without prior written authorization from The Open Group. Copyright (c) 1991, 1997 Digital Equipment Corporation, Maynard, Massachusetts. Permission is hereby granted, free of charge, to any person obtaining a copy of this software and associated documentation files (the "Software"), to deal in the Software without restriction, including without limitation the rights to use, copy, modify, merge, publish, distribute, sublicense, and/or sell copies...
- Page 464 Permission to use, copy, modify, distribute, and sell this software and its documentation for any purpose is hereby granted without fee, provided that the above copyright notice appear in all copies and that both that copyright notice and this permission notice appear in supporting documentation. The above copyright notice and this permission notice shall be included in all copies or substantial portions of the Software.
- Page 465 THE SOFTWARE IS PROVIDED "AS IS", WITHOUT WARRANTY OF ANY KIND, EXPRESS OR IMPLIED, INCLUDING BUT NOT LIMITED TO THE WARRANTIES OF MERCHANTABILITY, FITNESS FOR A PARTICULAR PURPOSE AND NONINFRINGEMENT. IN NO EVENT SHALL THE OPEN GROUP BE LIABLE FOR ANY CLAIM, DAMAGES OR OTHER LIABILITY, WHETHER IN AN ACTION OF CONTRACT, TORT OR OTHERWISE, ARISING FROM, OUT OF OR IN CONNECTION WITH THE SOFTWARE OR THE USE OR OTHER DEALINGS IN THE SOFTWARE.
- Page 466 THE SOFTWARE IS PROVIDED "AS IS", WITHOUT WARRANTY OF ANY KIND, EXPRESS OR IMPLIED, INCLUDING BUT NOT LIMITED TO THE WARRANTIES OF MERCHANTABILITY, FITNESS FOR A PARTICULAR PURPOSE AND NONINFRINGEMENT. IN NO EVENT SHALL THE XFREE86 PROJECT BE LIABLE FOR ANY CLAIM, DAMAGES OR OTHER LIABILITY, WHETHER IN AN ACTION OF CONTRACT, TORT OR OTHERWISE, ARISING FROM, OUT OF OR IN CONNECTION WITH THE SOFTWARE OR THE USE OR OTHER DEALINGS IN THE SOFTWARE.
- Page 467 SHALL KEITH PACKARD BE LIABLE FOR ANY SPECIAL, INDIRECT OR CONSEQUENTIAL DAMAGES OR ANY DAMAGES WHATSOEVER RESULTING FROM LOSS OF USE, DATA OR PROFITS, WHETHER IN AN ACTION OF CONTRACT, NEGLIGENCE OR OTHER TORTIOUS ACTION, ARISING OUT OF OR IN CONNECTION WITH THE USE OR PERFORMANCE OF THIS SOFTWARE.
- Page 468 of SuSE not be used in advertising or publicity pertaining to distribution of the software without specific, written prior permission. SuSE makes no representations about the suitability of this software for any purpose. It is provided "as is" without express or implied warranty. SuSE DISCLAIMS ALL WARRANTIES WITH REGARD TO THIS SOFTWARE, INCLUDING ALL IMPLIED WARRANTIES OF MERCHANTABILITY AND FITNESS, IN NO EVENT SHALL SuSE BE LIABLE FOR ANY SPECIAL, INDIRECT OR CONSEQUENTIAL DAMAGES OR ANY DAMAGES...
- Page 469 of the Software, and to permit persons to whom the Software is furnished to do so, subject to the following conditions: The above copyright notice and this permission notice shall be included in all copies or substantial portions of the Software. THE SOFTWARE IS PROVIDED "AS IS", WITHOUT WARRANTY OF ANY KIND, EXPRESS OR IMPLIED, INCLUDING BUT NOT LIMITED TO THE WARRANTIES OF MERCHANTABILITY, FITNESS FOR A PARTICULAR PURPOSE AND NONINFRINGEMENT.
- Page 470 Permission is hereby granted, free of charge, to any person obtaining a copy of this software and associated documentation files (the "Software"), to deal in the Software without restriction, including without limitation the rights to use, copy, modify, merge, publish, distribute, sublicense, and/or sell copies of the Software, and to permit persons to whom the Software is furnished to do so, subject to the following conditions: The above copyright notice and this permission notice (including the next paragraph) shall be included in...
- Page 471 FOR A PARTICULAR PURPOSE AND NONINFRINGEMENT. IN NO EVENT SHALL THE OPEN GROUP BE LIABLE FOR ANY CLAIM, DAMAGES OR OTHER LIABILITY, WHETHER IN AN ACTION OF CONTRACT, TORT OR OTHERWISE, ARISING FROM, OUT OF OR IN CONNECTION WITH THE SOFTWARE OR THE USE OR OTHER DEALINGS IN THE SOFTWARE.
- Page 472 Permission is hereby granted, free of charge, to any person obtaining a copy of this software and associated documentation files (the "Software"), to deal in the Software without restriction, including without limitation the rights to use, copy, modify, merge, publish, distribute, sublicense, and/or sell copies of the Software, and to permit persons to whom the Software is furnished to do so, subject to the following conditions: The above copyright notice and this permission notice shall be included in all copies or substantial...
- Page 473 THE SOFTWARE IS PROVIDED "AS IS", WITHOUT WARRANTY OF ANY KIND, EXPRESS OR IMPLIED, INCLUDING BUT NOT LIMITED TO THE WARRANTIES OF MERCHANTABILITY, FITNESS FOR A PARTICULAR PURPOSE AND NONINFRINGEMENT. IN NO EVENT SHALL THE OPEN GROUP BE LIABLE FOR ANY CLAIM, DAMAGES OR OTHER LIABILITY, WHETHER IN AN ACTION OF CONTRACT, TORT OR OTHERWISE, ARISING FROM, OUT OF OR IN CONNECTION WITH THE SOFTWARE OR THE USE OR OTHER DEALINGS IN THE SOFTWARE.
- Page 474 of the Software, and to permit persons to whom the Software is furnished to do so, subject to the following conditions: The above copyright notice and this permission notice (including the next paragraph) shall be included in all copies or substantial portions of the Software. THE SOFTWARE IS PROVIDED "AS IS", WITHOUT WARRANTY OF ANY KIND, EXPRESS OR IMPLIED, INCLUDING BUT NOT LIMITED TO THE WARRANTIES OF MERCHANTABILITY, FITNESS FOR A PARTICULAR PURPOSE AND NONINFRINGEMENT.
- Page 475 THE SOFTWARE IS PROVIDED "AS IS", WITHOUT WARRANTY OF ANY KIND, EXPRESS OR IMPLIED, INCLUDING BUT NOT LIMITED TO THE WARRANTIES OF MERCHANTABILITY, FITNESS FOR A PARTICULAR PURPOSE AND NONINFRINGEMENT. IN NO EVENT SHALL THE COPYRIGHT HOLDER(S) OR AUTHOR(S) BE LIABLE FOR ANY CLAIM, DAMAGES OR OTHER LIABILITY, WHETHER IN AN ACTION OF CONTRACT, TORT OR OTHERWISE, ARISING FROM, OUT OF OR IN CONNECTION WITH THE SOFTWARE OR THE USE OR OTHER DEALINGS IN THE SOFTWARE.
- Page 476 RICH MURPHEY AND DAVID DAWES DISCLAIM ALL WARRANTIES WITH REGARD TO THIS SOFTWARE, INCLUDING ALL IMPLIED WARRANTIES OF MERCHANTABILITY AND FITNESS, IN NO EVENT SHALL RICH MURPHEY OR DAVID DAWES BE LIABLE FOR ANY SPECIAL, INDIRECT OR CONSEQUENTIAL DAMAGES OR ANY DAMAGES WHATSOEVER RESULTING FROM LOSS OF USE, DATA OR PROFITS, WHETHER IN AN ACTION OF CONTRACT, NEGLIGENCE OR OTHER TORTIOUS ACTION, ARISING OUT OF OR IN CONNECTION WITH THE USE OR PERFORMANCE OF THIS SOFTWARE.
- Page 477 INDIRECT OR CONSEQUENTIAL DAMAGES OR ANY DAMAGES WHATSOEVER RESULTING FROM LOSS OF USE, DATA OR PROFITS, WHETHER IN AN ACTION OF CONTRACT, NEGLIGENCE OR OTHER TORTIOUS ACTION, ARISING OUT OF OR IN CONNECTION WITH THE USE OR PERFORMANCE OF THIS SOFTWARE. Portions based on kbdrate.c from util-linux 2.9t, which is Copyright 1992 Rickard E.
- Page 478 NEGLIGENCE OR OTHER TORTIOUS ACTION, ARISING OUT OF OR IN CONNECTION WITH THE USE OR PERFORMANCE OF THIS SOFTWARE. Code for Solaris operating systems is additionally covered by these notices: Copyright 1990,91 by Thomas Roell, Dinkelscherben, Germany Copyright 1993 by David Dawes <dawes@XFree86.org> Copyright 1999 by David Holland <davidh@iquest.net>...
- Page 479 Copyright (c) 2004-2005, 2008-2010, Oracle and/or its affiliates. All rights reserved. Copyright 2012 Red Hat, Inc. Permission is hereby granted, free of charge, to any person obtaining a copy of this software and associated documentation files (the "Software"), to deal in the Software without restriction, including without limitation the rights to use, copy, modify, merge, publish, distribute, sublicense, and/or sell copies of the Software, and to permit persons to whom the Software is furnished to do so, subject to the following conditions:...
- Page 480 Permission to use, copy, modify, distribute, and sell this software and its documentation for any purpose is hereby granted without fee, provided that the above copyright notice appear in all copies and that both that copyright notice and this permission notice appear in supporting documentation, and that the name of Kazutaka YOKOTA not be used in advertising or publicity pertaining to distribution of the software without specific, written prior permission.
- Page 481 UCHIYAMA YASUSHI DISCLAIMS ALL WARRANTIES WITH REGARD TO THIS SOFTWARE, INCLUDING ALL IMPLIED WARRANTIES OF MERCHANTABILITY AND FITNESS, IN NO EVENT SHALL UCHIYAMA YASUSHI BE LIABLE FOR ANY SPECIAL, INDIRECT OR CONSEQUENTIAL DAMAGES OR ANY DAMAGES WHATSOEVER RESULTING FROM LOSS OF USE, DATA OR PROFITS, WHETHER IN AN ACTION OF CONTRACT, NEGLIGENCE OR OTHER TORTIOUS ACTION, ARISING OUT OF OR IN CONNECTION WITH THE USE OR PERFORMANCE OF THIS SOFTWARE.
- Page 482 GRAPHICS AND/OR ITS SUPPLIERS BE LIABLE FOR ANY CLAIM, DAMAGES OR OTHER LIABILITY, WHETHER IN AN ACTION OF CONTRACT, TORT OR OTHERWISE, ARISING FROM, OUT OF OR IN CONNECTION WITH THE SOFTWARE OR THE USE OR OTHER DEALINGS IN THE SOFTWARE.
- Page 483 THE SOFTWARE IS PROVIDED "AS IS", WITHOUT WARRANTY OF ANY KIND, EXPRESS OR IMPLIED, INCLUDING BUT NOT LIMITED TO THE WARRANTIES OF MERCHANTABILITY, FITNESS FOR A PARTICULAR PURPOSE AND NONINFRINGEMENT. IN NO EVENT SHALL THE AUTHORS OR COPYRIGHT HOLDERS BE LIABLE FOR ANY CLAIM, DAMAGES OR OTHER LIABILITY, WHETHER IN AN ACTION OF CONTRACT, TORT OR OTHERWISE, ARISING FROM, OUT OF OR IN CONNECTION WITH THE SOFTWARE OR THE USE OR OTHER DEALINGS IN THE SOFTWARE.
- Page 484 All Rights Reserved. Permission is hereby granted, free of charge, to any person obtaining a copy of this software and associated documentation files (the "Software"), to deal in the Software without restriction, including without limitation on the rights to use, copy, modify, merge, publish, distribute, sub license, and/or sell copies of the Software, and to permit persons to whom the Software is furnished to do so, subject to the following conditions: The above copyright notice and this permission notice (including the next paragraph) shall be included in...
- Page 485 The above copyright notice and this permission notice shall be included in all copies or substantial portions of the Software. THE SOFTWARE IS PROVIDED "AS IS", WITHOUT WARRANTY OF ANY KIND, EXPRESS OR IMPLIED, INCLUDING BUT NOT LIMITED TO THE WARRANTIES OF MERCHANTABILITY, FITNESS FOR A PARTICULAR PURPOSE AND NONINFRINGEMENT.
- Page 486 OF CONTRACT, TORT OR OTHERWISE, ARISING FROM, OUT OF OR IN CONNECTION WITH THE SOFTWARE OR THE USE OR OTHER DEALINGS IN THE SOFTWARE. Except as contained in this notice, the name of The Open Group shall not be used in advertising or otherwise to promote the sale, use or other dealings in this Software without prior written authorization from The Open Group.
- Page 487 Copyright 1996 by Joseph Moss Copyright (C) 2002-2007 Free Software Foundation, Inc. Copyright (C) Dmitry Golubev <lastguru@mail.ru>, 2003-2004 Copyright (C) 2004, Gregory Mokhin <mokhin@bog.msu.ru> Copyright (C) 2006 Erdal Ronahî Permission to use, copy, modify, distribute, and sell this software and its documentation for any purpose is hereby granted without fee, provided that the above copyright notice appear in all copies and that both that copyright notice and this permission notice appear in supporting documentation, and that the name of the copyright holder(s) not be used in advertising or publicity pertaining to distribution of the software...
- Page 488 Copyright 1996, 1998 The Open Group Permission to use, copy, modify, distribute, and sell this software and its documentation for any purpose is hereby granted without fee, provided that the above copyright notice appear in all copies and that both that copyright notice and this permission notice appear in supporting documentation.
- Page 489 SILICON GRAPHICS DISCLAIMS ALL WARRANTIES WITH REGARD TO THIS SOFTWARE, INCLUDING ALL IMPLIED WARRANTIES OF MERCHANTABILITY AND FITNESS FOR A PARTICULAR PURPOSE. IN NO EVENT SHALL SILICON GRAPHICS BE LIABLE FOR ANY SPECIAL, INDIRECT OR CONSEQUENTIAL DAMAGES OR ANY DAMAGES WHATSOEVER RESULTING FROM LOSS OF USE, DATA OR PROFITS, WHETHER IN AN ACTION OF CONTRACT, NEGLIGENCE OR OTHER TORTIOUS ACTION, ARISING OUT OF OR IN CONNECTION WITH THE USE OR PERFORMANCE OF THIS SOFTWARE.
- Page 490 Except as contained in this notice, the name of a copyright holder shall not be used in advertising or otherwise to promote the sale, use or other dealings in this Software without prior written authorization of the copyright holder. Copyright (C) 1999, 2000 by Anton Zinoviev <anton@lml.bas.bg> This software may be used, modified, copied, distributed, and sold, in both source and binary form provided that the above copyright and these terms are retained.
- Page 491 FOR A PARTICULAR PURPOSE AND NONINFRINGEMENT. IN NO EVENT SHALL THE OPEN GROUP BE LIABLE FOR ANY CLAIM, DAMAGES OR OTHER LIABILITY, WHETHER IN AN ACTION OF CONTRACT, TORT OR OTHERWISE, ARISING FROM, OUT OF OR IN CONNECTION WITH THE SOFTWARE OR THE USE OR OTHER DEALINGS IN THE SOFTWARE.
- Page 492 WHETHER IN AN ACTION OF CONTRACT, TORT OR OTHERWISE, ARISING FROM, OUT OF OR IN CONNECTION WITH THE SOFTWARE OR THE USE OR OTHER DEALINGS IN THE SOFTWARE. • xserver-xorg The following is the 'standard copyright' agreed upon by most contributors, and is currently the canonical license preferred by the X.Org Foundation.
- Page 493 OR COPYRIGHT HOLDERS BE LIABLE FOR ANY CLAIM, DAMAGES OR OTHER LIABILITY, WHETHER IN AN ACTION OF CONTRACT, TORT OR OTHERWISE, ARISING FROM, OUT OF OR IN CONNECTION WITH THE SOFTWARE OR THE USE OR OTHER DEALINGS IN THE SOFTWARE. The following licenses are 'legacy': usually MIT/X11 licenses with the name of the copyright holder(s) in the license statement, but also some BSD-like licenses.
- Page 494 NEGLIGENCE OR OTHER TORTIOUS ACTION, ARISING OUT OF OR IN CONNECTION WITH THE USE OR PERFORMANCE OF THIS SOFTWARE. Copyright 1985-1998, 2001 The Open Group Copyright 2002 Red Hat Inc., Durham, North Carolina. Permission to use, copy, modify, distribute, and sell this software and its documentation for any purpose is hereby granted without fee, provided that the above copyright notice appear in all copies and that both that copyright notice and this permission notice appear in supporting documentation.
- Page 495 Copyright © 1999-2000 SuSE, Inc. Copyright © 2007 Red Hat, Inc. Permission to use, copy, modify, distribute, and sell this software and its documentation for any purpose is hereby granted without fee, provided that the above copyright notice appear in all copies and that both that copyright notice and this permission notice appear in supporting documentation, and that the name of SuSE not be used in advertising or publicity pertaining to distribution of the software without specific, written prior permission.
- Page 496 of Digital and Quarterdeck not be used in advertising or publicity pertaining to distribution of the software without specific, written prior permission. DIGITAL AND QUARTERDECK DISCLAIM ALL WARRANTIES WITH REGARD TO THIS SOFTWARE, INCLUDING ALL IMPLIED WARRANTIES OF MERCHANTABILITY AND FITNESS, IN NO EVENT SHALL DIGITAL BE LIABLE FOR ANY SPECIAL, INDIRECT OR CONSEQUENTIAL DAMAGES OR ANY DAMAGES WHATSOEVER RESULTING FROM LOSS OF USE, DATA OR PROFITS, WHETHER IN AN ACTION OF CONTRACT, NEGLIGENCE OR OTHER TORTIOUS ACTION, ARISING OUT OF...
- Page 497 LIMITED TO CONSEQUENTIAL OR INCIDENTAL DAMAGES, OR OTHER LIABILITY, WHETHER IN AN ACTION OF CONTRACT, TORT OR OTHERWISE, ARISING FROM, OUT OF OR IN CONNECTION WITH THE SOFTWARE OR THE USE OR OTHER DEALINGS IN THE SOFTWARE. Except as contained in this notice, the name of Digital Equipment Corporation shall not be used in advertising or otherwise to promote the sale, use or other dealings in this Software without prior written authorization from Digital Equipment Corporation.
- Page 498 Except as contained in this notice, the name of the Hewlett-Packard Company shall not be used in advertising or otherwise to promote the sale, use or other dealings in this Software without prior written authorization from the Hewlett-Packard Company. Copyright 1989 by Hewlett-Packard Company, Palo Alto, California. All Rights Reserved Permission to use, copy, modify, and distribute this software and its documentation for any purpose and without fee is hereby granted, provided that the above copyright notice appear in all copies and that both...
- Page 499 Partly based on code Copyright © 2000 SuSE, Inc. Permission to use, copy, modify, distribute, and sell this software and its documentation for any purpose is hereby granted without fee, provided that the above copyright notice appear in all copies and that both that copyright notice and this permission notice appear in supporting documentation, and that the name of Red Hat not be used in advertising or publicity pertaining to distribution of the software without specific, written prior permission.
- Page 500 THE SOFTWARE IS PROVIDED "AS IS", WITHOUT WARRANTY OF ANY KIND, EXPRESS OR IMPLIED, INCLUDING BUT NOT LIMITED TO THE WARRANTIES OF MERCHANTABILITY, FITNESS FOR A PARTICULAR PURPOSE AND NON-INFRINGEMENT. IN NO EVENT SHALL RED HAT, INC, OR PRECISION INSIGHT AND/OR THEIR SUPPLIERS BE LIABLE FOR ANY CLAIM, DAMAGES OR OTHER LIABILITY, WHETHER IN AN ACTION OF CONTRACT, TORT OR OTHERWISE, ARISING FROM, OUT OF OR IN CONNECTION WITH THE SOFTWARE OR THE USE OR OTHER DEALINGS IN THE SOFTWARE.
- Page 501 copies of the Software, and to permit persons to whom the Software is furnished to do so, subject to the following conditions: The above copyright notice and this permission notice (including the next paragraph) shall be included in all copies or substantial portions of the Software. THE SOFTWARE IS PROVIDED "AS IS", WITHOUT WARRANTY OF ANY KIND, EXPRESS OR IMPLIED, INCLUDING BUT NOT LIMITED TO THE WARRANTIES OF MERCHANTABILITY, FITNESS FOR A PARTICULAR PURPOSE AND NON-INFRINGEMENT.
- Page 502 THE SOFTWARE IS PROVIDED "AS IS", WITHOUT WARRANTY OF ANY KIND, EXPRESS OR IMPLIED, INCLUDING BUT NOT LIMITED TO THE WARRANTIES OF MERCHANTABILITY, FITNESS FOR A PARTICULAR PURPOSE AND NON-INFRINGEMENT. IN NO EVENT SHALL IBM, AND/OR THEIR SUPPLIERS BE LIABLE FOR ANY CLAIM, DAMAGES OR OTHER LIABILITY, WHETHER IN AN ACTION OF CONTRACT, TORT OR OTHERWISE, ARISING FROM, OUT OF OR IN CONNECTION WITH THE SOFTWARE OR THE USE OR OTHER DEALINGS IN THE SOFTWARE.
- Page 503 ACTION, ARISING OUT OF OR IN CONNECTION WITH THE USE OR PERFORMANCE OF THIS SOFTWARE. Copyright 1998 by Metro Link Incorporated Permission to use, copy, modify, distribute, and sell this software and its documentation for any purpose is hereby granted without fee, provided that the above copyright notice appear in all copies and that both that copyright notice and this permission notice appear in supporting documentation, and that the name of Metro Link Incorporated not be used in advertising or publicity pertaining to distribution of the software without specific, written prior permission.
- Page 504 Redistribution and use in source and binary forms, with or without modification, are permitted provided that the following conditions are met: o Redistributions of source code must retain the above copyright notice, this list of conditions and the following disclaimer. o Redistributions in binary form must reproduce the above copyright notice, this list of conditions and the following disclaimer in the documentation and/or other materials provided with the distribution.
- Page 505 the software without specific, written prior permission. Concurrent Computer Corporation makes no representations about the suitability of this software for any purpose. It is provided "as is" without express or implied warranty. CONCURRENT COMPUTER CORPORATION DISCLAIMS ALL WARRANTIES WITH REGARD TO THIS SOFTWARE, INCLUDING ALL IMPLIED WARRANTIES OF MERCHANTABILITY AND FITNESS, IN NO EVENT SHALL CONCURRENT COMPUTER CORPORATION BE LIABLE FOR ANY SPECIAL, INDIRECT OR CONSEQUENTIAL DAMAGES OR ANY DAMAGES WHATSOEVER RESULTING...
- Page 506 DISCLAIMS ALL WARRANTIES WITH REGARD TO THIS SOFTWARE, INCLUDING ALL IMPLIED WARRANTIES OF MERCHANTABILITY, FITNESS FOR A PARTICULAR PURPOSE AND NON- INFRINGEMENT OF THIRD PARTY RIGHTS. IN NO EVENT SHALL ADOBE BE LIABLE TO YOU OR ANY OTHER PARTY FOR ANY SPECIAL, INDIRECT, OR CONSEQUENTIAL DAMAGES OR ANY DAMAGES WHATSOEVER WHETHER IN AN ACTION OF CONTRACT,NEGLIGENCE, STRICT LIABILITY OR ANY OTHER ACTION ARISING OUT OF OR IN CONNECTION WITH THE USE OR PERFORMANCE OF THIS SOFTWARE.
- Page 507 TORTIOUS ACTION, ARISING OUT OF OR IN CONNECTION WITH THE USE OR PERFORMANCE OF THIS SOFTWARE. Copyright © 1998-2004, 2006 Keith Packard Copyright © 2000-2002 Keith Packard, member of The XFree86 Project, Inc. Copyright (c) 2002 Apple Computer, Inc. Copyright (c) 2003 Torrey T. Lyons. All Rights Reserved.
- Page 508 IN NO EVENT SHALL THE AUTHORS AND/OR COPYRIGHT HOLDERS BE LIABLE FOR ANY SPECIAL, INDIRECT OR CONSEQUENTIAL DAMAGES OR ANY DAMAGES WHATSOEVER RESULTING FROM LOSS OF USE, DATA OR PROFITS, WHETHER IN AN ACTION OF CONTRACT, NEGLIGENCE OR OTHER TORTIOUS ACTION, ARISING OUT OF OR IN CONNECTION WITH THE USE OR PERFORMANCE OF THIS SOFTWARE.
- Page 509 THOMAS ROELL DISCLAIMS ALL WARRANTIES WITH REGARD TO THIS SOFTWARE, INCLUDING ALL IMPLIED WARRANTIES OF MERCHANTABILITY AND FITNESS, IN NO EVENT SHALL THOMAS ROELL BE LIABLE FOR ANY SPECIAL, INDIRECT OR CONSEQUENTIAL DAMAGES OR ANY DAMAGES WHATSOEVER RESULTING FROM LOSS OF USE, DATA OR PROFITS, WHETHER IN AN ACTION OF CONTRACT, NEGLIGENCE OR OTHER TORTIOUS ACTION, ARISING OUT OF OR IN CONNECTION WITH THE USE OR PERFORMANCE OF THIS SOFTWARE.
- Page 510 Copyright 1998 by Alan Hourihane, Wigan, England. Copyright 2000-2002 by Alan Hourihane, Flint Mountain, North Wales. Permission to use, copy, modify, distribute, and sell this software and its documentation for any purpose is hereby granted without fee, provided that the above copyright notice appear in all copies and that both that copyright notice and this permission notice appear in supporting documentation, and that the name of Alan Hourihane not be used in advertising or publicity pertaining to distribution of the software without specific, written prior permission.
- Page 511 of Matthieu Herrb not be used in advertising or publicity pertaining to distribution of the software without specific, written prior permission. Matthieu Herrb makes no representations about the suitability of this software for any purpose. It is provided "as is" without express or implied warranty. MATTHIEU HERRB DISCLAIMS ALL WARRANTIES WITH REGARD TO THIS SOFTWARE, INCLUDING ALL IMPLIED WARRANTIES OF MERCHANTABILITY AND FITNESS, IN NO EVENT SHALL MATTHIEU HERRB BE LIABLE FOR ANY SPECIAL, INDIRECT OR CONSEQUENTIAL...
- Page 512 DAVID WEXELBLAT DISCLAIMS ALL WARRANTIES WITH REGARD TO THIS SOFTWARE, INCLUDING ALL IMPLIED WARRANTIES OF MERCHANTABILITY AND FITNESS, IN NO EVENT SHALL DAVID WEXELBLAT BE LIABLE FOR ANY SPECIAL, INDIRECT OR CONSEQUENTIAL DAMAGES OR ANY DAMAGES WHATSOEVER RESULTING FROM LOSS OF USE, DATA OR PROFITS, WHETHER IN AN ACTION OF CONTRACT, NEGLIGENCE OR OTHER TORTIOUS ACTION, ARISING OUT OF OR IN CONNECTION WITH THE USE OR PERFORMANCE OF THIS SOFTWARE.
- Page 513 NEGLIGENCE OR OTHER TORTIOUS ACTION, ARISING OUT OF OR IN CONNECTION WITH THE USE OR PERFORMANCE OF THIS SOFTWARE. Copyright 1995-1999 by Frederic Lepied, France. <fred@sugix.frmug.fr.net> Permission to use, copy, modify, distribute, and sell this software and its documentation for any purpose is hereby granted without fee, provided that the above copyright notice appear in all copies and that both that copyright notice and this permission notice appear in supporting documentation, and that the name of Frederic Lepied not be used in advertising or publicity pertaining to distribution of the software without...
- Page 514 that copyright notice and this permission notice appear in supporting documentation, and that the names of Rich Murphey and David Dawes not be used in advertising or publicity pertaining to distribution of the software without specific, written prior permission. Rich Murphey and David Dawes make no representations about the suitability of this software for any purpose.
- Page 515 ANHOLT BE LIABLE FOR ANY SPECIAL, INDIRECT OR CONSEQUENTIAL DAMAGES OR ANY DAMAGES WHATSOEVER RESULTING FROM LOSS OF USE, DATA OR PROFITS, WHETHER IN AN ACTION OF CONTRACT, NEGLIGENCE OR OTHER TORTIOUS ACTION, ARISING OUT OF OR IN CONNECTION WITH THE USE OR PERFORMANCE OF THIS SOFTWARE. Copyright (c) 1998 Todd C.
- Page 516 without limitation the rights to use, copy, modify, merge, publish, distribute, sublicense, and/or sell copies of the Software, and to permit persons to whom the Software is furnished to do so, subject to the following conditions: The above copyright notice and this permission notice shall be included in all copies or substantial portions of the Software.
- Page 517 THE COPYRIGHT HOLDERS DISCLAIM ALL WARRANTIES WITH REGARD TO THIS SOFTWARE, INCLUDING ALL IMPLIED WARRANTIES OF MERCHANTABILITY AND FITNESS, IN NO EVENT SHALL THE COPYRIGHT HOLDERS BE LIABLE FOR ANY SPECIAL, INDIRECT OR CONSEQUENTIAL DAMAGES OR ANY DAMAGES WHATSOEVER RESULTING FROM LOSS OF USE, DATA OR PROFITS, WHETHER IN AN ACTION OF CONTRACT, NEGLIGENCE OR OTHER TORTIOUS ACTION, ARISING OUT OF OR IN CONNECTION WITH THE USE OR PERFORMANCE OF THIS SOFTWARE.
- Page 518 THE SOFTWARE IS PROVIDED "AS IS", WITHOUT WARRANTY OF ANY KIND, EXPRESS OR IMPLIED, INCLUDING BUT NOT LIMITED TO THE WARRANTIES OF MERCHANTABILITY, FITNESS FOR A PARTICULAR PURPOSE AND NONINFRINGEMENT OF THIRD PARTY RIGHTS. IN NO EVENT SHALL THE COPYRIGHT HOLDER OR HOLDERS INCLUDED IN THIS NOTICE BE LIABLE FOR ANY CLAIM, OR ANY SPECIAL INDIRECT OR CONSEQUENTIAL DAMAGES, OR ANY DAMAGES WHATSOEVER RESULTING FROM LOSS OF USE, DATA OR PROFITS, WHETHER IN AN ACTION OF CONTRACT, NEGLIGENCE OR OTHER TORTIOUS ACTION, ARISING OUT OF OR...
- Page 519 Permission is hereby granted, free of charge, to any person obtaining a copy of this software and associated documentation files (the "Software"), to deal in the Software without restriction, including without limitation the rights to use, copy, modify, merge, publish, distribute, sublicense, and/or sell copies of the Software, and to permit persons to whom the Software is furnished to do so, subject to the following conditions: The above copyright notice and this permission notice shall be included in all copies or substantial...
- Page 520 OTHERWISE) ARISING IN ANY WAY OUT OF THE USE OF THIS SOFTWARE, EVEN IF ADVISED OF THE POSSIBILITY OF SUCH DAMAGE. Copyright (C) 2005 Bogdan D. bogdand@users.sourceforge.net Permission is hereby granted, free of charge, to any person obtaining a copy of this software and associated documentation files (the "Software"), to deal in the Software without restriction, including without limitation the rights to use, copy, modify, merge, publish, distribute, sublicense, and/or sell copies of the Software, and to permit persons to whom the Software is furnished to do so, subject to the...
- Page 521 Copyright (C) 1996-1999 SciTech Software, Inc. Copyright (C) David Mosberger-Tang Copyright (C) 1999 Egbert Eich Copyright (C) 2008 Bart Trojanowski, Symbio Technologies, LLC Permission to use, copy, modify, distribute, and sell this software and its documentation for any purpose is hereby granted without fee, provided that the above copyright notice appear in all copies and that both that copyright notice and this permission notice appear in supporting documentation, and that the name of the authors not be used in advertising or publicity pertaining to distribution of the software without specific, written prior permission.
- Page 522 that copyright notice and this permission notice appear in supporting documentation, and that the names of the above listed copyright holder(s) not be used in advertising or publicity pertaining to distribution of the software without specific, written prior permission. The above listed copyright holder(s) make(s) no representations about the suitability of this software for any purpose.
- Page 523 Copyright 1997 by Takis Psarogiannakopoulos <takis@dpmms.cam.ac.uk> Copyright 1994-2003 by The XFree86 Project, Inc Permission to use, copy, modify, distribute, and sell this software and its documentation for any purpose is hereby granted without fee, provided that the above copyright notice appear in all copies and that both that copyright notice and this permission notice appear in supporting documentation, and that the names of the above listed copyright holders not be used in advertising or publicity pertaining to distribution of the software without specific, written prior permission.
- Page 524 The above copyright notice and this permission notice shall be included in all copies or substantial portions of the Software. THE SOFTWARE IS PROVIDED "AS IS", WITHOUT WARRANTY OF ANY KIND, EXPRESS OR IMPLIED, INCLUDING BUT NOT LIMITED TO THE WARRANTIES OF MERCHANTABILITY, FITNESS FOR A PARTICULAR PURPOSE AND NONINFRINGEMENT.
- Page 525 TORTIOUS ACTION, ARISING OUT OF OR IN CONNECTION WITH THE USE OR PERFORMANCE OF THIS SOFTWARE. (C) Copyright IBM Corporation 2002-2007 All Rights Reserved. Permission is hereby granted, free of charge, to any person obtaining a copy of this software and associated documentation files (the "Software"), to deal in the Software without restriction, including without limitation on the rights to use, copy, modify, merge, publish, distribute, sub license, and/or sell copies of the Software, and to permit persons to whom the Software is furnished to do so, subject to the...
- Page 526 OpenedHand Ltd BE LIABLE FOR ANY SPECIAL, INDIRECT OR CONSEQUENTIAL DAMAGES OR ANY DAMAGES WHATSOEVER RESULTING FROM LOSS OF USE, DATA OR PROFITS, WHETHER IN AN ACTION OF CONTRACT, NEGLIGENCE OR OTHER TORTIOUS ACTION, ARISING OUT OF OR IN CONNECTION WITH THE USE OR PERFORMANCE OF THIS SOFTWARE. Copyright (c) 1987, 1990, 1993 The Regents of the University of California.
- Page 527 FOR A PARTICULAR PURPOSE AND NONINFRINGEMENT. IN NO EVENT SHALL THE OPEN GROUP BE LIABLE FOR ANY CLAIM, DAMAGES OR OTHER LIABILITY, WHETHER IN AN ACTION OF CONTRACT, TORT OR OTHERWISE, ARISING FROM, OUT OF OR IN CONNECTION WITH THE SOFTWARE OR THE USE OR OTHER DEALINGS IN THE SOFTWARE.
- Page 528 License terms of conditions of each program which are provided by owner of the copyright to the "Apache-2.0" are as follows. Apache License Version 2.0, January 2004 http://www.apache.org/licenses/ TERMS AND CONDITIONS FOR USE, REPRODUCTION, AND DISTRIBUTION 1. Definitions. "License" shall mean the terms and conditions for use, reproduction, and distribution as defined by Sections 1 through 9 of this document.
- Page 529 of electronic, verbal, or written communication sent to the Licensor or its representatives, including but not limited to communication on electronic mailing lists, source code control systems, and issue tracking systems that are managed by, or on behalf of, the Licensor for the purpose of discussing and improving the Work, but excluding communication that is conspicuously marked or otherwise designated in writing by the copyright owner as "Not a Contribution."...
- Page 530 from the Work, provided that such additional attribution notices cannot be construed as modifying the License. You may add Your own copyright statement to Your modifications and may provide additional or different license terms and conditions for use, reproduction, or distribution of Your modifications, or for any such Derivative Works as a whole, provided Your use, reproduction, and distribution of the Work otherwise complies with the conditions stated in this License.
- Page 531 To apply the Apache License to your work, attach the following boilerplate notice, with the fields enclosed by brackets "[]" replaced with your own identifying information. (Don't include the brackets!) The text should be enclosed in the appropriate comment syntax for the file format. We also recommend that a file or class name and description of purpose be included on the same "printed page"...
- Page 532 MERCHANTABILITY AND FITNESS FOR A PARTICULAR PURPOSE ARE DISCLAIMED. IN NO EVENT SHALL THE AUTHOR BE LIABLE FOR ANY DIRECT, INDIRECT, INCIDENTAL, SPECIAL, EXEMPLARY, OR CONSEQUENTIAL DAMAGES (INCLUDING, BUT NOT LIMITED TO, PROCUREMENT OF SUBSTITUTE GOODS OR SERVICES; LOSS OF USE, DATA, OR PROFITS; OR BUSINESS INTERRUPTION) HOWEVER CAUSED AND ON ANY THEORY OF LIABILITY, WHETHER IN CONTRACT, STRICT LIABILITY, OR TORT (INCLUDING NEGLIGENCE OR OTHERWISE) ARISING IN ANY WAY OUT OF THE USE OF THIS SOFTWARE, EVEN IF ADVISED...
- Page 533 Redistribution and use in source and binary forms, with or without modification, are permitted provided that the following conditions are met: 1. Redistributions of source code must retain the above copyright notice, this list of conditions and the following disclaimer. 2.
- Page 534 WARRANTIES OF MERCHANTABILITY AND FITNESS FOR A PARTICULAR PURPOSE ARE DISCLAIMED. IN NO EVENT SHALL THE COPYRIGHT OWNER OR CONTRIBUTORS BE LIABLE FOR ANY DIRECT, INDIRECT, INCIDENTAL, SPECIAL, EXEMPLARY, OR CONSEQUENTIAL DAMAGES (INCLUDING, BUT NOT LIMITED TO, PROCUREMENT OF SUBSTITUTE GOODS OR SERVICES;...
- Page 535 1. Redistributions of source code must retain the above copyright notice, this list of conditions and the following disclaimer. 2. Redistributions in binary form must reproduce the above copyright notice, this list of conditions and the following disclaimer in the documentation and/or other materials provided with the distribution. 3.
- Page 536 Copyright (c) 2006 Maxim Yegorushkin <maxim.yegorushkin@gmail.com> ============================== The arc4module is available under the following, sometimes called the "OpenBSD" license: Copyright (c) 1996, David Mazieres <dm@uun.org> Copyright (c) 2008, Damien Miller <djm@openbsd.org> Permission to use, copy, modify, and distribute this software for any purpose with or without fee is hereby granted, provided that the above copyright notice and this permission notice appear in all copies.
- Page 537 OR BUSINESS INTERRUPTION) HOWEVER CAUSED AND ON ANY THEORY OF LIABILITY, WHETHER IN CONTRACT, STRICT LIABILITY, OR TORT (INCLUDING NEGLIGENCE OR OTHERWISE) ARISING IN ANY WAY OUT OF THE USE OF THIS SOFTWARE, EVEN IF ADVISED OF THE POSSIBILITY OF SUCH DAMAGE. •...
- Page 538 NO EVENT SHALL CARNEGIE MELLON UNIVERSITY BE LIABLE FOR ANY SPECIAL, INDIRECT OR CONSEQUENTIAL DAMAGES OR ANY DAMAGES WHATSOEVER RESULTING FROM LOSS OF USE, DATA OR PROFITS, WHETHER IN AN ACTION OF CONTRACT, NEGLIGENCE OR OTHER TORTIOUS ACTION, ARISING OUT OF OR IN CONNECTION WITH THE USE OR PERFORMANCE OF THIS SOFTWARE.
- Page 539 2. Redistributions in binary form must reproduce the above copyright notice, this list of conditions and the following disclaimer in the documentation and/or other materials provided with the distribution. 3. The name of the author may not be used to endorse or promote products derived from this software without specific prior written permission.
- Page 540 OpenSSH contains no GPL code. * Copyright (c) 1995 Tatu Ylonen <ylo@cs.hut.fi>, Espoo, Finland All rights reserved * As far as I am concerned, the code I have written for this software can be used freely for any purpose. Any derived versions of this software must be clearly marked as such, and if the derived work is incompatible with the protocol description in the RFC file, it must be called by a name other than "ssh"...
- Page 541 NO WARRANTY BECAUSE THE PROGRAM IS LICENSED FREE OF CHARGE, THERE IS NO WARRANTY FOR THE PROGRAM, TO THE EXTENT PERMITTED BY APPLICABLE LAW. EXCEPT WHEN OTHERWISE STATED IN WRITING THE COPYRIGHT HOLDERS AND/OR OTHER PARTIES PROVIDE THE PROGRAM "AS IS" WITHOUT WARRANTY OF ANY KIND, EITHER EXPRESSED OR IMPLIED, INCLUDING, BUT NOT LIMITED TO, THE IMPLIED WARRANTIES OF MERCHANTABILITY AND FITNESS FOR A PARTICULAR PURPOSE.
- Page 542 * Modification and redistribution in source and binary forms is permitted provided that due credit is given to the author and the OpenBSD project by leaving this copyright notice intact. The Rijndael implementation by Vincent Rijmen, Antoon Bosselaers and Paulo Barreto is in the public domain and distributed with the following license: * @version 3.0 (December 2000) * Optimised ANSI C code for the Rijndael cipher (now AES)
- Page 543 * 3. Neither the name of the University nor the names of its contributors may be used to endorse or promote products derived from this software without specific prior written permission. * THIS SOFTWARE IS PROVIDED BY THE REGENTS AND CONTRIBUTORS ``AS IS'' AND ANY EXPRESS OR IMPLIED WARRANTIES, INCLUDING, BUT NOT LIMITED TO, THE IMPLIED WARRANTIES OF MERCHANTABILITY AND FITNESS FOR A PARTICULAR PURPOSE ARE DISCLAIMED.
- Page 544 Chris Adams Corinna Vinschen Cray Inc. Denis Parker Gert Doering Jakob Schlyter Jason Downs Juha Yrjölä Michael Stone Networks Associates Technology, Inc. Solar Designer Todd C. Miller Wayne Schroeder William Jones Darren Tucker Sun Microsystems The SCO Group Daniel Walsh Red Hat, Inc Simon Vallet / Genoscope * Redistribution and use in source and binary forms, with or without modification, are permitted provided...
- Page 545 EXEMPLARY, OR CONSEQUENTIAL DAMAGES (INCLUDING, BUT NOT LIMITED TO, PROCUREMENT OF SUBSTITUTE GOODS OR SERVICES; LOSS OF USE, DATA, OR PROFITS; OR BUSINESS INTERRUPTION) HOWEVER CAUSED AND ON ANY THEORY OF LIABILITY, WHETHER IN CONTRACT, STRICT LIABILITY, OR TORT (INCLUDING NEGLIGENCE OR OTHERWISE) ARISING IN ANY WAY OUT OF THE USE OF THIS SOFTWARE, EVEN IF ADVISED OF THE POSSIBILITY OF SUCH DAMAGE.
- Page 546 * 3. Neither the name of the University nor the names of its contributors may be used to endorse or promote products derived from this software without specific prior written permission. * THIS SOFTWARE IS PROVIDED BY THE REGENTS AND CONTRIBUTORS ``AS IS'' AND ANY EXPRESS OR IMPLIED WARRANTIES, INCLUDING, BUT NOT LIMITED TO, THE IMPLIED WARRANTIES OF MERCHANTABILITY AND FITNESS FOR A PARTICULAR PURPOSE ARE DISCLAIMED.
- Page 547 *THE SOFTWARE IS PROVIDED "AS IS", WITHOUT WARRANTY OF ANY KIND, EXPRESS OR IMPLIED, INCLUDING BUT NOT LIMITED TO THE WARRANTIES OF MERCHANTABILITY, FITNESS FOR A PARTICULAR PURPOSE AND NONINFRINGEMENT. IN NO EVENT SHALL THE ABOVE COPYRIGHT HOLDERS BE LIABLE FOR ANY CLAIM, DAMAGES OR OTHER LIABILITY, WHETHER IN AN ACTION OF CONTRACT, TORT OR OTHERWISE, ARISING FROM, OUT OF OR IN CONNECTION WITH THE SOFTWARE OR THE USE OR OTHER DEALINGS IN THE SOFTWARE.
- Page 548 NOTE: This license has been obsoleted by the change to the BSD-style copyright. You may continue to use this license if you wish, but you are under no obligation to do so. This document is freely plagiarised from the 'Artistic Licence', distributed as part of the Perl v4.0 kit by Larry Wall, which is available from most major archive sites.
- Page 549 2. You may apply bug fixes, portability fixes and other modifications derived from the Public Domain or from the Copyright Holder. A Package modified in such a way shall still be considered the Standard Version. 3. You may otherwise modify your copy of this Package in any way, provided that you insert a prominent notice in each changed file stating how and when AND WHY you changed that file, and provided that you do at least ONE of the following: a) place your modifications in the Public Domain or otherwise make them Freely Available, such as by...
- Page 550 The End • tcpdump-4.2.1 (BrightLink Pro 1460Ui) • libpcap-1.2.1 (BrightLink Pro 1460Ui) Copyright (c) The Regents of the University of California. All rights reserved. This code is derived from software contributed to Berkeley by Kenneth Almquist. Redistribution and use in source and binary forms, with or without modification, are permitted provided that the following conditions are met: 1.
- Page 551 Toyohashi Open Platform for Embedded Real-Time Systems/Just Standard Profile Kernel Copyright (C) 2000-2003 by Embedded and Real-Time Systems Laboratory Toyohashi Univ. of Technology, JAPAN Copyright (C) 2004 by Embedded and Real-Time Systems Laboratory Graduate School of Information Science, Nagoya Univ., JAPAN. The above copyright holder, limited to cases in which one satisfies conditions (1) ~ (4) below, or the conditions described in Version 2 of the GNU Public License officially announced by the Free Software Foundation, consents to the use, reproduction, alteration, and redistribution (hereafter called utilization)
- Page 552 The "TINET" are WITHOUT ANY WARRANTY; without even the implied warranty of MERCHANTABILITY AND FITNESS FOR A PARTICULAR PURPOSE. List of TINET programs • tinet-1.4.4 License terms of conditions of each program which are provided by owner of the copyright to the "TINET"...
- Page 553 Copyright (C) 2001-2006 by Dep. of Computer Science and Engineering Tomakomai National College of Technology, JAPAN The above copyright holder, limited to cases in which one satisfies conditions (1) ~ (4) below, or the conditions described in Version 2 of the GNU Public License officially announced by the Free Software Foundation, consents to the use, reproduction, alteration, and redistribution (hereafter called utilization) of this software (this software includes alterations, likewise below) without compensation.
- Page 554 All Rights Reserved. This program is licensed under the BSD license (the one with advertisement clause removed). If you are submitting changes to the project, please see CONTRIBUTIONS file for more instructions. License ----------- This software may be distributed, used, and modified under the terms of BSD license: Redistribution and use in source and binary forms, with or without modification, are permitted provided that the following conditions are met: 1.
- Page 555 Copyright (c) 2004, Jan Kneschke, incremental All rights reserved. Redistribution and use in source and binary forms, with or without modification, are permitted provided that the following conditions are met: - Redistributions of source code must retain the above copyright notice, this list of conditions and the following disclaimer.
- Page 556 Release 8 of PCRE is distributed under the terms of the "BSD" licence, as specified below. The documentation for PCRE, supplied in the "doc" directory, is distributed under the same terms as the software itself. The basic library functions are written in C and are freestanding. Also included in the distribution is a set of C++ wrapper functions, and a just-in-time compiler that can be used to optimize pattern matching.
- Page 557 THE C++ WRAPPER FUNCTIONS ----------- Contributed by: Google Inc. Copyright (c) 2007-2012, Google Inc. All rights reserved. THE "BSD" LICENCE ----------- Redistribution and use in source and binary forms, with or without modification, are permitted provided that the following conditions are met: * Redistributions of source code must retain the above copyright notice, this list of conditions and the following disclaimer.
- Page 558 List of FastCGI programs • fcgi-2.4.0 License terms of conditions of each program which are provided by owner of the copyright to the "FastCGI" are as follows. This FastCGI application library source and object code (the "Software") and its documentation (the "Documentation") are copyrighted by Open Market, Inc ("Open Market").
- Page 559 • openssl-conf • openssl-1.0.1t (BrightLink Pro 1460Ui) License terms of conditions of each program which are provided by owner of the copyright to the "openssl" are as follows. LICENSE ISSUES ============== The OpenSSL toolkit stays under a dual license, i.e. both the conditions of the OpenSSL License and the original SSLeay license apply to the toolkit.
- Page 560 * THIS SOFTWARE IS PROVIDED BY THE OpenSSL PROJECT ``AS IS'' AND ANY EXPRESSED OR IMPLIED WARRANTIES, INCLUDING, BUT NOT LIMITED TO, THE IMPLIED WARRANTIES OF MERCHANTABILITY AND FITNESS FOR A PARTICULAR PURPOSE ARE DISCLAIMED. IN NO EVENT SHALL THE OpenSSL PROJECT OR ITS CONTRIBUTORS BE LIABLE FOR ANY DIRECT, INDIRECT, INCIDENTAL, SPECIAL, EXEMPLARY, OR CONSEQUENTIAL DAMAGES (INCLUDING, BUT NOT LIMITED TO, PROCUREMENT OF SUBSTITUTE GOODS OR SERVICES;...
- Page 561 * 3. All advertising materials mentioning features or use of this software must display the following acknowledgement: "This product includes cryptographic software written by Eric Young (eay@cryptsoft.com)" The word 'cryptographic' can be left out if the rouines from the library being used are not cryptographic related :-).
- Page 562 1. Redistributions in source form must retain copyright statements and notices, 2. Redistributions in binary form must reproduce applicable copyright statements and notices, this list of conditions, and the following disclaimer in the documentation and/or other materials provided with the distribution, and 3.
- Page 563 The Academic Free License v. 2.1 This Academic Free License (the "License") applies to any original work of authorship (the "Original Work") whose owner (the "Licensor") has placed the following notice immediately following the copyright notice for the Original Work: Licensed under the Academic Free License version 2.1 1) Grant of Copyright License.
- Page 564 6) Attribution Rights. You must retain, in the Source Code of any Derivative Works that You create, all copyright, patent or trademark notices from the Source Code of the Original Work, as well as any notices of licensing and any descriptive text identified therein as an "Attribution Notice." You must cause the Source Code for any Derivative Works that You create to carry a prominent Attribution Notice reasonably calculated to inform recipients that You have modified the Original Work.
- Page 565 business, and under the laws of that jurisdiction excluding its conflict-of-law provisions. The application of the United Nations Convention on Contracts for the International Sale of Goods is expressly excluded. Any use of the Original Work outside the scope of this License or after its termination shall be subject to the requirements and penalties of the U.S.
- Page 566 * The AFL makes it clear that no trademark rights are granted to the licensor's trademarks. The Apache license contains such a provision, but the BSD, MIT and UoI/NCSA licenses do not. * The AFL includes the warranty by the licensor that it either owns the copyright or that it is distributing the software under a license.
- Page 567 # 950 Charter Street # Redwood City, CA 94063 # <info@isc.org> # https://www.isc.org/ • mktemp Copyright (c) 1996-1997, 2000-2001, 2008, 2010 Todd C. Miller <Todd.Miller@courtesan.com> Copyright (c) 1996, David Mazieres <dm@uun.org> Copyright (c) 2008, Damien Miller <djm@openbsd.org> Permission to use, copy, modify, and distribute this software for any purpose with or without fee is hereby granted, provided that the above copyright notice and this permission notice appear in all copies.
- Page 568 Copyright (c) 2001 Emin Martinian Redistribution and use in source and binary forms, with or without modification, are permitted provided that neither the name of Emin Martinian nor the names of any contributors are be used to endorse or promote products derived from this software without specific prior written permission. THIS SOFTWARE IS PROVIDED BY THE COPYRIGHT HOLDERS AND CONTRIBUTORS "AS IS"...
- Page 569 Redistribution and use in source and binary forms, with or without modification, are permitted provided that the following conditions are met: * Redistributions of source code must retain the above copyright notice, this list of conditions and the following disclaimer. * Redistributions in binary form must reproduce the above copyright notice, this list of conditions and the following disclaimer in the documentation and/or other materials provided with the distribution.
- Page 570 SIL Open Font License This projector product includes the open source software program which applies the terms and conditions provided by owner of the copyright to the "SIL Open Font License Version 1.1". The "SIL Open Font License" are WITHOUT ANY WARRANTY; without even the implied warranty of MERCHANTABILITY AND FITNESS FOR A PARTICULAR PURPOSE.
- Page 571 "Modified Version" refers to any derivative made by adding to, deleting, or substituting -- in part or in whole -- any of the components of the Original Version, by changing formats or by porting the Font Software to a new environment. "Author"...
- Page 572 CONTRACT, TORT OR OTHERWISE, ARISING FROM, OUT OF THE USE OR INABILITY TO USE THE FONT SOFTWARE OR FROM OTHER DEALINGS IN THE FONT SOFTWARE. FreeType License This projector product includes the open source software program which applies the terms and conditions provided by owner of the copyright to the "FreeType License".
- Page 573 o You can use this software for whatever you want, in parts or full form, without having to pay us. (`royalty-free' usage) o You may not pretend that you wrote this software. If you use it, or only parts of it, in a program, you must acknowledge somewhere in your documentation that you have used the FreeType code.
- Page 574 THE FREETYPE PROJECT IS PROVIDED `AS IS' WITHOUT WARRANTY OF ANY KIND, EITHER EXPRESS OR IMPLIED, INCLUDING, BUT NOT LIMITED TO, WARRANTIES OF MERCHANTABILITY AND FITNESS FOR A PARTICULAR PURPOSE. IN NO EVENT WILL ANY OF THE AUTHORS OR COPYRIGHT HOLDERS BE LIABLE FOR ANY DAMAGES CAUSED BY THE USE OR THE INABILITY TO USE, OF THE FREETYPE PROJECT.
- Page 575 Discusses general use and applications of FreeType, as well as future and wanted additions to the library and distribution. If you are looking for support, start in this list if you haven't found anything to help you in the documentation. o freetype-devel@nongnu.org Discusses bugs, as well as engine internals, design issues, specific licenses, porting, etc.
- Page 576 Bram Moolenaar <Bram@vim.org>. If this changes it will be announced in appropriate places (most likely vim.sf.net, www.vim.org and/or comp.editors). When it is completely impossible to contact the maintainer, the obligation to send him your changes ceases. Once the maintainer has confirmed that he has received your changes they will not have to be sent again.
- Page 577 IV) It is not allowed to remove this license from the distribution of the Vim sources, parts of it or from a modified version. You may use this license for previous Vim releases instead of the license that they came with, at your option. iperf (BrightLink Pro 1460Ui) This projector product includes the open source software program "iperf"...
-
Page 578: Binding Arbitration And Class Waiver
1. DISPUTES, BINDING INDIVIDUAL ARBITRATION, AND WAIVER OF CLASS ACTIONS AND CLASS ARBITRATIONS 1.1 Disputes. The terms of this Section 1 shall apply to all Disputes between you and Epson. The term "Dispute" is meant to have the broadest meaning permissible under law and includes any dispute, claim,... - Page 579 1.3 Pre-Arbitration Steps and Notice. Before submitting a claim for arbitration, you and Epson agree to try, for sixty (60) days, to resolve any Dispute informally. If Epson and you do not reach an agreement to resolve the Dispute within the sixty (60) days), you or Epson may commence an arbitration. Notice to Epson must be addressed to: Epson America, Inc., ATTN: Legal Department, 3840 Kilroy Airport Way,...
- Page 580 Epson's last written offer, if any, to settle the Dispute, Epson will: (i) pay you $1,000 or the amount of the award, whichever is greater; (ii) pay you twice the amount of your reasonable attorney's fees, if any;...
-
Page 581: Trademarks
Agreement by sending a written letter to the Epson Address within thirty (30) days of your assent to this Agreement (including without limitation the purchase, download, installation of the Software or other applicable use of Epson Hardware, products and services) that specifies (i) -
Page 582: Copyright Notice
Seiko Epson Corporation. The information contained herein is designed only for use with this Epson product. Epson is not responsible for any use of this information as applied to other products.
Need help?
Do you have a question about the BrightLink 697Ui and is the answer not in the manual?
Questions and answers