Tektronix WFM2200A User Manual
Multiformat multistandard portable waveform monitors
Hide thumbs
Also See for WFM2200A:
- Technical reference (78 pages) ,
- Instructions manual (24 pages) ,
- User manual (248 pages)
Table of Contents
Advertisement
Quick Links
Download this manual
See also:
Instruction Manual
Advertisement
Table of Contents

Subscribe to Our Youtube Channel
Related Manuals for Tektronix WFM2200A


Summary of Contents for Tektronix WFM2200A
- Page 1 WFM2300 and WFM2200A Multiformat Multistandard Portable Waveform Monitors User Manual *P077086502* 077-0865-02...
-
Page 3: User Manual
WFM2300 and WFM2200A Multiformat Multistandard Portable Waveform Monitors User Manual This document supports software version 2.11.X and above. www.tektronix.com 077-0865-02... - Page 4 Tektronix. All rights reserved. Licensed software products are owned by Tektronix or its subsidiaries or suppliers, and are protected by national copyright laws and international treaty provisions. Tektronix products are covered by U.S. and foreign patents, issued and pending. Information in this publication supersedes that in all previously published material.
- Page 5 Tektronix, with shipping charges prepaid. Tektronix shall pay for the return of the product to Customer if the shipment is to a location within the country in which the Tektronix service center is located. Customer shall be responsible for paying all shipping charges, duties, taxes, and any other charges for products returned to any other locations.
-
Page 7: Table Of Contents
..................Incoming inspection ........................Basic turn on and self test ......................Front panel test ........................Fan test ............................ Storing or shipping the instrument ....................To repackage the Li-Ion battery pack for shipment ..............WFM2300 and WFM2200A Waveform Monitors User Manual... - Page 8 ANC Data display (Option DATA only) ..................To access the ANC Data display ..................... Elements of the ANC Data display ..................Measure pop-up menu (ANC Data display) ................CONFIG menu ........................To configure the Watch List ....................WFM2300 and WFM2200A Waveform Monitors User Manual...
- Page 9 CONFIG menu ........................Bowtie display ..........................To access the Bowtie display ....................Elements of the Bowtie display ....................Measure pop-up menu (Bowtie display) ................. CONFIG menu ........................To position the Bowtie trace ....................WFM2300 and WFM2200A Waveform Monitors User Manual...
- Page 10 Vector pop-up menu (Lightning display) ................CONFIG menu ........................To position the Lightning trace ..................... LTC Waveform display ......................To access the LTC Waveform display .................. Elements of the LTC Waveform display ................WFM2300 and WFM2200A Waveform Monitors User Manual...
- Page 11 ....................Elements of the Vector display ..................... Vector pop-up menu ......................CONFIG menu ........................To position the Vector trace ....................Video Generator Status display ....................To access the Video Generator Status display ..............WFM2300 and WFM2200A Waveform Monitors User Manual...
- Page 12 To import presets from a USB device ................... Alarms ............................Possible alarm responses ....................... To set allowed alarm responses ..................... To set alarm responses globally .................... To enable alarms ........................To set limits or qualifications ....................Monitoring alarms ......................... WFM2300 and WFM2200A Waveform Monitors User Manual...
- Page 13 Check chroma/luma delay using the Lightning display ............. Checking gamut To set up gamut checks ......................Checking RGB gamut ......................... Usage notes ..........................Checking composite gamut ......................Usage notes ..........................Checking luma gamut ......................... Automating gamut checks ......................WFM2300 and WFM2200A Waveform Monitors User Manual...
- Page 14 ..........................Monitoring for safe area compliance ..................To configure safe area graticules ................... To display safe area graticules ....................Usage notes ..........................Monitoring for AFD compliance ....................To configure AFD graticules ....................viii WFM2300 and WFM2200A Waveform Monitors User Manual...
- Page 15 To use the timing display to time a signal to a reference ............Timing a Studio: Timing multiple inputs to a router ..............To time the inputs to a router ....................Usage notes ..........................Troubleshooting cable problems ....................WFM2300 and WFM2200A Waveform Monitors User Manual...
- Page 16 Table of Contents WFM2300 and WFM2200A Waveform Monitors User Manual...
-
Page 17: Important Safety Information
Read the safety sections of the other component manuals for warnings and cautions related to operating the system. When incorporating this equipment into a system, the safety of that system is the responsibility of the assembler of the system. WFM2300 and WFM2200A Waveform Monitors User Manual... - Page 18 Provide a safe working environment. Always place the product in a location convenient for viewing the display and indicators. Be sure your work area meets applicable ergonomic standards. Consult with an ergonomics professional to avoid stress injuries. WFM2300 and WFM2200A Waveform Monitors User Manual...
-
Page 19: Service Safety Summary
WARNING. Warning statements identify conditions or practices that could result in injury or loss of life. CAUTION. Caution statements identify conditions or practices that could result in damage to this product or other property. WFM2300 and WFM2200A Waveform Monitors User Manual xiii... -
Page 20: Terms On The Product
(This symbol may also be used to refer the user to ratings in the manual.) The following symbols may appear on the product: WFM2300 and WFM2200A Waveform Monitors User Manual... -
Page 21: Preface
Preface This manual contains the following information to help you use the Tektronix WFM2300 and WFM2200A Multiformat Multistandard Waveform Monitors: ■ How to set up various waveform displays for monitoring SD-SDI, HD-SDI, and 3 Gb/s SDI video signals. ■ How to set up audio displays to monitor embedded AES/EBU audio signals. -
Page 22: Conventions Used In This Manual
This is a printed manual and is also available on the Web at www.tektronix.com/downloads. Conventions used in this manual The following icon is used throughout this manual: Sequence step or item WFM2300 and WFM2200A Waveform Monitors User Manual... -
Page 23: Getting Started
The WFM2300 with Option ASI can monitor MPEG2 transport streams. You can use the Tektronix patented Timing display and the external reference waveform display to assist in ensuring correct video timing and troubleshooting timing problems. -
Page 24: Key Features
LTC waveform display Longitudinal Time Code (LTC) is monitored in a frame rate display to allow observation of amplitude and noise, and verify LTC is locked to the video. WFM2300 and WFM2200A Waveform Monitors User Manual... - Page 25 Support for monitoring auxiliary data including data conforming to ARIB standards and CEA608, CEA708, AFD, and CGMS-A. Timing display A Tektronix proprietary display that simplifies measuring the timing difference between two signals. Using the Timing display enables you to easily compare and correct the timing between two signals.
-
Page 26: Options And Optional Accessories
LOUD Add Audio Loudness monitoring capabilities including Loudness Meter Add Optical input/output SDI module support (includes one SFP module); an SFP module is available for additional purchase (Tektronix part number 119-8280-00) SFP-HDMI Adds HDMI input module support (includes one SFP module), not HDCP compliant;... -
Page 27: Optional Accessories
When ordering the A99 option, it is the responsibility of the end user to be sure that a certified power cord, for the country or region in which it is installed, is used with this instrument. WFM2300 and WFM2200A Waveform Monitors User Manual... -
Page 28: Service Options
40 °C. Do not block or restrict the ventilating holes. See the WFM2300 and WFM2200A Specifications and Performance Verification Technical Reference for the complete operating specifications. -
Page 29: Power Requirements
Use the proper power cord with the AC adapter. See International power cord options on page 5. NOTE. See the WFM2300 and WFM2200A Specifications and Performance Verification Technical Reference for additional information on power and environmental requirements. WFM2300 and WFM2200A Waveform Monitors User Manual... -
Page 30: Connect Power
The actual battery-charging temperature limit may be lower than 40 °C. Connect power This section provides procedures for installing the power cord and installing the battery pack. WFM2300 and WFM2200A Waveform Monitors User Manual... - Page 31 NOTE. If a battery pack is installed in the instrument, it will automatically charge whenever the supplied AC adapter is connected, whether the instrument is On, Off, or in Standby mode. WFM2300 and WFM2200A Waveform Monitors User Manual...
- Page 32 Use your fingers or a coin to turn the battery cover screw counterclockwise until the cover is loose. b. Lift away the battery cover. 2. Insert the WFM200BA battery pack into the battery compartment as shown below. WFM2300 and WFM2200A Waveform Monitors User Manual...
- Page 33 Getting started 3. Secure the battery pack tab as shown below. 4. Replace the battery compartment cover: a. Insert the three tabs on the battery cover into the chassis slots as shown below. WFM2300 and WFM2200A Waveform Monitors User Manual...
-
Page 34: Power-On And Power-Off Procedures
2. Press the Power button on the instrument front panel to turn the instrument 3. If you are powering the instrument using only the battery pack, check the power level before operating the instrument. See Battery charge level indicators on page 14. WFM2300 and WFM2200A Waveform Monitors User Manual... - Page 35 Press and hold the Power button for 5 seconds and then release the button to immediately power off the instrument. NOTE. To remove power completely from the instrument, disconnect the AC adapter from the power connector and remove any installed battery pack. WFM2300 and WFM2200A Waveform Monitors User Manual...
- Page 36 Battery fully charged, AC adapter plugged in Battery partially charged, AC adapter plugged in and charging Battery level low, AC adapter not plugged in Battery level critically low, AC adapter not plugged in WFM2300 and WFM2200A Waveform Monitors User Manual...
-
Page 37: Tripod Installation
There are two SFP modules available: With Option SFP, you receive an SFP module for monitoring or outputting ■ optical SDI signals. ■ With Option SFP-HDMI, you receive an SFP module for monitoring HDMI signals. WFM2300 and WFM2200A Waveform Monitors User Manual... - Page 38 SFP module removal. To remove the SFP module, lift up on the latch and then pull the module out of the SFP connector as shown below (optical SFP module shown). WFM2300 and WFM2200A Waveform Monitors User Manual...
-
Page 39: Video System Installation
To monitor the video bit stream of a serial receiver. Route an incoming serial signals into the SDI A or MULTI IN input on the instrument. NOTE. See the WFM2300 and WFM2200A Specifications and Performance Verification Technical Reference for the maximum allowed cable lengths. - Page 40 Video/Gen Outputs > Test Signal Genlock menu to enable the genlock function and to configure the genlock vertical and horizontal timing offsets. The Generator Status display and the Status Bar indicate the status of the genlock function. WFM2300 and WFM2200A Waveform Monitors User Manual...
-
Page 41: To Test Cable Margins (Wfm2300 Only)
Stress loop connections for a generated signal. To test the cable margins for a generated signal, route the SDI OUT signal to one of the STRESS LOOP connectors. Route a cable from the other connector of the STRESS LOOP to your video system as shown below. WFM2300 and WFM2200A Waveform Monitors User Manual... -
Page 42: To Measure A/V Delay Or Propagation Time (Option Avdp Only)
You can also use a network HUB connection between the PC and the instrument. 2. Press the Power button to power on the instrument. WFM2300 and WFM2200A Waveform Monitors User Manual... - Page 43 NOTE. If you selected DHCP mode, the network automatically assigns the instrument an IP address. DHCP typically requires several seconds to assign the network address. e. Press the CONFIG button on the front panel to close the menus. WFM2300 and WFM2200A Waveform Monitors User Manual...
-
Page 44: Enable The Web Remote Interface
SNMP and configure the SNMP parameters of the instrument. NOTE. The wfm_mon.mib and wfm2300.mib files contain the SNMP OIDs for the WFM2300 and WFM2200A waveform monitors. These files can be downloaded from the home page of the Web remote interface. - Page 45 Repeat steps a through c for the other three SNMP trap addresses as required for your installation. 5. Navigate to SNMP Enable and press the right arrow key to select On. This setting turns SNMP remote access to the instrument on and off. WFM2300 and WFM2200A Waveform Monitors User Manual...
-
Page 46: Incoming Inspection
These procedures require no external equipment. For a more robust inspection, see the performance verification procedures in the WFM2300 and WFM2200A Specifications and Performance Verification Technical Reference. Basic turn on and self test 1. Connect power to the instrument. See Connect power on page 8. -
Page 47: Fan Test
CAUTION. To prevent damage to the Li-Ion battery pack, use the original packaging when shipping the battery pack and ensure that the package labeling and documentation meets all of the requirements for shipping Li-Ion batteries under the IATA Dangerous Goods Regulations. WFM2300 and WFM2200A Waveform Monitors User Manual... -
Page 48: To Repackage The Instrument For Shipment
Styrofoam kernels, overfill the box and compress the kernels by closing the lid. There should be three inches of tightly packed cushioning on all sides of the instrument. 3. Seal the carton with shipping tape, industrial stapler, or both. WFM2300 and WFM2200A Waveform Monitors User Manual... -
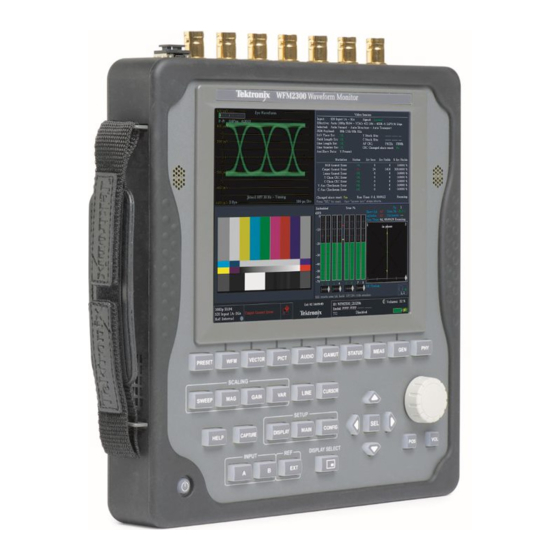
Page 49: Getting Acquainted With Your Instrument
The settings in the Display, Main, and Preset menus are also global. The Capture button can be either global or tile specific depending on the setting in the Configuration menu (Display Settings > Freeze Affects). WFM2300 and WFM2200A Waveform Monitors User Manual... -
Page 50: Layout And Usage
In the Datalist display, press the SEL button to toggle between line and sample select. See Line Select on page 159. WFM2300 and WFM2200A Waveform Monitors User Manual... - Page 51 REF IN input. See monitor the external reference signal on page 18 To use the timing display to time a signal to a reference on page 243. WFM2300 and WFM2200A Waveform Monitors User Manual...
- Page 52 Press to put the instrument in Standby mode or to turn the power on or off. See Power-on and power-off procedures on page 12. NOTE. The Power button does not remove power from the instrument. WFM2300 and WFM2200A Waveform Monitors User Manual...
-
Page 53: Online Help
Contents (entries never change) or the Index, or to highlight a link in the topic pane. 4. Press the SEL button to select the highlighted item. 5. Press the HELP button again to exit online help. WFM2300 and WFM2200A Waveform Monitors User Manual... -
Page 54: Instrument Display
AUDIO: display of levels (meters), phase (plot), and surround sound for monitoring audio signals ■ GAMUT: display of one of four views for checking the gamut of an SDI signal ■ STATUS: display of extensive views of signal status WFM2300 and WFM2200A Waveform Monitors User Manual... -
Page 55: Display Limitation
4. Use the up and down arrow keys to select parameters in a menu. Figure 2: Navigate menus using the arrow keys and select button 5. Navigate through the menu and make your selections. WFM2300 and WFM2200A Waveform Monitors User Manual... -
Page 56: Display Select Button
1. Press the MAIN button to display the Main menu. 2. Navigate to Display Select. 3. Press the right arrow key to select Thumb or Tile Sel. 4. Press the MAIN button to close the Main menu. WFM2300 and WFM2200A Waveform Monitors User Manual... - Page 57 The selected (active) tile in 4-tile mode is the tile expanded to full screen mode. NOTE. You can also use the Main menu to toggle between 4-tile and full screen mode and to select the active tile. WFM2300 and WFM2200A Waveform Monitors User Manual...
- Page 58 Getting acquainted with your instrument Figure 4: Changing from 4-tile to full-screen view WFM2300 and WFM2200A Waveform Monitors User Manual...
- Page 59 The following figure shows a full screen Waveform display with the thumbnail view enabled. In full screen mode, the thumbnail is always positioned in the lower right region of the display. Figure 5: Thumbnail view in Waveform display WFM2300 and WFM2200A Waveform Monitors User Manual...
-
Page 60: Status Bar
Red indicates that genlock is currently enabled but is not locked to the SDI output signal. ■ Yellow indicates that genlock is currently enabled but a lock is still being acquired for the SDI output signal. WFM2300 and WFM2200A Waveform Monitors User Manual... - Page 61 See Battery charge level indicators on page 14. AC status An icon that indicates whether the AC adapter is plugged in and/or charging the battery pack. See Battery charge level indicators page 14. WFM2300 and WFM2200A Waveform Monitors User Manual...
- Page 62 This icon appears when the battery has less than 10 minutes of operating power remaining. The icon turns from yellow to red when instrument shutdown is imminent due to low battery power. WFM2300 and WFM2200A Waveform Monitors User Manual...
-
Page 63: Signal Inputs
View the reference signal. You can use the waveform display to view the signal connected to the EXT REF connector. Press the WFM button to open the waveform display pop-up menu, and then select Display Type > Ref Waveform. WFM2300 and WFM2200A Waveform Monitors User Manual... -
Page 64: Dual Link Signals
Alpha Channel information is visible if present and is available in RGB and YCbCr display modes, but not in YRGB mode. The following figure is an example of how the signal components appear. Figure 7: Placement of dual link information in the Waveform display WFM2300 and WFM2200A Waveform Monitors User Manual... -
Page 65: Connectors
See the WFM2300 and WFM2200A Specifications and Performance Verification Technical Reference for the complete connector specifications. Both documents are available in electronic format on the Tektronix Web site at www.tektronix.com/downloads. Connector configuration... -
Page 66: Signal Outputs
■ 0% Flat Field ■ 50% Flat Field ■ 100% Flat Field ■ 5-Step Staircase ■ 10-Step Staircase ■ Checkerboard ■ Clean Aperture ■ Production Aperture ■ Convergence ■ Pluge and Luma Reference WFM2300 and WFM2200A Waveform Monitors User Manual... -
Page 67: Aes Audio Output
The following illustration shows signal connections for testing a device. After you connect the signals, use CONFIG > Audio/Gen Outputs submenu or the GEN pop-up menu to select the AES audio signal type that you want to generate. WFM2300 and WFM2200A Waveform Monitors User Manual... -
Page 68: A/V Delay Or Propagation Time Signal Output (Option Avdp Only)
Transceiver: Select to enable the SFP module as a transceiver. ■ Dual Tx: Select to enable the SFP module as dual transmitters. ■ Dual Rx: Select to enable the SFP modules as dual receivers. WFM2300 and WFM2200A Waveform Monitors User Manual... -
Page 69: Display Modes
128 ■ SFP Module Status display (Option SFP or Option SFP-HDMI) page 126 ■ Video Session display on page 131 ■ Timing Measure display on page 136 ■ Vector display on page 140 WFM2300 and WFM2200A Waveform Monitors User Manual... -
Page 70: Anc Data Display (Option Data Only)
2. Use the arrow keys to select Display Type > ANC Data DISP.. 3. Press the MEAS button to close the pop-up menu. Elements of the ANC Data display Figure 10: ANC Data display (full screen mode) WFM2300 and WFM2200A Waveform Monitors User Manual... - Page 71 ■ Format: Indicates the name of the ancillary data type or standard. ■ User Data Words: Contains the payload of the ancillary packet, displayed in hexadecimal; all 10 bits are displayed. WFM2300 and WFM2200A Waveform Monitors User Manual...
-
Page 72: Measure Pop-Up Menu (Anc Data Display)
The following menu selections are available: Display type. Select from the following display types: ■ Timing Measure - Displays a Tektronix proprietary view that enables you to easily compare and correct the timing between two signals. See Timing Measure display on page 136. -
Page 73: To Configure The Watch List
You can now view the data types you checked in the Watch List. Arrowhead display The Arrowhead display is a Tektronix proprietary display that shows gamut violations of the SDI input if translated into the Composite domain (NTSC and PAL). For more information about using the gamut-checking displays: ■... -
Page 74: Elements Of The Arrowhead Display
(Y) and gamut (Y+C) limits and not generate error reports. ■ Field and line numbers: Shows the currently selected video field and line numbers when Line Select mode is enabled. See Line Select on page 159. WFM2300 and WFM2200A Waveform Monitors User Manual... -
Page 75: Gamut Pop-Up Menu (Arrowhead Display)
Display modes Gamut pop-up menu Press and hold the GAMUT button to open the Gamut pop-up menu. The pop-up menu enables you to select the from the following Tektronix proprietary gamut (Arrowhead display) displays: ■ Arrowhead - Displays gamut violations of the SDI input if translated into the Composite domain (NTSC and PAL). -
Page 76: Asi Pid List Display (Wfm2300 Option Asi Only)
Hierarchy display: The ASI transport stream is displayed in a hierarchal structure to show the interrelationship of the components in the stream. Additional information about each stream component such as PID and Table ID numbers is displayed next to each icon. WFM2300 and WFM2200A Waveform Monitors User Manual... - Page 77 One or more transport packets with a PID value of 0x01 ■ PID: Shows the PID value of the CAT and a table_id value of 0x0001. ■ TableID: Shows the table_id value of the CAT WFM2300 and WFM2200A Waveform Monitors User Manual...
- Page 78 The LED turns red again if another error is detected. Use the Error Log display to view reported errors. See Error Log display page 123. WFM2300 and WFM2200A Waveform Monitors User Manual...
-
Page 79: Detected Asi Stream Types
Flex MUX Stream 0xE7 User Private 0x14 to 0x19 Reserved 0xEA MS WM9 Video 0x1A IPMP Stream 0xEB MS WM9 Video 0x1B H.264 Video 0xEC to 0xFF User Private 0x1C to 0x20 Reserved WFM2300 and WFM2200A Waveform Monitors User Manual... -
Page 80: Measure Pop-Up Menu (Asi Pid List Display)
Measure pop-up menu Select from the following display types: (ASI PID List display) ■ Timing Measure - Displays a Tektronix proprietary view that enables you to easily compare and correct the timing between two signals. See Timing Measure display on page 136. -
Page 81: Audio Display
223 and To check surround sound page 227 ■ Audio source/setup: Displays the selected audio input and related setup information, such as Listening Mode when in Surround display. See Audio monitoring on page 221. WFM2300 and WFM2200A Waveform Monitors User Manual... -
Page 82: Above-Bar Warning Messages
AES PARITY. The incoming subframe does not have even parity as specified by the digital audio standards. The data sample is unreliable and is ignored. The level meters and Lissajous display treat the sample as a zero sample. WFM2300 and WFM2200A Waveform Monitors User Manual... -
Page 83: Audio Pop-Up Menu
(audio phase or surround-sound) appears to the right of the level meter display. Some of the menu selections depend on the selected audio input source and which auxiliary display is enabled. WFM2300 and WFM2200A Waveform Monitors User Manual... - Page 84 Emb. 9-16 - Sets the audio source to be from the second eight channels in the embedded audio on the currently selected video input. This mode displays the correlation meters for the second eight channels and displays the Phase or Surround Sound auxiliary displays when they are enabled. WFM2300 and WFM2200A Waveform Monitors User Manual...
- Page 85 CONFIG > Audio Inputs/Outputs submenu. ■ When the selected surround sound type contains more than one program. The type of surround sound is selected in the CONFIG > Audio Inputs/Outputs > Program Cfg submenu. WFM2300 and WFM2200A Waveform Monitors User Manual...
-
Page 86: Config Menu
At any time, press and hold the VOL button to toggle audio muting. A red “X” appears over the speaker icon in the Status Bar when audio is muted. NOTE. When monitoring high-amplitude audio, volume levels over 90% may cause audio clipping. WFM2300 and WFM2200A Waveform Monitors User Manual... -
Page 87: Audio Generator Status Display
2. Use the arrow keys to select Display Type > Audio Generator. 3. Press the GEN button to close the pop-up menu. Elements of the Audio Generator Status display Figure 14: Audio Generator Status display WFM2300 and WFM2200A Waveform Monitors User Manual... - Page 88 NOTE. The above tone frequency, amplitude, and bitdepth settings are used in both the AES audio output and in the embedded audio of the SDI video output. The same audio channel pair is duplicated to all pairs of embedded audio. WFM2300 and WFM2200A Waveform Monitors User Manual...
-
Page 89: Generator Pop-Up Menu (Audio Generator Status Display)
144. Audio Generator – Displays the status of audio signals being generated by ■ the instrument. Diagnostics Monitor – Displays the status of various instrument diagnostics. ■ Diagnostics Monitor display on page 86. WFM2300 and WFM2200A Waveform Monitors User Manual... - Page 90 22 to 140. Level A signals will support all of the line numbers in that range; Level B signals will support only even numbers in that range. For HD and SD signals, the custom start line can be in the range of 11 to 70. WFM2300 and WFM2200A Waveform Monitors User Manual...
- Page 91 LtRt output. This parameter is part of the extended BSI. You can select +3.0 dB, +1.5 dB, 0.0 dB, –1.5 dB, –3.0 dB, –4.5 dB, –6.0 dB, or Infinite. WFM2300 and WFM2200A Waveform Monitors User Manual...
-
Page 92: Config Menu
Frame rate setting. If you change the Dolby E frame rate setting, it does not affect the actual audio data being streamed out by the generator, and it does not change the rate at which this data is being streamed or the video frame rate itself. WFM2300 and WFM2200A Waveform Monitors User Manual... -
Page 93: Dolby E Generated Formats (Option Dbe Only)
Multitone –18 dBFS –20 dBFS –22 dBFS –24 dBFS –26 dBFS –28 dBFS –30 dBFS –32 dBFS 119.9 Hz 239.8 Hz 359.7 Hz 479.5 Hz 599.4 Hz 1198.8 Hz 1798.2 Hz 2397.6 Hz WFM2300 and WFM2200A Waveform Monitors User Manual... - Page 94 Multitone –18 dBFS –20 dBFS –22 dBFS –24 dBFS –26 dBFS –28 dBFS –30 dBFS –32 dBFS 120 Hz 240 Hz 360 Hz 480 Hz 600 Hz 1200 Hz 1800 Hz 2400 Hz WFM2300 and WFM2200A Waveform Monitors User Manual...
- Page 95 Multitone –18 dBFS –20 dBFS –22 dBFS –24 dBFS –26 dBFS –28 dBFS –30 dBFS –32 dBFS 125 Hz 250 Hz 350 Hz 475 Hz 600 Hz 1200 Hz 1800 Hz 2400 Hz WFM2300 and WFM2200A Waveform Monitors User Manual...
- Page 96 Multitone –18 dBFS –20 dBFS –22 dBFS –24 dBFS –26 dBFS –28 dBFS –30 dBFS –32 dBFS 119.9 Hz 239.8 Hz 359.7 Hz 479.5 Hz 599.4 Hz 1198.8 Hz 1798.2 Hz 2397.6 Hz WFM2300 and WFM2200A Waveform Monitors User Manual...
- Page 97 Multitone –18 dBFS –20 dBFS –22 dBFS –24 dBFS –26 dBFS –28 dBFS –30 dBFS –32 dBFS 120 Hz 240 Hz 360 Hz 480 Hz 600 Hz 1200 Hz 1800 Hz 2400 Hz WFM2300 and WFM2200A Waveform Monitors User Manual...
-
Page 98: Dolby E Loudness Measurements
Display modes Dolby E loudness The following tables list the Dolby E loudness measurements for each program. The measurements were made with a Tektronix WFM8000 Series waveform measurements monitor using the ATSC A/85 2013 Loudness preset. Dialnorm values of –23 dB and –24 dB are used by default within the instrument, depending on the Dolby E level setting. - Page 99 –16.9 –18 dBSF –10.3 –14.9 Multitone –17.5 –28.5 –20 dBSF –12.3 –18 dBSF –10.3 Multitone –17.5 –20 dBSF –16.9 –16.9 –16.9 –16.9 –18 dBSF –14.9 –14.9 –14.9 –14.9 Multitone –20.1 –23.6 –27.0 –28.5 WFM2300 and WFM2200A Waveform Monitors User Manual...
-
Page 100: Av Delay Measurement Display (Option Avdp Only)
1. Press and hold the MEAS button to open the Measure pop-up menu. AV Delay display 2. Use the arrow keys to select Display Type > AV Delay. 3. Press the MEAS button to close the pop-up menu. WFM2300 and WFM2200A Waveform Monitors User Manual... -
Page 101: Elements Of The Av Delay Display
Press and hold the MEAS button to open the Measure pop-up menu. The pop-up menu enables you to configure the display type and configure display parameters (AV Delay display) for the different display types. The following menu selections are available: WFM2300 and WFM2200A Waveform Monitors User Manual... -
Page 102: Config Menu
Display modes Display type. Select from the following display types: Timing Measure - Displays a Tektronix proprietary view that enables you to ■ easily compare and correct the timing between two signals. See Timing Measure display on page 136. Datalist (Option DATA only) - Displays the content of all digital signal ■... -
Page 103: Bowtie Display
■ Display: Shows the display type as Bowtie. ■ Y-axis units: The units for the y-axis depend on the test signal and the signal format. ■ X-axis units: Shows the x-axis in microseconds/divisions. WFM2300 and WFM2200A Waveform Monitors User Manual... -
Page 104: Measure Pop-Up Menu (Bowtie Display)
The following menu selections are available: Display type. Select from the following display types: ■ Timing Measure - Displays a Tektronix proprietary view that enables you to easily compare and correct the timing between two signals. See Timing Measure display on page 136. -
Page 105: Config Menu
1. Press and hold the MEAS button to open the Measure pop-up menu. Datalist display 2. Use the arrow keys to select Display Type > Datalist Display. 3. Press the MEAS button to close the pop-up menu. WFM2300 and WFM2200A Waveform Monitors User Manual... -
Page 106: Elements Of The Datalist Display
Blue: Data in horizontal or vertical blanking intervals. ■ White: EAV and SAV packets; other reserved values such as the XYZ word. ■ Yellow: Data outside the nominal allowed values. ■ Red: Data with illegal values. WFM2300 and WFM2200A Waveform Monitors User Manual... -
Page 107: Finding Sav And Eav In The Active Video Stream
The following menu selections are available: Display type. Select from the following display types: ■ Timing Measure - Displays a Tektronix proprietary view that enables you to easily compare and correct the timing between two signals. See Timing Measure display on page 136. -
Page 108: Config Menu
2. Use the arrow keys to select Display Type > Diag Monitor. 3. Press the GEN button to close the pop-up menu. Elements of the Diagnostics Monitor display Figure 18: Diagnostics Monitor display (page 1) WFM2300 and WFM2200A Waveform Monitors User Manual... - Page 109 Display modes Figure 19: Diagnostics Monitor display (page 2) Figure 20: Diagnostics Monitor display (page 3) WFM2300 and WFM2200A Waveform Monitors User Manual...
- Page 110 2 and 3 of the display: See Diagnostics Monitor display page 86. ■ Power Supply Voltages: Shows the last, low, high, and average power supply voltages for various internal components. WFM2300 and WFM2200A Waveform Monitors User Manual...
-
Page 111: Generator Pop-Up Menu (Diagnostics Monitor Display)
Use the Alarms > System and Diagnostics setting to enable an alarm for a hardware fault. ■ Use the menu selection under Utilities to run diagnostics, to set how the diagnostics log responds when full, to view the diagnostics log, and to configure custom diagnostics. WFM2300 and WFM2200A Waveform Monitors User Manual... -
Page 112: Diamond Display
Display modes Diamond display The Diamond display is a Tektronix proprietary display that shows gamut violations of the SDI input if translated to the RGB color space. For more information about using the gamut-checking displays: ■ Arrowhead display on page 51 ■... -
Page 113: Gamut Pop-Up Menu (Diamond Display)
Line Select on page 159. Gamut pop-up menu Press and hold the GAMUT button to open the Gamut pop-up menu. The pop-up menu enables you to select the from the following Tektronix proprietary gamut (Diamond display) displays: ■ Arrowhead - Displays gamut violations of the SDI input if translated into the Composite domain (NTSC and PAL). -
Page 114: External Reference Waveform Display
H and V positions: When you press the POS button to adjust the position of the waveform, a position readout appears with a knob icon to indicate whether the horizontal or vertical position is the focus of the General knob. WFM2300 and WFM2200A Waveform Monitors User Manual... -
Page 115: Waveform Pop-Up Menu (External Reference Waveform Display)
The knob icon appears next to the selected adjustment readout. 3. Turn the General knob or use the up/down arrow keys to adjust the position of the waveform. 4. Press the POS button to turn off the position adjustment mode. WFM2300 and WFM2200A Waveform Monitors User Manual... -
Page 116: Eye Display (Wfm2300 Only)
Eye waveform. NOTE. See Monitoring the SDI Physical Layer for information about taking Eye measurements. Figure 24: WFM2300 Eye display from 4-tile mode (no histogram) WFM2300 and WFM2200A Waveform Monitors User Manual... -
Page 117: Elements Of The Eye Display
Center Waveform: Press the SEL button to center the waveform. ■ Jitter Meter: Select to not display the jitter meter or readout (Off), Meter Only, Readout Only, or Meter and Readout. ■ Enable Measure: Press the SEL button to enable eye measurement. WFM2300 and WFM2200A Waveform Monitors User Manual... -
Page 118: Usage Notes
See also To make jitter measurements page 194. Figure 26: The Jitter display parameters as shown in a single tile when the instrument is in 4-tile mode WFM2300 and WFM2200A Waveform Monitors User Manual... -
Page 119: Elements Of The Jitter Display
100 kHz for HD signals. These are the correct values for measuring alignment jitter. 10 Hz, 100 Hz, Sets the detector high-pass filter to the selected value. 1 kHz, 10 kHz, 100 kHz WFM2300 and WFM2200A Waveform Monitors User Manual... -
Page 120: Lightning Display
SDI Physical Layer. Lightning display The Lightning display is a Tektronix proprietary display that plots the Pr and Pb signals against luminance. As shown below, Y versus Pb is plotted in the top half of the display and Y versus Pr is plotted in the bottom half. -
Page 121: To Access The Lightning Display
General knob. ■ Field and line numbers: Shows the currently selected video field and line numbers when Line Select mode is enabled. See Line Select on page 159. WFM2300 and WFM2200A Waveform Monitors User Manual... -
Page 122: Vector Pop-Up Menu (Lightning Display)
140. ■ Lightning – This Tektronix proprietary display shows the same Pr and Pb color signals as in the Vector mode, but they are plotted against luminance. Bar targets. To select which scaling (75% or 100%) will be used in the current tile for either the Vector or Lighting display. -
Page 123: Ltc Waveform Display
H and V positions: When you press the POS button to adjust the position of the waveform, a position readout appears with a knob icon to indicate whether the horizontal or vertical position is the focus of the General knob. WFM2300 and WFM2200A Waveform Monitors User Manual... -
Page 124: Waveform Pop-Up Menu (Ltc Waveform Display)
The knob icon appears next to the selected adjustment readout. 3. Turn the General knob or use the up/down arrow keys to adjust the position of the waveform. 4. Press the POS button to turn off the position adjustment mode. WFM2300 and WFM2200A Waveform Monitors User Manual... -
Page 125: Picture Display
6 at the bottom) to make the image fit. ■ VChip rating: Displays detected VChip ratings from any of these systems: MPAA (US), TV (US), Canadian English, and Canadian French. VChip information is labeled CA (Content Advisory). WFM2300 and WFM2200A Waveform Monitors User Manual... -
Page 126: Picture Pop-Up Menu
■ CC/Teletext Format: Select the format of the closed caption content in the video signal. You can select from Off, Auto, CEA608, CEA708, and WST. WFM2300 and WFM2200A Waveform Monitors User Manual... -
Page 127: Config Menu
Picture display in the Waveform, Vector, or Gamut displays. See also DISPLAY SELECT button on page 34. WFM2300 and WFM2200A Waveform Monitors User Manual... -
Page 128: Split Diamond Display
Display modes Split Diamond display Like the Diamond display, the Split Diamond display is a Tektronix proprietary display that shows gamut violations of the SDI input if translated to the RGB color space. For more information about using the gamut-checking displays: ■... -
Page 129: Gamut Pop-Up Menu (Split Diamond Display)
Line Select page 159. Gamut pop-up menu Press and hold the GAMUT button to open the Gamut pop-up menu. The pop-up menu enables you to select the from the following Tektronix proprietary gamut (Split Diamond display) displays: ■ Arrowhead - Displays gamut violations of the SDI input if translated into the Composite domain (NTSC and PAL). -
Page 130: Status Displays
Display Type > Video Session – Displays several performance parameters which provide an overview of the video input signal. See Video Session display on page 131. 3. Press the STATUS button to close the pop-up menu. WFM2300 and WFM2200A Waveform Monitors User Manual... -
Page 131: Aes Channel Status Display
Channels 5 & 6 (Ls and Rs) ■ Channels 7 & 8 (Lo and Ro) ■ Format: Use the arrow keys to select the format of the data display. Select from Text, Hex, Binary, or XMSN Binary formats. WFM2300 and WFM2200A Waveform Monitors User Manual... -
Page 132: Alarm Status Display
Use the arrow keys to navigate through the different pages of the display. Figure 34: Alarm Status display WFM2300 and WFM2200A Waveform Monitors User Manual... - Page 133 Use the menu selections under Aux Data Settings to set various expected data parameters. ■ Use the menu selections under Display Settings to set various general display parameters which affect all applicable display modes such as waveform intensity and graticule color. WFM2300 and WFM2200A Waveform Monitors User Manual...
-
Page 134: Arib Status Displays
WFM2300 and WFM2200A Waveform Monitors User Manual... - Page 135 For HD signals, the audio control packet carries additional information used in the process of decoding the audio data and has a similar structure to standard definition. Figure 37: Audio Control Packet display WFM2300 and WFM2200A Waveform Monitors User Manual...
- Page 136 To select a status display on page 108. ■ Mute Alarms: Mutes alarms for all of the Status display types. An Alarms Muted icon appears in the Status Bar. See Status bar icons on page 40. WFM2300 and WFM2200A Waveform Monitors User Manual...
-
Page 137: Audio Session Display
The Audio Session display contains several performance parameters that you can display to see an overview of the audio input signal. This instrument maintains a running audio status session. Figure 38: Audio Session display WFM2300 and WFM2200A Waveform Monitors User Manual... - Page 138 Audio the maximum is 20 bits. ■ Smpl Rate: The sample rate of the channel pair. Changed Since Last Reset: Either Yes or No. Indicates whether an error has ■ occurred since the last reset. WFM2300 and WFM2200A Waveform Monitors User Manual...
- Page 139 If Option 3G is installed, 3G Level A signals use the Embedded A or B settings as appropriate. 3G Level B signals use the Embedded Dual Link settings. ■ Use the menu selections under Alarms > Audio Content and Alarms > AES/Embedded to enable various audio alarms. WFM2300 and WFM2200A Waveform Monitors User Manual...
-
Page 140: Auxiliary Data Status Display
The Auxiliary Data Status display allows you to view closed-caption, teletext, video index, AFD, WSS, V-chip related status, and other ancillary data present display on monitored signals. Figure 39: Auxiliary Data Status display WFM2300 and WFM2200A Waveform Monitors User Manual... - Page 141 ■ BG Data: Indicates the binary group (BG) data value. ■ Wide Screen Signaling (WSS): Indicates if the WSS is present. The supported formats include Composite PAL and 625-line SD. The WSS data WFM2300 and WFM2200A Waveform Monitors User Manual...
- Page 142 Use the Aux Data Settings selections to define the ANC data types by name and DID/SDID values. ■ Use the menu selections under Alarms to enable the alarms for various types of ANC data errors. WFM2300 and WFM2200A Waveform Monitors User Manual...
-
Page 143: Dolby Audio Status Display
Display modes Dolby Audio Status You can view Dolby metadata from the currently monitored SDI input. Select to view the metadata from the VANC. display Figure 40: Dolby Audio Status display WFM2300 and WFM2200A Waveform Monitors User Manual... - Page 144 SMPTE337 pre-amble. Also displays the Dolby E sync words one and two for bit depths of 16, 20, and 24. ■ Dolby PA Alignment: Indicates an alignment error between the left and right Dolby channels. WFM2300 and WFM2200A Waveform Monitors User Manual...
-
Page 145: Error Log Display
You can view all of the errors or just the errors for the selected input and save the log to a USB memory device. Figure 41: Error Log display WFM2300 and WFM2200A Waveform Monitors User Manual... - Page 146 When an ASI transport stream is being monitored (WFM2300 Option ASI only) and a Continuity Count error occurs, the value "NG" will be displayed along with a number indicating the number of PIDs with errors. WFM2300 and WFM2200A Waveform Monitors User Manual...
- Page 147 Use the menu selections under Aux Data Settings to set various expected data parameters. ■ Use the menu selections under Display Settings to set various general display parameters which affect all applicable display modes such as waveform intensity and graticule color. WFM2300 and WFM2200A Waveform Monitors User Manual...
-
Page 148: Sfp Module Status Display (Option Sfp Or Option Sfp-Hdmi)
For more detailed information about the values of each element, refer to “INF-8074i Specification for SFP (Small Formfactor Pluggable) Transceiver”, published by the SFF Committee and available at ftp://ftp.seagate.com/sff. Figure 42: SFP Module Status display WFM2300 and WFM2200A Waveform Monitors User Manual... - Page 149 Length 62.5 Micron: Specifies the link length supported by the SFP transceiver while operating in compliance with the applicable standards using 62.5 micron multi-mode fiber. Value shown in units of 10 meters (m). WFM2300 and WFM2200A Waveform Monitors User Manual...
-
Page 150: Sdi Status Display (Wfm2300 Only)
(WFM2300 only) calculated source level. Automatic measurements of eye amplitude, rise time, fall time, overshoot, and rise-fall difference are also displayed. Figure 43: SDI Status display WFM2300 and WFM2200A Waveform Monitors User Manual... - Page 151 ASI transport stream is being monitored, the display changes as shown below. The jitter measurements are replaced by ASI status readouts and the cable measurements are left blank. Figure 44: SDI/ASI Status display WFM2300 and WFM2200A Waveform Monitors User Manual...
- Page 152 Eye Fall Overshoot: Shows the percentage of fall time overshoot of the eye waveform. ■ ASI Packet Size: (Option ASI only) Shows the packet size in the transport stream (188 or 204 bytes). The readout shows "Unlocked" when the signal input is not ASI. WFM2300 and WFM2200A Waveform Monitors User Manual...
-
Page 153: Video Session Display
CRC values, that you can view to get an overview of the video input signal. This instrument maintains a running video status session. Figure 45: Video Session display of an HD-SDI signal WFM2300 and WFM2200A Waveform Monitors User Manual... - Page 154 When an ASI transport stream is being monitored (WFM2300 Option ASI only), the Video Session display shows whether or not the signal is locked. Figure 46: Video Session display of an ASI transport stream (WFM2300 Option ASI only) WFM2300 and WFM2200A Waveform Monitors User Manual...
- Page 155 Y Stuck Bits: For HD signals only, displays which of the luminance video bits are stuck. If the readout is "---- ---- LL", then none of the bits are stuck. LL is displayed for the two unused bits. WFM2300 and WFM2200A Waveform Monitors User Manual...
- Page 156 Input: Shows the selected input source. ■ Signal: Indicates whether the instrument is locked to the selected input. ■ Effective: Shows the detected format of the input signal. ■ Selected: Shows the selected format of the instrument. WFM2300 and WFM2200A Waveform Monitors User Manual...
- Page 157 Use the menu selections under Alarms to set various alarms related to video input, content, and format errors. ■ Use the menu selections under Display Settings to set various general display parameters which affect all applicable display modes. WFM2300 and WFM2200A Waveform Monitors User Manual...
-
Page 158: Timing Measure Display
Display modes Timing Measure display The Timing Measure display a Tektronix proprietary display that simplifies measuring the timing difference between the SDI video input signal and the analog video external reference signal as the timing is corrected. This display enables you to easily compare and correct the timing between two signals. -
Page 159: Measure Pop-Up Menu (Timing Measure Display)
A warning message appears on the screen if you attempt to save the offset when it is not allowed. If you select Saved Offset, you can save the timing from one signal, and then display the timing relative to that saved offset. WFM2300 and WFM2200A Waveform Monitors User Manual... - Page 160 Save Offset menu entry. Display type. Select from the following display types: ■ Timing Measure - Displays a Tektronix proprietary view that enables you to easily compare and correct the timing between two signals. ■ Datalist (Option DATA only) - Displays the content of all digital signal formats, structures, and transports (SD, HD, 3G, dual link, 4:2:2, 4:4:4, and others) except for composite signals.
-
Page 161: Timing Displays For Simple Versus Complex Timing
Figure 48: Timing display of non-integer multiples of reference rates Non-deterministic cases include timing of slow rate inputs against fast frame-rate references or when timing video against film rates. WFM2300 and WFM2200A Waveform Monitors User Manual... -
Page 162: Vector Display
1. Press and hold the VECTOR button to open the Vector pop-up menu. display 2. Use the arrow keys to select Display Type > Vector. 3. Press the VECTOR button to close the pop-up menu. WFM2300 and WFM2200A Waveform Monitors User Manual... -
Page 163: Elements Of The Vector Display
V Gain: Shows the current gain setting when the gain is other than 1x. Press the GAIN button to toggle the vertical gain between 1x and the most recently selected gain value. Gain is applied equally in the horizontal and vertical directions. WFM2300 and WFM2200A Waveform Monitors User Manual... -
Page 164: Vector Pop-Up Menu
■ Lightning – This Tektronix proprietary display shows the same Pr and Pb color signals as in the Vector mode, but they are plotted against luminance. The Lightning display is useful for checking chroma and luma gain, and for checking chroma to luma delay using the timing marks that show errors in the green to magenta transition on a color bar signal. -
Page 165: Config Menu
148. 3. Turn the General knob or use the up/down arrow keys to adjust the position of the waveform. 4. Press the POS button to turn off the position adjustment mode. WFM2300 and WFM2200A Waveform Monitors User Manual... -
Page 166: Video Generator Status Display
Test Signal Format: Shows the signal format that will be output when the SDI Output setting is Test Signal. ■ Moving Picture Mode: Shows whether the Moving Picture mode is turned on or off. WFM2300 and WFM2200A Waveform Monitors User Manual... -
Page 167: Generator Pop-Up Menu (Video Generator Status Display)
Diagnostics Monitor – Displays the status of various instrument diagnostics. See also Diagnostics Monitor display on page 86. SDI output. Sets the SDI video output to be a test signal or a loopout of the selected SDI video input. WFM2300 and WFM2200A Waveform Monitors User Manual... - Page 168 Genlock offset H. Sets the amount of offset (in microseconds) for the horizontal timing of the output test signal relative to the external reference signal. WFM2300 and WFM2200A Waveform Monitors User Manual...
-
Page 169: Config Menu
The settings controlled in the Generator Status pop-up menu are duplicated in the CONFIG > Video/Gen Outputs menu. Changes made in the Generator Status pop-up menu immediately appear in the CONFIG > Video/Gen Outputs menu selections. WFM2300 and WFM2200A Waveform Monitors User Manual... -
Page 170: Waveform Display
Mag: Shows the current horizontal magnification factor when the magnification is other than 1x. Press and hold the MAG button to select a magnification factor. See also MAG, GAIN, SWEEP, and CURSOR buttons on page 151. WFM2300 and WFM2200A Waveform Monitors User Manual... -
Page 171: Waveform Pop-Up Menu (Waveform Display)
Y, R, G, B components. Select to turn on or off the display of the individual video components: Luma (Y), Red (R), Green (G), or Blue (B). WFM2300 and WFM2200A Waveform Monitors User Manual... - Page 172 Luma or Low Pass - Display only the low-frequency part of the signal. Center waveform. Select this option to cancel any horizontal or vertical position adjustments and restore the trace to the default position. This puts the baseline at the zero graticule. WFM2300 and WFM2200A Waveform Monitors User Manual...
-
Page 173: Config Menu
CURSOR button. Press the CURSOR button to toggle the measurement cursors on and off. Press and hold the CURSOR button toselect the cursor style (Voltage, Time, or Voltage + Time) and to select the voltage cursor units (mV or %). WFM2300 and WFM2200A Waveform Monitors User Manual... -
Page 174: To Position The Waveform Trace
148. 3. Turn the General knob or use the up/down arrow keys to adjust the position of the waveform. 4. Press the POS button to turn off the position adjustment mode. WFM2300 and WFM2200A Waveform Monitors User Manual... -
Page 175: Functions
The default gain setting is 1x. You can use the Gain pop-up menu to select one of the available fixed gain settings (such as 2x, 5x, and 10x) or you can enable variable gain mode and manually set the gain. WFM2300 and WFM2200A Waveform Monitors User Manual... -
Page 176: To Set The Sweep Rate
1. Press and hold the SWEEP button to display the Sweep pop-up menu. 2. Use the arrow keys to select a line or field sweep. The available sweep options depend on which display mode is active. WFM2300 and WFM2200A Waveform Monitors User Manual... -
Page 177: To Set The Horizontal (Sweep) Magnification
The magnification function for the ANC Data display allows you to see more of the user data at the bottom of the display or to see more of the listed data types at the top of the display. WFM2300 and WFM2200A Waveform Monitors User Manual... -
Page 178: Measurement Cursors (Waveform Display Only)
■ %: Sets the cursors units to percentage. a. Press the CURSOR button once to close the pop-up menu. The enabled measurement cursors will be displayed and the CURSOR button will remain illuminated. WFM2300 and WFM2200A Waveform Monitors User Manual... - Page 179 4. Repeat steps 2 through 3 to adjust the position of the other enabled cursors. 5. Read the cursor measurements in the Cursors readout. Figure 52: Using measurement cursors in the Waveform display WFM2300 and WFM2200A Waveform Monitors User Manual...
-
Page 180: Display Capture (Freeze)
IP address of the instrument into the URL address bar of a Web browser. Before you can connect to the remote interface, use the CONFIG > Network Settings > Web Enable submenu to enable access to the remote interface. WFM2300 and WFM2200A Waveform Monitors User Manual... -
Page 181: Line Select
Line Select and Sample Select. 4. The line and field information will appear at the bottom of the display screen. 5. Use the General knob or the up/down arrow keys to select a video line to view. WFM2300 and WFM2200A Waveform Monitors User Manual... -
Page 182: Audio Volume And Source Adjustment
At any time, press and hold the VOL button to toggle audio muting. A red “X” appears over the speaker icon in the Status Bar when audio is muted. NOTE. When monitoring high-amplitude audio, volume levels over 90% may cause audio clipping. WFM2300 and WFM2200A Waveform Monitors User Manual... -
Page 183: To Select The Audio Source
A through D, with each group containing 8 preset storage locations. By default, the presets are named after their storage location (A1 – A8, B1 – B8, C1 – C8, and D1 – D8). WFM2300 and WFM2200A Waveform Monitors User Manual... -
Page 184: To Save Presets
Repeat for each character in the name. 5. After you have edited the name, select the Accept box and press the SEL button. WFM2300 and WFM2200A Waveform Monitors User Manual... -
Page 185: To Recall Presets
USB device so that you can USB device import them to another instrument. The instrument saves the presets to the subfolder you specify in a root directory folder named WfmPrst on the USB device. WFM2300 and WFM2200A Waveform Monitors User Manual... - Page 186 9. Press the left arrow key and then the down arrow key to highlight Copy. 10. Press the SEL button. You should see a pop-up message that says Preset Export Complete after the copy-to-USB function is complete. WFM2300 and WFM2200A Waveform Monitors User Manual...
-
Page 187: To Import Presets From A Usb Device
Select Group A – D: Selects all of the presets in the USB folder from the selected preset group. ■ From Group A – D: Selects a single preset from any of the four preset groups. WFM2300 and WFM2200A Waveform Monitors User Manual... -
Page 188: Alarms
Configuration menu is open. This option also enables alarm reporting with color on the Status screen. ■ Logging. The instrument makes an entry in the Event Log. See also Status displays on page 108. WFM2300 and WFM2200A Waveform Monitors User Manual... -
Page 189: To Set Allowed Alarm Responses
(or disabled) for that alarm. G-Possible.Alarm.Responses 5. Navigate to highlight the Return box, and press the SEL button to return to the Configuration menu. WFM2300 and WFM2200A Waveform Monitors User Manual... -
Page 190: To Enable Alarms
4. Select the required services for the desired CC type and select the CC channels and/or Text channels for which you want to trigger the CC Services Missing Alarm. 5. For SDI Gamut display related alarms, select Gamut Thresholds and then the desired gamut thresholds. WFM2300 and WFM2200A Waveform Monitors User Manual... -
Page 191: Monitoring Alarms
Arrowhead gamut thresholds. Luma Gamut Error Indicates that the selected video input signal contains luminance levels that violate the currently set limits for Luma gamut, which are specified by the Luma gamut thresholds. WFM2300 and WFM2200A Waveform Monitors User Manual... - Page 192 Indicates that the instrument cannot lock to the external reference signal when REF EXT is selected. This is usually due to a wrong or unsupported video standard. Reference Genlock Unlocked Indicates that the instrument cannot lock to the generated reference signal. WFM2300 and WFM2200A Waveform Monitors User Manual...
- Page 193 Indicates that Sync_byte is not equal to 0x47 per ETSI TR 101 290 First Priority 1.2. Continuity Counter Error Indicates an incorrect packet order or that a packet occurs more that twice or the a packet is lost per ETSI TR 101 290 First Priority 1.4. WFM2300 and WFM2200A Waveform Monitors User Manual...
- Page 194 Indicates that the dialnorm (dialog normalization) level indicated in the Dolby Metadata does not match the specified Target Loudness setting in the CONFIG menu. The default value is set to – 24 LKFS and can range from –31 to 0 LKFS. WFM2300 and WFM2200A Waveform Monitors User Manual...
- Page 195 CEA608 Service(s) Missing Indicates that one or more of the services selected for the CEA608 Required Services setting in the CONFIG menu is not present in the current closed caption data stream. WFM2300 and WFM2200A Waveform Monitors User Manual...
- Page 196 Indicates that World System Teletext (WST) VBI teletext packets are not present for SD and composite signals. ANC (SMPTE 334M) CC Missing Indicates that there are no ANC (SMPTE334M) captions in the selected video input signal. The alarm is not active for analog signals. WFM2300 and WFM2200A Waveform Monitors User Manual...
- Page 197 Indicates that the instrument did not find a valid SMPTE 2031 ANC data packet in the ancillary data space. S2031 Protocol Error Indicates that an error was detected in the SMPTE 2031 protocol layer. WFM2300 and WFM2200A Waveform Monitors User Manual...
- Page 198 Indicates that the jitter level for the Jitter2 engine has exceeded the Jitter2 Level threshold (in unit intervals) as set in the CONFIG menu for the type of signal connected to the instrument (SD, HD, or 3G). The Jitter2 engine controls tiles 3 and 4. WFM2300 and WFM2200A Waveform Monitors User Manual...
- Page 199 Description Hardware Fault Indicates that there has been a hardware failure with the instrument and service is required. If this alarm occurs, power down the instrument and contact your local Tektronix service representative. WFM2300 and WFM2200A Waveform Monitors User Manual...
- Page 200 Functions WFM2300 and WFM2200A Waveform Monitors User Manual...
-
Page 201: Software Upgrades
Software upgrades Tektronix releases software updates for products to add new features and to fix software problems. You can find the latest software for your product at the Tektronix Web site (www.tektronix.com/software). Before you begin Perform the following steps to determine if the software on your instrument should be upgraded: 1. -
Page 202: Software Upgrade Overview
If power to the instrument is lost before it begins erasing the internal flash, you can restart the software upgrade after the instrument reboots. If the instrument displays only a blank screen after power is reapplied, see the troubleshooting section for help. WFM2300 and WFM2200A Waveform Monitors User Manual... -
Page 203: Usb Software Installation
USB device from a well known brand that is 16 GB or less. 9. Press the SEL front panel button. This displays the System Software Upgrade from USB window. WFM2300 and WFM2200A Waveform Monitors User Manual... -
Page 204: Network Software Installation
Press the SEL front panel button. Note the IP address of the instrument displayed in the System Software Upgrade window. d. Select Continue from the System Software Upgrade window, and then press the SEL button to prepare the instrument to receive a software upgrade. WFM2300 and WFM2200A Waveform Monitors User Manual... - Page 205 After the instrument reboots, if you configured the network settings of the instrument for DHCP when you started this upgrade, navigate to CONFIG > Network Settings > IP Config Mode and select DHCP. WFM2300 and WFM2200A Waveform Monitors User Manual...
-
Page 206: Verify The Software And Installed Options
4. Verify that the software version number matches the version of the software- upgrade package you installed. 5. Navigate to Utilities > View Options. 6. Verify that the options that were enabled to the software upgrade are still enabled. WFM2300 and WFM2200A Waveform Monitors User Manual... -
Page 207: Software Installation Troubleshooting
To prevent upgrade failure, leave the instrument power on during the upgrade process. The upgrade process may take up to 15 minutes to complete. If you continue to experience an upgrade problem, contact Tektronix customer support or your local Tektronix representative for assistance. - Page 208 Software upgrades WFM2300 and WFM2200A Waveform Monitors User Manual...
-
Page 209: Monitoring The Sdi Physical Layer (Wfm2300 Only)
Automatic measurements of eye amplitude, rise time, fall time, overshoot, and rise-fall difference are also displayed. The Jitter and Cable Loss thermometers graphically relate those measurements to their alarm limits. WFM2300 and WFM2200A Waveform Monitors User Manual... -
Page 210: Configuring Physical Layer Settings
6. Select Source Level Min and use the General knob to increase or decrease the setting. NOTE. The maximum value you can select is 1000 mV; the minimum value is 600 mV. WFM2300 and WFM2200A Waveform Monitors User Manual... -
Page 211: To Set Smpte 259-292-425 Alarm Thresholds
The fall time range for SD is 410 ps to 3000 ps. The fall time range for HD and 3G is 10 ps to 1000 ps. 15. Select Eye Falltime Min. Use the General knob to increase or decrease the setting. WFM2300 and WFM2200A Waveform Monitors User Manual... -
Page 212: To Configure Physical Layer Alarms
Similarly, the automatic rise time and fall time measurements use histograms to find the centers of the distributions of 20% and 80% crossings. The difference between manual and automatic measurements is usually insignificant for clean, symmetrical signals. WFM2300 and WFM2200A Waveform Monitors User Manual... -
Page 213: Eye Measurement Set Up
(See the following image.) 5. Note the amplitude of the eye waveform that is displayed in the Voltage Cursor readout. (See the following image.) Figure 55: Eye measurement cursor placement WFM2300 and WFM2200A Waveform Monitors User Manual... -
Page 214: To Manually Measure Aberrations
Figure 56: Using cursors to measure aberrations in the eye pattern NOTE. Aberrations at the top or bottom line of the waveform should not exceed 10% of the signal amplitude. Automatic equalizer circuits in receivers may be sensitive to larger aberrations. WFM2300 and WFM2200A Waveform Monitors User Manual... -
Page 215: To Manually Measure Rise Time Using Variable Gain
(See the following image.) 7. Note the 20 – 80% rise time measurement displayed in the Delta time readout. (See the following image.) Figure 57: Measuring rise time using variable gain in the Eye display WFM2300 and WFM2200A Waveform Monitors User Manual... -
Page 216: To Make Automatic Eye Measurements
(these components appear as stationary or near-stationary artifacts in line or field sweeps). WFM2300 and WFM2200A Waveform Monitors User Manual... - Page 217 This jitter is from a sine wave component. Notice that there is no indication of jitter spikes. In the lower Eye display, the jitter is of a low-density haze, which suggests a less uniform jitter distribution. This is indicated by the spikes. Figure 58: Measuring jitter WFM2300 and WFM2200A Waveform Monitors User Manual...
-
Page 218: To Manually Measure Jitter
■ 3 Gb/s Signals (per SMPTE 424M) ■ Timing jitter (10 Hz filter): 673 ps (2.0 unit intervals). ■ Alignment jitter (100 kHz filter): 101 ps (0.3 unit intervals). (See the following image.) WFM2300 and WFM2200A Waveform Monitors User Manual... -
Page 219: Taking Cable Loss Measurements
4. Use the arrow keys and the SEL button to select the SDI Status display. 5. Use the Cable Loss thermometer and readouts to monitor the cable loss. measurement set up on page 191 WFM2300 and WFM2200A Waveform Monitors User Manual... - Page 220 Monitoring the SDI physical layer (WFM2300 only) Figure 60: Cable loss information in the SDI Status display WFM2300 and WFM2200A Waveform Monitors User Manual...
-
Page 221: Checking Chroma-Luma Delay
Alignment to a mark toward white means the color-difference signal ■ leads the luma signal. The upper half of the display measures the Pb to Y timing; the bottom ■ half measures the Pr to Y timing. WFM2300 and WFM2200A Waveform Monitors User Manual... - Page 222 Tic mark SD Timing error (ns) HD Timing error (ns) 1080p 50, 59.94, 60, 3Gbps (3 Gb/s and dual link formats) Timing error (ns) 0 marks 13.5 6.75 13.5 Luma sample Chroma sample WFM2300 and WFM2200A Waveform Monitors User Manual...
-
Page 223: Checking Gamut
This limit depends on the application. For example, a video tape machine may be able to record and play out signals with higher luma and chroma components than a transmitter. WFM2300 and WFM2200A Waveform Monitors User Manual... -
Page 224: To Set Up Gamut Checks
The direction of an excursion out of gamut indicates which signal is excessive. Errors in green amplitude affect both diamonds equally, while blue amplitude errors affect only the top diamond and red errors affect only the bottom diamond. (See following image.) WFM2300 and WFM2200A Waveform Monitors User Manual... - Page 225 G > 700 mV B - Ok ■ Example B: R - Ok G - Ok B > 700 mV ■ Example C: R - Ok G - Ok, 350 mV B < 0 mV WFM2300 and WFM2200A Waveform Monitors User Manual...
-
Page 226: Usage Notes
Use the Diamond Area or Arrowhead Area settings (found in the Gamut Thresholds submenu of the Configuration menu) to specify a percentage of the image pixels to ignore for gamut violations. The Gamut bright-ups, however, will continue to indicate all Gamut violations. WFM2300 and WFM2200A Waveform Monitors User Manual... -
Page 227: Checking Composite Gamut
The bottom horizontal line shows the minimum allowed luminance level. 0 or 7.5 IRE for NTSC and 0 mV for PAL. Usage notes For a procedure to automate this check, see Automating gamut checks page 206. WFM2300 and WFM2200A Waveform Monitors User Manual... -
Page 228: Checking Luma Gamut
5. When you have configured the Alarms as you want them, move to the Select here box and select it. 6. Back in the Alarms menu, check that Enable Alarms is set to On before exiting the Alarms menu. WFM2300 and WFM2200A Waveform Monitors User Manual... -
Page 229: Arib Content Displays
ARIB STD-B.37 Closed Captioning - Analog signal 0x5F 0xDD - SD signal 0x5F 0xDE - HD signal 0x5F 0xDF ARIB STD-B.39 Inter Stationary Control Data - ARIB specification 0x5F 0xFE - ITU specification 0x43 0x01 WFM2300 and WFM2200A Waveform Monitors User Manual... -
Page 230: To Enable The Arib Content Displays
ARIB STD-B.37 (closed caption data). ■ ARIB STD-B.35 (trigger signal data). ■ ARIB TR-B.23 (1) (guidelines for inter-stationary control data transport, group 1). ■ ARIB TR-B.23 (2) (guidelines for inter-stationary control data transport, group 2). WFM2300 and WFM2200A Waveform Monitors User Manual... -
Page 231: Arib Std-B 39 Display
Type - Type of the ANC Data packet. For ARIB B.39, this is always a Type 2 packet (DID less than 0x80), as defined by SMPTE 291M. The actual value (with parity bits added) is displayed in parentheses. WFM2300 and WFM2200A Waveform Monitors User Manual... - Page 232 Q32..Q25, 32 bits that can be used to indicate changes in the program; usage is user-defined. ■ Trigger Bits (Q24..Q17 Q32..Q25) - Together with trigger bits Q8..Q1 Q16..Q9; 32 bits that can be used to indicate changes in the program; usage is user-defined. WFM2300 and WFM2200A Waveform Monitors User Manual...
-
Page 233: Arib Std-B 37 Display And Status Screens
ARIB STD-B.37. When this display is selected, the instrument searches the signal for ARIB STD-B.37 packets using the DID/SDID combinations defined by ARIB. Figure 67: ARIB STD-B.37 display (with the associated ARIB Status display) WFM2300 and WFM2200A Waveform Monitors User Manual... - Page 234 CC Data ID - Indicates the CC Data ID of the packet. Can be one of the following: ■ Exchange Format CC ■ Exchange Format PMI ■ Exchange Format Page 1 ■ Exchange Format Page 2 ■ Short Form Management Data WFM2300 and WFM2200A Waveform Monitors User Manual...
-
Page 235: Arib Std-B 35 Display And Status Screens
ARIB STD-B.35. When this display is selected, the instrument searches the signal for ARIB STD-B.35 packets using the DID/SDID combinations defined by ARIB. Figure 68: ARIB STD-B.35 display (with the associated ARIB Status display) WFM2300 and WFM2200A Waveform Monitors User Manual... - Page 236 ■ Format - Indicates the name of the ancillary data type or standard. ■ User Data Words - Contains the payload of the ancillary packet, displayed in hexadecimal. Displays all 10 bits. WFM2300 and WFM2200A Waveform Monitors User Manual...
-
Page 237: Arib Tr-B 23 (1) Display And Status Screens
■ DC - Data Count word of the acquired packet. The number of User Data words is displayed in decimal. The actual value (with parity bits added) is displayed in parenthesis, in hexadecimal. WFM2300 and WFM2200A Waveform Monitors User Manual... -
Page 238: Arib Tr-B 23 (2) Display And Status Screens
The ARIB TR-B.23 (2) display shows the decoded data for video signals using ancillary data compliant with ARIB TR-B.23 (2). When this display is selected, the instrument searches the signal for ARIB TR-B.23 (2) packets using the DID/ SDID combinations defined by ARIB. WFM2300 and WFM2200A Waveform Monitors User Manual... - Page 239 Field - The field of the video from which the packet was acquired. Displays 1 for progressive formats. ■ Line - The line of the video (within the field) from which the packet was acquired. WFM2300 and WFM2200A Waveform Monitors User Manual...
-
Page 240: Arib Tr-B 22 Display And Status Screens
ARIB TR-B.22. When this display is selected, the instrument searches the signal for ARIB TR-B.22 packets using the DID/SDID combinations defined by ARIB. Figure 71: ARIB TR-B.22 display (with the associated ARIB Status display) WFM2300 and WFM2200A Waveform Monitors User Manual... - Page 241 ■ Format - Indicates the name of the ancillary data type or standard. ■ User Data Words - Contains the payload of the ancillary packet, displayed in hexadecimal. Displays all 10 bits. WFM2300 and WFM2200A Waveform Monitors User Manual...
- Page 242 ARIB content displays WFM2300 and WFM2200A Waveform Monitors User Manual...
-
Page 243: Audio Monitoring
Select which inputs are allowed to generate alarms. d. Select the Return box to return to the Configuration menu. 7. Repeat these steps for any other Audio inputs that you want to configure. WFM2300 and WFM2200A Waveform Monitors User Manual... -
Page 244: To Display An Audio Input
Green – Indicates audio levels below the test level. ■ Yellow – Indicates audio levels between the test and peak program level. ■ Red – Indicates audio levels above the peak program level. WFM2300 and WFM2200A Waveform Monitors User Manual... -
Page 245: To Check Audio Phase
For uncorrelated signals, the indicator is yellow and tends to stay in the middle. ■ For anticorrelated signals (one goes up when the other goes down), the indicator is red and moves to the left side. WFM2300 and WFM2200A Waveform Monitors User Manual... -
Page 246: Usage Notes
The following response times of the correlation meters can be set from the Configuration menu. Speed setting Response averaging Speed setting Response averaging time (s) time (s) 0.0167 0.0333 0.0667 0.1333 0.2667 0.5333 8 (default) WFM2300 and WFM2200A Waveform Monitors User Manual... -
Page 247: To Monitor Embedded 16-Channel Audio
16-channel audio 2. Select Audio Input and then select the Emb. 16-Ch option. 3. Press the AUDIO button to close the pop-up menu. The following figure shows the 16-channel audio bars display. WFM2300 and WFM2200A Waveform Monitors User Manual... -
Page 248: To Quickly Select Channels 1-8 Or 9-16 Of The Embedded Audio
NOTE. When the audio input source is set to Emb. 16-Ch, Emb. 1-8, or Emb. 9-16, you can then use the left/right arrow keys to quickly toggle through these three audio input sources. WFM2300 and WFM2200A Waveform Monitors User Manual... -
Page 249: To Check Surround Sound
Check the surround sound display for performance parameters and indicators. Figure 75: Surround sound indicators NOTE. The Audio Surround Sound display is courtesy of Radio-Technische Werkstätten GmbH & Co. KG (RTW) of Cologne, Germany. WFM2300 and WFM2200A Waveform Monitors User Manual... -
Page 250: Elements Of The Surround Sound Display
The bar to the right of the white tic mark behaves similarly, depending on the C-R correlation. This PSI indicator uses the same color coding as the other PSI indicators. WFM2300 and WFM2200A Waveform Monitors User Manual... -
Page 251: Usage Notes
4. Surround sound program with strong center channel presence. 5. Surround sound program with weak center channel presence. 6. Monaural signal in channels Ls and Rs, creating a phantom source in the center, as in a 3.1 surround sound system. WFM2300 and WFM2200A Waveform Monitors User Manual... - Page 252 Audio monitoring WFM2300 and WFM2200A Waveform Monitors User Manual...
-
Page 253: Closed Captioning (Cc) Teletext Afd And Safe Area Compliance
5. Select VBI Timing and select Normal, Early, or Late. 6. If required services is set to Yes, select Req Services and press the SEL button. This will show a dialog box that allows you to select CC and Text required channels. WFM2300 and WFM2200A Waveform Monitors User Manual... -
Page 254: To View Cc Status And Subtitles
2. Press and hold the STATUS button to display the Status pop-up menu. 3. Select Display Type. 4. Select Aux Data Status. The Auxiliary Data Status display shows the status of the closed caption data. WFM2300 and WFM2200A Waveform Monitors User Manual... -
Page 255: To Display Cc
The Picture display includes Closed Captioning in the area designated by the Closed Caption data. 5. Press the PICT button again to dismiss the Picture pop-up menu. Figure 77: Closed caption display area WFM2300 and WFM2200A Waveform Monitors User Manual... -
Page 256: Usage Notes
NOTE. The custom parameters you set are used when or is chosen for any of the four Safe Area Graticules accessed in the Picture menu. WFM2300 and WFM2200A Waveform Monitors User Manual... -
Page 257: To Display Safe Area Graticules
Configuration menu. ■ Custom selections for vertical and horizontal size and offset of the Save Areas can be set in the Configuration menu. Figure 78: Safe Action and Safe Title areas WFM2300 and WFM2200A Waveform Monitors User Manual... -
Page 258: Monitoring For Afd Compliance
2. Select AFD Graticules and then select On. View the graticules in the Picture display. AFD information can viewed in the Auxiliary Data Status display. See Auxiliary Data Status display page 118. WFM2300 and WFM2200A Waveform Monitors User Manual... -
Page 259: Remote Web Interface
From this page, you can save screen captures, download presets, view the event and diagnostic logs, and even browse the online help. You can also download a Java applet or the SNMP MIB. Figure 79: Remote Web interface WFM2300 and WFM2200A Waveform Monitors User Manual... -
Page 260: Java Applet
A Java application (referred to as “remote application”) can be downloaded from the Tektronix Web site and loaded onto a PC. The remote application is very similar to the remote applet, but it has greater capability for storing presets, since it has access to storage on the host machine. -
Page 261: Network Access
SNMP control is primarily intended for access by means of automation systems. The complete SNMP MIB can be downloaded from the instrument Web page. You can also download a printable version of the MIB from the Tektronix Web site: www.tektronix.com/manuals. -
Page 262: General Information
SNMP command stream. In extreme cases, you may fill up the allowed memory on the PC running the Web applet or application and have to stop and restart the Web program to recover. WFM2300 and WFM2200A Waveform Monitors User Manual... -
Page 263: Application Examples
8. Press the MAG button to increase the timing resolution. 9. Activate another waveform display in a second tile. 10. Press and hold the SWEEP button and select FIELD to put the display in field mode. WFM2300 and WFM2200A Waveform Monitors User Manual... -
Page 264: Timing A Studio: Using The Timing Display Method
Mag active to show the location of significantly mistimed signals. Timing a Studio: Using the timing display method The Tektronix Timing Display provides a quick, easy way to measure the timing of an input relative to the external reference: ■... -
Page 265: To Use The Timing Display To Time A Signal To A Reference
This is because the color frame detection circuit can be temporarily disrupted as the signal shifts. The jump is often a multiple of the field time. The circle will settle back to the correct location in a second or so. WFM2300 and WFM2200A Waveform Monitors User Manual... -
Page 266: Timing A Studio: Timing Multiple Inputs To A Router
5. Now select other inputs to the router to be connected to the instrument. For each input, the relative timing will be displayed. 6. Adjust the timing offset at the master sync source to time down the inputs to the router to match the master. WFM2300 and WFM2200A Waveform Monitors User Manual... -
Page 267: Usage Notes
This problem also occurs using traditional timing methods unless you use something similar to the SMPTE318 10 field flag to identify a specific sub-multiple of the reference. WFM2300 and WFM2200A Waveform Monitors User Manual... -
Page 268: Troubleshooting Cable Problems
Format selection to one of the 720p, 1080i, or 1080p formats. 10. Press the STATUS button to return to the Video Session display. 11. Press the SEL button to reset the Video Session display. WFM2300 and WFM2200A Waveform Monitors User Manual... - Page 269 Secs value(s) are increasing each second, then you are approaching the digital cliff where errors will occur. 13. Repeat steps 1 through 12 to test SD and HD signals through each input link to your video system. WFM2300 and WFM2200A Waveform Monitors User Manual...
- Page 270 Application examples WFM2300 and WFM2200A Waveform Monitors User Manual...
- Page 271 53 installation, 10 ASI input, 41 Black events, 134 ASI stream types, 57 Bowtie Audio center waveform, 82 Above-bar warnings, 60 Bowtie display, 81 AUDIO button, 48, 59 checking surround sound, 227 WFM2300 and WFM2200A Waveform Monitors User Manual...
- Page 272 Audio pop-up menu, 63 Genlock how to display, 227 external reference signal, 42, 45 Dual Link signals, 42 SDI video output, 44 Status Bar icon, 38 EAV and SAV finding in the active video stream, 85 WFM2300 and WFM2200A Waveform Monitors User Manual...
- Page 273 Network software upgrade, 182 checking installed, 4 IP settings, 20 Online help Jitter measurements, 194 how to use, 31 Operation basic, 47 Lightning control levels (types), 27 display, 98 verification, 24 Vector pop-up menu, 100, 142 WFM2300 and WFM2200A Waveform Monitors User Manual...
- Page 274 Presets Service exporting, 164 options, 6 factory, 163 importing, 165 connecting a signal, 46 recalling, 163 SFP Status saving, 162 elements of the display, 127 SFP Status display using the USB for, 165 WFM2300 and WFM2200A Waveform Monitors User Manual...
- Page 275 MEAS button, 136 YPbPr, 150 Troubleshooting YRGB, 150 cable problems, 246 Web interface, 237 Upgrading software, 179 Audio pop-up menu, 63 save display to, 29 phase style, 224 USB device software upgrade, 181 WFM2300 and WFM2200A Waveform Monitors User Manual...
- Page 276 Index Waveform pop-up menu, 150 YRGB Waveform pop-up menu, 150 YPbPr WFM2300 and WFM2200A Waveform Monitors User Manual...
Need help?
Do you have a question about the WFM2200A and is the answer not in the manual?
Questions and answers