Table of Contents
Advertisement
Advertisement
Table of Contents

Related Manuals for Taurus T9.9


Summary of Contents for Taurus T9.9
- Page 1 Assembly and operating instructions Treadmill T9.9 Art. No. TF-T99-2...
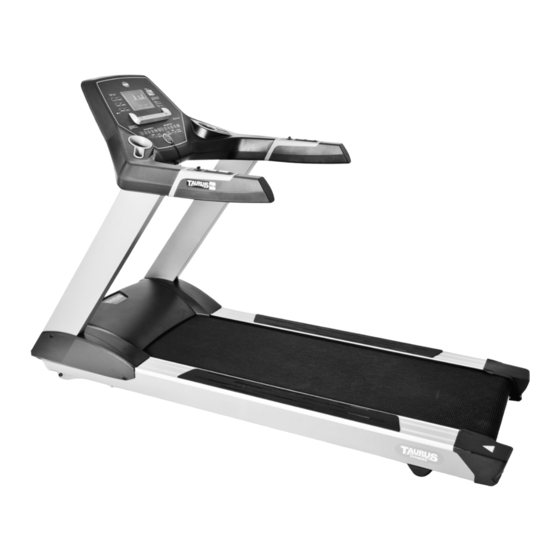
- Page 2 T9.9...
- Page 3 Dear Customer, Thank you for deciding for a high-quality training equipment of the brand Taurus, the brand that makes athlete‘s hearts beat faster. Taurus offers a wide range of home fitness equipment like elliptical cross trainers, ergometers, treadmills and rowing machines.
-
Page 4: Table Of Contents
4.4.3 Random program 4.4.4 Heart rate controlled programs 4.4.5 User-defined programs 4.4.6 Body fat mode 4.4.7 APP (iOS & Android) installation manual WORKOUT INSTRUCTIONS 5.1 Heart rate measuring 5.2 10 tips for effective running training 5.3 Designing a workout T9.9... - Page 5 5.4 Stretching exercises for leg & chest muscles 5.5 Workout journal WARRANTY INFORMATION DISPOSAL ORDERING ACCESSORIES ORDERING SPARE PARTS 9.1 Service hotline 9.2 Serial number and model name 9.3 Parts list 9.4 Exploded drawing...
-
Page 6: General Information
Article weight (net, without packaging): 131 kg Packaging dimensions (L x W x H): approximately 2260 mm x 1000 mm x 420 mm Setup dimensions (L x W x H): approximately 2075 mm x 920 mm x 1375 mm Maximum user weight: 180 kg/396 lbs T9.9... -
Page 7: Personal Safety
Personal safety Before you start using the equipment, you should consult your physician that this type of exercise is suitable for you from a health perspective. Particularly affected are persons who: have a hereditary disposition to high blood pressure or heart disease, are over the age of 45, smoke, have high cholesterol values, are overweight and/or have not exercised regularly in the past year. -
Page 8: Electrical Safety
Do not use the equipment in the meantime. Do not keep electrical devices (e. g., mobile phones) in close proximity to the console or the control electronics, otherwise display values (e. g., pulse measuring) could be inaccurate. T9.9... -
Page 9: Set-Up Place
Set-up place The equipment should only be used indoors, in a sufficiently heated and dry area (ambient temperature between 10°C and 35°C). The equipment should not be used outdoors or in rooms with high humidity (over 70%) like swimming pools. The equipment should only be stored in surroundings with an ambient temperature between 5°C and 45°C. -
Page 10: Assembly Instructions, Maintenance And Care
Please contact your contract partner in such a case. The equipment should no longer be used until it has been repaired. When needed, only use original Taurus spare parts. Check the tightness of all screw connections once a month. -
Page 11: Errors And Error Diagnosis
The equipment may be cleaned of dust, dirt and sweat using a damp cloth. The use of solvents should be strictly avoided. Also, make sure that no liquids (e. g. sweat) get into the openings of the equipment (e. g. console). Errors and error diagnosis The equipment runs through regular quality controls during production. -
Page 12: Error Codes And Troubleshooting
5km/h. Nobody may be on the equipment during this process. If the running belt is offset to the left, turn the left setting screw on the rear end of the equipment at most 1/4 rotation clockwise and the right setting screw at most 1/4 rotation counterclockwise (fig. C). T9.9... - Page 13 If the running belt is offset to the right, turn the right setting screw on the rear end of the equipment at most 1/4 rotation clockwise and the left setting screw at most 1/4 rotation counterclockwise (fig. D). Then watch how the belt runs for approximately 30 seconds, because the change will not be visible immediately.
-
Page 14: Maintenance And Service Calendar
(no solvent!) in order to avoid damage caused by sweat. After 150 hours of operation, the maintenance symbol reminds you to clean the treadmill. After you have cleaned the treadmill and checked all components, turn off the symbol by simultaneously pressing the INCLINE up and INCLINE down buttons. T9.9... -
Page 15: Assembly
The following routine work must be done in the specified time intervals: Part Weekly Monthly 2x annually Annually Display console Belt tension Belt lubrication Plastic covers Screws & cable connections Legends: C = cleaning; I = inspect ASSEMBLY Package contents The package contains the parts represented in the illustration, including a power cable with mains plug. -
Page 16: Assembly Instructions
(C) and right (D) handrails with the cables from the console (A). The logo sticker must show outwards. After you have assembled the handrails on the console, mount the parts with four screws (c). T9.9... - Page 17 Step 2: Assembly of the upright side frame Guide the control cable that comes out of the base frame through the left side frame (C) from the bottom to the top. In order to make this step easier for you, a wire was already led through the side frame (C), which is mounted on the upper and lower end of the...
-
Page 18: Operating Instructions
OPERATING INSTRUCTIONS Console display T9.9... - Page 19 Time Beats per minute and age Heart rate zones Training profile Calories Note on calorie measuring: The calculation of calorie consumption is based on a general formula. It is not possible to exactly determine an individual calorie consumption, because diverse personal data is required for this. In order to allow for an approximation of your actual energy consumption, you can enter your body weight for this model.
-
Page 20: Button Functions
- Press this button in the pause mode for four seconds in order to stop the training and to get to the standby mode. - Press this button in the menu mode in order to return to the main menu. T9.9... - Page 21 - Press this button and adjust the incline of the treadmill INCLINE up/ down in increments of 1. If you hold the button, the value will change quicker. - With this button, you can confirm your settings and ENTER get to the next step. - Press this button during the start/ready status in order MODE to enter programs.
-
Page 22: Heart Rate Training
The normal heart rate is between 40 and 220 heartbeats per minute (BPM). If you can choose between the hand pulse sensors and the chest strap, please prefer to use the chest strap. Basis Basis Basis T9.9... -
Page 23: Turning On The Equipment
Charging through USB This equipment can be used for a Bluetooth connection. The user can communicate with the treadmill through the special APP. This opening is used to charge batteries from IOS or Android sets. The outgoing current is 1 A. Turning on the equipment (1) The default weight value is 70 kg (150 lbs). - Page 24 Rest mode: If the equipment is not used for a longer period of time, the computer will go into rest mode. The system goes into standby mode and turns off the screen lighting in order to save electricity. If you press a button in the rest mode, the screen will lighten up again. T9.9...
-
Page 25: Programs
Quick start mode - beginning of training (1) Press ENTER in standby mode in order to confirm the weight. Press QUICK START in order to start the training directly. “READY GO” appears on the display and after three seconds, the program starts at a speed of 0.8 km/h (0.5 mph), the incline is zero, the training time starts at 0:00, the maximum value is 99:59. -
Page 26: Manual Program
(2) Confirm the selected level with ENTER. Press SPEED+ or SPEED- in order to enter the time. The default value is 30:00 min:sec; the range is between 20:00 to 99:00. (3) Confirm the target time with ENTER. “Ready Go” appears on the screen and training begins after three seconds. T9.9... - Page 27 P2 (climbing) Program P3 to P6: Setting corresponds to P2 P3 (hill run) P4 (interval) P5 (rolls) P6 (weight reduction)
-
Page 28: Random Program
60%, 75% and the target heart rate (personal setting). HRC 1-3 (heart rate 1-3) Confirm the program selection HRC 1-3 with ENTER. Press SPEED+ or SPEED- in order to enter the desired heart rate: 60%, 75%, target heart rate. T9.9... - Page 29 Note: In the HRC mode, only a wireless pulse signal can be received. Wear a wireless chest strap. If the system does not receive a pulse signal for longer than 45 seconds, the system will stop automatically and displays “NO PULSE”. Hold STOP for four minutes and the system will return to the standby mode.
- Page 30 The normal heart rate is between 40 and 220 heartbeats per minute (BPM). If you can choose between the hand pulse sensors and the chest strap, please prefer to use the chest strap. Heart rate training zones T9.9...
-
Page 31: User-Defined Programs
Determination of the maximum heart rate: Max. heart rate = (220 - age). Low: 0~64% Fat burning: 65%~74% Aerobic: 75%~84% High: Instructions: If the user is 30 years old, the maximum heart rate is 190 in the heart rate training mode. If the user’s heart rate is at 120, this corresponds to 120/190 = 63% and LOW is displayed. -
Page 32: Body Fat Mode
20.0 - 25.0 - 30.0 - above (male) 14.9 19.9 24.9 29.9 34.9 35.0 0.0 - 15.0 - 20.0 - 25.0 - 30.0 - 35.0 - 40.0 - above (female) 14.9 19.9 24.9 29.9 34.9 39.9 44.9 45.0 BODY FAT T9.9... -
Page 33: App (Ios & Android) Installation Manual
4.4.7 APP (iOS & Android) installation manual For iOS devices (iPad) APP Software Download Connect the iPad with the APP (iTunes) store and search for PAFERS. Read through the APP manual and download the APP, which has a treadmill function, e. g., “Tread Monitor”... - Page 34 “not connected” to “connected”. This means that the computer is successfully connected with the iPad. Step 6: Press HOME on the iPad and the screen will go to the iPad desktop. Then open the treadmill APP that you downloaded from the iTunes Store. T9.9...
- Page 35 Step 7: Once you have gotten to the APP page, the treadmill will find the APP. As soon as the APP has successfully connected to the treadmill, the APP sign will appear on the screen. Then you can use any mode in the APP interface in order to control the treadmill.
- Page 36 Bluetooth devices in its range. Search for the Bluetooth device name from the treadmill and click on it to connect - As soon as the Bluetooth devices are detected, but you do not know the corresponding name, please contact your contract partner. T9.9...
- Page 37 Step 5: Please wait a few seconds until the status has changed to “connected”. Then check if the Bluetooth sign appears in the upper right corner of the tablet (white sign stands for successful Bluetooth connection; gray sign stands for the Bluetooth is open, but not connected).
- Page 38 If the iOS devices APP no longer works, execute the following steps in order to establish the connection again: Step 1: Press HOME on the iPad quickly one after the other twice and delete all APPs in the temporary storage (also the PAFERS APP). T9.9...
- Page 39 Step 2: Enter the iPad setting program. Press the arrow to the right right from the Bluetooth device name and select “Yes” in order to delete this Bluetooth device. Step 3: Close the Bluetooth function and turn off the treadmill. Step 4: Turn on the treadmill again after 10 seconds.
- Page 40 If an update is required, it will be specified on the PAFERS website. Update iOS to 7.0 version or higher, Android to 4.0 or higher - this allows the user to have the best possible results. T9.9...
-
Page 41: Workout Instructions
WORKOUT INSTRUCTIONS Heart rate measuring Pulse measuring through hand sensors The hand sensors integrated in the handles allow you to determine your heart rate. You can measure your heart rate by lightly grasping the sensors with both hands at the same time. - Page 42 In order to achieve this training goal, a high intensity (approximately 90% of the maximum heart rate) with short, intense load is required, which is followed by a recovery phase in order to prevent muscle fatigue. T9.9...
- Page 43 Example: For a 45-year-old man or woman, the maximum heart rate is 175 (220 - 45 = 175). • The fat burning target zone (55%) is at approximately 96 beats/min. = (220 - age) x 0.55. • The cardio target zone (75%) is at approximately 131 beats/min. = (220 - age) x 0.75.
-
Page 44: 10 Tips For Effective Running Training
8. Creating the right workout Every training session should have a warm-up phase, a cool-down phase and a targeted stretching. It increases physical and mental performance and prevents injuries and sore muscles. T9.9... -
Page 45: Designing A Workout
9. Workout journal Keep a record of your training sessions. Note the date, resting pulse, active pulse, recovery pulse, resistance level, time, distance, calories burnt and fitness level. 10. Reward yourself Do something good for you and your body after training or after achieving a partial goal. - Page 46 If you feel comfortable, then include a tes, run seven minutes. Maintain your heart few steps or hills in your training. rate. Cool-down approximately 5 min. Finish your training at low resistance and at slow speed. Allow your body to gently slow back down. T9.9...
-
Page 47: Stretching Exercises For Leg & Chest Muscles
Stretching exercises for leg & chest muscles 1. Exercise: Stretching of front thigh / leg extension (quadriceps) • Stable position, grab arches of feet • Pull heel towards buttocks, knee points downwards (no abduction) • Straight upper body, avoid tilting the pelvic forward (hollow back) by tensing the abdominal muscles •... - Page 48 All of the tips are intended only as a guide to help you create a workout. Your physician can offer appropriate advice for particular, personal requirements. We hope you enjoy your workout and have a lot of success! T9.9...
-
Page 49: Workout Journal
Workout journal Date Time (min.) Training weight Calories burnt Body weight Ø Pulse Distance Resistance level I feel ... -
Page 50: Warranty Information
WARRANTY INFORMATION Taurus training fitness equipment is subject to strict quality controls. However, if a fitness equipment purchased from us does not work perfectly, we take it very seriously and ask you to contact our customer service as indicated. We are happy to help you by phone via our service hotline. - Page 51 The terms of use are defined as follows: • Home use: solely for private use in private households up to 3 hours per day • Semi-professional use: up to 6 hours per day (e. g. rehabilitation centers, hotels, clubs, company gyms) •...
-
Page 52: Disposal
The materials can be recycled as per their symbols. Through the reuse, recycling of materials or other forms of recovery of old equipment, you make an important contri- bution to the protection of the environment. T9.9... -
Page 53: Ordering Accessories
ORDERING ACCESSORIES Sport-Tiedje floor mat size XXL Art. No. ST-FM-XXL Polar transmitter chest strap T34 uncoded Art. No. T34 Togu Senso Walking Trainer Art. No. TOGU-470501 Chest strap Sport-Tiedje contact gel silicone spray 250ml Art. No. ST-1003 Art. No. BK-250 Fitness equipment care set Art. -
Page 54: Ordering Spare Parts
9:00 am - 6:00 pm Serial number and model name Before assembling your equipment, find the serial number on the white sticker and enter it in the appropriate space. Serial number: Brand / category: Model name: Taurus treadmill T9.9 T9.9... -
Page 55: Parts List
Parts list Qty. Part number Description HTF236P-D5 console set P-3534 console upper cover SOC8 nylon nut M8xP1.25 P-3544 iPad holder SAA5-15 round head Philips screw M5xP0.8x15 SOI5 nut M5X25X13 XEK-248 Bluetooth module XRA-179-003 console board (LCD with BT module) XEM-016 safety key switch set 1XEK-247 keyboard... - Page 56 M10xP1.5 SOC10-8T nylon nut M10xP1.5x8t XM-118 DC motor SGA10-25I CKS hex screw M10xP1.5x25 SPA100-200-30 flat washer ø10xø20x3t SPB10 spring washer M10 CA-240J10 drive belt SGA8-80I CKS hex screw M8xP1.25x80 SOA8 hex nut M8xP1.25 PEC-UC-1 wire clip knob T9.9...
- Page 57 Qty. Part number Description SAA5-10GZ round head Philips screw M5xP0.8x10 BAE0500-240-3 rubber pad 50mmX24mmX3t XEH-002-001 power cord socket XEA-A002A power switch XLZ-TM power cord P-1825 power cord switch cover XRB-013-002 controller XEG-10-001 circuit breaker NT-1636 power cord collector XEM-002 sensor SCE4-10 truss head Philips screw M4xP0.7x10 P-2231...
- Page 58 14AWGx500x2R PEC-HC-25 KSS wire clip fixing base BJ-36-163B cable tie 3.6mmx163mm BE-1500 magic strap SSB8-200 T-wrench BD-001-100 silicon SSH5-70-70M L hex spanner & Philips screwdriver 5mmx70mmx70mm SEA8-115-25 hex screw M8xP1.25x115 SPA080-200-20 washer ø8ø20x2t SPB8 spring washer M8 T9.9...
- Page 59 Qty. Part number Description P-2589L motor side cover left P-2589R motor side cover right XLT035 extension wire-white 14AWGx550x2T XEN-008 choke XEB-009 filter BAC9100-920-05 double-sided tape 910mmx92mmx0.5t BAC0900-200-05 double-sided tape 90mmx20mmx0.5t P-2296B side pedal decorative strap XLT074 extension wire-yellow 14AWGx300x1T1R XLT027 extension wire-white 14AWGx260x2t XLT029 extension wire-black 14AWGx260x2t...
-
Page 60: Exploded Drawing
Exploded drawing T9.9... - Page 61 DISCLAIMER ©2011 TAURUS is a registered brand of the company Sport-Tiedje GmbH. All rights reserved. Any use of this trademark without the explicit written permission of Sport-Tiedje is prohibited. Product and instructions are subject to change. Technical data can be changed without advance notice.
- Page 62 Notes: T9.9...
- Page 64 Treadmill T9.9...
Need help?
Do you have a question about the T9.9 and is the answer not in the manual?
Questions and answers
now to change kph to mph