Avery Dennison snap 500 Operator's And Service Manual
Gen 1 and gen 2
Hide thumbs
Also See for snap 500:
- User manual (135 pages) ,
- User manual (123 pages) ,
- User manual (135 pages)
Table of Contents
Advertisement
Quick Links
Download this manual
See also:
User Manual
Operators and Service Manual
Avery Dennison
028028
SNAP
300dpi: 2/1 2/0 1/1 1/0
600dpi: 1/1 2/1
Gen 1 – 2 heads
Gen 2 – 1, 2, or 3 heads
05631398 Rev 5.2 02/17
Original Instructions
Classification: Avery Dennison - Public
TM
500 Thermal Printer, Gen 1 and Gen 2
© 2017 Avery Dennison Corp. All rights reserved
Advertisement
Table of Contents
Troubleshooting

Related Manuals for Avery Dennison snap 500


Summary of Contents for Avery Dennison snap 500
- Page 1 300dpi: 2/1 2/0 1/1 1/0 600dpi: 1/1 2/1 Gen 1 – 2 heads Gen 2 – 1, 2, or 3 heads 05631398 Rev 5.2 02/17 Original Instructions © 2017 Avery Dennison Corp. All rights reserved Classification: Avery Dennison - Public...
-
Page 2: Threading Diagrams - Gen
2) this device must accept any interference that may cause undesired operations. This Class A digital apparatus meets all requirements of the Canadian Interference Causing Equipment Regulations. Cet appareil numerique de la classe A respecte toutes les exigences du Reglement sur le material broilleur du Canada Classification: Avery Dennison - Public... - Page 3 User’s Manual—SNAP™ 500 Gen 1 and Gen 2 Classification: Avery Dennison - Public...
-
Page 4: Table Of Contents
Installing Ink to the Bottom Ink Supply Station 4.1.3 Loading the Stock 4.1.4 Butt Splice Threading Diagrams – Gen 1 4.1.5 Threading Diagrams – Gen 2 4.1.6 Sending a Print Job to the Printer Printing Labels Classification: Avery Dennison - Public... - Page 5 Troubleshooting the Network Connection 6.0 MAINTENANCE Print Head Cleaning and Handling 6.1.1 Handling Techniques 6.1.2 Cleaning Procedures Print Head Replacement Lubrication Rotary Knife Assembly 6.4.1 Removing and Replacing the Knife Assembly 6.4.2 Adjust the Knife Home Position Classification: Avery Dennison - Public...
- Page 6 Minimum Cut Length 10.6 Stacker 11.0 APPENDICES 11.1 Ink and Tape Transfer Types 11.2 Tape/Ink Transfer Types to Use When Not Found in PCMate 11.3 Printer Specifications 11.4 Mini Web Guide Adapter 11.5 Programming Contrast Sensors Classification: Avery Dennison - Public...
- Page 7 Turn Bar / Stacker Mount Assembly – Gen 2 13.23 600DPI Machine Parts List – Gen 1 13.24 600DPI Machine Parts – Gen 2 13.25 Upright Frame Assembly – Gen 1 13.26 13.27 Stacker 13.28 Label Stop 14.0 REVISION RECORD Classification: Avery Dennison - Public...
-
Page 9: Introduction
SNAP 500 printer. The SNAP 500 printer line consists of 2 generation of printers: SNAP 500 Gen 1 is a 2-headed machine for printing on both sides of the label. SNAP 500 Gen 2 is a 1-, 2-, or 3-headed machine. It always has locations for 3 heads even if there the printer does not have all 3 heads. -
Page 10: Safety Instructions
Do not remove, deface, or defeat any safety guards or warning labels. Do not operate the printer with any parts missing or broken. For information about supply compatibility or environmental information, contact your local Avery Dennison Customer Service. Classification: Avery Dennison - Public... - Page 11 Obey all warning labels and safety instructions during operation. CAUTION: The SNAP 500 printer has some pinch points which have safeguards design in. AVERY DENNISION strongly recommends that you do not modify or bypass these safeguards.
-
Page 12: Installation
3.1.2 Location Considerations The SNAP 500 printer weighs 55 pounds (25 kg) and requires a table of sufficient quality and strength to handle this load. The printer requires an area of approximately 72" wide x 30" deep x 32" high (1.8 m x 76 cm x 81 cm). The host PC (if used) and any printer options will increase the required area. -
Page 13: Pc Requirements
AVERY DENNISON Command Language, or PCL. PCMate Platinum tag and label printing software supports the new virtual control panel feature when using the SNAP 500 printer. PCMate features higher communication speeds of the SNAP 500. Finally, it can deliver firmware upgrades from the Internet. -
Page 14: User Safety
Keep hair, loose garments, jewelry and fingers away 3.2 Receiving The SNAP 500 printer shipping carton weighs 75 pounds (34 Kg). The carton is large and specially made to protect the printer. It may be awkward or difficult to move by hand to its installation location. - Page 15 CAUTION: Do not discard any of the packing / shipping material in case you have to move the printer to another location or return it to AVERY DENNISON for service. 5. The printer has been wrapped with plastic to protect the printer from the packing material and moisture.
-
Page 16: Inspection And Inventory Checklist
User’s Manual—SNAP™ 500 Gen 1 and Gen 2 Figure 2B: Possible Lift Locations 3.3.2 Inspection and Inventory Checklist 1. Inspect the printer for any damage that may have occurred from shipping. 2. Check the SNAP 500 printer shipping carton for: Serial Cable ... -
Page 17: Disassembly And Disposal
User’s Manual—SNAP™ 500 Gen 1 and Gen 2 2. Find the section marked “Documentation & Printer Status Codes,” select “Snap 500” from the Select Apparel Model drop-down box, and look in the appropriate section on the page for the following. -
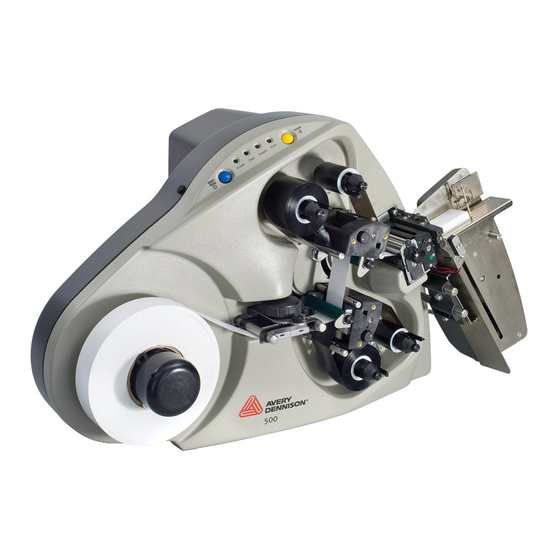
Page 18: Printer Description
User’s Manual—SNAP™ 500 Gen 1 and Gen 2 3.4 Printer Description 3.4.1 Component Descriptions Shown below are the important parts of the SNAP 500 Printer. Please take a moment to familiarize yourself with the printer. Upper Right Print Station Control Panel... -
Page 19: Printer Configurations
0, 1 over 1, and the 1 over 0. Each of these configurations is described below. 2 over 1 – The Snap 500 2 over 1 features two print heads over 1 lower print head, capable of printing a two sided label. Two colors on top and one color on the bottom. - Page 20 Print head retainers (mounted to print heads) and print head brackets are also different between the two generations. They are not interchangeable. See differences in pictures below. Figure 3A: Print Heads and Retainers GEN 1 GEN2 Figure 3B: Print Head Brackets GEN 1 GEN2 Classification: Avery Dennison - Public...
-
Page 21: Printer Setup
NOTE: There is a sleeve on the connector that will snap when the connector is fully engaged with the mating connector. The two cables will slide into each other only when the connectors are properly aligned with each other. Classification: Avery Dennison - Public... -
Page 22: Attaching The Unwind Assembly
100-240VAC @ 50-60Hz, single phase. There are no main fuses on the SNAP 500 printer. The line cord is the printer’s mains disconnect device. 1. Look at the line voltage level shown on the back of the printer (see Figure 5). -
Page 23: Installing The Power Cord
AVERY DENNISON supplier. In the U.S.A., call (937) 865-2123. Outside the U.S.A., please contact your local AVERY DENNISON supplier. WARNING: Some older printers require internal changes when switching the line (mains) voltage from 115V to 230V. Refer to Appendix 1 for instructions. Failure to follow the instructions may result in damage to the printer. -
Page 24: Communications Cable Installation
Use either the USB option card if higher download speeds are required for the extra expense of the option, or USB to Serial adapter, if the USB connector is needed and serial download speed is acceptable. Classification: Avery Dennison - Public... -
Page 25: Networking Setup
For GbE Controller set to ENABLE. For 82573 Controller set to ENABLE Press F10, the Enter (OK) to save. Restart the printer. 3.7.2 Connecting the networking cable Older motherboards: Network Interface Card Motherboard: Do not use. Classification: Avery Dennison - Public... -
Page 26: Setting The Printer Ip Address
Enter the static IP address as described in section 5.4.2. 5. If moving to another network, set the printer back into DHCP mode. See section 5.4.3 for instructions using the webserver. 6. See section 5.4.4 for troubleshooting tips on the network connection. Classification: Avery Dennison - Public... -
Page 27: Pcmate Platinum Software Installation
The software used to drive the AVERY DENNISON family of printers is covered ® in a separate manual. The PCMate Platinum software is a Windows application used to create designs for the SNAP 500 printer as well as all other AVERY DENNISON printers. 3.9 Printing a Test Label 3.9.1 Loading Supplies Before you can print a test label, the printer must be loaded with tape and ink. -
Page 28: Selecting The Test Format
Correct the problem and press the Start button again. Repeat this until the printer runs continuously. 3. If you can’t get the printer to run, refer to sections 9 and 10 for troubleshooting. Classification: Avery Dennison - Public... -
Page 29: Operation
Avery Dennison Customer Service. Your SNAP 500 printer is designed with up to three ink supply stations, as many as two upper and one lower. The ink supply station setup is dictated by the option of the printer your ordered. There is no way to change this setup at your location. - Page 30 3. Open the print roller (See Figure 8). 4. Pull the ink down and to the right, beneath the turn bar, between the upper print roller and the upper print station, toward the stacker side of the upper ink rewind arbor. Classification: Avery Dennison - Public...
- Page 31 5. Wind the core for several turns to make sure the ink tracks flat as it is pulled through the printer. 6. To remove an ink core from the arbor, depress the latch and slide the core from the arbor. Save the empty core to be used as the next rewind core. Classification: Avery Dennison - Public...
-
Page 32: Installing Ink To The Bottom Ink Supply Station
Adjust so that the guides are just touching the edges of the tape. If your SNAP 500 printer has the Mini Web Guide Adapter installed, please refer to Appendix 10.4. The Upper and Lower Print Stations on the SNAP 500 printer are stationary. - Page 33 Knife and Nip Rollers and into the Stacker (until it extends about ½ inch or 10 mm - 15 mm from the rollers). 11. If the stock will not advance through the knife, refer to Section 5.4.2, Knife Home Position Adjustment. Classification: Avery Dennison - Public...
-
Page 34: Butt Splice
CAUTION: To prevent damage to the print head, do not use butt splices. The SNAP 500 printer is designed to allow for fast, frequent changing and loading of tape and supplies. We recommend re-threading the tape rather than to using a butt splice. If you determine that splicing is faster for threading, tape the ends of the stock together. -
Page 35: Threading Diagrams - Gen
User’s Manual—SNAP™ 500 Gen 1 and Gen 2 4.1.5 Threading Diagrams – Gen 1 SNAP 500 1 over 1 (Gen 1) 4.1.6 Threading Diagrams – Gen 2 Snap 500 2 over 1 Classification: Avery Dennison - Public... - Page 36 User’s Manual—SNAP™ 500 Gen 1 and Gen 2 Snap 500 2 over 0 Snap 500 1 over 1 (Gen 2) Snap 500 1 over 0 Classification: Avery Dennison - Public...
-
Page 37: Sending A Print Job To The Printer
4.3 Printing Labels 4.3.1 Printer Control Panel The Control Panel on your SNAP 500 printer is located at the top of the machine. Figure 11 shows the control buttons and lights displayed on the printer. The buttons allow you to control the printer, and the lights indicate the status of the printer. -
Page 38: Printing
(If you are not using the stacker, or you are using some other accessory such as a rewinder or allowing the labels to fall into a box, you may need to handle the leader differently.) Classification: Avery Dennison - Public... -
Page 39: Feeding The Stock
AVERY DENNISON printer models. If the error continues to recur, contact your local AVERY DENNISON representative. 4.3.5 End of Day When the printer finishes printing all the print jobs that have been sent, it will stop with a few labels left to print. -
Page 40: Clearing Print Jobs
The SNAP 500 printer comes with a top reflective sensor standard. This sensor, mounted in the top-right-hand post of the web guide, detects a black sense mark on the top surface of a white tape. The sensor cannot be moved from the center position. -
Page 41: Option Menu System
For more information on how to use each of the possibilities in the Option Menu System, refer to sections for Running Test Labels; and Setting /Adjusting Voice Button Volume. Classification: Avery Dennison - Public... -
Page 42: Running Test Patterns
User’s Manual—SNAP™ 500 Gen 1 and Gen 2 4.5.1 Running Test Patterns Your SNAP 500 printer offers you four test patterns to run before you proceed to production. Narrow Test Pattern, consisting of a solid line down the middle on the front and back of the label and a solid line across the web that is exactly 1”... - Page 43 8. The voice message will say, “Clearing Current Batch.” The Data light will go out. The Same procedure should be followed for Custom Test Pattern 1 and Custom Test Pattern 2. Classification: Avery Dennison - Public...
-
Page 44: Setting / Adjusting Voice Button Volume
User’s Manual—SNAP™ 500 Gen 1 and Gen 2 4.5.2 Setting / Adjusting Voice Button Volume The volume level of the voice messages on your SNAP 500 printer is set at Level 3 at the factory. To adjust volume: NOTE: During the menu, the printer will begn with the ... -
Page 45: Making Adjustments
5.0 Making Adjustments 5.1 Print Head Adjustments The one, two, or three print stations on the SNAP 500 printer are stationary. The print rollers swing open for loading stock and ink and close when the machine is printing. The rollers are held in the print position with a latch on both the inside and outside end of the rollers. -
Page 46: Adjusting Density (Darkness)
CAUTION: For extended print head life, use the lowest print contrast the produces acceptable print quality. 5.2 Adjusting the Stacker The stacker on your SNAP 500 printer is adjustable in three ways: The stacker position on the mounting pins (in and out), ... -
Page 47: Stacker Position
1. When the label is 2 inches (51 mm) or longer, or when using coated tapes, the stacker works well with the bottom tipped out. 2. When using woven tapes, the stacker should be vertical or almost vertical. Label Stop Platform Adjustment Thumb Screw Shafts Classification: Avery Dennison - Public... -
Page 48: Platform Angle
There is no adjustment for the stacker sensor on Gen 2 printers. On Gen 1 there is a switch on the back of the stacker that will change stack height to either the upper or lower position. Classification: Avery Dennison - Public... -
Page 49: Static Brush
In general – a light pressure is sufficient to stack well, but long feeds will require slightly more pressure. Keep the static brush parallel to the nip roller mount bracket. Classification: Avery Dennison - Public... -
Page 50: Virtual Control Panel
PCMate Platinum allows the operator to control the printer and make adjustments directly from the PC. The Virtual Control Panel (VCP) shows at the bottom of the PCMate Platinum screen when a SNAP 500 printer is properly connected. Printer Selection Box Printer Controls and Lights... -
Page 51: Changing Printer Settings In Pcmate
Click on the “Show Settings” button on the VCP to bring up the Printer Settings Window. Figure 22a: Virtual Control Panel with Show Setting Window (Firmware 3.35 and below) Figure 22b: Virtual Control Panel (Firmware 3.36 and above) showing the adjustments available across the width of the printer. Classification: Avery Dennison - Public... -
Page 52: Print/Cut Adjust Tab
NOTE: Don’t use print and cut adjusts to “fine-tune” a format. Rather correct any print position problems in the format and use these adjustments to correct printer variation only. Otherwise, you have to adjust each format before printing. Classification: Avery Dennison - Public... -
Page 53: Selecting The Printer Language
5.3.5 Setting the Date and Time The SNAP 500 printer has a built-in clock and calendar. You may change the date and time as follows: In the Virtual Control Panel, click on the Options tab. The current printer date and time is shown. -
Page 54: Enabling Or Disabling The Cutter
5 ips (the third speed in the printer’s speed list of 3, 4, and 5 ips), the SNAP 500 printer would use 6 ips, which is the third speed in its speed list of 3, 4.5, 6, and 7 ips. -
Page 55: Selecting The Flagging Mode
Format – uses the flagging mode specified in the format Side-step – This selection is for the High Volume Stacker, which is not available for the SNAP 500 printer. Do not select this. Disabled – Disables flagging. No flagging will be done. -
Page 56: Viewing The Life Counts
User’s Manual—SNAP™ 500 Gen 1 and Gen 2 5.3.11 Viewing the Life Counts The SNAP 500 printer maintains a count of the total number of labels printed, and the total number of inches of material. Also, there is a resettable label counter. -
Page 57: Print Quality
Files – lists files stored on the printer. This can help determine in the printer has a font installed. Diagnostics – Test various printer components by running Interactive SNAP Diagonstics. You can also view the Error Log File. Classification: Avery Dennison - Public... -
Page 58: Web Server
Enter the printer’s IP address in the address bar and press Enter. The following window will appear: The values shown are the current printer settings. To change the settings, click the Configure button. The following window will appear: Classification: Avery Dennison - Public... -
Page 59: Converting The Dhcp Address To A Static Address
Enter the static IP address in the IP Address box and click the “Submit as Static address” button. At this time, the IP address is set to the static address and the web server will no longer be available. Classification: Avery Dennison - Public... -
Page 60: Resetting The Printer To Dhcp Mode
198.1.63.123” <Enter>. 10. The ping command will try to contact the printer four times. If there is a problem with the connection, the result will be “Request timed out” 11. A successful ping looks like this Classification: Avery Dennison - Public... -
Page 61: Maintenance
Service should be performed only by trained service personnel. 6.1 Print Head Cleaning and Handling NOTE: AVERY DENNISON recommends cleaning print heads as follows: 1. With alcohol and a cotton pad or cloth every 2-4 hours of continuous usage;... -
Page 62: Cleaning Procedures
CAUTION: AVERY DENNISON recommends Master Cleaning Kit #05921341K for use in cleaning print heads. 1. Before cleaning any part of your SNAP 500 printer, turn off the power. 2. Following handling techniques recommended above. 3. After 2 to 4 hours of continuous use: Apply a liberal amount of alcohol to a cotton pad and rub firmly across the print line of the print head several times to remove any build-up of ink, dust, dirt or debris. -
Page 63: Print Head Replacement
(see Fig. 17a). Depressing the two grey tabs on the top of the print station (see Fig. 17b). Reach underneath and remove the print head assembly from the print station. Classification: Avery Dennison - Public... - Page 64 Figure 17e. Print Head Assembly Figure 17f. Print Head 5. Place the new print head assembly onto the metal mount bracket underneath the print station (see Fig. 17c and 17d). Push it up until it clicks into position. Classification: Avery Dennison - Public...
-
Page 65: Lubrication
6.4 Rotary Knife Assembly The rotary knife assembly for the SNAP 500 printer sets into a groove in the mounting bracket and is locked in place with a single screw. Expect an average of 2 million cuts from woven tapes and 4 million cuts from coated tapes. Knife life decreases when foreign objects are inserted into the assembly. -
Page 66: Removing And Replacing The Knife Assembly
Pivot Screw Knife Shaft Rotation Retaining Screw Retaining Screw Figure 18b. Outboard End View of Knife Figure 18c. Removing Knife Assembly WARNING: Keep your fingers out of the knife assembly to avoid personal injury. Classification: Avery Dennison - Public... -
Page 67: Adjust The Knife Home Position
Coatings that are thicker and softer may require more frequent cleaning. Woven materials without coatings require less frequent cleaning. 6.5.1 Cleaning Procedure 1. Follow knife removal instructions in section 5.4.1. 2. Remove knife cover by removing 3 screws shown in figures 18d and 18e. Classification: Avery Dennison - Public... - Page 68 5. Clean both input and exit edges of stationary blade. 6. Clean all surfaces of rotary blade. 7. Clean knife cover and frame for any buildup. 8. Replace cover on knife then replace knife on machine following instructions in section 5.4.1. Classification: Avery Dennison - Public...
-
Page 69: Service Adjustments
(see Sect. 5.4.2, Knife Home Position Adjustment). 7.4 Knife Shear Adjustment The Knife Assembly in your SNAP 500 printer has no field replacement components, and basically requires no maintenance or adjustments. The only adjustment that can be made to the knife in the field is for shear. - Page 70 (Fig. 19d). The knife should rotate freely, and will make a metallic shearing sound during rotation. 8. Insert a strip of the material to be cut so it extends from both sides of the knife. Test by rotating the knife shaft again to cut the material. Classification: Avery Dennison - Public...
-
Page 71: Feed Assembly Adjustment
20a using a 5/32 Allen wrench until they stop on Feed Assembly frame. Note this only needs to be done until screws touch assembly, too much force will bend assembly frame. Classification: Avery Dennison - Public... - Page 72 6. Begin by backing out adjustment set screws ¼ to ½ turn at a time. 7. Retighten Phillips head screws shown in figure 20b and retry printing. 8. Continue with steps 5 through 8 until tape tracks appropriately. Classification: Avery Dennison - Public...
-
Page 73: Upgrading The Printer Firmware
8.1 Introduction The SNAP 500 printer firmware can be updated electronically using “UPG” files received from Avery Dennison. A “UPG” file is a software file with “.upg” as an extension. Files are either “zip” files, which must be extracted/unzipped, or UPG files. -
Page 74: Getting The Upg File
You may download the upgrade file as follows: 1. Go to www.monarch.averydennison.com. 2. On the left, click “SUPPORT”, then “Printer Utilities, Firmware & Drivers” one down), click “Apparel Models – SNAP 500 3. Next in the Firmware second (2 & SNAP 700”... -
Page 75: Performing The Upgrade
2. If you have a “.zip” file or the “Type” is “Compressed (zipped) Folder”, and then extract/unzip the file by right-clicking on it and selecting “Extract All…” Some version of Windows will allow you to double click on the zip file and copy the internal .upg file to another folder. Classification: Avery Dennison - Public... -
Page 76: Upgrading Through Pcmate
If you have more than one printer connected to the PC, they will all show in this window. If you leave the Upgrade Schedule box at Upgrade Now (see below), all the printers will be upgraded, one at a time. Classification: Avery Dennison - Public... - Page 77 During the first part of the upgrade process, PCMate Platinum sends the necessary files to the printer. This screen allows you to monitor the progress of the file transfer. The top progress bar shows the file being sent, while the bottom bar shows the overall progress. Classification: Avery Dennison - Public...
- Page 78 - Upgrade in progress. Please wait - Programming MCB. Please wait - Updating auxiliary files - Starting system backup of this upgrade - Distributing language sound files - Upgrade complete Then the following window will appear. Click “Close” to continue. Classification: Avery Dennison - Public...
-
Page 79: Upgrading Through Usb Flash Drive
Accessing the printer though Filezilla or another ftp client allows access to the entire printer file structure. Moving, deleting or otherwise changing any files or folders can result in erroneous operation or disabling of the printer. Use caution. Classification: Avery Dennison - Public... - Page 80 In the right panes, the root directory of the printer is shown. The upgrade file must be placed in the printer’s root directory. Classification: Avery Dennison - Public...
- Page 81 There may be a folder in the root directory of the printer called PAXA. This is a temporary folder used in processing the upgrade file. Ignore this directory and place the upgrade file in the root directory. Classification: Avery Dennison - Public...
- Page 82 If you refresh the browser window during the upgrade process, you will receive an error message that the connection has timed out or the web page is unavailable. Simply refresh again until the web page appears. Classification: Avery Dennison - Public...
-
Page 83: Electrical Troubleshooting
BIOS settings. the motherboard or reset the BIOS” during power up 2) Motherboard failure 1) Replace motherboard Printer says “Boot Error 1) Flash Disk Failure 1) Replace Flash Disk Module 3” or “Hardware error Classification: Avery Dennison - Public... - Page 84 User’s Manual—SNAP™ 500 Gen 1 and Gen 2 3. Printer requires service” or “Corrupted safe operating system. Replace the flash disk” during power up. (Message depends on software version.) 2) Motherboard Failure 1) Replace motherboard Classification: Avery Dennison - Public...
- Page 85 DENNISON PCL printer as per your PCMate manual. 6) Faulty Mother Board 1) Replace the Mother Board. IF THE RECOMMENDED CORRECTIVE ACTIONS DO NOT RESOLVE THE PROBLEM (S), CONTACT YOUR LOCAL AVERY DENNISON REPRESENTATIVE. Classification: Avery Dennison - Public...
-
Page 86: Tape / Ink Advance
1) Stock Arbor Tension too low 1) See Section 6.5 outward while printing 2) Feed Assembly Alignment Incorrect 3) Feed Assembly Damage IF THE RECOMMENDED CORRECTIVE ACTIONS DO NOT RESOLVE THE PROBLEM (S), CONTACT YOUR LOCAL AVERY DENNISON REPRESENTATIVE. Classification: Avery Dennison - Public... -
Page 87: Print
3) Tape Arbor is not tight. 1) Check and adjust as needed. Refer to section 3.1 Loading Supplies. IF THE RECOMMENDED CORRECTIVE ACTIONS DO NOT RESOLVE THE PROBLEM (S), CONTACT YOUR LOCAL AVERY DENNISON REPRESENTATIVE. Classification: Avery Dennison - Public... - Page 88 1) Set print head pressure. Refer to section pressure. 4.1.1, Adjusting Print Head Pressure. 5) Worn printer roller. 1) Contact your local AVERY DENNISON representative. IF THE RECOMMENDED CORRECTIVE ACTIONS DO NOT RESOLVE THE PROBLEM (S), CONTACT YOUR LOCAL AVERY DENNISON REPRESENTATIVE.
-
Page 89: Cut / Stack
Knife will not cut. 1) Knife blades are dull. 1) Refer to section 5.4.1, Removing and Replacing the Knife assembly. IF THE RECOMMENDED CORRECTIVE ACTIONS DO NOT RESOLVE THE PROBLEM (S), CONTACT YOUR LOCAL AVERY DENNISON REPRESENTATIVE. Classification: Avery Dennison - Public... -
Page 90: Printer Errors
Check the printhead connections. If the error still occurs, change the printhead. If the error still occurs, replace the printhead cable. If the error still occurs, replace the MCB. Classification: Avery Dennison - Public... - Page 91 MCB BAD STACK ERROR continues to occur, report the error and the MCB KNF FLIT TBL TOO circumstances that cause it to AVERY DENNISON Service. These errors are caused by errors in the MCB KNIFE STATE TOO software and are not caused by hardware failures.
- Page 92 The printer checks to make sure the software software versions are versions within the printer are compatible. This error not compatible indicates that the versions are not compatible. Upgrade to the latest operating system software. Classification: Avery Dennison - Public...
- Page 93 This will also reset all the printer settings (print and cut adjust, baud rate, cutter enable, etc.) to their default values. IF THE RECOMMENDED CORRECTIVE ACTIONS DO NOT RESOLVE THE PROBLEM (S), CONTACT YOUR LOCAL AVERY DENNISON REPRESENTATIVE. Classification: Avery Dennison - Public...
-
Page 94: Mechanical Troubleshooting
1) Be sure the nip roller is free to rotate and moves easily in the bearing slots. Check for a loose drive gear. IF THE RECOMMENDED CORRECTIVE ACTIONS DO NOT RESOLVE THE PROBLEM (S), CONTACT YOUR LOCAL AVERY DENNISON REPRESENTATIVE. Classification: Avery Dennison - Public... -
Page 95: Ink
1) Knife blades are dull. 1) Refer to section 5.4.1, Removing and of the knife. Replacing the Knife Assembly. IF THE RECOMMENDED CORRECTIVE ACTIONS DO NOT RESOLVE THE PROBLEM (S), CONTACT YOUR LOCAL AVERY DENNISON REPRESENTATIVE. Classification: Avery Dennison - Public... -
Page 96: Minimum Cut Length
3) Printer has no batches to print. Platform cannot find 1) Sensor unplugged 1) Remove back cover and check home connections. 2) Broken wire or damaged LED 2) Sensor out of alignment 1) Outer bracket bent and needs to be reformed. Classification: Avery Dennison - Public... - Page 97 2) Nip roller not pulling 1) Worn rubber roller - Replace 2) Loose set screw or drive gear - Tighten 3) Soft material / narrow web 1) Adjust the height of the static brush hitting static brush Classification: Avery Dennison - Public...
-
Page 98: Appendices
4002NWT Fabric & XC-3111 (UK) 4002NWT Fabric & HR-1111 (UK) G.S. Satin & XC-3111 (UK) 2012T Fabric & XC-3111 (UK) 1021T Fabric & XC-3111 (UK) 2800 Fabric & CT-1111 591SST Fabric & CT-1111 Ink 591SST/601SST Fabrics & CT-1114 Ink Classification: Avery Dennison - Public... - Page 99 4800TST Fabric & HS1111 770SWT Fabric & CT1112 770SWT Fabric & CT1114 770SWT Fabric & CT1115 770SWT Fabric & CT5137 772SWT Fabric & CT1112 772SWT Fabric & CT1114 772SWT Fabric & CT1115 772SWT Fabric & CT5137 Classification: Avery Dennison - Public...
-
Page 100: Tape/Ink Transfer Types To Use When Not Found In Pcmate
User’s Manual—SNAP™ 500 Gen 1 and Gen 2 11.2 Tape/Ink Transfer Types to Use When Not Found in PCMate PCMate and the SNAP 500 printer allow an operator to program the energy levels of the printhead to optimize print quality and printhead life. In the PCMate format, on the “Design Properties”... - Page 101 5. When printing from a program that doesn’t use PCMate, place the transfer type code after the ~XT command. e.g. ~XA~XUS0~XW1536~XP4546~XMH4180~XFN~XL1~XS30~XN1~XT203~XN2~XT203~XC01~XX700~ XD300~XGL CAUTION: For extended print head life and prevent ink breakage, use the lowest print contrast the produces acceptable print quality. Classification: Avery Dennison - Public...
-
Page 102: Printer Specifications
Supply Roll: 3” ID (76 mm) cardboard core, Maximum roll size 11.5” O.D. (29 cm) Interface Null modem serial cable DB9 F connector May require USB/serial adapter May require external Ethernet adapter Push-button start/stop with 4 LED lights – Ready, Data, Supply, Error voice button Control Classification: Avery Dennison - Public... - Page 103 - Missed sense mark detection and correction Ink Ribbon AVERY DENNISON standard thermal colors and widths AVERY DENNISON white plastic core: Maximum Ink I.D. 3.5” Ink widths: With Metric Adapter - 25mm, 30mm, 35mm 40mm, 45mm, 50mm or 60mm metric widths only.
-
Page 104: Mini Web Guide Adapter
Turn the large black web guide knob so that the web guide plates close in on the Mini Web Guide Adapter. Doing this will automatically center the Mini Web Guide Adapter. WEB GUIDE POST WEB GUIDE POST WEB GUIDE PLATE MINI WEB GUIDE ADAPTER Classification: Avery Dennison - Public... -
Page 105: Programming Contrast Sensors
User’s Manual—SNAP™ 500 Gen 1 and Gen 2 11.5 Programming Contrast Sensors The SNAP 500 has an optional contrast sensors available. 05580009 is the color contrast sensor that may be required in situations with less contrast between the material and the sense mark or the material and sense mark are of similar colors. - Page 106 7. Move the material so that the sense mark moves back and forth under the sensor. The Q/ok light on the sensor should flash when the sense mark passes under the sensor. 8. Move the configuration switch to RUN position. Classification: Avery Dennison - Public...
-
Page 107: Using The Web Guide Hole Sensor
Hole Sensor Switch Edge Hole Sensor Pair Center Hole Sensor Pair The hole sensor switch in the “up” position activates the edge hole sensors. The “down” position activates the center hole sensor. Classification: Avery Dennison - Public... -
Page 108: Warranty Policy
Equipment and parts will perform within published specifications. Promised or implied statements by any Avery Dennison employee or representative will not be deemed to vary the terms of the warranty. Equipment and parts must be installed and operated according to recommended procedures and operating conditions. -
Page 109: Service
User’s Manual—SNAP™ 500 Gen 1 and Gen 2 purchases a printer in the US, exports to Brazil, and then needs warranty coverage, Avery Dennison Brazil has no obligation to provide warranty coverage. The agent must purchase services from Avery Dennison Brazil. -
Page 110: Option Menu System Flowchart
MODE. RETURNS TO PRINT MODE. PRESS VOICE BUTTON TO GO TO THE NEXT OPTION NOTE: PRESS AND HOLD THE VOICE BUTTON AT ANY TIME TO EXIT THE VOICE MENU SYSTEM. VOICE OPTION MENU NAVIGATION CHART Classification: Avery Dennison - Public... -
Page 111: Electrical Assembly Drawings
User’s Manual—SNAP™ 500 Gen 1 and Gen 2 12.0 Electrical Assembly Drawings Classification: Avery Dennison - Public... -
Page 112: Electrical System Schematic
User’s Manual—SNAP™ 500 Gen 1 and Gen 2 12.1 Electrical System Schematic Gen I Mother Board P/N 05589027 Gen II Classification: Avery Dennison - Public... - Page 113 User’s Manual—SNAP™ 500 Gen 1 and Gen 2 Mother Board P/N 05589027 Classification: Avery Dennison - Public...
-
Page 114: Harness Connections
R406 R127 R126 VERIFIER TP15 R305 OPTIONAL FRONT PANEL 631134 – Mother Board Power On / Reset RTH2 RFID MB PWR MB RESET TP11 OSC1 R139 996265A – Mother Board Audio C198 MOTHER BOARD AUDIO Classification: Avery Dennison - Public... -
Page 115: Mechanical Assembly Drawings
The SNAP 500 comes in various print head configurations and resolutions. These drawings cover the SNAP 500 1/1 – Gen 1 SNAP 500 2/1 300DPI – Gen 2 SNAP 500 2/1 600DPI differences are shown on a page at the end – Gen 2 Classification: Avery Dennison - Public... -
Page 116: Unwind Assembly - Gen
05583007 Shaft, Unwind 05990325 Snap ring, 3/16 e-ring 05586004 Spacer, Ink arbor, Outer 05583002 Hub, Outer, Unwind 117954 Gear, Ribbon, 75T 05583005 Bracket, Core locator 05990327 Snap ring, 5/16 e-ring 05990052 8-32 x 1/2 Cap screw Classification: Avery Dennison - Public... -
Page 117: Unwind Assembly - Gen
05990052 8-32 X 1/2 CAP SCREW 05990325 E-RING, 3/16 05990327 E-RING, 5/16 05991436 6-32 X 375 PHILLIPS PAN HEAD SCREW 05991443 SPRING, COMPRESSION 05991510 BALL BEARING , 16mm O.D. x 8mm I.D. FLG 13 7 Classification: Avery Dennison - Public... -
Page 118: Unwind Assembly - Gen
05990052 8-32 X 1/2 CAP SCREW 05990325 SNAP RING, 3/16 "E" RING 05991436 6-32 X 375 PHILLIPS PAN HEAD SCREW 05991443 SPRING, COMPRESSION 4 SCREW, 4-40 X 5/8 PPHS W/ EXT TOOTH 05996311 LOCK WASHER Classification: Avery Dennison - Public... -
Page 119: Guide Assembly - Gen 1 And
05584025 GEAR, WEB GUIDE ADJUST 05990148 1/4-20 E-S NUT 05991366 KNOB, CLAMPING 05581128 SENSOR, REF HARN 05989975 4-40 X 3/16 PAN HD SCREW 05991379 10-32 X 3/8 PHILLIPS PAN HEAD SCREW * Recommended spare parts Classification: Avery Dennison - Public... -
Page 120: Guide Assembly - Gen 1 With Hole Sensing
05991447 SPRING, COMPRESSION 05591121 LED, HARNESSED SENSOR, REG OPTL 05591128 SWITCH SENSOR, IR LED CEN 05591129 HARN SWITCH, SENS HOLE 05591130 HARN COVER, HOLE SENSR 05581222 SWITCH ITEMS 18-22 NOT SHOWN * RECOMMENDED SPARE PARTS Classification: Avery Dennison - Public... -
Page 121: Print Head Assembly - Gen
990436 Roll pin, 1/16 x 3/8 991382 Spring, Compression 991383 Spring, Extension 990469 Washer, Nylon, .031 Thick PB00700220 Screw, Pan head, Phillips 05581190 Assembly, Print head, 500 05589029 Harness, Fan, Print Head 991492 Nylon rivet Classification: Avery Dennison - Public... -
Page 122: Print Head Assembly - Gen
ASSY, LATCH, PRINT HEAD 05585005 SCREW, SPECIAL, HEAD LOCK 991383 SPRING, EXTENSION 05581111 POT, CONTRAST CONTROL 990469 WASHER, NYLON, .031 THICK 117951 BUTTON PRESSURE - TOOL T-10542 991382 SPRING, COMPRESSION 991653 SCREW, PAN HEAD PHILLIPS 05581126 CABLE, PRINTHEAD Classification: Avery Dennison - Public... -
Page 123: Swing Arm Assembly - Gen
ITEM PART NO. DESCRIPTION * ITEM 7 – PRINTERS COME STANDARD SENSOR, OPTICAL SLOTTED, 05581130 HARNESSED WITH RED PLATEN ROLLERS UNLESS KIT, FRAME ASSEMBLY, SNAP 500 OTHERWISE SPECIFIED 05631201 117903 BALL BEARING 05585012 SHAFT, SWING BLOCK 05585014 BRACKET, SWING ARM... -
Page 124: Ink Unwind / Rewind Assembly - Gen
Hexagon socket BH cap screw 991368 2.5mm x 5mm Slotted PH screw 05586003 Shaft, Ink turn 05586094K Kit, Single arbor assembly, Inch *Item 20 may be ordered as a complete arbor assembly 05586095K Kit, Single arbor assembly, Metric Classification: Avery Dennison - Public... -
Page 125: Ink Unwind / Rewind Arbor Assembly - Gen 2
BRACKET, CORE STOP (METRIC) 05586006 SHAFT, IN K ARBOR, LOCK 991370 SPRING, TORSION, CORE STOP 991454 8-32 X 1/4" THUMB SCREW 991510 BALL BEARING , 16mm O.D. x 8mm I.D. FLG 117954 GEAR-RIBBON 75T 990327 E-RING, 5/16 Classification: Avery Dennison - Public... -
Page 126: Ink / Unwind Motor Assembly - Gen 2
05581186 MOTOR, STOCK UNWIND W/ EXTENSION 05593001 SHAFT, UNWIND, 600 05596001 SHAFT, INK ARBOR, 600 05631201 KIT, FRAME ASSEMBLY, SNAP 500 2/1 990327 E-RING, 5/16 991510 BALL BEARING , 16mm O.D. x 8mm I.D. FLG 991639 M2.6 X 4mm PPHS... -
Page 127: Feed - Drive Train Assembly - Gen 1
10-32 X 5/16 PHILLIPS PAN HEAD SCREW 990089 10-32 X 1/4 BHCS 990067 #8 SAE WASHER 990068 LOCK WASHER, #8 05584075 COVER, FEED GUARD, SNAP 500 991636 8-32 X 3/8 PHILLIPS PAN HEAD SCREW 05594041 SHAFT, AUX. DRIVE SUPPORT Classification: Avery Dennison - Public... -
Page 128: Feed Assembly - Gen
8-32 X 1/4 PAN PHILLIPS 05991376 10-32 X 1/2 PAN PHILLIPS 05991377 10-32 X 3/4 PAN PHILLIPS 05991436 6-32 X 3/8 PAN PHILLIPS NS 05991636 8-32 X 3/8 PHILLIPS PAN HEAD 05999098 BUSHING, 3/16 X 1/4 X 3/8 Classification: Avery Dennison - Public... -
Page 129: Knife - Drive - Nip Roller Assembly - Gen 1
Gear, Nip 26T, 32P 05584027 Gear, Idler 22T, 32P 991372 6-32 x 1/4 Phillips pan head screw 05584034 Electrical, Static brush 990006 4-40 x 1/4 Cap screw 991471 4-40 x 1/4 Thumb screw *Recommended Spare Parts Classification: Avery Dennison - Public... -
Page 130: Drive Assembly - Gen 2
BALL BEARING 05351141 STEPPER MOTOR, HARNESSED 05585016 GEAR, 38T DRIVE 300DPI 05627030 DRIVE, BEAM COUPLING, ALTERED 05631201 KIT, FRAME ASSEMBLY, SNAP 500 2/1 05634011 SHAFT, FEED DRIVE 05634012 BEARING MOUNT, FEED SHAFT 05634013 DRIVE SOCKET, FEED SHAFT 05634027 SHAFT, NIP ROLLER DRIVE... -
Page 131: Knife Assembly - Gen 2
User’s Manual—SNAP™ 500 Gen 1 and Gen 2 Knife Assembly – Gen 2 13.16 ITEM PART NO. DESCRIPTION 05331201 KIT, FRAME ASSEMBLY, SNAP 500 2/1 05587017 STANDOFF, KNIFE MOTOR 05637001 BRACKET, KNIFE 991376 10 SCREW, 10-32 X 1/2 PAN PHILLIPS... -
Page 132: Nip Roller Assembly - Gen 2
05634024 BRACKET, NIP OUTTER ASY 05634025 ROLLER, NIP MOLDED 05634026 SPRING, NIP 05634033 ELECTRICAL, STATIC BRUSH 990015 6-32 X 1/4 SHCS 990314 KNOB, THUMB SCREW, #6 991422 4 SCREW, 4-40 X 1/4 PAN HD PHILLIPS Classification: Avery Dennison - Public... -
Page 133: Short Feed Option - Gen 1
User’s Manual—SNAP™ 500 Gen 1 and Gen 2 Short Feed Option – Gen 1 13.18 Classification: Avery Dennison - Public... -
Page 134: Covers Assembly - Gen 1
10-32 x 1/2 Phillips pan head screw 991379 10-32 x 3/8 Phillips pan head screw 05631205 Cover, Rear 05581201 Frame, Upright 05581207 Bracket, Support, Rear cover 990091 8-32 x 1/2 Button head screw 05581206 Cover, Front Classification: Avery Dennison - Public... -
Page 135: Covers Assembly – Gen 2
PART NO. DESCRIPTION 05341210 FEET, 1 1/2 DIAMETER, RUBBER 05581112 MINI FRONT PANEL 05631201 KIT, FRAME ASSEMBLY, SNAP 500 2/1 05631205 REAR COVER, SNAP 500 2/1 05631206 COVER, FRONT, 500 2 OVER 1 991374 1/4 SCREW, 1/4-20 X 1/2 PAN PHILLIPS... -
Page 136: Fan Assembly - Gen 1
HARNESS, FAN 80MM 12V 989965 LOCK WASHER, #6 SAE 990020 6-32 X 3/8 BHCS 990038 6-32 HEX NUT 991086 6-32 X 1 1/4 SHCS 991285 6-32 X 1 250 BHCS 991372 6-32 X 1/4 PAN PHILLIPS Classification: Avery Dennison - Public... -
Page 137: Electrical Components Assembly - Gen 2
ASSEMBLY, ADVANTECH MOTHERBOARD, 2 OVER 1, HARNESSED 05631107-500-2/1-0 PCB, MCB 500 2/1 PROGRAMMED 05631116 POWER SUPPLY, MEANWELL 24V HARNESSED WITH OFSET BRACKET, 2 OVER 1 05631201 KIT, FRAME ASSEMBLY, SNAP 500 2/1 05589012 BRACKET, FAN MOUNT 05631202 BRACKET MCB SUPPORT 05589015... -
Page 138: Turn Bar / Stacker Mount Assembly - Gen 2
PART NO. DESCRIPTION 05586003 SHAFT, INK TURN 05588009 SHAFT, STACKER MOUNT 05631201 KIT, FRAME ASSEMBLY, SNAP 500 2/1 05638001 SHAFT, LONG STACKER MOUNT 991374 1/4 SCREW, 1/4-20 X 1/2 PAN PHILLIPS 991379 10-32 X 3/8 PHILLIPS PAN HEAD SCREW 05586010... -
Page 139: 600Dpi Machine Parts List - Gen 1
600DPI Machine Parts List – Gen 1 13.24 ITEM PART NO. DESCRIPTION 05341150A335 MODULE, PC MEMORY, ALTERED, V335 05580078D DOCUMENT, 600DPI UPGRADE, SNAP 500 05584072 BRACKET, FEED MOTOR MOUNT 600DPI 05587117 ASSY, KNIFE DRVE SHAFT 600 DPI 05591143 CABLE, PRINT HEAD 05621107 500 600DPI... -
Page 140: 600Dpi Machine Parts - Gen 2
05635009 BRACKET, PRINT HEAD MOUNT, 600DPI 05634030 BRACKET, 600DPI 05635022 MOUNT, PRINT HEAD 05634031 GEAR, 21T 990326 SNAP RING, 1/4" E-RING 05634044 SHAFT, NIP DRIVE 600 DPI 991379 10-32 X 3/8 PHILLIPS PAN HEAD SCREW Classification: Avery Dennison - Public... -
Page 141: Upright Frame Assembly - Gen 1
10-32 X 3/8 PHILLIPS PAN HEAD SCREW 991372 6-32 X 1/4 PHILLIPS PAN HEAD SCREW 05581204-2 BRACKET, MCB SUPPORT 341210 FEET, 1 1/2 DIAMETER X 3/4 HIGH 991374 1/4-20 X 1/2 PHILLIPS PAN HEAD SCREW Classification: Avery Dennison - Public... -
Page 142: Stacker
05990104 10-32 E-S NUT 05991455 10-32 X 5/8 THUMB SCREW 29 10 27 05588072 COVER, STACKER REAR VENTED 11 12 05991508 8-32 X 1/2 FLANGED BUTTON HEAD SCREW 05638008 CHAIN, STACKER DRIVE 05991335 E-RING, 3/32 Classification: Avery Dennison - Public... -
Page 143: Label Stop
User’s Manual—SNAP™ 500 Gen 1 and Gen 2 13.28 Label Stop Item Part # Description 05588043 Magnet, Label stop 05588041 Bracket, Magnetic label stop 05588042 Pin, Magnetic label stop 05991356 Snap ring, 1/8 E-ring Classification: Avery Dennison - Public... - Page 144 AVERY DENNISON Technical Support Product / Services Installation Report Customer: Failure Report #: (For office use) Address: Service Report #: Failure Reported Date: Model #: Contact: Serial #: Phone #: Mfg. Date: (For office use) Within 30 Days of installation...
-
Page 145: Revision Record
12/Jul/16 Updated BOM for section 13.13. Page 132 22/Sep/16 Updated networking (Sections 3.7 and 5.4) and Image Shift in VCP (Section 5.3.3) Added page classifications per Avery Dennison policy 22/Nov/16 Added more legible call out numbers to mechanical drawings. 02/Feb/17... - Page 146 028028 Avery Dennison 170 Monarch Lane Miamisburg, OH 45342 1-800-543-6650 (In the U.S.A.) 1-800-387-4740 (In Canada) www.averydennison.com...
Need help?
Do you have a question about the snap 500 and is the answer not in the manual?
Questions and answers