Table of Contents
Advertisement
Quick Links
INSTALLATION, OPERATION AND MAINTENANCE MANUAL
Please read carefully before proceeding with installation. Your failure to follow any attached instructions
Refer to enclosed warranty for operating parameters to ensure proper use with your water supply.
Watts Premier
Phone: 800-752-5582
Manual: 199404
or operating parameters may lead to the product's failure.
Save manual for future reference
Model: RO-PURE
8716 W Ludlow Drive, Suite 1
www.premierH2o.com
Warning
System Tested and certified by WQA
against NSF/ANSI Standard 58 for the
performance data sheet.
Peoria, AZ 85381
Fax: 623-866-5666
Manual Date: 07/20/2016
Advertisement
Table of Contents

Related Manuals for Premier RO-PURE


Summary of Contents for Premier RO-PURE
- Page 1 Please read carefully before proceeding with installation. Your failure to follow any attached instructions or operating parameters may lead to the product’s failure. Save manual for future reference Model: RO-PURE System Tested and certified by WQA against NSF/ANSI Standard 58 for the performance data sheet.
- Page 2 Thank you for your purchase of a state of the art Premier Reverse Osmosis (RO) water treatment system. Water quality concerns are becoming more of a focus for the public. You may have heard about contaminants in the drinking water such as Arsenic, Chromium, Cryptosporidium or Giardia.
-
Page 3: Table Of Contents
Table of Contents Operational Parameters ........................4 Contents of Reverse Osmosis System .................... 4 Installation & Startup Tools Recommended For Installation ....................4 Plumbing diagram and parts list ...................... 5 Drill a Hole for the Reverse Osmosis Faucet .................. 6 How to use Quick Connect Fittings on Your RO System .............. -
Page 4: Operational Parameters
1 Parts Bag 1 Faucet Bag 1 Manual If any of the items are missing please contact Premier prior to installing. INSTALLATION & STARTUP Tools Recommended For Installation 1 1/4" Diamond Tipped Hole Saw bit for faucet opening (Counter Tops/Porcelain & Stainless Sinks) 1 1/4”... -
Page 5: Plumbing Diagram And Parts List
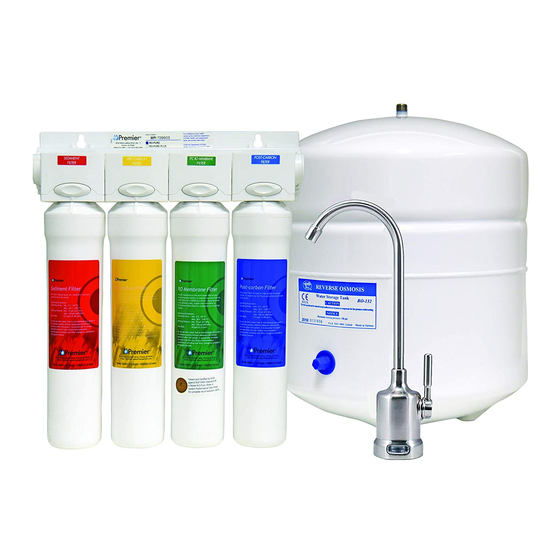
Plumbing Diagram and Parts List FAUCET BLUE - 1/4” TUBE TANK DRAIN SADDLE TANK AUTO SHUT-OFF VALVE ADAPT VALVE GREEN- 1/4” TUBE Item # Part # Description FEED COLD WATER 610051 FILTER HEAD & ASO VALVE ANGLE-STOP 134003 SHUT-OFF-VALVE QC (SUPPLY) 119007 TANK-3 GALLON-METAL-WHITE 560080 ADAPT-A-VALVE KIT... -
Page 6: Drill A Hole For The Reverse Osmosis Faucet
Drill a Hole for the Reverse Osmosis Faucet Marble Counter-top marble counter-top. Counter Top / Porcelain & Stainless Steel Sink Note: Most sinks are pre drilled with 1 ¼” diameter hole that you can use for your RO faucet. (If you are already using it for a sprayer or soap dispenser, see step 1) Porcelain sinks are extremely hard and can crack or chip easily. -
Page 7: Faucet Installation
Premier Monitored (Top Mount) Faucet Installation A) Connect tubes to the RO faucet (Figure A) installation. To connect tubes, simply push them into their (3) BLACK (4) RED end of the toggle bolt assembly. 2. Connect 1/4” BLUE tube. (1/4” Fitting Adapter on Toggle Bolt) (2) BLUE 3. -
Page 8: Helpful Installation Tips For The Watts Top Mount Faucet
Helpful Installation Tips for the Watts Top Mount Faucet During shipping/handling the tog- gle bolt on your new faucet may push up out of position. Prior to the install, hold the faucet as shown in the picture and pull down on the wing nut. -
Page 9: Adapt-A-Valve Installation
Adapt-a-Valve Installation Caution: Water supply line to the system must be from the cold water supply line only. Hot water will severely damage your system. Verify contents prior to installation: Black Collet ( 1 ) - Plastic Adapt-a-Valve with black collet ( 1 ) - Brass Adapter no washer ( 1 ) - Brass Adapter with black washer ( 1 ) - White rubber washer... -
Page 10: Drain Saddle Installation
Installation of the drain saddle near a garbage disposal may cause the drain line to plug. If no other installation of drain line is available, Premier offers drain line installation kit (part number 164020) that can be used with garbage disposals. -
Page 11: Blue Tube Connection
Locate the 1/4” RED tube attached to the RO faucet. Insert the end of the Flow Restrictor back side of the RO-Pure Head behind the Membrane head making sure Insert the tube is pushed in all the way to the tube stop. See Diagram Above IMPORTANT: The Flow Restrictor is installed inside of the red tube at the bent end. -
Page 12: Green Tube Connection
Green Tube Connection Green Tube Step 15 Locate green tube attached to the RO Module. Insert the open on the plastic water feed valve making sure the tube is pushed in all the way to the tube stop. Adapt-a-Valve Reverse Osmosis Module Mounting Step 16 Determine best location for the RO module to be mounted to allow for future system maintenance. -
Page 13: Startup Instructions
Startup Instructions Turn on the incoming cold water at the angle stop valve and the Step 1 as necessary. (Check frequently over the next 24 hours to ensure no leaks are present). Note: If you have connected your RO system to a refrigerator / ice maker, make sure the ice maker is have an in-line valve installed before the ice maker so it can easily be closed to prevent water Open the RO faucet and leave it open until water begins to trickle out (this may take a few Step 2... -
Page 14: Changing The Filter Cartridges
Premier recommends replacing the membrane when TDS reduction falls below 75%. A water sample may be sent to Premier for a free diagnosis of your membranes performance. To send 2nd container. Clearly label each sample. Send the samples to the address listed on the cover of this manual attention “Water Samples”. -
Page 15: Annual Sanitization
Annual Sanitization NOTICE Step 1: Turn off the water supply to your RO system at the adapt-a- valve and open the RO faucet to drain the storage tank. DOSING SYRINGE WITH NO NEEDLE NOTICE If you have connected your RO system to a refrigerator/ ice maker, make sure the connection has been turned process is complete. -
Page 16: Check Air Pressure In The Tank
Check Air Pressure in the Tank NOTICE Check air pressure only when tank is empty of water! Check air pressure in the storage tank when you notice a decrease in available water from the RO sys the tank behind the blue plastic cap. Step 1: Turn off the incoming water supply to the RO. -
Page 17: Troubleshooting
1. Low/Slow Production Low Water Pressure Assure a minimum of 40 psi incoming water pressure. Premier sells a booster pump if home water pressure is low. Make sure water supply is turned on and feed water valve is all the way open. -
Page 18: Product Technical & Warranty Information Performance Data Sheet
0.5NTU Depending on water chemistry, water temperature, and water pressure Premier’s R.O. Systems production and performance will vary. of the system that is available to the user as reverse osmosis treated water when the system is operated without a storage tank or when the storage tank is bypassed. -
Page 19: Arsenic Fact Sheet
This Premier reverse osmosis system is designed to remove up to 98% of pentavalent arsenic. It will not convert trivalent arsenic to pentavalent arsenic. Under laboratory standard testing conditions, this system reduced 0.30 mg/L (ppm) pentavalent arsenic to under 0.010 mg/L... - Page 20 This page intentionally left blank Page 20...
-
Page 21: Service Record
Service Record Model Number:__________ Serial Number:___________ Date of Purchase:__________ Date of Install:___________ Installed by:_____________ Sediment Carbon Membrane Carbon Date Filter Pre-Filter Post-Filter (6 months) (6 months) (2-5 years) (12months) NOTES: Page 21... -
Page 22: Limited Warranty
If any part of your Reverse Osmosis System is defective in workmanship (excluding replaceable filters and membranes), return unit after obtaining a return authorization (see below), less tank, within 1 year of original retail purchase, Watts Premier will repair or, at Watts Premier’s option, replace the system at no charge.
Need help?
Do you have a question about the RO-PURE and is the answer not in the manual?
Questions and answers