Table of Contents
Advertisement
Quick Links
INSTALLATION, OPERATION AND MAINTENANCE MANUAL
Please read carefully before proceeding with installation. Failure to follow attached
instructions or operating parameters may lead to the product's failure.
******************************************************************************************
Watts Premier
Phone: 800-752-5582
Manual: 191934
Warning
Save manual for future reference.
Model: WP-ST6DM
REVERSE OSMOSIS SYSTEM
8716 W Ludlow Drive, Suite 1
www.premierH2o.com
Page 1
Peoria, AZ 85381
Fax: 623-866-5666
Manual Date: 07/19/2016
Advertisement
Table of Contents

Related Manuals for Premier WP-ST6DM


Summary of Contents for Premier WP-ST6DM
- Page 1 Please read carefully before proceeding with installation. Failure to follow attached instructions or operating parameters may lead to the product’s failure. ****************************************************************************************** Save manual for future reference. Model: WP-ST6DM REVERSE OSMOSIS SYSTEM Watts Premier 8716 W Ludlow Drive, Suite 1...
- Page 2 With proper installation and maintenance, this system will provide you with high quality water for years to come. All of Watts Premier’s water enhancement products are rigorously tested by independent laboratories for safety and reliability.
-
Page 3: Table Of Contents
Table of Contents Operational Parameters ........................4 Contents of Reverse Osmosis System .................... 4 Installation & Startup Tools Recommended For Installation ....................4 Plumbing diagram and parts list ...................... 5 Drill a Hole for the Reverse Osmosis Faucet .................. 6 How to use Quick Connect Fittings on Your RO System .............. -
Page 4: Operational Parameters
Operational Parameters Do not use with water that is micro biologically unsafe or of unknown quality without adequate disinfection before or after the system. System is intended to be installed on the cold water line only. Operating Temperatures: Maximum 100°F (37.8°C) Minimum 40°F (4.4°C) Operating Pressure: Maximum 100 psi (7.03 kg/cm... -
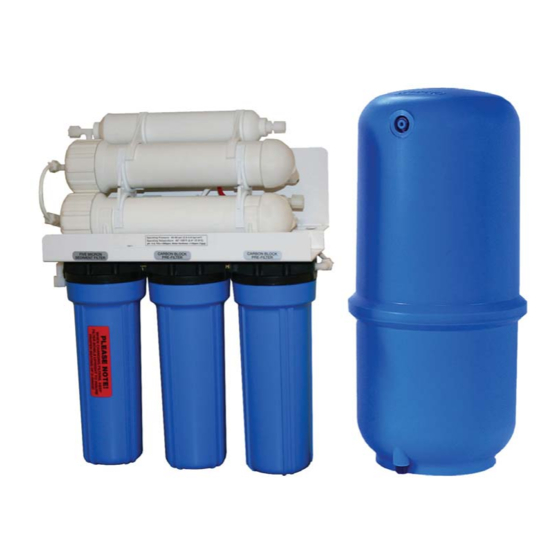
Page 5: Plumbing Diagram And Parts List
Plumbing Diagram and Parts List Faucet 15 Compression Nut Polishing Filter Storage Tank Tank Ball Valve Elbow Fitting System Bracket Tee Fitting Flow Restrictor Tee Fitting Sediment Filter 11 Shut Off Valve Carbon Block Filter Fitting Adapter RO Membrane FAUCET 14 Tee Fitting STAGE 6 FINAL FILTER... -
Page 6: Drill A Hole For The Reverse Osmosis Faucet
Drill a Hole for the Reverse Osmosis Faucet Marble Counter-top marble counter-top. Counter Top / Porcelain & Stainless Steel Sink Most sinks are pre drilled with 1 ¼” diameter hole that you can use for your RO faucet. Note: (If you are already using it for a sprayer or soap dispenser, see step 1) Porcelain sinks are extremely hard and can crack or chip easily. -
Page 7: Installation Of Faucet
Installation of Faucet Step 5 Place the escutcheon chrome plate and the black rubber washer on the faucet shank. (Parts found in faucet parts bag). Step 6 Insert the faucet shank through the hole in sink and let it rest on the sink top. Step 7 From the underside of the sink, slide on the locating washer, lock washer and brass nut onto the shank. -
Page 8: Adapt-A-Valve Installation
Adapt-a-Valve Installation Caution: Black Water supply line to the system must be from the cold water Collet supply line only. Hot water will severely damage your system. Verify contents prior to installation: ( 1 ) - Plastic Adapt-a-Valve with black collet White ( 1 ) - Brass Adapter no washer Washer... -
Page 9: Drain Saddle Installation
Installation of the drain saddle near a garbage disposal may cause the drain line to plug. If no other installation of drain line is available, Premier offers drain line installation kit (part number 164020) that can be used with garbage disposals. -
Page 10: Tank Ball Valve Installation
Tank Ball Valve Installation Step 18 Blue Tube Connection - TANK Locate the remaining 1/4” blue tube in the parts bag. Insert one Step19 open end FIRMLY into the open TEE plastic nut securely. Position tank in desired location. Insert the open end of the blue 1/4” tube from the RO System Step 20 FIRMLY into the tank ball valve. -
Page 11: Start Up Instructions
Start up Instructions Turn on the incoming cold water at the angle stop valve and the Adapt-a-Valve. Check the Step 1 hours to ensure no leaks are present). Note: If you have connected your RO system to a refrigerator / ice maker, make sure the ice maker is have an in-line valve installed before the ice maker so it can easily be closed to prevent water Open the RO faucet and leave it open until water begins to trickle out (this may take a few Step 2... -
Page 12: Six Month System Maintenance
System Maintenance Six Month Maintenance Items needed: Stage 2 & 3 - Carbon Block Filter (part #: 101009) Step 1 Turn off the incoming water supply to the RO at the feed water valve. (Follow the green tube Step 2 Close ball valve on the storage tank and open the RO Faucet to depressurize. -
Page 13: Annual Maintenance
Annual Maintenance NOTICE: Sanitizing of unit is recommended - RO storage tank must be drained. Step 1: Perform steps 2 through 5 in the Six Month System Maintenance (Page 12). NOTICE: If not sanitizing the system, skip to step 11 Step 2: Remove the RO membrane from its housing and rest in a clean sanitary place. -
Page 14: Membrane Replacement
TDS reduction falls below 75%. NOTE: A water sample may be sent to Premier for a free diagnosis of your membrane performance. To send a water sample, use two (2) clean containers and fill ½ cup of tap water in one container and ½ cup of reverse osmosis water in 2nd container. Clearly label each sample. -
Page 15: Check Air Pressure In The Tank
Check Air Pressure in the Tank Important: Check air pressure only when tank is empty of water! Check air pressure in the storage tank when you notice a decrease in available water from the RO system. Air can be added with a bicycle pump using the schrader valve that is located on the lower side of the tank behind a blue plastic cap. -
Page 16: Performance Data Sheet
Performance Data Sheet WP-ST6DM Watts Premier 8716 W Ludlow Drive Suite #1 Peoria, AZ 85381 (480) 675-7995 GENERAL USE CONDITIONS: 1. System to be used with municipal or well water sources treated and tested on regular basis to insure bacteriological safe quality. Do not use with water that is microbiologically unsafe or unknown quality without adequate disinfection before and after the system. -
Page 17: Service Record
Service Record Date of Purchase:__________ Date of Install:___________ Installed by:__________________ 2 & 3 stage Final Filter 1st stage Date Carbon Carbon Membranes Sediment (6 months) (1 year) (2-5 years) (6 months) NOTES: Page 17... -
Page 18: Limited Warranty
If any part of your Reverse Osmosis System is defective in workmanship (excluding replaceable filters and membranes), return unit after obtaining a return authorization (see below), less tank, within 1 year of original retail purchase, Watts Premier will repair or, at Watts Premier’s option, replace the system at no charge.
Need help?
Do you have a question about the WP-ST6DM and is the answer not in the manual?
Questions and answers