Table of Contents
Advertisement
Quick Links
Download this manual
See also:
User Manual
Advertisement
Table of Contents

Related Manuals for Zavio B8210


Summary of Contents for Zavio B8210
- Page 1 B8210 8608586000000...
-
Page 2: Table Of Contents
Zavio B8210 Quick Installation Guide Please follow the installation steps below to set up your B8210 Bullet IP Camera. Check the package contents against the list below. See P.1 Physical overview. See P.2 I/O Terminal Block Circuit. See P.3 I/O Terminal Block Pin Definition. See P.3 LED Indicator Definition. -
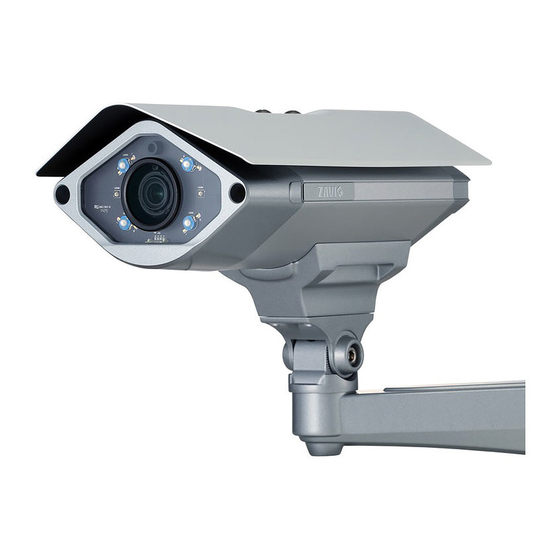
Page 3: Physical Overview. See
Physical overview - Front - Light Sensor IR LED Lens Warning: The IR LED is classified as class 3B laser IR. It’s hazardous and harmful if the eye is exposed directly. Please don’t look straight at the LEDs during operation. -... -
Page 4: I/O Terminal Block Circuit. See
I/O Terminal Block Circuit I/O Terminal Block Pin Definition Definition Description Max. V/A Ground 12V DC + 12VDC 1.2 W Audio In Unbalanced, 1.4Vp-p, 1Vrms, terminal block Audio Out Unbalanced, 1.4Vp-p, 1Vrms, terminal block Uses an NPN transistor with the emitter connected to 100 mA the GND pin. -
Page 5: Power Mode. See
LED Indicator Color Indication Steady blue for Network link Network Blue Flash blue while Network activity Steady red for booting up process Blue Steady blue for booting up completion Power when reset button pressed for at least 5 sec. Unlit to factory default Steady yellow means SD card ready SD Card... -
Page 6: Install The Hardware And Connect All Cables. See
(Please change a new moisture absorber if open the front/ back covers afterwards.) f. Feed all cables through adapter and wall mount bracket if you use B8210 bracket, or let the cable through out the hole on right side of adapter if you use standard bracket. (Please see B. Two way... - Page 7 B. Two ways bracket installation a. Use B8210 supplied bracket RJ45, power, DIDO, video out cables can be fed through the supplied adapter and bracket with cable management protected installation. (See figure 1) b. Use standard bracket Through our supplied adapter, there’s alternatived to use your selected standard bracket. Cables will be passed through the right side hole of adapter.
- Page 8 D. Wall mounting and Ceiling mounting a. Attached the alignment sticker to the wall. Drill five holes into the wall, which four for screws and one for cable. Then hammer the supplied plastic anchors into the screw holes and secure the mounting plate with supplied screws (T1/4”*32).
-
Page 9: Microsoft Os: Use The Software Cd To Install Intelligent Ip Installer. See
Microsoft OS: Use the software CD to install Intelligent IP Installer Power on your PC and insert the CD-ROM. The setup page will show up automatically. Please follow these steps to install the firmware. Select “Intelligent IP Installer” and follow the installation process to complete the installation. Access the IP Camera using Intelligent IP Installer 1. - Page 10 IP Camera. (Default is admin / admin) 4. When accessing the IP Camera for the first time, a yellow information bar appears below the address bar: This website wants to install the following add-on: ‘AxvideoView.cab from ‘Zavio Inc’.
- Page 11 5. Click the information bar, and select Install ActiveX control. 6. Click Install. 7. Live video displays in the centre of your web browser.
- Page 12 Mac OS using Safari Browser 1. Select Safari icon, 2. Click Bonjour function and select the camera you wish to access. 3. Enter name and password to login to the 4. The monitor image will be displayed in your IP camera. (Default is admin / admin) browser.
-
Page 13: Change The Web Interface Into Your Preferred Language. See
Change the Web Interface into your preferred language Use the settings screen to set the language of the Web Interface. Go to “Setting > System > Maintenance”. 1. Insert Software CD into your CD-ROM. 2. Browse and select the preferred language from language pack in the Software CD and then click OK. 3. - Page 14 Memo ………………………………………………………………………………….. ………………………………………………………………………………….. ………………………………………………………………………………….. ………………………………………………………………………………….. ………………………………………………………………………………….. ………………………………………………………………………………….. ………………………………………………………………………………….. ………………………………………………………………………………….. ………………………………………………………………………………….. ………………………………………………………………………………….. ………………………………………………………………………………….. ………………………………………………………………………………….. ………………………………………………………………………………….. ………………………………………………………………………………….. ………………………………………………………………………………….. ………………………………………………………………………………….. ………………………………………………………………………………….. ………………………………………………………………………………….. ………………………………………………………………………………….. ………………………………………………………………………………….. ………………………………………………………………………………….. ………………………………………………………………………………….. ………………………………………………………………………………….. ………………………………………………………………………………….. …………………………………………………………………………………..
- Page 15 Memo ………………………………………………………………………………….. ………………………………………………………………………………….. ………………………………………………………………………………….. ………………………………………………………………………………….. ………………………………………………………………………………….. ………………………………………………………………………………….. ………………………………………………………………………………….. ………………………………………………………………………………….. ………………………………………………………………………………….. ………………………………………………………………………………….. ………………………………………………………………………………….. ………………………………………………………………………………….. ………………………………………………………………………………….. ………………………………………………………………………………….. ………………………………………………………………………………….. ………………………………………………………………………………….. ………………………………………………………………………………….. ………………………………………………………………………………….. ………………………………………………………………………………….. ………………………………………………………………………………….. ………………………………………………………………………………….. ………………………………………………………………………………….. ………………………………………………………………………………….. ………………………………………………………………………………….. …………………………………………………………………………………..
Need help?
Do you have a question about the B8210 and is the answer not in the manual?
Questions and answers