Advertisement
Quick Links
INSTALLATION INSTRUCTIONS FOR PART FRST
(Will not retain THX or SYNC in OE navigation models)
The FRST interface is for 2007 and up Ford, Lincoln, and Mercury
vehicles equipped with RSE (Rear Seat Entertainment), Sync,
or THX or any combination of the three to retain these features,
plus retain the OEM satellite radio (viewed through external LCD,
supplied) if so equipped . Also the FRST can retain the OEM
steering wheel control functions as long as the aftermarket radio
has a steering wheel control input. THE FRST also PROVIDES
a MUTE, PARKING BRAKE, VSS OR SPEED SENSE, and a
reverse output to make installing an aftermarket navigational radio
NOTE: *compatiable with non amplifi ed and amplifi ed sound systems
*Sync or thx is not retained when replacing oem navigation radio
FORD
Edge 2008-up
Escape 2008-up
Expedition 2007-up
Explorer 2008-up
Explorer sport trac 2008-up
F-150 2009-up
Five hundred 2006-07
Flex 2009-up
Focus 2008-up
Fusion 2007-up
Taurus 2008-up
Taurus x 2008-2009
1-800-221-0932
© COPYRIGHT 2004-2010 METRA ELECTRONICS CORPORATION
FRST
*Read Important Warning On Page 1
Before Attempting Any Installation*
simpler and less time comsuming.
APPLICATIONS
LINCOLN
Mark lt 2007-08
Mkx 2008-up
Mkz 2007-up
Navigator 2007-up
MERCURY
Mariner 2008-up
Milan 2008-up
Montego 2006-07
Mountaineer 2008-up
Sable 2008-09
axxessinterface.com
Advertisement

Related Manuals for Axxess FRST


Summary of Contents for Axxess FRST
- Page 1 Before Attempting Any Installation* (Will not retain THX or SYNC in OE navigation models) The FRST interface is for 2007 and up Ford, Lincoln, and Mercury vehicles equipped with RSE (Rear Seat Entertainment), Sync, or THX or any combination of the three to retain these features, plus retain the OEM satellite radio (viewed through external LCD, supplied) if so equipped .
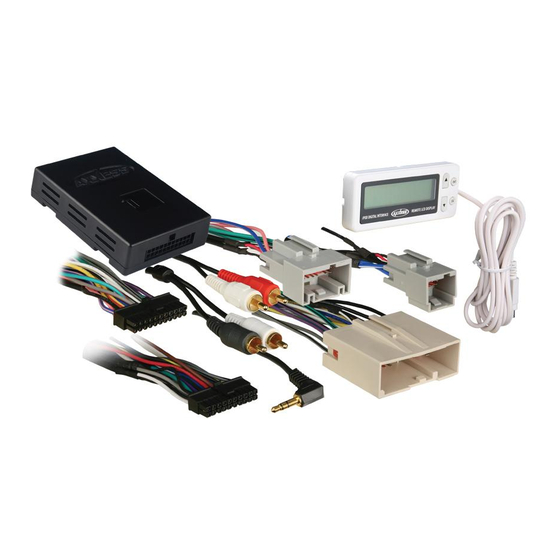
- Page 2 INTERFACE COMPONENTS •A) FRST Interface •B) 4 pin harness with stripped leads •C) 20 pin harness with stripped leads •D) 22 pin to Ford 24 pin harness •E) Female 3.5mm connector with Brown and Brown/White wires •F) LCD Screen 20 pin...
- Page 3 TABLE OF CONTENTS WIRING CONNECTIONS ..........1-3 INSTALLING THE FRST ..........4-5 THE LCD SCREEN ............6 PROGRAMMING THE SWC .........7-9 NOWLEDGE IS OWER Enhance your installation and fabrication skills by enrolling in the most recognized and respected mobile electronics school in our industry.
-
Page 4: Wiring Connections
*IMPORTANT: BEFORE BEGINNING ANY OF THE FOLLOWING, DISCONNECT THE NEGATIVE BATTERY TERMINAL TO PREVENT AN ACCIDENTAL SHORT CIRCUIT. WIRING CONNECTIONS FROM THE 20 PIN HARNESS: • Connect the Red wire to the ignition/accessory wire of the aftermarket radio • Connect the Orange/White wire to the illumination wire of the aftermarket radio. If the aftermarket radio has no illumination wire just tape off the Orange/White wire. - Page 5 FOR AMPLIFIED SYSTEMS: • Connect the White rca to the left front low level output of the aftermarket radio • Connect the Gray rca to the right front low level output of the aftermarket radio • Connect the Green rca to the left rear low level output of the aftermarket radio •...
- Page 6 FOR ECLIPSE RADIOS: Connect the Eclipse SWC wires (Normally Brown and Brown/Black) to the Brown and Brown/White wires of the 3.5 jack. Brown goes to Brown and Brown/White goes to Brown/Black. FROM THE FORD 24 PIN HARNESS: • Connect the YELLOW wire to 12 volt constant wire of the aftermarket radio •...
-
Page 7: Installing The Frst
INSTALLING THE FRST 1. With all the connections completed, plug the 22, 20, and 8 pin harnesses into the FRST. 2. Reconnect the negative battery terminal. 3. Plug the 24, 16, and 8 pin FORD harnesses into the vehicle side harness, and plug the aftermarket radio harness into the aftermarket radio. - Page 8 SELECTING SYNC/RSE/SAT/DVD/AUX: With the ignition on, and the aftermarket radio on (Make sure radio is in AUX mode): (NOTE: Not all vehicles have all sources factory equipped) Press and hold the Media button on the steering wheel for 2 seconds. This will switch to the next available sources in your vehicle.
-
Page 9: The Lcd Screen
THE LCD SCREEN The LCD screen will allow you to navigate through factory installed SYNC, R.S.E. (rear seat entertainment), aux, and satellite options. It will also allow you to view the current source and any information that may be available. 1. -
Page 10: Programming The Swc
SWC functions. REMAPPING THE SWC BUTTONS Let’s say you have the FRST programmed to your vehicle and your radio and you want to change the button assignment for the steering wheel controls. For instance you would like Seek Up to be Mute. - Page 11 5. Follow the list below in order however pushing the steering wheel control button you want for the function below. If you want to skip a command press the Volume Up on the steering wheel, this will tell the FRST to skip the command and go to the next one.
- Page 12 command. Hold down the Mode button till the led lights up solid red, and then release it. Now your Mode button on the steering wheel is Volume Down. 6. After the last button is programmed on your steering wheel (you do not have to go through the whole list), hold down the Volume Up button for at least 10 seconds then the led will go out.
- Page 13 NOTES...
- Page 14 NOTES...
- Page 15 NOTES...
- Page 16 INSTALLATION INSTRUCTIONS FOR PART FRST 1-800-221-0932 axxessinterface.com © COPYRIGHT 2004-2010 METRA ELECTRONICS CORPORATION...
Need help?
Do you have a question about the FRST and is the answer not in the manual?
Questions and answers