Table of Contents
Advertisement
1
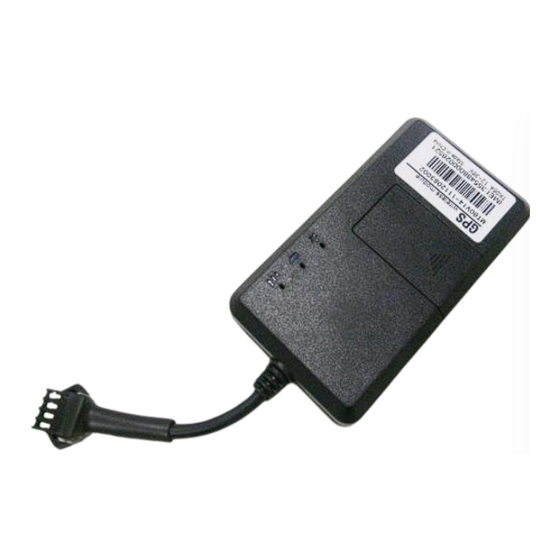
GPS GSM GPRS GPS Tracking System
User Manual
Model: TK06B
Thank you for purchasing the tracker. This manual shows how to operate the device smoothly
and correctly. Make sure to read this manual carefully before using this product. Please note
that specification and information are subject to changes without prior notice in this manual.
Any change will be integrated in the latest release.
Advertisement
Table of Contents

Subscribe to Our Youtube Channel
Related Manuals for Coban TK06B


Summary of Contents for Coban TK06B
-
Page 1: User Manual
GPS GSM GPRS GPS Tracking System User Manual Model: TK06B Thank you for purchasing the tracker. This manual shows how to operate the device smoothly and correctly. Make sure to read this manual carefully before using this product. Please note that specification and information are subject to changes without prior notice in this manual. -
Page 2: Table Of Contents
Contents ◆Installation attentions ..................3 ◆Attentions ......................3 1.Summary ......................4 2.Specs........................4 3. Installation instructions ..................5 4. Wires connection .................... 6 5. Function setting ....................7 5.1 Initialization ....................7 5.2 Change Password .................... 8 5.3Authorization ....................8 5.4 Set up monitor central number .............. -
Page 3: Installation Attentions
◆Installation attentions NOTE: device front side towards the sky. When install in car, if the windscreen glued by metal thermal insulation layer or heating layer, it will reduce the GPS receive signal and lead to GPS work disorder. ◆Attentions ◆Device light 1)No yellow light: failed to read SIM card, need reinstall SIM card. -
Page 4: Summary
◆Device can’t track on platform 1) Check three lights are stable lighting on. Make sure device can communicate by sending SMS and make a call. 2)Check the Vehicle State Send SMS command “check+password” to the tracker device to check the IP port etc info. -
Page 5: Installation Instructions
3. Installation instructions 3.1 Preparation 4.1.1 Open the package to check the device model number is correct, be with full accessories, or else please contact your supplier; 4.1.2 Choose SIM card, need insert a GSM SIM card into the device, please refer to the suggestion of your supplier for SIM card choice. -
Page 6: Wires Connection
material for skin); ③The hidden place in the board below the back windscreen. Notice: If the windscreen glued by metal thermal insulation layer or heating layer, it will reduce the GPS receive signal and lead to GPS work disorder, then please change the installation place. -
Page 7: Function Setting
5. Function setting 5.1 Initialization Send SMS “begin+password” to the unit, it will reply “BEGIN,CONFIG OK ” and initialize all the settings to default factory settings.(default password: 123456) For example: send SMS “begin123456”, it will reply “BEGIN,CONFIG OK ”. The “+” in the command, please don’t type “+”, space means press the space keyboard on your cell phone. -
Page 8: Change Password
5.2 Change Password 5.2.1 Send SMS “password+old password+space+new password” to the unit to change the password. For example: send SMS “password123456 888888” to the unit. If succeeded, “PASSWORD,CONFIG OK” will reply to your cell phone from the device tracker. 5.2.2 Make sure the new password is in 6 digits, or else the tracker cannot recognize the password. -
Page 9: Single Tracking
authorized number. 5.4.2 Cancel: Send “centernum+password” to tracker, it will reply “CENTERNUM,CONFIG OK”. 5.5 Single Tracking Make a missed call to device number or Send SMS “smslink123456” to device number, it will reply a real time tracking message include Long & Lat info. 5.6 Continuous Tracking Automatically 5.6.1Send SMS command “ITV+password+space+moving time... -
Page 10: Data Logging
terminal, it will reply "MONITOR,CONFIG OK" and switch to “monitor” mode. In this mode, the user can dial up the tracker device to monitor the voice. 5.8.3 Send SMS command "tracker+password" to tracker device of vehicle terminal, It will return "TRACKER,CONFIG OK" and restore to “track” mode. 5.9 Data logging This function must insert TF card. -
Page 11: Geo-Fence Alarm
“power alarm+latitude/longtitude” to central number when external power is cut off. 5.12.2 This function disactivates as default. Cancel: Send SMS “extpower+ password+space+0” to deactivate it. 5.13 Geo-fence alarm Set up a geo-fence for the tracker device to restrict its movements within a district. -
Page 12: Overspeed Alarm
5.15 Overspeed alarm 6.8.7.1 Set up: Send SMS “speed+password+space+80” to the unit(suppose the speed is 80km/h),and it will reply “speed OK!”. When the target moves exceeding 80km/h.the unit will send SMS “speed+Geo-info” to the central number. 5.15.1 Cancel: Send SMS “speed+password+space+0” to deactivate the overspeed alarm. -
Page 13: Set All Alarm Mode
5.18 Set all alarm mode Send SMS"KC +password+space+0" to tracker to close the function. Send SMS"KC +password+space+1" to tracker to choose alarm by SMS. Send SMS"KC +password+space+2" to tracker to choose alarm by calling. 5.19 Cut off the Oil and Power System Send SMS command “DY+password”... -
Page 14: Device Resetting
GF:500,1,1: Geo-fence function, 500meters. OS: 0 means deactivate, 1 means activate door:1: means door alarm function open. 5.22 Device Resetting SMS Reset Send SMS “reset+password” to tracker device to reset the GSM module and GPS module of the tracker device, it will reply “reset ok”. 5.23 IMEI Checking 5.23.1 Send SMS command "getimei+password"... -
Page 15: Set Apn
tracking by GPRS on tracking system. 5.25.1 Set APN 6.22.1.1 APN standards for Access Point Name and differs from country to country. For more information about your local APN, please inquire with your local GPRS network operator. “APN+password+space+local 5.25.2 Send APN+space+APN password”... -
Page 16: Faults & The Solutions
3. Don’t put the unit in overheated or overcooled places. 4. Handle carefully. Don’t vibrate or shake it violently. 5. Clear the unit with a piece of dry cloth. Don’t clean in chemicals, detergent. 6. Don’t paint the unit, this may cause some foreign materials left in between the parts.
Need help?
Do you have a question about the TK06B and is the answer not in the manual?
Questions and answers