Matrix R1x Owner's Manual
Hide thumbs
Also See for R1x:
- Owner's manual (34 pages) ,
- Service manual (71 pages) ,
- Manual (169 pages)
Advertisement
Table of Contents
- 1 Important Precautions
- 2 Power Requirements
- 3 Important Notes
- 4 Tools Required
- 5 Parts Included
- 6 Before You Begin
- 7 Hybrid Seat Height
- 8 Recumbent Seat Height
- 9 Upright Seat Height
- 10 Proper Usage
- 11 Using the Heart Rate Function
- 12 Wireless Heart Rate Receiver
- 13 Maintenance Schedule
- 14 Product Specifications
- Download this manual
Advertisement
Table of Contents

Related Manuals for Matrix R1x


Summary of Contents for Matrix R1x
- Page 1 R1xe U1xe...
- Page 2 ความช ่ ว ยเหล ื อ อ ื ่ น ๆ โปรดต ิ ด ต ่ อ ไปย ั ง ข ้ อ ม ู ล ต ิ ด ต ่ อ Matrix ท ี ่ ใ ห ้ ไ ว...
- Page 3 NETHERLANDS (BELGIUM, DENMARK, LUXEMBOURG) UNITED ARAB EMIRATES Johnson Health Tech Brasil Johnson Health Tech (HK) Limited Matrix Fitness / Johnson Health Tech. Netherlands Johnson Health Tech. UAE Estrada Municipal, 200 – mód 14 e 15 – gleba 3 Room 1501-1502, Aitken Vanson Centre,...
-
Page 4: Important Precautions
IMPORTANT PRECAUTIONS SAVE THESE INSTRUCTIONS • When using an exercise bike, basic precautions should always be followed, including the following: Read all instructions before using this equipment. It is the responsibility of the owner to ensure that all users of this equipment are adequately informed of all warnings and precautions. •... -
Page 5: Power Requirements
110 V UNITS ADD-ON PCTV All Matrix 1x 110 V cycles require the use of a 100-125 V, 60 Hz and a 15 A “Dedicated A 15 A or 20 A “Dedicated Circuit” with a non-looped (isolated) neutral/ Circuit”, with a non-looped (isolated) neutral/ground for power. This outlet should ground is required. -
Page 6: Important Notes
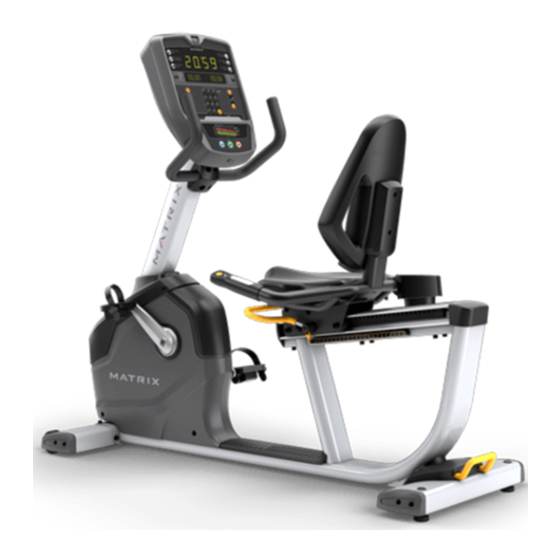
Unpack the equipment where you will be using it. Place the carton Page on a level flat surface. It is recommended that you place a protective R1x Recumbent covering on your floor. Never open box when it is on its side. IMPORTANT NOTES During each assembly step, ensure that ALL nuts and bolts are in place and partially threaded. - Page 7 CONSOLE CONSOLE MAST HANDLEBARS RESISTANCE TOGGLES CONSOLE MAST PULSE GRIPS TOP CAP SEAT BACK FRONT SHROUD SEAT BOTTOM POWER CORD SOCKET WATER BOTTLE HOLDER TRANSPORT WHEELS SEAT POSITION CRANK ADJUSTMENT LEVER TRANSPORT HANDLE PEDALS...
-
Page 8: Tools Required
Pink Hardware Bag Recumbent Cycle Assembly Description Bolt Spring Washer TOOLS REQUIRED: F 4 mm Allen Wrench F 6 mm Allen Wrench F Flat Wrench (15mm/17mm 325L) F Phillips Screwdriver PARTS INCLUDED: F 1 Main Frame F 1 Rear Stabilizer Tube F 1 Front Stabilizer Tube F 1 Rear Frame Handle F 1 Rear Frame Cover... - Page 9 Yellow Hardware Bag Black Hardware Bag Description Description Bolt Bolt Screw Tooth Washer Screw (pre-installed)
- Page 10 Red Hardware Bag White Hardware Bag Description Description Screw Bolt Bolt Spring Washer...
- Page 11 Blue Hardware Bag Purple Hardware Bag R1X ASSEMBLY COMPLETE! Description Description Bolt Bolt Arc Washer Bolt (pre-installed) Spring Washer Screw...
- Page 12 RESISTANCE TOGGLES CONSOLE WATER BOTTLE HOLDERS PULSE GRIP HANDLEBARS CONSOLE MAST SEAT TOP CAP SEAT ADJUSTMENT KNOB POWER CORD SOCKET PEDALS SHROUD TRANSPORT HANDLE CRANK...
- Page 13 Red Hardware Bag Upright Cycle Assembly Description Bolt Flat Washer TOOLS REQUIRED: F 4 mm Allen Wrench F 6 mm Allen Wrench F Flat Wrench (13/15 mm) F Phillips Screwdriver PARTS INCLUDED: F 1 Main Frame F 1 Rear Stabilizer Tube F 1 Front Stabilizer Tube F 1 Rear Frame Handle F 1 Rear Frame Cover...
- Page 14 Pink Hardware Bag Green Hardware Bag Description Description Bolt Bolt Screw Tooth Washer Screw (pre-installed) Screw Bolt...
- Page 15 Yellow Hardware Bag Pre-installed Hardware Description Description Bolt Flat Washer Nylon Nut...
- Page 16 Pre-installed Hardware U1X ASSEMBLY COMPLETE! Description M Bolt...
-
Page 17: Before You Begin
BEFORE YOU BEGIN POWER LOCATION OF THE UNIT If the equipment is powered by a power supply, the power must be plugged into the power jack, which is located in the front of the equipment near the Place the equipment on a level and stable surface away from direct sunlight. stabilizer tube. -
Page 18: Proper Usage
PROPER USAGE To determine proper seat position, sit on the seat and position the ball of your foot on the center of the pedal. Your knee should bend slightly at the furthest pedal position. You should be able to pedal without locking your knees or shifting your weight from side to side. -
Page 19: Maintenance Schedule
60.8” x 26.7” x 45.6” 42” x 18.3” x 30.1” * Ensure a minimum clearance width of 0.6 meters (24”) for access to and passage around MATRIX equipment. Please note, 0.91 meters (36”) is the ADA recommended clearance width for individuals in wheelchairs. - Page 20 R1x / U1x Cycle Frame Part # 1000345282 © 2016 Johnson Health Tech Rev 1.0 A...
Need help?
Do you have a question about the R1x and is the answer not in the manual?
Questions and answers