Table of Contents
Advertisement
Advertisement
Table of Contents

Related Manuals for Ortech Photo-eBox Plus


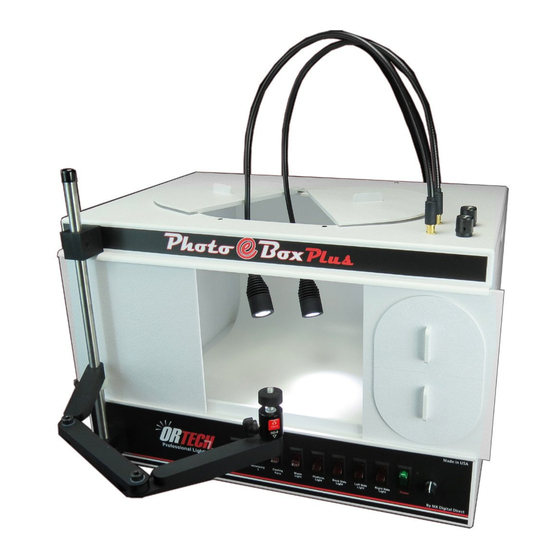
Summary of Contents for Ortech Photo-eBox Plus
-
Page 2: Table Of Contents
OR Technologies | Photo-eBox Plus Manual Table of Contents • Parts Included . . . . . . . . . . . . . . . . . . . . . . . . . . . . . . . . . . . . . . . . . . . . . . . . . . . . . . . 4 • Accessory Kit Contents . - Page 3 OR Technologies | Photo-eBox Plus Manual Lighting System Manual Please make sure the system arrives in perfect condition and all parts are included. Contact us immediately if there is any damage or if you are missing any parts. WARNING IF YOU ARE USING THE SYSTEM IN A COUNTRY THAT USES 220V POWER (MANY COUNTRIES OUTSIDE OF THE USA), YOU MUST POWER THE SYSTEM USING A 220V/110V STEP DOWN TRANSFORMER.
-
Page 4: Parts Included
OR Technologies | Photo-eBox Plus Manual Introduction Thank you for choosing the OR Tech Photo@Box Plus professional lighting system . This technically advanced electronic lighting system contains three different light sources to correctly illuminate any type of product you are interested in photographing . The three types of lights are fluorescent, warm LED... -
Page 5: Benefits And Features
OR Technologies | Photo-eBox Plus Manual Benefits and Features • Natural lighting for proper product display • Easy to setup and continuously capture product images • Clean white background (or add your own background) • Shadow-free wrap-around lighting eliminates the need for digital cleanup • Show the true color, clarity and cut of your diamonds by showing the brilliance, scintillation and refraction of your diamonds using white high power LED light . • Warm LED lighting for clear and natural gem stone colors • Increase sales with sharp quality product images • Tremendous savings and fast turn-around time by producing images in-house rather than outsourcing to a graphic design company or professional photographer Product Applications The Photo@Box Plus simplifies many product imaging applications, by allowing you to create high-quality professional photographs in minutes . Here are just a few examples of how you can use your photos: • Product Sales (Print) – Advertising, brochures, catalogs, flyers, postcards • Product Sales (Internet) – Auctions, banner advertising, e-commerce,... -
Page 6: Camera Bracket Assembly
OR Technologies | Photo-eBox Plus Manual Camera Bracket Assembly Our Linkage Bracket is designed for attaching most digital cameras to the lighting system . This gives your camera a straight top-to-bottom view of the items being photographed, and the reliability to change camera lenses and to position the camera in endless ways . Note: Carefully read the following information, as failure to do so may cause improper use of the bracket and cause damage to your camera and equipment. Positioning the camera bracket Photo A 1 . The bracket comes pre-assembled and attached to the lighting system . In order to get started, you must attach your camera to the ball head at the end of the bracket (photo A). -
Page 7: Cleaning
OR Technologies | Photo-eBox Plus Manual Cleaning The outside and inside of our lighting systems are made of thermoplastic . Simply use a damp cloth to clean it, or use a plastic cleaner if needed . For difficult marks, use odorless mineral spirits . Lamp Replacement All electronics and lamps used in your lighting system are made of the best quality . But eventually you may need to replace a burnt-out lamp . Use the following steps to replace a lamp: a) Disconnect the power supply cable from the wall or remove it from the back of the unit b) Remove the back panel and slide out the lamp house c) Remove the burnt-out lamp, using caution, by snapping it out from the retainers and replace the burnt-out lamp (Model # DZU28) d) Make sure all the lamps are the same model and same Kelvin color temperature Note: Gently pull out the wire connector. Make sure when you remove the wire to remember the original position. Replace the lamp and reconnect the wires in their original position. Be very careful when connecting the power: We suggest you test the unit before reinstalling the panels to ensure that your lights are working properly. Connect the power... -
Page 8: Specifications
Specifications Lighting Fluorescent: 6500º Kelvin (flicker-free continuos lighting) Warm LED Light: 3200º White High Power LED Lighting: 5800º Kelvin (Dimmable) Lighting Panels Fluorescent: Left, Right, and Bottom (4 Lights) Warm LED Light: Left and right (2 lights) White High Power LED Light: One foot of LED (12 LEDs) Power Controls 9 Switches: (1) On/Off, (2) Two warm LED lights, (3-6) (Right to Left) Individual switches for each of the 4 fluorescent light panels, (7) Fan (On/Off ), (8) High Power LED Iight strip, (9) Optional Goosenecks (not included) . Total of nine switches and one dimmer on the front, Two dimmers for gooseneck on the top (Optional) Size (exterior)
Need help?
Do you have a question about the Photo-eBox Plus and is the answer not in the manual?
Questions and answers