Advertisement
Advertisement
Table of Contents

Related Manuals for Gamma Progression STII


Summary of Contents for Gamma Progression STII
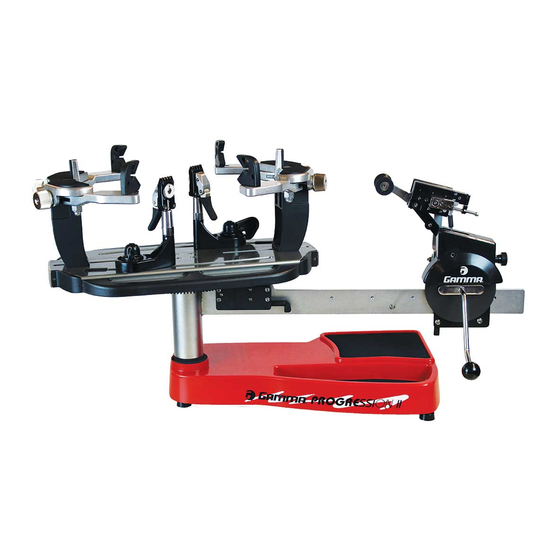
- Page 1 STII STRINGING MACHINE OWNER'S MANUAL Issue 5 - January 2009...
-
Page 2: Table Of Contents
Should any defects develop under normal use within the specified time periods, GAMMA will at its option, repair or replace the defective EQUIPMENT provided it is returned to GAMMA prepaid at the purchaser's expense. This warranty does not apply to any damage or defect caused by negligence, abuse, misuse, unauthorized alteration, shipping, handling, or part wear and tear as a result of normal use. -
Page 3: Features
FEATURES MACHINE FEATURES Professional Six Point Quick Mount Racquet Mounting System - Accomodates All Racquets Without Adapters Parallel Jaw String Gripper w/ Diamond Dust Coated Gripping Surfaces Professional Quick Action, Diamond Dust Coated, Fixed String Clamps Durable Polystyrene Base Cover w/ Convenient Padded Tool Tray Strong, Light Weight, Aluminum Construction... -
Page 4: Assembly Instructions
ASSEMBLY INSTRUCTIONS Turntable Installation To install the turntable remove the four nuts underneath holding the mounting bolts in place. Position the turntable over the turn- table pin and align the bolts with the holes in the flange. Secure them with the included allen wrench. - Page 5 ASSEMBLY INSTRUCTIONS Clamp Head Installation The post of the string clamp head and tube of the string clamp base are treated with grease to provide protection against corro- sion during shipping. Remove any exces- sive grease with a clean cloth prior to use. The post and tube may also be cleaned with isopropyl alcohol.
-
Page 6: Mounting The Frame
MOUNTING THE FRAME Adjusting the Frame Support Posts Loosen the lock bolts of the frame support posts and space them apart with the frame support slides separated by the approximate length of the racquet head. Although it is not required, it is good practice to center the support posts on the turntable. - Page 7 MOUNTING THE FRAME Securing the Frame Shoulder Clamps Lock the shoulder supports in position by turning the knob at the base clockwise. Repeat the adjustment procedure for the remaining support post. Re-tighten all of the frame supports in the same order as before. Do not overtighten any of the supports as racquet damage may occur.
-
Page 8: Stringing The Frame
STRINGING THE FRAME Setting Tension The STII utilizes a rotary adjusting knob along with a linear tension scale to indicate the tension setting. The scale is divided into 3 lb increments and each 1/3 turn of the tension knob changes tension by 1 lb. To set the desired tension, rotate the tension knob and align the mark on the spring guide with the desired tension setting on the scale. - Page 9 STRINGING THE FRAME Clamp Head Operation Quick Action Clamps are of a dual action design where the clamp head and clamp base operate independently of one another. To clamp a string, lift the clamp head and place the string between the jaws and de- press the clamp head lever to secure the string.
- Page 10 STRINGING THE FRAME Pulling Tension Wrap the loose section of string once around the roller guide and insert the string between the diamond dust coated string gripper plates. Pull the string perpendicular to the gripper plates while slowly rotating the tensioner crank clock- wise until the brake lever pops out of the latching block.
-
Page 11: Pathfinder Awl
PATHFINDER AWL The machine includes the Pathfinder string- ing awl which creates a pathway between and around strings to make inserting a string through tight grommets easier and quicker. Insert the awl through the grommet hole in the same manner as for traditional awls. The Pathfinder awl must be in the closed position before insertion. -
Page 12: Maintenance & Adjustments
MAINTENANCE & ADJUSTMENTS Tension Calibration Procedure Step 1 Set the tension to 60 lbs. as indicated by the linear scale and rotary knob. Place the string on one end of a tension calibrator into a string clamp and secure. Place string lo- cated on the other end of the calibrator into the string tensioner and apply tension. - Page 13 MAINTENANCE & ADJUSTMENTS Adjusting the Tensioner Brake After stringing many racquets, the brake of the tensioner may need to be adjusted. With the brake lever engaged, loosen the lock bolt located on the back side of the tensioner frame with the 4mm hex wrench. Note: The lock bolt should only be loosened enough to be turned by hand and must not be removed completely.
- Page 14 MAINTENANCE & ADJUSTMENTS Adjusting the Clamp Jaws The Quick Action Clamps will need minor adjustments according to what string type, construction, and gauge you are using. To adjust the gap (clamping pressure) between the clamp jaws, insert the string through the racquet as if you were beginning the main strings.
-
Page 15: Troubleshooting Tips
TROUBLESHOOTING TIPS PROBLEM SOLUTION String slips in clamps - Adjust gap between clamp jaws - Clean clamp jaws String slips in gripper - Adjust gripper jaws spacing - Clean gripper jaws String clamp base slips on turntable - Clean bottom of clamp & glide bar with alcohol - Adjust clamp base locking nut Tensioner slips on Tensioner Bar... -
Page 16: Notes
NOTES... -
Page 17: Parts List
PARTS LIST PART # DESCRIPTION TOOLS & ACCESSORIES 6MM T-HANDLE HEX WRENCH RUBBER FEET BOX WRENCH- 10MM CAP SCREW- M8 NEEDLE NOSE PLIERS SET SCREW BENT NOSE PLIERS WASHER- M8 DIAGONAL CUTTERS WASHER- M10 17MM SOCKET FRAME SUPPORT SLIDE HEX WRENCH SET TENSIONER ASSEMBLY STRINGERS AWL RETAINER SCREW... -
Page 18: Parts Drawing
PARTS DRAWING 148L MMSPP MDCSC MQAC MFSPP 283 285 146A 133 14 296A MFSPP MMSPP MMSSA... - Page 19 GAMMA SPORTS 200 Waterfront Drive Pittsburgh, Pennsylvania 15222 Phone: 800-333-0337 Fax: 412-323-0317 Visit our website at www.gammasports.com Copyright 2009 GAMMA Sports - All Rights Reserved...
Need help?
Do you have a question about the Progression STII and is the answer not in the manual?
Questions and answers