
Related Manuals for Gamma PROGRESSION 600ES-LED


Summary of Contents for Gamma PROGRESSION 600ES-LED
- Page 1 PROGRESSION 600ES - LED OWNER'S MANUAL Issue 3 / Version E - Oct. 28, 1997 Copyright 1997 GAMMA Sports - All Rights Reserved...
- Page 2 GAMMA's obligation under this warranty is limited to repair or replacement of defective EQUIPMENT, and no one is authorized to promise any other liability. GAMMA shall in no event be liable for any incidental or consequential damages.
-
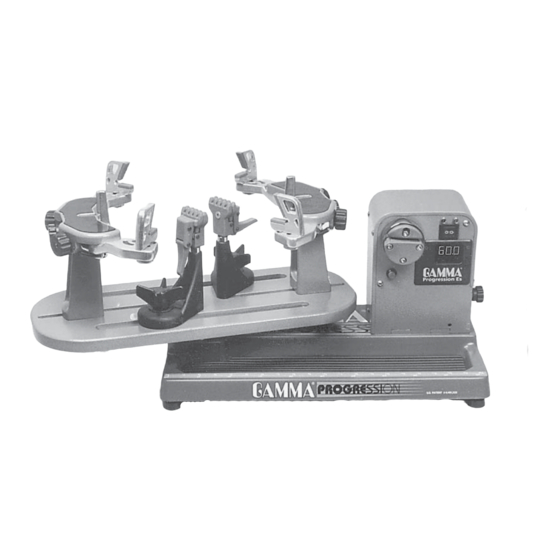
Page 3: Features
FEATURES Electric Constant Pull Tensioner w/ 11lb. to 89lb. Tension Range Digital Tension Setting Display Professional Six Point “Quick Mount” Racquet Mounting System - Accomodates All Racquets Without Adapters Parallel Jaw Rotating Gripper w/ Diamond Dust Coated Gripping Surfaces Professional Dual Action, Diamond Dust Coated, Fixed String Clamps Durable Polystyrene Base Cover w/ Convenient Padded Tool Tray... -
Page 4: Assembly Instructions
Insert the center post of the turntable into the bushing of the stringing machine base. Installing the Frame Support Posts The GAMMA 600ES support post assem- blies are precision aligned at the factory and are marked for proper installation on the turntable. - Page 5 ASSEMBLY INSTRUCTIONS Fixed Clamp Installation - (cont.) Place the load bushing into the top of the clamp base mating it to the lower guide bushing. After checking that the thrust bear- ing is positioned correctly in the base of the winged lock knob, screw the knob into the base bushing until fully seated.
-
Page 6: Mounting The Frame
MOUNTING THE FRAME Adjusting the Frame Support Posts Place the racquet frame over the center posts and onto the frame support. Loosen the lever lock bolt on one support post. Slide the post outward until the center support of the racquet support slide is positioned near the inside surface of the racquet frame. -
Page 7: Tensioner Controls
TENSIONER CONTROLS Front Panel Features A - String Gripper B - Indicator lights C - Tension Switch 8 8 . 8 D - L.E.D. Tension Display E - Tension Adjustment Knob F - Cover Plate G - Gripper Reversing Switch Rear Panel Features A - Lighted Power Switch To turn the power on, press the top half... -
Page 8: Stringing The Frame
STRINGING THE FRAME Fixed Clamp Operation - Step 1 The fixed clamps for the GAMMA 600ES are of a dual action design. The string clamp and the clamp base operate independently of one another. To clamp a string, lift the clamp head and place the string between the jaws. - Page 9 STRINGING THE FRAME Pulling Tension To pull tension, wrap the free string clock- wise around the gripper drum and position the string between the gripper jaws. The string must pass over the top half of the gripper before being placed between the gripper jaws, as the tension on the string provides the clamping force to the gripper jaws.
- Page 10 STRINGING THE FRAME Weaving the Cross Strings Weave the cross strings over and under the main strings being careful to alternate the weave direction of each consecutive cross string so as to be opposite of the previously installed cross string. Once the final cross string is tensioned and clamped, tie off at the appropriate hole speci- fied by the racquet manufacturer.
-
Page 11: Pathfinder Awl
PATHFINDER AWL The GAMMA 600ES includes the new Path- finder stringing awl which creates a pathway between or around strings to make inserting a string through tight gromets easier and quicker. Insert the awl through the grommet hole in the same manner as for traditional awls. The Pathfinder awl must be in the closed position before insertion. -
Page 12: Maintenance And Adjustments
Note: The string clamps supplied with your Gamma stringing machine can accomodate tight string patterns such as badminton. Depending on the string pattern, the clamp may spread the strings slightly which will not compromise the quality of the string job. -
Page 13: Troubleshooting Tips
Replace the fuse holder into the machine and check for proper operation. For additional assistance, contact Gamma Sports Customer Service at 1-800-333-0337 CARE and CLEANING With time and use, the clamping surfaces of your machine may become oily or dirty and result in string or clamp slippage while stringing. - Page 14 PARTS LIST PART # DESCRIPTION PART # DESCRIPTION ALUMINUM BASE PIVOT PIN BASE COVER CLAMP HEAD ASSEMBLY TRAY PAD CLAMP BASE ASSEMBLY TURNTABLE BUSHING CLAMP BASE RUBBER FEET GUIDE BUSHING CAP SCREW GUIDE BUSHING NUT FOOT NUT LOAD BUSHING BUSHING SET SCREW RADIAL BEARING WASHER WINGED KNOB...
- Page 15 EXPLODED PARTS VIEW...
-
Page 16: Mounting Stand Parts
MOUNTING STAND PARTS PART # DESCRIPTION PART # DESCRIPTION WASHER - M8 MTNG. STAND PAD POST LOCKING LEVER SUPPORT ARM - LEFT WASHER - M10 SUPPORT ARM - RIGHT SUPPORT POST SHOULDER SUPP. LOCK KNOB FRAME SUPPORT SLIDE SUPP. ARM RETURN SPRING BADMINTON ADAPTER ARM ADJUSTMENT KNOB TENNIS ADAPTER...
Need help?
Do you have a question about the PROGRESSION 600ES-LED and is the answer not in the manual?
Questions and answers