Table of Contents
Advertisement
Quick Links
Advertisement
Table of Contents

Related Manuals for Elektron Analog heat


Summary of Contents for Elektron Analog heat
-
Page 3: Thank You
Samplers, drum machines, synths, the master bus, you name it. Analog Heat is a fiery furnace destined to make your music glow. This Quick Guide will guide you through the basic functions of this product. For more detailed informa- tion, please see the Analog Heat User Manual that you can download on www.elektron.se. - Page 4 Elektron may also make improvements and/or changes in the products and pro- grams described in this document at any time without notice. In no event shall Elektron be liable for any special, indirect, or consequential damages or any damages whatsoever resulting from loss of use, data, or profits, whether in an action of contract, negligence, or other action, arising out of or in connection with the use or performance of this information.
- Page 5 FCC compliance statement This device complies with part 15 of the FCC rules. Operation is subject to the following two con- ditions: (1) This device may not cause harmful interference, and (2) this device must accept any interference received, including interference that may cause undesired operation. NOTE: This equipment has been tested and found to comply with the limits for a Class B digital device, pursuant to Part 15 of the FCC Rules.
-
Page 6: Important Safety Instructions
IMPORTANT SAFETY INSTRUCTIONS 1. Do not use the unit near water. 2. Never use aggressive cleaners on the casing or on the LCD screen. Remove dust, dirt and finger- prints with a soft, dry and non-abrasive cloth. More persistent dirt can be removed with a slightly damp cloth using only water. - Page 7 Do not open the casing. There are no user repairable or adjustable parts inside. Leave service and repairs to trained service technicians only. • Do not exceed the limitations specified in the Electrical specifications. SAFETY INSTRUCTIONS FOR THE POWER ADAPTER ELEKTRON PSU-3B • The adapter is not safety grounded and may only be used indoors. •...
-
Page 8: Table Of Contents
2. PANEL LAYOUT AND CONNECTIONS ....................10 2.1 FRONT PANEL CONTROLS............................10 2.2 REAR PANEL CONNECTIONS ............................12 3. FIRST STEPS WITH THE ANALOG HEAT ....................13 3.1 CONNECTING THE UNIT ..............................13 3.2 SETTING THE INPUT SENSITIVITY LEVEL ......................13 3.3 SETUP EXAMPLES ................................14 4. -
Page 9: Introduction
1. INTRODUCTION 1.1 CONVENTIONS IN THIS MANUAL We have used the following conventions throughout the manual: Key names are written in upper case, bold style and within brackets. For instance, the key labeled “Settings” on the main panel is written as [SETTINGS]. Knobs are written in upper case, bold, italic letters. -
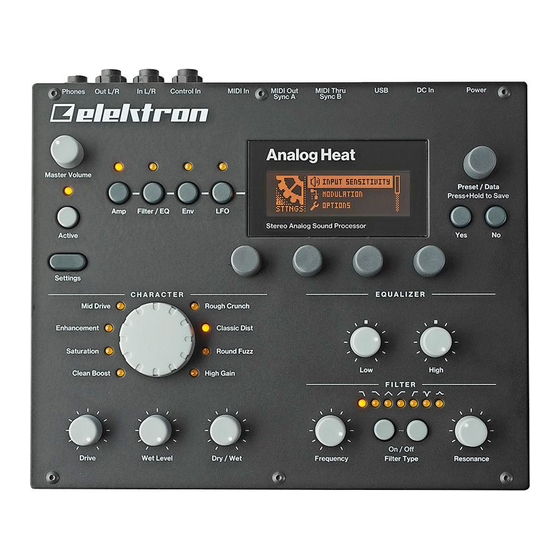
Page 10: Panel Layout And Connections
2. PANEL LAYOUT AND CONNECTIONS 2.1 FRONT PANEL CONTROLS 1. MASTER VOLUME sets the master volume for the L/R and Headphones outputs. 2. [AMP] key accesses the AMP parameter page where you can set things such as drive amount and the volume of the preset. 3. - Page 11 4. [ENV] key accesses the ENV parameter pages where you adjust the settings for the envelope generator/envelope follower. Press twice to access the second page. 5. [LFO] key accesses the LFO parameter pages where you set all things related to the Low Frequency Oscillator.
-
Page 12: Rear Panel Connections
2.2 REAR PANEL CONNECTIONS 1. POWER, Switch for turning the unit on and off. 2. DC In, Input for power supply. Use the included PSU-3b power adapter connected to a power outlet. 3. USB, For connecting the unit to a computer. For MIDI control or Overbridge use. Connect to a computer host using the included A to B USB 2.0 connector cable. -
Page 13: First Steps With The Analog Heat
Overbridge Suite that is used for these actions. 5. If you want to use MIDI to control the Analog Heat, connect the MIDI OUT port of the device you wish to send data from to the MIDI IN port of the Analog Heat. The MIDI THRU port duplicates the data arriving at the MIDI IN port, so it can be used for chaining MIDI units together. -
Page 14: Setup Examples
3. Adjust the level at the sound source if needed. 3.3 SETUP EXAMPLES The Analog Heat is very well suited for use in both an analog setup and in a more digital environment. Here are a couple of examples of how you can use the Analog Heat. -
Page 15: Signal Flow
ANALOG HEAT AS A SOUND CARD Analog Heat also functions as a 2 in/2 out sound card for your computer and can be used for both recording and monitoring audio. At the same time you can, via Overbridge, use the effect to process another set of audio signals. -
Page 16: Modulation Signal Flow
Dry/Wet Preset Master Head- Sensitivity Volume Volume phones Overbridge 4.2 MODULATION SIGNAL FLOW This illustration shows the flow of how modulation signals are generated and routed through the Analog Heat. Filter Modulation Over- bridge Modulation Destination Trig Bandpass Envelope Compar-... -
Page 17: The User Interface
The <ACTIVE> LED indicates if the effect is active or not. You can also use a Footswitch to toggle the Active Mode. You also have the option to set if you want the Analog Heat to start in active mode or not when you turn it on. -
Page 18: Filter Type
[FILTER TYPE] keys simultaneously to toggle the filter on/off. It is possible to change the filter type even if the filter is turned off. There are seven different analog filter types in the Analog Heat to help to shape the sound. •... -
Page 19: Wet Level
5.7 WET LEVEL Sets the level of the signal coming from the effect. It is applied before the DRY/WET mix. It is used to match the level of the dry signal for easy mixing of the two. 5.8 DRY/WET Sets the mix between the clean signal and the signal that is affected by the effect. 5.9 SETTINGS MENU Press [SETTINGS] to access the SETTINGS menu. -
Page 20: Lcd Screen Title Bar
N.B. You must have Analog Heat OS 1.02 or later to run Overbridge with Analog Heat. When using the Overbridge setup, the user interface for the Analog Heat will present itself as a clearly laid out plug-in window in your DAW. Browse through and organize presets. Access, edit or automate parameters for sound shaping on screen. -
Page 21: Technical Information
Dimensions: W215 x D184 x H63 mm (8.5” x 7.2” Accepts CV, Expression pedals, Foot switches x 2.5”) (including power switch, jacks, knobs and Unit power consumption: 12 W typical feet) Compatible Elektron power supply: PSU-3b Weight: approximately 1.5 kg (3.3 lbs) Maximum recommended ambient operating temperature: +35˚C (+96˚F) -
Page 22: Credits And Contact Information
CREDITS CONTACT INFORMATION PRODUCT DESIGN AND DEVELOPMENT ELEKTRON WEBSITE Oscar Albinsson http://www.elektron.se Ali Alper Çakır OFFICE ADDRESS Oscar Dragén Elektron Music Machines MAV AB Magnus Forsell Sockerbruket 9 Anders Gärder SE-414 51 Gothenburg Fabian Hundertmark Sweden Christer Lindström TELEPHONE Jimmy Myhrman...
Need help?
Do you have a question about the Analog heat and is the answer not in the manual?
Questions and answers