
Subscribe to Our Youtube Channel
Related Manuals for Ltl Acorn AG-680V Series


Summary of Contents for Ltl Acorn AG-680V Series
- Page 1 ® Acorn Guard Most Cost-effective Scouting Trail Camera AG-680V Series USER’S MANUAL...
-
Page 2: Table Of Contents
Contents Introduction 1.1 Fully Functionality Introduction 1.2 Application 1.3 Power Supply 1.4 Attention 1.5 Key Features Whole View and Details of Camera 2.1 Figure 1: Front View of Camera; 2.2 Figure 3.2: Bottom View of Camera; 2.3 Figure 3.3: Side View of Camera. 2.4 Figure 3.4: Internal View of Camera 2.5 Function Keys &... -
Page 3: Fully Functionality Introduction
Introduction Thank you for choosing one of our AcornGuard(AG-680V) easy operation highly qualified products. You now may enjoy the excellences reflected on this series product. This 12MP HD digital camera was totally R&D by our diligent and smart engineers based on feedbacks and requirements from customers globally. -
Page 4: Attention
camera to be able to work with most standard 6~12V lithium battery build-in solar panels. Power Adaptor—Security Surveillance Purpose This camera can also be powered by an external 6~12V DC adapter. Recommend to remove the alkaline batteries when power adapter is used, to avoid surcharging. -
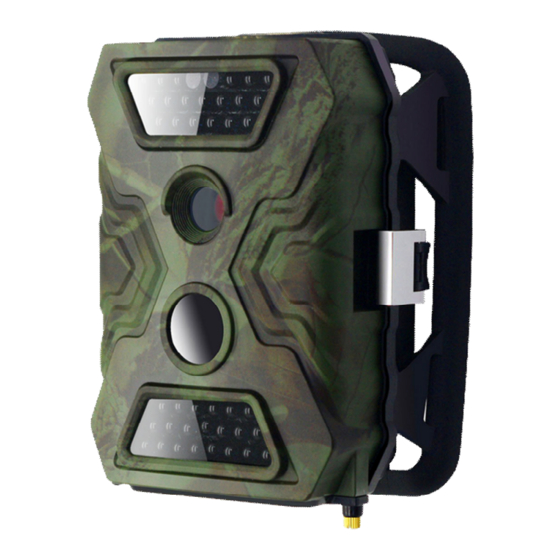
Page 5: Whole View And Details Of Camera
Time Lapse for automatically and constantly shooting of pictures/videos at preset interval; With specified Timer, camera can be programmed to work only during preset time period every day; Stamp of USER LABEL, date, time, temperature and moon phase on every picture enables you to identify where and when the camera shot photos;... -
Page 6: Figure 3.2: Bottom View Of Camera
2.2 Figure 3.2: Bottom View of Camera; Figure 3.3: Side View of Camera. - 5 -... -
Page 7: Figure 3.4: Internal View Of Camera
2.4 Figure 3.4: Internal View of Camera - 6 -... -
Page 8: Function Keys & Other Details
Introduction of each button a) Press Buttons 01: Menu; 02/ 03/ 04/ 05: navigation arrow buttons; 06: OK b) Switch Buttons 07: Power Switch; 08: Camera/Video Switch; 09: IR LEDs Group Switch; 10: GPRS Switch c) Interfaces 11: 12V DC in; 12: USB Port; 13: SD Card Slot; 14: TV Out. 2.5 Function Keys &... -
Page 9: Quick Start
Press and hold button “OK” for 5 sec to get back to mode “Power On” Quick Start 3.1 How to start the camera? Switch button ⑦ to “ON”, press button ⑥ “OK” once to wake up camera LCD screen (to enter TEST Mode.) 3.2 How to set the functions? Test mode, Press button ①... -
Page 10: Delete
button “↑” again to return. Press “Menu” button to initiate Deletion of files or Format of SD card. 4.2 Delete: Delete one: delete selected photo/video; Delete All. press“↑” and “↓”for selection, “OK” to confirm, “menu” return back to previous interface. 4.3 Format of SD Card Yes: to format SD card via camera. - Page 11 High/ Middle/ Low; Higher sensitivity is 1) more sensitive to movements by smaller subjects; 2) longer detection distance; 3) easier sensor detect difference between body heat and outdoor 9. PIR Sensitivity Middle temperature; 4) easier to trigger camera record. high temperature environment, body heat subjects environment...
-
Page 12: Specification
screen flicker 17. Language English English… Date/Time; Date: “month/ date/ 18. Time/Date 2011 year”; Time: “hour/minute” 12: 00 Select “OFF” to turn off camera 19. Camera Sound speaker. Select “ON”, camera will continue to record photos/videos by deleting Cycle earliest photos or video clips recorded Recording in SD card. -
Page 13: Mms, Sms, Smtp, Ftp, Tcp/Udp Functions Of Gprs
Shooting Numbers Trigger Time 0.8-1s Trigger Interval 2s-5s Camera + Video Playback Zoom in 2x, 3x, 4x Device Serial No. Time Lapse Beep Sound ON/OFF SD Card cycle ON/OFF Operation Power Battery: 6V; DC: 12V Battery Type External DC Stand-by Current 0.15mA Stand-by Time 4~6 months (4×AA~8×AA) -
Page 14: Sd Cards Selection And Battery Life Test Report
SD Cards Selection and Battery Life Test Report 8.1 SD Card Selection Using a memory card is required to operate the camera. When the camera is "ON" and no memory card is used, the screen displays "Pls insert memory card". The SD slot of the camera has a 32 GB memory capacity. Before inserting or removing the memory card, the camera must be turned "OFF". -
Page 15: Trouble Shooting
100 photos 49 days 640× 480 10 sec 10 clips 42 days 12MP 100 photos 45 days 1280× 720 10 sec 10 clips 40 days IR LEDs Off IR LEDs Off 100 photos 59 days 320× 240 10 sec 20 clips 119 days 100 photos 55 days... -
Page 16: Gprs Version Camera Stops Sending Photos To Email Or Mobiles
9.3 GPRS version camera stops sending photos to email or mobiles. 1. Check if the SIM card is out of charge. 2. Check if SIM card in using can work with mobile phone. 3. Check if the signal is too weak or there is no signal covered. 4.
Need help?
Do you have a question about the AG-680V Series and is the answer not in the manual?
Questions and answers
How do I send pictures to my pc or phone. There are no instructions to set mms or gprs
To send pictures from the Ltl Acorn AG-680V Series camera to your PC or phone, use the following methods:
1. SMS/MMS/GPRS/SMTP/HTTP: The camera can automatically send photos via MMS or email to 1–4 mobile phones and 1–4 email accounts using a supported 2G or 3G SIM card.
2. SMS Command: You can send an SMS to the camera to trigger it to take a photo and send it back instantly.
3. USB Connection: Use the USB port on the camera to connect directly to a PC and transfer photos.
4. SD Card: Remove the SD card from the camera and insert it into a PC or phone (with compatible reader) to copy the photos.
Make sure the SIM card is inserted and configured correctly, and that the correct recipient numbers and email addresses are set in the camera settings.
This answer is automatically generated
@Mr. Anderson But how do you set up the SMS/MMS/GPRS/SMTH/HTTP
Hello! I have camera AG-680V and when I turn on , it write Please Input Password. I don't know password. How can I reset this and use the camera. Thanks!
Hello, the divace is asking for password and it just turns off by itself. Could you send me Idea how ti resat it and start it up again? Thank you