
Related Manuals for Ltl Acorn Ltl-6511-4G


Summary of Contents for Ltl Acorn Ltl-6511-4G
- Page 1 ® LTL ACORN Low Power Consumption Infrared Scouting Camera Ltl-6511-4G(EXT.LCD) LTE Cellular Mobile Communication Series 1080P HD Video Trigger Time 0.8 Seconds USER’S MANUAL...
-
Page 2: Table Of Contents
FTP Uploading Function .................. 48 4.1 Setup FTP Parameters on Camera ............48 4.2 Set up FTP Parameters on PC ............. 49 4.3 Set up FTP Parameters on Mobile ............54 LTL-6511-4G Series Products ................. 57 5.1 Ltl-6511-4G series model: ..............57... - Page 3 6.1 Power Supply ..................58 6.2 Prevent From Short-Circuits ..............58 6.3 SD Card ....................58 6.4 Auto Adjustment on Video Length ............59 6.5 850nm and 940nm IR LED ..............59 6.6 Mount on Tripod ..................59 6.7 FAQs on 4G MMS Function ..............60 6.8 Low Battery Alert ..................
-
Page 4: General Information
General Information This manual applies model Ltl-6511-4G(EXT.LCD), Ltl-6511W-4G(EXT.LCD), The series of cameras are 4G LTE cellular mobile communication network transmission cameras, developed by our company, which have external button control boxes with display screens and low power dual PIR sensor. -
Page 5: Features
mobile phone, send email to E-mail account or upload to users’ FTP server directly. The rest of the time is in the standby state, when only PIR infrared sensor part is working and the standby current is only about 60uA.Please read the USER’S MANUAL in details before starting for better understanding and operation. -
Page 6: Application
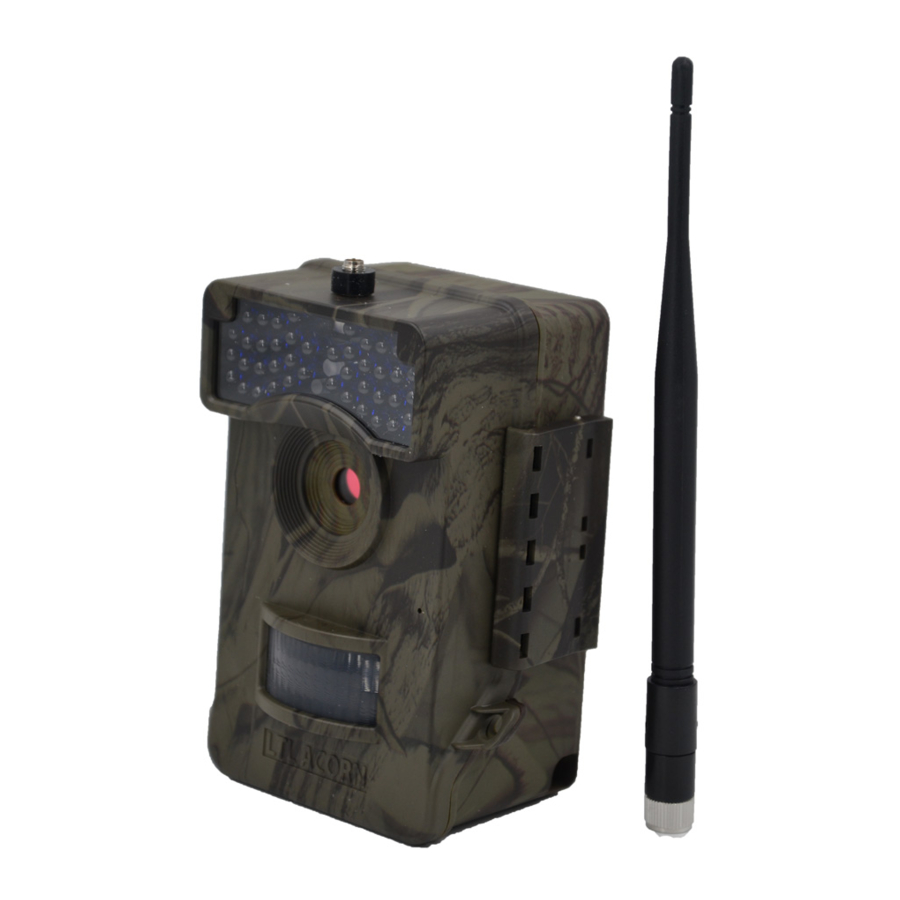
• Ultra-long standby time: more than 3 years with 4 AA alkaline batteries and 6 18650 lithium batteries in battery box. • Working temperature: -45℃ - +70℃. • Tight waterproof housing: IP66. • Patent technology of Low Power Dual PIR Pyroelectric Infrared Sensor, the camera detects animals in advance from wide scope in two stages, then quickly trigger to shoot, standby current is about 60uA, makes it to be the pioneer in the industry. - Page 7 Antenna Connector Light Sensor Motion Indicator IR LED Light Lens Lock Buckle Low Power Dual Lock Hole PIR Pyroelectric Infrared Sensor Figure 1.1Font View of the Camera Battery door TV out jack External DC Power/Mode Power in jack switch C TYPE socket of SD card slot external control box Figure 1.2 Bottom View of the Camera...
- Page 8 LED display Loudspeaker Keypad • Figure 1.3 shows the camera's external button control box with display screen Electrode contact Battery container Lock hole • Figure 1.4 shows the camera's battery compartment CAUTION: If you are not using the camera for an extended period of time, it is highly recommended that you remove the batteries from the camera to avoid possible acid leak that may damage the camera and void the warranty.
-
Page 9: Keypad
1.4 Keypad Keypad Keypad Function Power OFF: power off. ON: automatic shooting. ON (connect with mode external button control box with display screen): enter test switch mode. MENU key Enter/exit menu. Turn on 4G menu (TEST mode). Choose submenu setting Left key item of menu (me nu mode). -
Page 10: Getting Started
Getting Started 2.1 Load Batteries • Push inward to open the battery door of the main unit, load 4 AA batteries and press to close battery door. • Load 6 18650 lithium batteries in the battery box (keep the battery polarity same with the sign on the battery container). •... -
Page 11: Insert The External Button Control Box With Display Screen
Insert SIM Card At the left side of the camera back, you can see the SIM sign and the SIM card slot. Insert the SIM card into the slot as the sign slightly and you will hear sound “click” and finish insertion. Please make sure the insertion direction of SIM card is correct when inserting. -
Page 12: Enter Test Mode
2.5 Enter Test Mode After correctly connecting the external button control box with display screen, turn the switch outward to the preview test mode. external button control box with display screen with the keypad, in this case, you can use the camera as a normal digital camera to take picture and video by controlling the keypad. -
Page 13: Automatic Infrared Sensing Shooting
2.6 Automatic Infrared Sensing Shooting Without inserting the external button control box with display screen, set the switch to the ON position and then enter the automatic infrared camera mode. After entering this mode, the red indicator light on the front of the camera will flash for five times. -
Page 14: Low Power Dual Pir Sensor
The trigger time varies among different scouting camera brands on the market, generally from 1 to 5 plus seconds. Our LTL ACORN scouting camera has an impressive 0.8 seconds trigger time. The shorter of the trigger timer, the higher possibility to capture the animal. -
Page 15: Brightness Adjustment Of Night Picture
4、 Detect the position of the game. When game comes into detective area from random direction, the corresponding PIR will feedback to camera processor. The system would judge if there is game enters dual-PIR sensing area, whether it is in sense activation area of left/right PIR or in overlapping shooting area of left and right. -
Page 16: Advanced Settings
ADVANCED SETTINGS 3.1 Set up Parameters on Camera The LTL ACORN trail camera comes with preset manufacturer settings. You can change the settings to meet your requirements. Please make sure the camera is in the TEST mode. After correctly inserting the external button... - Page 17 01 Photo, 02 Select the number of burst shooting Picture No. Photos, 03 Photos at per trigger. Video AVI 10s, optional Select the duration of recording a Length from 1s to 60s video. Select the length of time that the camera will wait from when the last picture was taken and written on the 1 Min, optional from...
- Page 18 Select On and the camera will automatically work within a specified period of the day. For instance, if the starting time is set at 7:00 and the Timer1 Off, On ending time at 9:00, the camera can be triggered from 7:00 a.m. to 9:00 a.m.
-
Page 19: File Format
3.2 File Format All photos are in JPEG format and video in AVI format of H.264. Ltl-6511-4G(EXT.LCD) saves files in folder DCIM\100IMA4G in the SD card, Picture would be named like IMAG0001.JPG and video like IMAG0001.AVI. You can retrieve the SD card from camera and connect with computer with a SD card reader, view the files on computer directly. -
Page 20: Set Up 4G Parameters On Camera
3.3 Set up 4G Parameters on Camera After correctly inserting the external button control box with display screen, battery and SD card, set the camera switch to the ON position, and enter the preview test mode after the camera is turned on, press to enter 4G setting menu. - Page 21 Send immediately: Camera will send the picture/video to mobile, E-mail or FTP immediately after shooting. MMS is able to send thumbnail only instead of full size picture and video. All thumbnail, full size picture and video can be sent to the preset recipient E-mail or FTP by email.
- Page 22 TV System NTSC,PAL Set the TV system of the TV out. Software Show the software version of the camera. Version Full Image: Camera would automatically send original picture or video to the Send Full Image, preset E-mail or FTP after shooting . Image Thumbnail Thumbnail: Camera would send...
-
Page 23: Set Up Camera On Pc
Obtain the CD from the gift box and insert into PC, the external disc drive may be needed if the PC without the disc drive. Then run the 4G-Setup.exe software from the CD. Or download the software from website of Ltl Acorn: http://www.ltlacorn.cn/about/downloaden.html (Download→Classification→PC Setup→4G-Setup.exe) Below is the icon of the 4G-Setup.exe software:... - Page 24 Click to enter camera setting interface:...
- Page 25 Set the camera as your requirements. Please refer to section 3.1 Set up Parameters on Camera for better operation. Click choose the save directory, SD card root directory is recommended (connect SD card to computer with SD card reader first). Click and the below window will pop out: Then click...
-
Page 26: Set Up 4G Send Parameters On Pc
3.5 Set up 4G Send Parameters on PC Below is the icon of the 4G-Setup.exe software: Double click the 4G-Setup.exe icon to enter Setup homepage: Click to choose the camera model as request. Click to enter camera setting interface:... - Page 29 There are 2 pages of the 4G Parameter Settings, click to enter next page, click to turn to previous page when you at next page, change the 4G send setting parameters as your request in this interface, please refer to 3.3 Set up 4G Parameters on Camera for details.
- Page 30 Then click to exit. A file named CFG.BIN has been created and saved in the selected directory, before inserting the SD card into camera, please copy the CFG.BIN file to the root directory of the SD card if you didn’t choose SD card to save the file before.
-
Page 31: Instruction Of Mobile Setup Software
USB cable or other ways and install it. Note: The external disc drive is needed if the PC is without the disc drive. Or download the software from website of Ltl Acorn: http://www.ltlacorn.cn/about/downloaden.html (Download→Classification→APP→4G_Setup) Then copy the software to mobile with the provided USB cable or with other method and install it. - Page 32 Click Camera to choose the model as request.
- Page 33 Or use the default-generated saving path by the mobile, different mobile may generate different default path, but all would be saved in Ltl Acorn. Click the blank of Directory to popup the interface to choose saving...
-
Page 34: Set Up Camera Parameters On Mobile
Attention: Please remember the setting directory for searching configuration file easily. Click Camera SIM to input the SIM card number Set up the items as request. 3.7 Set up Camera Parameters on Mobile Enter the setup software on mobile, choose the camera model as LTL 6510-4G in the main interface. - Page 35 Set the parameters as request, please refer to section 3.1 Set up Parameters...
- Page 36 on Camera. Click after finishing setting, you will see below prompt message. Also you can click to obtain default setting. A file named menu.dat would be created and saved in the folder appointed. Copy the parameters setting file to the root directory of SD card in camera and install it.
-
Page 37: Set Up 4G Send Parameters On Mobile
3.8 Set up 4G Send Parameters on Mobile Click in main interface to enter the interface of 4G parameters setting:... - Page 38 Set the 4G parameters as request, please refer to 3.3 Set up 4G Parameters on Camera. Click to pop out below prompt message, a file named menu.dat would be created and saved in the folder appointed. Copy the 4G parameters setting file generated to the root directory of SD card in camera and install it.
-
Page 39: Mobile Remote Control
3.9 Mobile Remote Control Click in the main interface to enter camera parameters setting interface:... - Page 40 You can set the camera parameters and 4G working status in this interface, please refer to 3.1 Set up Parameters on Camera and 3.12 SMS Remote Control & Table of Command Code. Click to tick the circle in the left side, tick means the setting need to be generated to SMS command and send;...
-
Page 41: Instruction Of Iphone Mobile Setup Software
3.10 Instruction of iPhone Mobile Setup Software Download and install iPhone mobile setup APP You can input keywords ‘Super Ltl’ or “Ltl Acorn” in App Store to search the APP on your iPhone, download and install directly. Below is the icon of setup software:... - Page 42 The software named “Super Ltl”, applies to full series iPhone mobile and iPad Pro. Click the icon to enter the interface: The operation of iPhone version software is the same with Android mobile version, for more details please refer to the section 3.6, 3.7, 3.8, 3.9 and 4.3 of user manual.
-
Page 43: Obtain Configuration File Generated By Iphone Setup Software
The generated configuration file is saved in the folder Documents/Ltl Acorn of mobile application Super Ltl. Connect iPhone to PC with USB cable, enter the folder named LtlAcorn by the way of file sharing, finding the configuration file and copy to the SD card. -
Page 44: Sms Remote Control & Table Of Command Code
The camera configuration files generated by iPhone version software can be seen when open folder Documents/Ltl Acorn in this interface. 3.12 SMS Remote Control & Table of Command Code In order to communicate well with your camera via text message/SMS, format your texts and send in a certain way is needed. - Page 45 power consumption: “0” the highest and “off” zero. Camera will reply you message as below format when your SMS command is in correct format and received: Message "LTL..." format OK. SQ10,R1,G1. Attention: The content in the replied message in quote marks ("…") is the front part of the SMS command due to message length limitation.
- Page 46 Interval: beginning with S(s) represents second, with M(m) Interval: 30 06*s30# represents minute, seconds 1-60 indicates different value Serial Number: Off (0), turn off serial number 07*0xxxx#; Serial Number: 07*1ABCD# On (1), refer to ABCD camera setting, digit+ letter. Sense Level: Low (0), Normal (1), High 08*1# Normal...
- Page 47 Time Lapse: Off (0), The camera takes On (1). Time photo/video every indicated with 2 18*1013000# one and a half digits, e.g.: 1 Hour 30 hour no matter Min 0 Sec, indication: triggered or not. 013300. Timer1: Off (0), On (1).
-
Page 48: View Local Mpno Name And Signal Strength On Tft Screen
valid in FTP or email mode only; Get the camera to take picture The camera immediately and would take a send to your remote picture control mobile, On immediately and (1). 60*1# send to the This code is remote control workable in these mobile number mode: Camera,... -
Page 49: Features And Working Condition Of 4G Wireless Module
3.14 Features and Working Condition of 4G Wireless Module Ltl-6511-4G is able to take picture or video automatically and send to mobile, E-mail or FTP when works with 4G wireless module, also you can send SMS command to control the camera remotely and modify the camera parameters. - Page 50 4G communication of Ltl-6511-4G is working with below conditions: Camera switch is in On mode and camera is functioning well. SD card has enough storable capacity. Correct installation and enough power of batteries. MMS sending by timing or triggering should be workable in Camera mode or Cam+ Video mode only, not in Video mode.
-
Page 51: Ftp Uploading Function
FTP Uploading Function Ltl-6511-4G with newly added FTP upload function, it is able to upload the picture or video to the appointed FTP site. When you use this function, please set the FTP parameters first and switch camera to ON mode, then the camera will automatically take picture or video and upload as preset. -
Page 52: Set Up Ftp Parameters On Pc
4.2 Set up FTP Parameters on PC After formatting the SD card on camera, retrieve the SD card and insert into PC. The SD card reader may be needed if your PC cannot read SD card directly. The software 4G-Setup.exe icon is as below: After double-click 4G-Setup.exe software, the window appears below: Click to choose the camera model as request. - Page 55 4G parameter settings interface has two pages, click turn to next page, click to turn to the previous page. Select “4G Send Options” as “FTP” in ”4G Parameter Settings” window: Set up “Server”, “Port”, “User name” and “Password” in “FTP Settings” and the FTP directory for uploading.
- Page 56 command 22 sent by email). After finishing setting, click , the below prompt window would be shown when generate the file successfully: Please click the close button in top right corner of the window to close the window. After copying the CFG.BIN file to the root directory of SD card on PC, retrieve the SD card with CFG.BIN copy file and insert into camera.
-
Page 57: Set Up Ftp Parameters On Mobile
4.3 Set up FTP Parameters on Mobile Click the SuperLtl icon to enter Setup homepage: Click button in the main... - Page 58 window, enter into setting window, set up “4G Send Options” as “FTP”. Slide in the window, select “FTP Parameters Setting”, set up “Server”, “Port”, “User Name”, “Password” and the FTP directory for uploading file.
- Page 59 After finishing setting, click the top button of the window, below prompt window would be shown when generate configuration file successfully: After copying the CFG.BIN file to the root directory of SD card on PC, retrieve the SD card with CFG.BIN copy file and insert into camera. Connect the camera to the external button control box with display screen, set the switch to the ON position and enter the preview test mode.
-
Page 60: Ltl-6511-4G Series Products
LTL-6511-4G Series Products Ltl-6511-4G is the latest 4G wireless communication camera, with 4G wireless communication module of high communication capability and high transmission speed. Infrared LED light 850 light (visible) and 940 light (invisible) are for optional. Standard lens series camera of 55 degrees and wide angle lens series camera of 100 degrees are for optional. -
Page 61: Power Supply
IMPORTANT INFORMATION 6.1 Power Supply Ltl-6511-4G Series scouting camera works on electricity up to 12 voltages. The 4 AA batteries in the bottom of the camera, 6 cells of 18650 lithium batteries in the battery box and the external power supply form a three-path parallel circuit, each path is isolated from others and does not charge or discharge others. -
Page 62: Auto Adjustment On Video Length
Therefore, the number of video clips decreases accordingly. 6.5 850nm and 940nm IR LED There are two types of IR LED for optional of Ltl-6511-4G series scouting camera, 850nm and 940nm. For Ltl-6511-4G series (standard angle lens), 850nm provides flash distance up to 115 feet/ 35m whereas 940nm up to 59 feet/ 18m. -
Page 63: Faqs On 4G Mms Function
6.7 FAQs on 4G MMS Function The camera stops sending MMS to the pre-set mobile number suddenly: Please check if the SIM card balance is enough and local signal is well, if the operator sets limits to the number of MMS sending or if the mobile number was blacklisted. -
Page 64: Firmware Upgrades
The upgrade will have been finished successfully. Attention: The upgrade program of Ltl-6511-4G is not compatible to other models. In other word, an upgrade for Ltl-6511-4G only applies to Ltl-6511-4G model. If a camera is accidently upgraded by running a non-compatible program, it will quit working and needs to be sent back for repair. - Page 65 Set the “4G Send Status” as “MMS” or “Email”, “4G Send Mode” as “Send Immediately”, input the remote mobile number (to receive message of finishing upgrade). Switch the camera to ON mode and trigger it to take picture. The module would be activated after shooting and start the upgrade.
-
Page 66: Limited Warranty
It does not cover normal wear of the product. Please contact our tech support department to determine the nature of the problem before you return a LTL ACORN product under this warranty for repair or exchange. -
Page 67: Appendix I: Technical Specification
Appendix I: TECHNICAL SPECIFICATION Model Parameters Image Sensor 5 Mega Pixels Color CMOS FOV=55°; Auto IR-Cut Lens FOV=100°; Auto IR-Cut 940nm (55 degrees standard lens flashes 18 meters/ 59 feet) 940nm (100 degrees wide angle lens flashes 13 meters/ 42 feet) IR Flash 850nm (55 degrees standard lens flashes 35 meters/ 115 feet) - Page 68 Photo Burst Video Length 1-60sec.; Programmable Camera + Video First take Picture then Video Playback Zoom In 1~16 Times On/Off; Include serial No., temperature, moon Time Stamp phase, date and time. Timer1 On/Off; Programmable Timer2 On/Off; Programmable Password 4 Digits (0~9) Serial No.
-
Page 69: Appendix Ii: Package Contents
Stand-by Time 3 year (4 x AA, 6 x 18650 Lithium Battery) Auto power off in 3 minutes without any Auto Power Off operation in TEST mode. Power Consumption 180mA (+620mA when 940nm IR LED lights up) TV out; C TYPE External Control Box Socket; Interface SD Card Slot;... -
Page 70: Appendix Iii: Illustration Of Battery Box Installation
Appendix III: Illustration of Battery Box Installation 1、Load 6 cells of 18650 lithium battery in battery box. 2、Close the camera with battery box. Align and close both... - Page 71 3、Hook camera body with two lock buckles on side of battery box. Hook up the camera catching groove 4、 Snap on lock buckles.
-
Page 72: Appendix Iv: Place And Install Camera
Appendix IV: Place and Install Camera Mount on tripod 1、 There is a 1/4" nut hole on the back of the camera battery box, fix the camera to tripod by screw up the nut, and then adjust shooting angle. Nut hole... -
Page 73: Mount On Tree Trunk
Mount on tree trunk 2、 Fits holes on battery box with four conical plastic pillars can avoid cameras being slipped off from tree and loose. Then across the theft proof holes at the side of the battery box with a cable lock, mount the camera on tree trunk. - Page 74 FCC Caution. This equipment has been tested and found to comply with the limits for a Class B digi tal device, pursuant to Part 15 of the FCC Rules. These limits are designed to provide reasonable protection against harmful interference in a residential installation. This e quipment generates, uses and can radiate radio frequency energy and, if not installe d and used in accordance with the instructions, may cause harmful interference to ra dio communications.
Need help?
Do you have a question about the Ltl-6511-4G and is the answer not in the manual?
Questions and answers