Ltl Acorn Ltl 5210 User Manual
Scouting camera 5mp & 12mp
Hide thumbs
Also See for Ltl 5210:
- User manual (28 pages) ,
- Operation manual (24 pages) ,
- User manual (44 pages)
Table of Contents
Advertisement
Advertisement
Table of Contents

Related Manuals for Ltl Acorn Ltl 5210


Summary of Contents for Ltl Acorn Ltl 5210
- Page 1 LTL ACORN Scouting Camera Ltl 5210(5MP)& Ltl 5210A(12MP) USER’S MANUAL - 0 -...
-
Page 2: Table Of Contents
TABLE OF CONTENTS General Information ........................2 1.1 Features ..........................2 1.2 Application .......................... 2 1.3 Illustration ........................... 3 Quick Start............................5 2.1 Load Batteries ........................5 2.2 Insert SD Card........................5 2.3 Enter Test Mode ........................5 2.4 Enter Live Mode ......................... 6 Advanced Settings ........................... -
Page 3: General Information
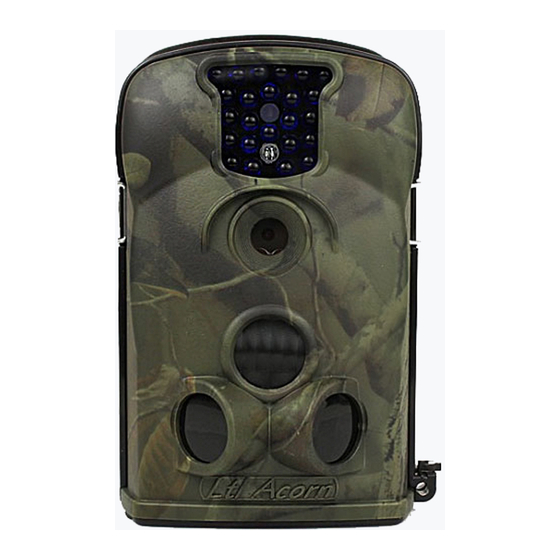
GENERAL INFORMATION 1.1 Introduction The Ltl Acorn (Model: Ltl-5210 & Ltl-5210A) scouting camera (also called game camera/trail camera) is a scouting device. It can be triggered by sudden change of ambient temperature caused by moving game in a region of interest (ROI), which is detected by a highly sensitive Passive Infra-Red (PIR) sensor, and then take pictures or video clips automatically. - Page 4 Quick Start Figure 1.1: Front View Figure 1.2: Bottom View - 3 -...
- Page 5 Quick Start The camera provides the following connections for external devices: USB port, SD card slot, TV out jack, and external DC power in jack. The 3-way Power/Mode Switch is used to select the main operation modes: OFF, ON and TEST. To supply power, it is recommended to use four new high-performance alkaline AA batteries or low self-discharge Ni-MH chargeable AA batteries.
-
Page 6: Quick Start
Quick Start QUICK START 2.1 Load Batteries Let us begin with loading the batteries. Please follow the instructions below. • Open the bottom cover by pulling down the lock hole. • Push the cover of the battery compartment and release. It will pop out. •... -
Page 7: Enter Live Mode
PIR sensor. By doing this test, you can find the best placement when mounting and aiming the Ltl Acorn camera. In general, you are recommended to place the camera 3 to 6 feet (1 to 2 meters) above the ground. - Page 8 The trigger time varies among different scouting camera brands in the market, generally from 1 to 5 plus seconds. Our Ltl Acorn scouting camera has an impressive 1 second trigger time. However, when game passes across very quickly, the picture may only capture the rear part of the body, and possibly nothing at all.
-
Page 9: Advanced Settings
Advanced Settings ADVANCED SETTINGS The Ltl Acorn trail camera comes with preset manufacturer settings. You can change the settings to meet your requirements. Please make sure the camera is in the test mode. 3.1 Parameter Settings Press “MENU” key to enter/exit the menu. Press... - Page 10 Advanced Settings Video Length (affects Avi 10 s, optional from Videos are in AVI format that can be video clips only) 1s to 60s played back on most video players. Interval 1 Min, optional from Select the shortest length of time that the 1S to 60M camera will wait until it responds to any subsequent triggers from the PIR sensor...
-
Page 11: File Format
Advanced Settings helpful when observing cold-blooded animals like snakes, or the process of flowering, etc. Side PIR On, Off The default setting is On. The two side prep PIR sensors provide wider sensing angle and detect more potential triggers. In some situations, you only want to monitor a narrow spot. -
Page 12: Warranty Information
This warranty extends solely to failures due to defects in materials or workmanship under normal use. It does not cover normal wear of the product. If you need to return a Ltl Acorn product under this warranty, please contact your dealer or our distributor. -
Page 13: Appendix I Technical Specifications
Appendix I: Technical Specification Appendix I: TECHNICAL SPECIFICATION Model Parameters Ltl-5210 Ltl-5210A Image Sensor 5 Mega Pixels Color CMOS Max. Pixel Size 2560x1920 F=3.1; FOV=52°; Auto IR-Cut Lens IR Flash 65 Feet/20 Meters LCD Screen 48x35.69mm(2.36"); 480(RGB)*234DOT; 16.7M Color Operation Keypad 6 Keys Memory SD Card (8MB ~16GB) - Page 14 Appendix I: Technical Specification Low Battery 4.2~4.3V Alarm Interface TV out (NTSC); USB; SD Card Slot; 6V DC External Mounting Strap; Tripod Nail IP54 Waterproof -22~+158°F/-30 ~+70°C Operation Temperature 5% ~ 95% Operation Humidity FCC & CE & ROHS Certificate - 13 -...
-
Page 15: Appendix Ii Package Contents
Appendix II: Package Contents Appendix II: PACKAGE CONTENTS Part name Quantity Digital camera Additional battery box(optional) TV AV IN cable USB cable Strap External DC cable (optional) Instruction Manual Warranty Card - 14 -... - Page 16 Appendix II: Package Contents - 15 -...
-
Page 17: Appendix Iii Instruction On Installing Additional Battery Box
Appendix III: Instruction on Installing Additional Battery Box Appendix III: INSTRUCTION ON INSTALLING ADDITIONAL BATTERY BOX - 16 -...
Need help?
Do you have a question about the Ltl 5210 and is the answer not in the manual?
Questions and answers