Table of Contents
Advertisement
Advertisement
Table of Contents

Related Manuals for MAGINON HS 120

Summary of Contents for MAGINON HS 120
-
Page 3: Introduction
Dear customer, Congratulations on purchasing a high-quality Maginon® product. You have chosen a modern portable scanner with excellent technical features and respective accessory, which is particularly easy to use. Please study all information in detail, observing, in particular, the safety information. -
Page 4: Table Of Contents
2. Contents Introduction 1. Contents of box 2. Contents 3. Hazard, Safety and Warning notices 4. Your portable scanner 4.1. Designation of parts 4.2. Overview of device 4.3. Status displays 5. Using the scanner 5.1. Inserting the batteries 5.2. Inserting a memory card 5.3. - Page 5 7. Use with computer 7.1. Connecting to a computer 7.2. Installing the text recognition software 7.3. Using the text recognition software 8. Fault finding 9. Conformity 10. Cleaning the device 11. Disposal 12. Warranty and Service 13. System requirements 14. Technical Specification 15.
-
Page 6: Hazard, Safety And Warning Notices
3. Hazard, Safety and Warning notices Intended use „ This portable scanner has been designed for private use and is not suitable to be used for commercial purposes Hazards for children and persons with limited ability to operate electronic equipment „... - Page 7 Hazards of using batteries „ Remove batteries from portable scanner if device is not used for some time. „ Do not remove batteries immediately after having used the portable scanner for a longer period of time, as batteries can become hot during use. „...
-
Page 8: Your Portable Scanner
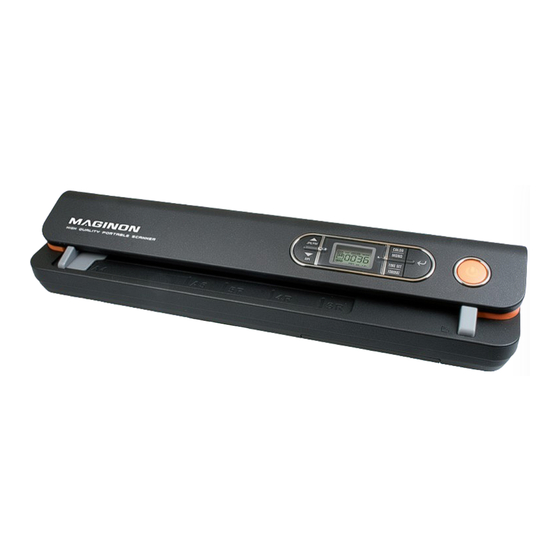
4. Your portable scanner 4.1. Designation of parts 1. Maginon® portable scanner HS 120 5. USB connection cable 2. 4 GB microSD memory card and SD 6. Cleaning card memory card adapter 7. Card for white balance 3. USB power supply 8. -
Page 9: Overview Of Device
4.2. Overview of device Element Function The USB interface serves to provide power for the scanner via the supplied Mini USB interface USB power supply or a computer. The interface can also be used for connec- ting the device to a computer for transferring images. Insert four AA batteries or rechargeable batteries with the same specification Battery compartment in the battery compartment. -
Page 10: Status Displays
4.3. Status displays Function Description SD display The images are stored on the inserted memory card. Battery full Battery display Battery empty File format display Scan as JPG or PDF EFFECT display Scan in colour (COLOR) or b/w (MONO) Counter Number of scanned files on inserted memory card HI: high resolution (900 dpi) RESOLUTION display... -
Page 11: Using The Scanner
5. Using the scanner 5.1. Inserting the batteries 1. Open the battery compartment on the underside of the scanner. 2. Insert the AA Mignon LR6 (1.5V) batteries or rechargeable batteries with the same specification in the battery compartment. The correct position of the batteries is shown next to the battery compartment. -
Page 12: Inserting A Memory Card
5.2. Inserting a memory card A microSD or a microSDHC memory card must be inserted to scan documents or photos (a 4 GB microSD card is supplied with the scanner). The memory card is inserted in the scanner as follows: 1. -
Page 13: Setting Date And Time
5.4. Setting date and time In order to be able to save scanned documents and photos with the correct scanning date, the date and time must be set before starting the scanner for the first time. 1. Push the TIME SET key for about 3 seconds to switch to the date and time setting mode. 2. -
Page 14: Formatting The Memory Card
5.6. Formatting the memory card This function formats the memory card and deletes all pictures and data contained on there. Note: • Caution: Formatting irrevocably deletes all files contained on the memory card. All impor- tant data should therefore be saved to the computer prior to formatting. Write-protected memory cards cannot be formatted. 1. -
Page 15: Scanning
5.9. Scanning As soon as all settings have been entered and a memory card has been inserted into the scanner, documents and images can be scanned. 1. Press the ON/OFF key to switch on the scanner. 2. The scanner is now in standby operation (ready mode). Select the file format, colour or b/w scan- ning and high or low resolution, as required. -
Page 16: Scanning Photos
5.10. Scanning photos The portable scanner can also be used to scan your photos. 1. Press the ON/OFF key to switch on the scanner. 2. Push the photo with side to be scanned facing down into scanner until resistance can be felt. 3. -
Page 17: Cleaning And Calibrating The Scanner
6. Cleaning and calibrating the scanner 6.1. Cleaning the scanner lens The scanner should be cleaned before or after use to ensure a high image quality at all times. A cleaning card is enclosed with the scanner. Cleaning card 1. Insert the cleaning card like a normal paper document and leave the scanner to run for approx. six seconds. -
Page 18: Use With Computer
7. Use with computer 7.1. Connecting to a computer Using the supplied USB cable, the scanner can be connected to a computer to transfer pictures from the memory card to the computer or view the images on the computer screen. No drivers have to be installed as the scanner is recognized as a USB removable storage device for which drivers have been preinstalled for all Windows systems (2000, XP, Vista, 7 or 8). -
Page 19: Using The Text Recognition Software
7.3. Using the text recognition software With the supplied programs ABBYY FineReader 9.0 Sprint and ABBYY Screenshot Reader you have various capabilities of converting your scanned text documents into text files. For this purpose the documents must be present as JPEG file. Before using both programs you must complete a free registration via ABBYY FineReader 9.0 Sprint. - Page 20 7.3.2. ABBYY Screenshot Reader To convert the text content of a scanned document, first open the document with an image proces- sing program. Then start the program ABBYY Screenshot reader and enter the settings required for text recognition. Under “Capture” specify the area of the computer screen to be recognized: a framed area, a program window or the entire screen.
-
Page 21: Fault Finding
8. Fault finding Problem Cause Solution 1. Batteries are empty. 1. Change batteries. Scanner cannot be switched on. 2. Batteries not inserted correctly. 2. Insert batteries as specified. 1. Insert memory card correctly. 1. The memory card was not inserted 2. -
Page 22: Conformity
9. Conformity This device was tested according to Part 15 of the FCC regulations and it was confirmed that the device complies with the limit values for class B digital devices. The aim of these limit values is to provide appro- priate protection against adverse sources of interference in case of a domestic installation. -
Page 23: Cleaning The Device
10. Cleaning the device CAUTION! Prior to any cleaning, disconnect USB power supply from the mains socket and remove batteries from scanner. Do not clean with solvent, aggressive or abrasive cleaning agents as this may damage the surface. Carefully clean the scanner and the display using a soft cloth. Remove stubborn stains by lightly moistening the cloth, ensuring that no humidity enters the scanner. -
Page 24: Warranty And Service
Please see enclosed Warranty Card for details Please contact our hotline prior to returning a defective device. Service address Manufacturer’s address Schenker Australia Pty Ltd supra Maginon Service Foto-Elektronik-Vertriebs-GmbH P.O. Box 329 Denisstr. 28A Villawood, NSW 2163 67663 Kaiserslautern Australia Germany Tel.: 1 800 623 432... -
Page 25: Technical Specification
14. Technical Specification Model Maginon HS 120 Image sensor Colour contact image sensor in A4 format Sensor size 5136 image points (of which 5104 used) Colour depth 24 Bit High resolution: 900 x 900 dpi (interpolated) Resolution Medium resolution: 600 x 600 dpi (interpolated) Low resolution 300 x 300 dpi Max. -
Page 26: Index
15. Index ABBYY FineReader 17 LCD display 7, 8 ABBYY Screenshot reader 18 Accessory 1, 6 Memory card slot 7 Memory card, inserting 10 Battery change 9 Mini USB interface 7 Battery compartment 7, 9 Battery type 9, 23 Operating keys 7 Overview of device 7 Calibrating 15 Cleaning 15, 21... - Page 28 supra Foto-Elektronik-Vertriebs-GmbH 35876 Denisstr. 28A 04/2013 67663 Kaiserslautern 2610 9701 Germany...
Need help?
Do you have a question about the HS 120 and is the answer not in the manual?
Questions and answers