
Related Manuals for Alcatel-Lucent OpenTouch 8088


Summary of Contents for Alcatel-Lucent OpenTouch 8088
- Page 1 Alcatel-Lucent OpenTouch™ Conversation 8088 Smart DeskPhone User Manual 8AL90314ENAA ed01 -1517 R100...
- Page 2 Thank you for choosing this phone. This model offers enhanced ergonomical features for more effective communication. With its touch screen and built-in interactive capabilities, the 8088 Smart DeskPhone can deliver the comfort and convenience you are looking for. The availability of certain functions described in this guide may depend on the version or configuration of your system.
-
Page 3: Table Of Contents
1 GETTING TO KNOW YOUR TELEPHONE 1.1 PHONE DESCRIPTION 1.2 DESCRIPTION OF THE CONNECTORS 1.3 PERMANENT FEATURES KEYS 1.4 ABOUT THE HOMEPAGE 1.5 NAVIGATION 1.6 BLUETOOTH® WIRELESS HANDSET 1.7 INSTALL A COMFORT WIRED HANDSET 1.8 HDMI CONNECTOR 2 USING YOUR TELEPHONE 2.1 MAKING A CALL 2.2 MAKE A CALL USING THE PERSONAL PHONE BOOK (CONTACTS) 2.3 USING CALL BY NAME... - Page 4 4 VIDEO CALL 4.1 VIDEO CALL 4.2 START A VIDEO CALL 4.3 MUTE/UNMUTE THE VIDEO CALL 4.4 HIDE/SHOW THE ‘PICTURE IN PICTURE’ 4.5 DISPLAY VIDEO IN FULLSCREEN MODE 4.6 RECEIVING A SECOND CALL 4.7 VIDEO CONFERENCE 4.8 SCHEDULED VIDEO CONFERENCE 5 CONTACTS MANAGEMENT 5.1 DEFINE A CONTACT 5.2 ADD A CONTACT FROM THE CALL LOG...
- Page 5 8 PROGRAMMING YOUR TELEPHONE 8.1 DEFINE THE PHONE LANGUAGE 8.2 LOCK / UNLOCK YOUR TELEPHONE 8.3 AUTOMATIC LOCK 8.4 ADJUSTING THE AUDIO FUNCTIONS 8.5 ACTIVATE/DEACTIVATE SILENT MODE 8.6 RING TONES 8.7 PROGRESSIVE RINGING 8.8 ADJUSTING THE RINGER VOLUME 8.9 ADJUST RINGER VOLUME WHILE A CALL ARRIVES 8.10 ADJUST THE LOUDSPEAKER AND THE HANDSET VOLUME 8.11 INSTALL A JACK ACCESSORY (HEADSET, HANDSFREE, LOUDSPEAKER) 8.12 IF NECESSARY, YOU CAN ALSO SELECT THE ACCESSORY TYPE IN THE AUDIO SETTINGS:...
- Page 6 11 SUPERVISION AND CALL PICK UP 12 CONTACT-SYNC 12.1 INTRODUCTION 12.2 PREREQUISITES 12.3 INSTALLING THE APPLICATION ON YOUR PC 12.4 UNINSTALLING THE APPLICATION 12.5 REPAIRING THE APPLICATION 12.6 CONFIGURATION 12.7 SYNCHRONIZE YOUR PHONE AND YOUR PC 12.8 TROUBLESHOOTING 13 GUARANTEE AND CLAUSES 8AL90314ENAAed01 6 /70...
-
Page 7: Getting To Know Your Telephone
1 Getting to know your telephone 1.1 Phone description Sensitive LCD wide screen with ambient light sensor. Embedded HD Video camera with shutter. Swipe the shutter right or left to use or hide the camera. Permanent feature keys: quick access to the phone’s main features. Bluetooth®... -
Page 8: Description Of The Connectors
1.2 Description of the connectors Various connections to allow phone extensions. Add-on module connector (SATA type). Two Universal Serial Bus (USB) ports (1.1/2.0) to connect an external camera, audio equipment, a low smartphone charger or USB stick. HDMI® 1.4 output for screen replication and for dedicated HD video display. 10/100/1000 Mbps Ethernet connectors to a PC (RJ45). -
Page 9: Permanent Features Keys
1.3 Permanent features keys They are located just below the touch screen Mute key. During a call, press this key to stop your contact from hearing you. As long as the mute feature is activated, the mute key stays lit (blue). Press this key to deactivate the mute feature. Turn down the volume. -
Page 10: About The Homepage
1.4 About the homepage Homepage in standard mode Homepage in business mode Personal area This area displays information about the user's phone and configuration, including last name, first name, avatar, and routing. The colored bar under your photo/avatar shows your present status. Routing profile Access programming and configuration of routing profiles. - Page 11 Date, time and connectivity area This area displays time, date, connectivity and customization information (wake-up on, intercom mode on). Security mode (encrypted audio communication). USB Accessory or storage device connected to USB port. Bluetooth® device pairing in progress. Bluetooth® device connected (Other than your Bluetooth® handset). Headset plugged in.
- Page 12 Active area This area is reserved for running applications and for previews of applications selected by the user. When you start an application, it is displayed in the active zone. If no application has been launched, the active zone displays the application previews that you have preset on the homepage.
-
Page 13: Navigation
1.5 Navigation The phone set homepage can be viewed in standard or advanced mode. Scroll your finger up or down to get the page or menus scrolling vertically (in advanced mode), or scroll right or left to get the page scrolling horizontally. (in standard mode only). Homepage in standard mode Homepage in business mode Make your selection by pressing the right icon on the sensitive screen. -
Page 14: Bluetooth® Wireless Handset
1.6 Bluetooth® Wireless handset Ignore incoming call . Off-hook/On-hook: press this key to take or terminate a call . Volume/Mute: Short successive presses to change the handset volume level (3 levels) Long press to activate or deactivate mute mode Location of the battery If the Bluetooth®... -
Page 15: Install A Comfort Wired Handset
Installing or replacing the Bluetooth® handset battery Lift up the battery cover Slide out the battery holding part The battery recharges when the Bluetooth® handset is on its base. 1.7 Install a comfort wired handset You can install a wired handset in place of the Bluetooth® Wireless Handset. ... - Page 16 Broadcast the video conversation (HD capability) Use one of the following: o During the video conversation, swipe up on the video displayed on the phone to broadcast it to the equipment connected via HDMI. o To stop the broadcast, swipe down on the video displayed on the phone.
-
Page 17: Using Your Telephone
2 Using your telephone 2.1 Making a call Use one of the following: o Dial directly the number for your call. o Lift the receiver Enter the destination number. Press the on-hook/off-hook key of the Bluetooth® device. (Bluetooth® Wireless handset) Dial the destination number. -
Page 18: Make A Call Using The Personal Phone Book (Contacts)
2.2 Make a call using the personal phone book (Contacts) Contacts Select the contact to call Information regarding your contact is displayed on the screen. Press the call icon to call your contact. If there are several numbers for the same contact, select the desired number. 2.3 Using call by name ... -
Page 19: Call Back One Of The Last Numbers Dialed
2.5 Call back one of the last numbers dialed Open the dialpad Select the contact to call in the list of last number dialed. Call your contact directly by selecting the badge You can also access the feature by selecting the application preview History. 2.6 Redialing the last number dialed (redial) ... -
Page 20: Ignore Call
2.9 Ignore call A call is received: Use one of the following: Ignore Press on the On-hook key on the permanent features keys panel Your phone no longer rings but your caller still hears the ringing tone. You can still answer the call after you have ignored it. 2.10 Divert an incoming call A call is received: Your telephone rings. -
Page 21: Receiving Intercom Calls (Interphony)
To go back to “handsfree“ mode Press the “handsfree“ key again Press on the handsfree mode. You can hang-up the handset. 2.12 Receiving intercom calls (Interphony) You can answer a call without lifting the receiver. When you receive a call, you are automatically connected in hands-free mode. -
Page 22: Delete One Call Log Event
2.15 Delete one call log event Access the call log by pressing the Communication key. Select tab: History Press the desired event: Delete You can also access the feature by selecting the application preview History. 2.16 Delete events from the call log ... - Page 23 Use one of the following: o You are notified of a new voicemail message (notification zone) Press the voicemail messages notification button in the top middle area of the screen. Voicemail Select the contact who has left a voice message. Press the communication key on the permanent features keys panel (Lit).
-
Page 24: Set An Alarm
Change your voice mailbox password To change your voice mailbox call your voice mailbox and follow the voice guide instructions. 2.18 Set an alarm Alarm Enter the alarm time. Select the melody of your choice. Adjust the alarm volume. -
Page 25: During A Conversation
3 During a conversation 3.1 Putting a caller on hold You are in communication: On hold Your call is placed on hold. Your caller hears on-hold music or a tone until you pick the call up again. Recover the call on hold ... -
Page 26: Transferring A Call
3.4 Transferring a call During a conversation, to transfer the call to another number: You are in communication with a first caller Transfer to Call the recipient of the transfer: You can directly call the person by dialing his/her number, select the person to call from the call log, or use the search by name feature to call the second person. -
Page 27: N-Party Conference (More Than Three)
3.6 N-party conference (more than three) If allowed by the system, you can establish an N-party conference (more than three callers including you). You are on a call with one or more contacts. Add a new participant to the conference - N-party conference ... -
Page 28: Recording The Current Conversation
3.9 Recording the current conversation When you are on a call with one or more callers, you can record the conversation. To record the conversation during communication: More Record Recording in progress... Stop The user must have the appropriate rights to use this feature. Recorded conversations will then appear as voicemails. -
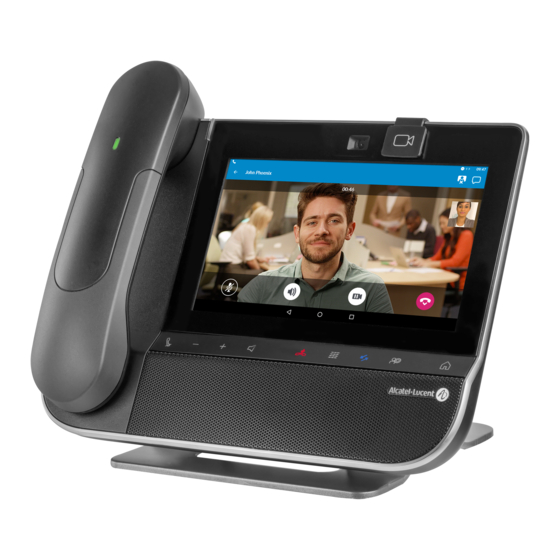
Page 29: Video Call
4 Video call 4.1 Video call To use this feature, both your phone and your caller's phone must have the feature enabled. The phones must also be able to handle video. During a video call, the screen comprises two areas. The main screen shows your callers video and the “picture in the picture“... -
Page 30: Hide/Show The 'Picture In Picture
4.4 Hide/Show the ‘picture in picture’ You can choose to hide or show the ‘picture in picture’. Long press or double tap on the main video screen or the ‘picture in picture’ to hide or show the ‘picture in picture’. When you hide the ‘picture in picture’... -
Page 31: Scheduled Video Conference
Starting a video conference by directly adding a participant. You are on a video call. Add participant. Call your caller. Once your contact answers, the previous ongoing video is retrieved as it was before adding the new contact, and the video is automatically broadcasted on the phone of the new contact. In order to see the video from the new contact, he/she has to press on the "picture in picture"... -
Page 32: Contacts Management
5 Contacts management 5.1 Define a contact Contacts Add new contact Fill in the contact file. You must provide at least a last name. Back Your contact is added to the directory. For external numbers, we recommend you use canonical address formats comprising “+“, followed by the country code (e.g. -
Page 33: Modify A Contact
5.4 Modify a contact Contacts Select the contact to modify. Edit Change the contact file. Back You can modify a contact while you are on a call. 5.5 Delete a contact Contacts Select the contact to delete. ... -
Page 34: Define A Contact As A Favorite (Favorites)
5.7 Define a contact as a favorite (Favorites) Most frequently called contacts can be defined as a favorite. The telephony presence is activated for all your contacts defined in the favorites. This allows you to see the status of any contact defined in the favorites before calling them. Contacts must be connected to the same local system to be able to see the telephony presence. - Page 35 Move a shortcut key on the standard homepage When in standard display mode, press and hold an empty space of the homepage. Select shortcut key to move: Select destination. Back to homepage. Delete a direct call key on the standard homepage ...
-
Page 36: Keep In Touch
6 Keep in touch 6.1 Telephony presence You can let your contacts know whether you are reachable (status). The status is displayed on your contact’s phone when they try to reach you. You can only see the telephony presence of the contacts registered in your Favorites. Contacts must be connected to the same local system to be able to see the telephony presence. -
Page 37: Immediate Forward To Voice Mailbox
6.3 Immediate forward to voice mailbox Use one of the following: Press the User services key. o Press your information area in the top left corner of the screen. Routing profile Voicemail Forward is activated (The forward key lights blue if configured so in: Settings Phone configuration... -
Page 38: Multi Devices Routing
Overflow to voicemail Use one of the following: Press the User services key. o Press your information area in the top left corner of the screen. Overflow If busy/no reply to Voicemail Calls will be diverted to your voicemail when you are busy or absent. 6.5 Multi devices routing You can choose to have your business calls diverted to any other devices that are able to receive calls. -
Page 39: Keypad
7 Keypad At any time, you can show or hide the keypad by swiping up or down the bottom of the screen. 7.1 Change the keyboard type While editing text, you can change the keyboard type to match the language you are writing: AZERTY, QWERTY, QWERTZ, Cyrillic. -
Page 40: Write In Uppercase
7.3 Write in uppercase By default, the written characters are in lowercase. Press this key once. The next character will be written in uppercase and then you will automatically switch to lowercase. Press this key twice. The associated key light is on. Uppercase mode is used for all written characters. -
Page 41: Programming Your Telephone
8 Programming your telephone 8.1 Define the phone language The phone language is set in your OpenTouch profile on the server as long as you don't change the phone language directly on the phone. To change the phone language, you are recommended to: ... -
Page 42: Automatic Lock
Unlock your terminal Enter your password to unlock the phone. By default, the password is your OpenTouch password. If necessary, refer to your administrator to find out your password. 8.3 Automatic lock When your phone’s backlight goes off, the phone is locked at the same time. Activate the automatic lock ... -
Page 43: Ring Tones
8.6 Ring tones Settings Device Audio Beeps before ringing One beep: One beep before ringing Two beep: Two beeps before ringing Three beep: Three beeps before ringing No beep: Ring without beep Validate your choice. 8.7 Progressive ringing ... -
Page 44: Install A Jack Accessory (Headset, Handsfree, Loudspeaker)
8.11 Install a jack accessory (headset, handsfree, loudspeaker) By default, the audio jack of your telephone can be used to connect a headset, hands-free kit or loudspeaker. When you plug the jack accessory in the jack, a popup asks you for the type of accessory: o Headset o Handsfree o Loudspeaker... -
Page 45: Install A Bluetooth® Device (Pairing)
8.13 Install a Bluetooth® device (pairing) You can use Bluetooth® devices such as handsets or headsets with your phone. To use your Bluetooth® device, it must be paired to the set. To manage the pairing, the Bluetooth® device must be in detectable mode. Refer to your Bluetooth® device documentation to find out how to activate detectable mode. -
Page 46: Install The Ale International Bluetoothø Wireless Handset
8.14 Install the ALE International Bluetoothø Wireless handset Settings Device Bluetooth® Scan The set scans for available Bluetooth® devices. Your Bluetooth® device needs to be prepared for pairing. Take the handset off the hook and switch it off, then press and hold both handset buttons at the same time. You will hear a 3-note tone and the LED will flash green and orange. -
Page 47: Hearing Aid Kit
8.16 Hearing aid kit If you are using your phone with a hearing device, you must install and activate the hearing aid device (HAC) to avoid hearing discomfort. Settings Device Audio Hearing aid Enable the feature: The hearing aid kit is activated. 8.17 Phone wallpaper You can change the wallpaper on your phone. -
Page 48: Phone Screensaver
8.18 Phone screensaver You can change your phone screensaver to a default or a personal screensaver. The default screensaver uses predefined images. The personal screensaver uses images you have stored in your phone memory and set up in a screensaver pool. ... -
Page 49: Change The Theme (Skin) Of Your Phone
8.19 Change the theme (skin) of your phone Settings Device Phone configuration Select the current theme in the configuration page The available theme list is displayed on the screen. Select the desired new theme from the list. ... -
Page 50: File Manager
9 File Manager This application allows you to manage audio files and images. My files Select the file type you want: o Audio o Picture Select where to read the files from: files stored on the phone or on the connected USB device, or both. -
Page 51: Copy A File From The External Storage Device To The Phone Internal Memory
9.2 Copy a file from the external storage device to the phone internal memory My files Select the file type you want: o Audio o Picture Filters Select the storage device. Select the file to copy. ... -
Page 52: Play All Audio Files
Start listening again: Play Stop listening: Stop Supported audio formats are mp3, aac and wav. When released from the manufacturing plant, the audio files hosted on the phone are ALE International property and can be used as is. When an installer or End-User downloads MP3 files via a USB link, they are responsible for the Intellectual Property Right requirements related to such downloads. -
Page 53: Manager/Assistant
10 Manager/Assistant 10.1 Manager/Assistant The Manager/Assistant application offers specific additional features when the manager set is configured for use with an assistant phone. On the manager set, a dedicated application window shows the name of the assistant, the direct call feature access button, and the filtering mode access button. -
Page 54: Select And Activate The Filtering Mode Between The Manager And Assistant Phones
On both sets, the header of the dedicated assistant/manager application shows the telephony presence of the assistant or manager and the current activated filtering mode The assistant or the manager is on a call. The assistant or the manager is not on a call. 10.2 Select and activate the filtering mode between the manager and assistant phones The filtering mode allows the assistant and the manager to choose how to route and monitor incoming... -
Page 55: Consult The Manager Or The Assistant While In A Call
The manager picks up the incoming call: Monitored call Control Answer displayed call. Manager receives the calls & Assistant monitors them In this filtering mode, the assistant is notified of the incoming call on the manager set. If necessary, the assistant can pick up the incoming call before the manager answers the call. -
Page 56: Transfer A Call To The Manager Set
10.5 Transfer a call to the manager set When on a call, the assistant can directly transfer the call to the manager. The assistant is on a call To manager The call is forwarded to the manager. 10.6 Define a priority number (“White List“) A registered number in the 'White List' is a private number. -
Page 57: Activate/Deactivate A Temporary Backup Assistant
10.8 Activate/deactivate a temporary backup assistant The main assistant can define a temporary backup assistant. This is to ensure you receive continuous service in case, for instance, the main assistant is not available. Activation of the backup assistant: Press on the backup assistant key (from Manager/Assistant mode window). o If no backup assistant was previously defined: select the backup assistant via the keypad that opens automatically. -
Page 58: Supervision And Call Pick Up
11 Supervision and call pick up Depending on the configuration of the system made by your administrator, you might be part of a supervision group. Your set can be supervised, supervisor or both. Thus, incoming calls to your phone can be picked up by a supervisor phone (when you are absent or busy for instance) and your phone can pick up incoming calls to supervised phones if your phone is supervisor. - Page 59 There are five different status: Free Free and ringing On the line On the line and ringing Out of the supervision group When the supervision application preview is displayed on the phone screen it replaces the favorites and the history applications preview.
- Page 60 Call a supervised phone from a supervisor phone You can directly call a supervised phone by pressing on the name of the supervised user in the dedicated application preview. Press on the supervised user in the application preview Display a supervised user contact card You can display the contact card of a supervised phone (where available) by pressing (long press) on the name of the supervised user in the dedicated application preview.
-
Page 61: Contact-Sync
12 Contact-Sync 12.1 Introduction This application is for synchronizing your address book between your phone and the Outlook application. It supports synchronization of the Outlook data placed locally, for example in a local Outlook archive file. The default maximum number of contacts you can synchronize between your phone and your PC is 500. - Page 62 3. Read and agree the license Agreement. 4. Select the application destination folder on your PC (make sure you have the necessary administration rights to install the application in the selected folder). 5. Follow the installation steps. 8AL90314ENAAed01 62 /70...
-
Page 63: Uninstalling The Application
12.4 Uninstalling the application There are two different ways for uninstalling the application: Access the feature “Add/remove programs“ (Windows XP) or “Programs and features“ (Windows Vista or Windows 7). Run the installation executable file and select the “Remove“ option. 12.5 Repairing the application If the application becomes corrupted, you can repair it. - Page 64 2. You can define: The profile and the Outlook folder to use for synchronizing contacts. The default profile and Outlook folder will be used for synchronizing unless you specify a folder and profile. You can change the profile and folder used. You can define a profile for synchronizing the contacts.
- Page 65 The port used by PC for synchronization: if default port cannot be used on the PC you can change it. If you modify the port used by the application, you have to do the same modification on the phone side. Secured connection: while communicating between Contact-Sync and the device, both unsecured HTTP or secured HTTPS protocols can be used.
-
Page 66: Synchronize Your Phone And Your Pc
12.7 Synchronize your phone and your PC Before starting synchronization please make sure both the phone and PC software are properly configured. Start synchronization Use one of the following: Synchronization (If enabled in the synchronization settings) Settings Application Synchronization ... -
Page 67: Troubleshooting
12.8 Troubleshooting Below is a troubleshooting guide that can help you resolve any problems that might occur. Installation says you do not have write You are probably not permitted to change the folder in which you are permissions in this folder trying to install PC Sync. -
Page 68: Guarantee And Clauses
13 Guarantee and clauses Safety Instructions Changes or modifications to the equipment not expressly approved by the party responsible for compliance could void the user's authority to operate the equipment. Magnets could affect the functioning of pacemakers and implanted heart defibrillators. Keep a safe distance between your pacemaker or implant defibrillator and the handset which includes magnetic elements: 4 centimeters (1,6 inches) at least ... - Page 69 Regulatory Statements EUROPE This equipment is in compliance with the essential requirements of R & TTE Directive 1999/5/EC. The Declaration of Conformity may be obtained from your installer. USA and Canada This device complies with Part 15 of the FCC Rules and with RSS-210 of Industry Canada. Operation is subject to the following two conditions: (1) this device may not cause harmful interference, and (2) this device must accept any interference received, including interference that may cause undesired operation.
- Page 70 Privacy Privacy of communications may not be ensured when using the Bluetooth® handset or any additionnal Bluetooth® device Disposal The equipment must be returned to a collection point for electronic equipment waste disposal. Defective batteries must be returned to a collection point for chemical waste disposal. The labels and icons presented in this document are not contractually binding and may be modified without prior warning.
Need help?
Do you have a question about the OpenTouch 8088 and is the answer not in the manual?
Questions and answers