Advertisement
Table of Contents
- 1 Table of Contents
- 2 Warnings
- 3 Ac401 Setup Requirements
- 4 STEP 1 - Charging the Parent Unit (15 Hours)
- 5 STEP 2 - Installing the Sensor Pad
- 6 STEP 3 - Setting up the Nursery Unit
- 7 STEP 4 - Turning on Your Monitor
- 8 STEP 5 - Testing and Getting to Know Your Monitor
- 9 STEP 6 - Activating and Deactivating Additional Functions
- 10 Additional Functions
- 11 Troubleshooting
- 12 Limited Warranty
- 13 Technical Specifications
- Download this manual
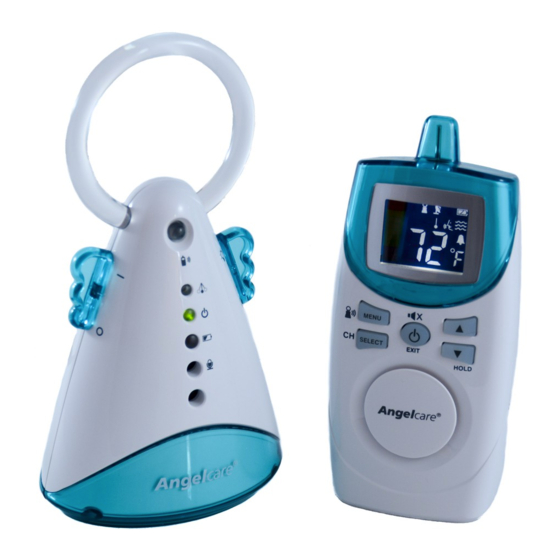
OWNER'S MANUAL
MOVEMENT & SOUND BABY MONITOR
Model AC401
IMPORTANT ADVICE FOR INITIAL SETUP
Movement Alarm
Your monitor comes with the movement alarm activated.
When switching on your monitor it will alarm, with or without
the Sensor Pad plugged in, if no movement is detected.
Deactivate the movement function to use the monitor without
the Sensor Pad.
Batteries
Insert the enclosed rechargeable batteries into the Parent
Unit. If inserted incorrectly the Parent Unit will not charge
when placed in the charging cradle. The battery icon will flash
briefly on the Parent Unit screen to indicate charging.
Cord Safety
Ensure the Nursery Unit is at least 1 metre away from your
baby's cot. The Sensor Pad cord must always be kept out of
reach of baby and secured using the cord cover kit provided.
Voice-activated Sound Transmission
Your monitor will transmit when it detects sound from
your baby or in their room. You can adjust the microphone
sensitivity to suit your needs.
PLEASE FOLLOW THE INSTRUCTIONS CAREFULLY FOR CORRECT SETUP
Please DO NOT return this product to the store. For assistance please
contact our helpline on 0345 009 1789 or email helpline@babyhelpline.co.uk
Mon – Fri 10am – 4pm, excluding bank holidays.
FOR YOUR PEACE OF MIND
Advertisement
Table of Contents

Related Manuals for Angelcare AC401


Summary of Contents for Angelcare AC401
- Page 1 FOR YOUR PEACE OF MIND OWNER’S MANUAL MOVEMENT & SOUND BABY MONITOR Model AC401 IMPORTANT ADVICE FOR INITIAL SETUP Movement Alarm Your monitor comes with the movement alarm activated. When switching on your monitor it will alarm, with or without the Sensor Pad plugged in, if no movement is detected.
-
Page 2: Table Of Contents
Keep small parts away from children when assembling. This Angelcare Monitor is a Personal Care Product. Please DO NOT return this to the store where you purchased it from. If you have any questions or require assistance please call the Angelcare Helpline on 0345 009 1789 or email helpline@babyhelpline.co.uk. -
Page 3: Warnings
WARNINGS 1. THIS PRODUC T CANNOT REPL ACE CAUTION RESPONSIBLE ADULT SUPERVISION. This product is designed to aid in the monitoring RISK OF ELECTRIC SHOCK of your child. When using the monitor, you DO NOT OPEN must still provide the supervision necessary DO NOT EXPOSE TO RAIN OR MOISTURE for the continued safety of your child. - Page 4 15.10 Accessories - Only use attachments/ non-rechargeable batteries. Rechargeable batteries are ONLY to be charged under accessories specified by the manufacturer. adult supervision. Keep all batteries away DO NOT place this product on an unstable from children. cart, stand, tripod, bracket or table. The product may fall, causing serious injury to a child or adult and serious damage to 15.
- Page 5 Sensor Pad measuring at least 33 x 33 cm and 6 mm thick. Only use your Angelcare monitor in ® a stationary sleeping environment such as...
- Page 6 17.2 NOTE: This equipment has been tested 16.10 DO NOT attempt to rejuvenate the and found to comply with Part 15 of the batteries provided with or identified for FCC Rules and the Industry Canada licence- use with this product by heating them. exempt RSS standard(s).
-
Page 7: Ac401 Setup Requirements
Screwdriver Batteries Sensor Pad surface area or in the case of for Nursery Unit the AC401-2PU-2SP of two Sensor Pads. IMPORTANT BABY’S ROOM: Place the crib near a supporting wall and far from air currents. Install the Nursery Unit on a flat, stable surface facing the crib at a distance of at least 1 meter. -
Page 8: Step 1 - Charging The Parent Unit (15 Hours)
STEP 1 - CHARGING THE PARENT UNIT IMPORTANT Never use regular alkaline batteries in the Parent Unit; they may explode. 1) Remove the battery door and insert the Rechargeable Batteries (included). 2) Connect the AC Adapter to the Parent Unit and into an electrical outlet. 3) Charge the unit for 15 continuous hours (prior to first use). - Page 9 HOW TO CHARGE THE BATTERIES IN THE PARENT UNIT: Leave the Parent Unit in the Charging Cradle to fully charge the unit. Although the batteries at 1/2 capacity works normally, we recommend that you fully recharge them. empty 1/2 full full PARENT UNIT: A) LCD Screen...
-
Page 10: Step 2 - Installing The Sensor Pad
STEP 2 - INSTALLING THE SENSOR PAD Cord covers 1, 2, 3, 4: Position on floor Cord cover 4: Contains double sided tape to securely install beneath crib leg Cord cover 5: Position vertically between mattress support and floor Sensor Pad with pre-installed cord covers Cord cover 6: Place under the mattress... - Page 11 2.2 SELECT THE CRIB LEG YOU WILL BE USING TO SECURE THE CORD COVERS RECOMMENDED Use the crib leg by the wall closest to the Nursery Unit (Fig 1). In cases where the Nursery Unit is across the room, use the leg closest to the Nursery Unit to position the covered wire (Fig 2).
- Page 12 8 cm 6) Place the 6 cord cover approximately 8 cm from the edge of the mattress support. 7) Snap together the remaining cord covers that will run along the floor. 8) Remove any cord slack to make sure CLIC! no parts of the cord are loose.
-
Page 13: Step 3 - Setting Up The Nursery Unit
STEP 3 - SETTING UP THE NURSERY UNIT 1) Remove the battery door and insert 4 AAA Alkaline Batteries (not included). 2) Place the Nursery Unit at a minimum of 1 m away from the crib. 3) Connect the AC Adapter to the Nursery Unit and into an electrical outlet. -
Page 14: Step 4 - Turning On Your Monitor
STEP 4 - TURNING ON YOUR MONITOR 1) Press the Parent Unit ON/OFF button for 2 seconds. 2) Slide ON the Nursery Unit Power ON/OFF button. NOTE: The screen of the Parent Unit will show the channel of transmission (C1 to C8) and after 5 seconds the room temperature and function icons. - Page 15 IMPORTANT ICONS SOUND TRANSMISSION (VOX) Detection mode icons: Indicates selected detection mode: Nursery Unit: Movement Only Appears when options are being set for the Nursery Unit Sound Only Out-of-Range: Indicates the lost of connection “TIC”, Sound & Movement between the Parent Unit and Nursery Unit.
-
Page 16: Step 5 - Testing And Getting To Know Your Monitor
STEP 5 - TESTING AND GETTING TO KNOW YOUR MONITOR The Angelcare monitor can be used with the pre-program factory settings ® or you can also customise your settings to your preference. All changes and IMPORTANT adjustments made in the main MENU and... - Page 17 5.3 - CHANGING THE MOVEMENT AND SOUND MONITORING FUNCTIONS TO SET DETECTION MODE: 1) Press the MENU button once and the flashing icons will appear. 2) Use the UP and DOWN Arrows to select your preferred detection mode. 3) Press the SELECT button to confirm your choice.
- Page 18 TO STOP THE ALARM Place your hand Press back on the any key mattress. to put on Hold (see section 5.8) Shut the Nursery Unit OFF TO ADJUST SENSOR PAD SENSITIVITY LEVEL: Turn the Nursery Unit sensitivity dial from less sensitive (0) to very sensitive (5).
- Page 19 TO ACTIVATE THIS FUNCTION: 1) Press MENU button 2 times. The Out-of-Range Indicator will blinks. 2) Using the arrows, turn the function ON or OFF. 3) Press SELECT button to confirm your choice. OUT-OF-RANGE ALARM The Out-of-Range will flash • Alarm activates when your two units are not communicating. when changing the channel • The Parent Unit will emit a double beep every 8 seconds.
-
Page 20: Step 6 - Activating And Deactivating Additional Functions
TO ADJUST SOUND SENSITIVITY (VOX): The sensitivity of the microphone is adjustable and has 4 levels (the most sensitive is level 4). This means that sound will only transmit based on the level that you set. 1) Press MENU button 3 times. Sensitivity Level icon will appear. - Page 21 Unit even if they were activated before pressing the MENU or SUB-MENU mode. 5.8 - HOLD Allows you to put your Angelcare monitor on HOLD. 1) Press and hold the Down Volume arrow for 2 seconds. The Hold Icon will appear on the screen.
- Page 22 5.9 - TEMPERATURE TO ACTIVATE TEMPERATURE ALARM: 1) Press MENU button 5 times. The Temperature Indicator (Low and High) will appear. 2) Using the arrows, to turn the function ON or OFF. 3) Press SELECT button to confirm your choice. TO SET TEMPERATURE RANGE: 1) Press the MENU button 6 times.
- Page 23 YOU ARE NOW READY TO USE YOUR MONITOR The Angelcare monitor can be used with the pre-program factory settings ® or you can also customise your settings to your preference. DEFAULT SETTINGS Detection Mode: Sound & Movement are ON Tic is OFF...
-
Page 24: Additional Functions
STEP 6 - ACTIVATING AND DEACTIVATING ADDITIONAL FUNCTIONS The Angelcare monitor can be used with the pre-program factory settings ® or you can also customise your settings to your preference. IMPORTANT When in MENU or SUB-MENU mode NO In order to activate any... -
Page 25: Troubleshooting
TROUBLESHOOTING TAKING CARE OF YOUR RECHARGEABLE BATTERIES • Ensure that you fully charge your batteries for 15 hours before their first use. • To maintain maximum battery life it is recommended that you fully discharge your batteries periodically. Battery performance can be diminished by leaving the batteries constantly charging. - Page 26 ALARM WILL NOT SOUND • Avoid contact with the crib when the monitor is ON. • Place crib near a solid supporting wall to avoid Sensor Pad from detecting movement from outside the crib. • You may need to decrease the sensitivity, refer to step 5.3. NO SOUND IS BEING TRANSMITTED • Bring Parent Unit closer to Nursery Unit.
-
Page 27: Limited Warranty
® ® movement and sound monitor (model AC401) is free from any material and workmanship defects, for a period of one (1) year (rechargeable batteries not included) from the date of the original purchase. If this monitoring system fails to function properly when used as... -
Page 28: Technical Specifications
Caution: To reduce the risk of electric America/Ecuador/Oceania. shock, do not expose this product to rain or moisture. Hereby, Angelcare Monitors Inc, declares this baby monitor is in compliance with the Danger of explosion if batteries are essential requirements and other relevant incorrectly replaced. - Page 32 This Angelcare Baby Monitor is a Personal Care Product. Please DO NOT return this to the store, but contact us initially for advice and assistance: Angelcare Helpline on 0345 009 1789 Website: www.angelcare.co.uk Email: helpline@babyhelpline.co.uk NOTE: Helpline is open Monday to Friday, 10am to 4pm, excluding bank holidays.
Need help?
Do you have a question about the AC401 and is the answer not in the manual?
Questions and answers