Angelcare Monitor AC401 Manual
- Manual (87 pages) ,
- Owner's manual (64 pages) ,
- Quick setup manual (17 pages)
Advertisement
- 1 How does your Angelcare Sound and Movement Monitor Work?
- 2 Factory Settings
- 3 GETTING TO KNOW YOUR MONITOR
-
4
SETTING UP YOUR MONITOR
- 4.1 Installation of the SensorPad
- 4.2 Functions Nursery Unit
- 4.3 Installation of the Nursery Unit
- 4.4 Functions Parent Unit
- 4.5 Installation of the Parent Unit & Charger
- 4.6 Parent Unit Display Settings
- 4.7 Establishing connection between the Parent Unit and the Nursery Unit
- 4.8 Changing Channels
- 4.9 Testing your Monitor
- 4.10 Adjusting the Sensitivity Settings
- 5 MENU ACCESS AND CHANGING SETTINGS
- 6 FREQUENTLY ASKED QUESTIONS
- 7 IMPORTANT WARRANTY INFORMATION IF SOLD/USED OUTSIDE OF THE UK, IRELAND & ROI
- 8 TROUBLESHOOTING PROBLEMS
- 9 IMPORTANT INFORMATION
- 10 Limited Warranty
- 11 Documents / Resources
This instruction Manual is applicable for the AC401 (with one parent unit) and the AC401 Deluxe (with 2 parent units).
Additional features of the Deluxe are highlighted throughout the Manual.
The Angelcare Baby Monitor is a Personal Care Product. Please DO NOT return it to the store, but contact us initially for advice and assistance:
Angelcare Helpline 0845 009 1789; Monday to Friday, 10am - 3pm
Website: www.angelcare-uk.co.uk; Email: helpline@babyhelpline.co.uk
How does your Angelcare Sound and Movement Monitor Work?
Your monitor can be used in the following way:
- To monitor sound only
- To monitor movement only
- To monitor sound and movement together
Factory Settings
Your monitor comes to you set up in sound and movement mode, as this is the most popular setting. Please take time to read the instructions as they really will help you to get the best out of your purchase.
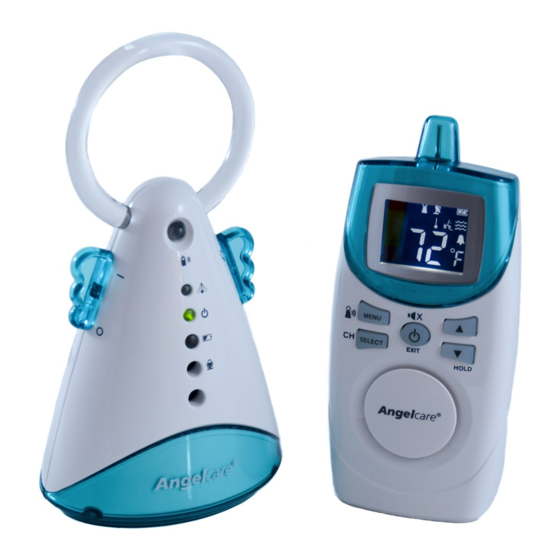
GETTING TO KNOW YOUR MONITOR
FUNCTIONS PARENT UNIT/PARENT UNIT SCREEN
- SensorPad
- Power ON/OFF; also EXIT function; also MUTE function (Step 7)
- ARROWS UP/DOWN (volume level); also HOLD function
- MENU button (to access menu); also PAIRING & RECONNECTION button function
- SELECT button (to confirm menu choices); also CHANNEL button (to change transmission channel - Step 5)
- Parent Unit display (shows all activated functions/settings)
- Battery compartment
- AC Adapter socket
- Charging cradle
- Temperature Indicator (in baby's room)
- Movement & Sound Monitoring Setting (Step 6, Menu 1)
- Temperature Control Setting (Step 6, Menu 5)
- Sound Transmission Setting (Step 6, Menu 3)
- Out of Range Setting (Step 6, Menu 2)
- Alarm Setting (Step 6, Menu 4)
- Nursery Unit Icon (will flash if Parent and Nursery Units are not connected)
- Parent Unit Icon (will be visible in MENU access only)
- Battery Icon (will only be visible when batteries are inserted)
FUNCTIONS NURSERY UNIT
- PAIRING/PAGING BUTTON
- Power ON/OFF
- Night light ON/OFF
- PENDULUM light (flashes when movement is being detected)
- POWER ON light
- LOW BATTERY indicator
- Microphone
- Speaker
- SensorPad socket
- AC adapter socket
- SensorPad sensitivity dial
- Battery compartment
- SensorPad

AC401

AC401 Deluxe
Quick Set-up Guide
- SensorPad: place the SensorPad under the mattress in the middle of the baby's bed on a flat and rigid surface. Connect the SensorPad to the Nursery Unit.
Keep the SensorPad wire out of reach of the baby. - Nursery Unit: Insert 4 x AAA standard batteries (not included) in the Nursery Unit and connect the AC adapter to the Nursery Unit and the mains. Check if SensorPad sensitivity is on level 3.
- Parent Unit: Insert 4 x AAA rechargeable batteries (included) in the Parent Unit and connect AC adapter to the Parent Unit charger and mains. Place Parent Unit in charger and charge for 15 hours.
- Turn Parent Unit and Nursery Unit both ON. Connection between the units should establish automatically. If not, please go to Part 2 - Step 4 in this Manual.
- Test the SensorPad by putting your hand on the mattress. The SensorPad should detect your movements. Take your hand off the mattress after approx. 60 seconds. The alarm should sound after 20 seconds. Turn the Nursery Unit OFF to stop the alarm. Repeat this process for all four corners of the bed. Your Angelcare Monitor is now ready for use.
SETTING UP YOUR MONITOR
Installation of the SensorPad


- The SensorPad works with most baby bed sizes and mattresses, except memory foam mattresses and hollow framed mattresses.
- Position the SensorPad in the middle of the bed on top of the cot base as shown on the left, with the printed side of the SensorPad facing upwards.
- Safely pass the SensorPad cord through the slatted base/springs of the cot keeping the cord well away from baby.
NOTE: If your cot has a solid hardwood base; drill a hole in the hardwood base and pass the SensorPad cord safely through the hole, keeping the cord well away from baby.
Place the mattress back ON TOP of the SensorPad. - Safely secure the SensorPad cord by wrapping it around one of the cot legs and attach it securely using a plastic cable tie.
- Plug the SensorPad cord into the Nursery Unit, with the SensorPad cord running safely out of reach of children.
- The Sensitivity adjustment has been preset. DO NOT ADjUST UNLESS NECESSARY.
The sensitivity of the SensorPad can be adjusted to ensure optimal performance in any situation (e.g. mattress size and thickness). See Step 5: Testing your Angelcare Monitor.
NEVER use the Angelcare Movement & Sound Monitor if multiple babies are sleeping together in ONE bed. For monitoring more than one baby (e.g. twins) you need two Angelcare AC401 Movement & Sound Monitors and the babies need to be in SEPARATE beds.![]()
- Keep the cord on the floor, well out of reach of children.
- The Sensor Pad is not designed for use with adults, children or infants older than 24 months.
- Once you have finished using the Sensor Pad, please remove it from the baby's crib and store it away.
The SensorPad CANNOT be used with mattresses for adults or any mattress with memory foam.
DO NOT attach to/put in the cot any items or objects that move or vibrate (e.g. mobile/battery powered items) as this will affect the SensorPad readings.
DO NOT attach any objects that move or vibrate to the cot, for example mobile/ battery powered items.


 STRANGULATION HAZARD
Children have STRANGLED in cords. Keep the Adapter cords and Sensor Pad cord WELL out of the reach of children.
DO NOT put the Nursery Unit inside a crib (cot) or play yard (play pen).
Because of the serious strangulation risk to infants and toddlers, parents and caregivers should NEVER place the Nursery Unit within 1 meter (3 feet) of a crib. NEVER use extension cords with AC Adapters. ONLY use the AC Adaptors provided.
Functions Nursery Unit

- PAIRING button and Parent Unit PAGING function
- Power ON/OFF
- Night light ON/OFF
- PENDULUM light (flashes when movement is being detected)
- POWER ON light
- LOW BATTERY indicator
- Microphone
- Speaker
Installation of the Nursery Unit

- Place the Nursery Unit at least 3 feet (1 metre) away from the baby's bed, a safe distance from baby's reach.
- Connect the plug of the SensorPad into the dedicated socket on the back of the Nursery Unit.
- Insert 4 x AAA regular batteries (not included) into the Nursery Unit (for battery backup in case of power failure).
- Connect the AC adapter to the Nursery Unit and plug the adapter into the mains in the baby's room.
Functions Parent Unit

- Power ON/OFF; also EXIT function; also MUTE function
- ARROWS UP/DOWN (volume level); also HOLD function
- MENU button (to access menu); also CONNECTING function
- SELECT button (to confirm menu choices); also CHANNEL button (to change transmission channel - Step 5)
Installation of the Parent Unit & Charger

- The Parent Unit is portable and fully rechargeable.
- Insert 4 x AAA NiMH rechargeable batteries (included) into the Parent Unit. NEVER use regular alkaline batteries as these batteries are not suitable and might explode.
- Connect the AC adapter to the charger and plug the adapter into the mains. Place the Parent Unit in the charger and charge the batteries for 15 hours before first use.
NOTE
The battery icon will appear for 5 seconds and then the Parent Unit screen will go to a power save screen as it charges. - Place the charger in a convenient place in your home, e.g. your living room. The maximum distance between the Parent Unit and the Nursery Unit is approx. 100 metres indoors and 250 metres outdoors.
Parent Unit Display Settings

- Temperature Indicator (in baby's room)
- Movement & Sound Monitoring Setting (Part 3, Menu 1)
- Temperature Control Setting (Part 3, Menu 5)
- Sound Transmission Setting (Part 3, Menu 3)
- Out of Range Setting (Part 3, Menu 2)
- Alarm Setting (Part 3, Menu 4)
- Nursery Unit Icon (will flash if Parent and Nursery Unit are not connected)
- Parent Unit Icon (will be visible in MENU access only)
- Battery Icon (will only be visible when batteries are inserted correctly)
Establishing connection between the Parent Unit and the Nursery Unit
Once you have completed Steps 1, 2 & 3, turn your Parent Unit on by pressing and holding the Power button. Turn the Nursery Unit on by pushing up the left wing to the ON position. You will see the Channel Number appear and after a few seconds this will change to the temperature reading of the baby's room.
AC401 DELUXE
- Install the baby monitor according to the instructions with one of the Parent Units. This Parent Unit and Nursery Unit should connect automatically. If this is not the case, please follow the reconnecting procedure. Your baby monitor is now ready for use with one Parent Unit. If you want to connect the 2nd Parent Unit, please go to Step 2.
- Keep the first Parent Unit and Nursery Unit turned ON and then turn on the 2nd Parent Unit, which should also connect automatically. If this is not the case, please follow the reconnecting procedure. Once both Parent Units are connected to the Nursery Unit your baby monitor is ready for use.
- All monitor settings can be changed from both Parent Units (according to the Instruction Manual). The new settings will automatically be activated on both Parent Units.
SWITCHING ON
The connection between the Parent and Nursery Unit is automatically established every time both units are ON.
RECONNECTION PROCEDURE
Should connection not be automatically established when you turn on both units please follow the reconnection procedure on the right:
- Turn both units OFF.
- Turn ON the Parent Unit, then press and hold the MENU button until a beep sounds and the OUT OF RANGE indicator starts flashing.
- Turn ON the Nursery Unit, then press and hold the PAIRING button on the front of the Nursery Unit until a beep sounds and the TIC light flashes (see PART 1, Step 1a).
- The Parent Unit will show the channel number, which will be replaced by the standard menu after a few seconds.
NOTE
If the Parent Unit is turned ON but the Nursery Unit is OFF, the Parent Unit will double beep for 1 minute and then turn itself off as it cannot locate the Nursery Unit. By turning the Nursery Unit on again this will re-establish connection and the monitor is ready for use.
Changing Channels
The Angelcare Monitor has 8 manually selectable channels. If the transmission is not clear or you experience interference the channel can be changed as follows:
- Turn both units ON.
- Press and hold the SELECT button.
- The current channel will be shown on the Parent Unit display.
- Change the channel with the ARROWS UP or DOWN.
- Press the SELECT button again to confirm the channel.
ALWAYS keep at least 3 metres distance between the Parent Unit and the Nursery Unit to avoid feedback (loud whistling noise) between the units.
Testing your Monitor
- TEST YOUR MONITOR TO DETECT MOVEMENT
- Make sure the Sensor Pad is installed correctly and turn both units ON.
- Gently move your hand over the mattress to simulate your baby's movements.
Note: The movement alarm will sound if no movement is detected within 20 seconds. - Once movement is detected the green PENDULUM light will flash on the Nursery Unit and the PENDULUM icon on the Parent Unit screen will swing.
- After approx. 1 minute remove your hand from the mattress. Do not lean against the baby's bed!
- STOPPING THE ALARM
There are 2 ways of stopping the alarm once it is sounding:- Turn off the nursery unit
- Press any key on the parent unit (except the ON OFF button). This will put the monitor on HOLD. To deactivate the HOLD function press and hold the down arrow for 2 seconds. (See Other Functions Section).
- THE 4 CORNER TEST
Follow the same process for all 4 corners of the mattress to ensure that the SensorPad is picking up movements from all corners of the mattress. If the monitor does not alarm after 20 seconds once you have taken you hand off the mattress, the SensorPad may be detecting other movements such as a cot mobile, a fan, or simply the cot being touched or leant on. If the monitor does alarm during this testing, this could indicate that the sensitivity of the sensor pad may need adjusting. (See Adjusting the Sensitivity Setting).
Adjusting the Sensitivity Settings
The Standard Setting for the Sensitivity is Level 3. (The Sensitivity Dial on the back of the Nursery Unit will be pre-set to Level 3. This is suitable for most bed sizes and types of mattress. Do not Adjust unless necessary. By increasing the sensitivity the Sensor Pad will cover a larger area. It could also detect vibrations from outside the baby's bed (i.e. cot mobiles or fans), or other movements. It is important to find the right balance for your situation, to ensure optimum performance of the sensor pad. Reducing the sensitivity can be useful if the sensor pad is picking up external movements. For example a cot placed right next to an adults bed could be picking up the movements from the adults. In this instance you may need to reduce the sensitivity. We recommend only moving the Sensitivity Adjustment Dial by half a notch and repeating the '4 Corner Test', as described above. Try this new setting for a few days. If you need to further increase or decrease the sensitivity please do this by a further ½ notch and re-test.
MENU ACCESS AND CHANGING SETTINGS
The menu settings are accessed by using the MENU button on the Parent Unit.
The MENU functions are in a loop. Each time you press the menu button briefly you move on to the next MENU function.
The MENU functions are in the following order:
| Press 1 Time | MOVEMENT AND SOUND | Menu 1 |
| Press 2 Times | OUT OF RANGE | Menu 2 |
| Press 3 Times | SOUND TRANSMISSION | Menu 3 |
| Press 4 Times | ALARM | Menu 4 |
| Press 5 Times | TEMPERATURE CONTROL | Menu 5 |
NOTE:
By continuing to press the MENU button you will be continuously moving through the loop.
Menu 1: Movement & Sound Monitoring Settings

FACTORY SETTING
Tic, Sound & Movement function activated
OVERVIEW ICONS IN DISPLAY: Tic function
 Sound function
 Movement function
 In MENU mode
 Sound level
Functions
You can use your monitor up in a variety of ways:
Tic function: The 'tic' is a sound that tells you that your SensorPad is detecting movements. This function can only be activated together with the Movement function.
Sound function: Activates the sound transmission between the Parent Unit and the Nursery Unit.
Movement function: Activates (switches on) the SensorPad. The SensorPad will detect your baby's movements and sound an alarm after 20 seconds.
The movement alarm is split into 2 parts: Once the SensorPad has not detected movement for 15 seconds, a short 'rouse alarm' (single beep) will sound. This may be sufficient to 'rouse' baby. If baby's movement is detected the monitor will carry on monitoring. If the monitor does not detect movement within 5 seconds of the rouse alarm, the 'main alarm' will sound (loud rapid beeps).
Options
| Combinations | Icons shown on display |
| Tic, Sound & Movement | |
| Sound & Movement | |
| Tic & Movement | |
| Movement Only | |
| Sound Only | |
How to change this setting
- Press the MENU button once; flashing icons will appear (current setting).
- Select your chosen combination with the ARROWS UP or DOWN (see 5 options above).
- Press SELECT to confirm your choice.
- Press EXIT if you are finished programming (or MENU if you would like to go to MENU 2).
Menu 2: Out of Range Setting

FACTORY SETTING
OUT OF RANGE is turned OFF
OVERVIEW ICONS IN DISPLAY: Out of Range indicator
 In MENU mode
 Sound level
Functions
The monitor is equipped with an OUT OF RANGE Indicator function, which will alert you when the two units are not communicating with each other. OUT OF RANGE interference situations can be caused by (e.g.) too much distance or thick walls between the two units.
RANGE
Up to 250 metres/820 ft (open field); between 80 metres/262 ft and 100 metres/328 ft (indoors).
When the units are OUT OF RANGE you will hear a DOUBLE BEEP every 8 seconds and the OUT OF RANGE icon (satellite dish) will flash on the display of the Parent Unit.
When the alarm sounds move the units closer together until communication has been (re) established.
OUT OF RANGE can also be used to warn you to turn ON the Nursery Unit again after you have taken your baby out of bed (e.g.) for a feed. If activated, the Parent Unit will beep until the Nursery Unit is turned ON again, or after 1 minute the unit will switch itself off.
Options
| Options | Icons shown on display |
| OUT OF RANGE OFF | OFF |
| OUT OF RANGE ON | ON |
How to change this setting
- Press the MENU button briefly twice; the icons of the current setting will appear (ON)
- Select ON or OFF with the ARROWS UP or DOWN
- Press SELECT to confirm your choice
- Press EXIT if you are finished programming (or MENU if you would like to go to MENU 3)
Menu 3: Sound Transmission

FACTORY SETTING
The microphone sensitivity is set to maximum sensitivity (level 4) as standard, which means that even the slightest sound will activate the sound transmission.
OVERVIEW ICONS IN DISPLAY: Sound Transmission Indicator
 Microphone sensitivity level
 In MENU mode
Functions
Your monitor is 'Sound Activated'. This means that it will transmit sounds only when it detects them. It will detect even the softest levels of crying.
The sensitivity of the microphone is adjustable and has 4 levels. The highest level (level 4) is the most sensitive, i.e. it will activate the sound transmission when the lowest level of sound is detected.
To save power, after 10 seconds, the sound transmission will stop if no sound is detected. Once sound is detected transmission will automatically activate.
How to change this setting
- Press the MENU button briefly three times.
- The vertical bar on the left hand side of the display will show the actual microphone sensitivity level. Standard setting is a full vertical bar (level 4).
- Increase the microphone sensitivity using the ARROW UP and decrease the sensitivity using the ARROW DOWN. A higher sensitivity means that the microphone will pick up (softer) sounds quicker.
- Press SELECT to confirm the sensitivity level.
- Press EXIT if you are finished programming (or MENU if you would like to go to MENU 4).
Menu 4: Alarm Settings

FACTORY SETTING
Sound Alarm activated
OVERVIEW ICONS IN DISPLAY: Alarm Setting Indicator
 Vibrating Alarm
 Sound Alarm
 In MENU mode
 Sound level
Functions
There are 3 options to alert you when your monitor alarms:
Sound Alarm: An audible alarm will sound if an alarm is activated.
Vibrating Alarm: The Parent Unit will only vibrate if an alarm is activated, no sound will be heard.
Sound & Vibration Alarm: Combination of a Sound and Vibrating alarm.
Options
| There are three combinations: | Icons shown on display: |
| Sound Alarm | |
| Vibrating Alarm | |
| Vibrating & Sound Alarm | |
How to change this setting
- Press the MENU button 4 times; the icons of the current setting will appear.
- Select your chosen combination with the ARROWS UP or DOWN (see 3 options above).
- Press SELECT to confirm your choice.
- Press EXIT if you are finished programming (or MENU if you would like to go to MENU 5).
Menu 5: Temperature Control Settings

FACTORY SETTING
Temperature Control is OFF
OVERVIEW ICONS IN DISPLAY: Temperature Control Indicator
 Low Temperature Setting
 High Temperature Setting
 In MENU mode
 Sound level
Functions
Your Angelcare Monitor can be used to monitor the temperature in your baby's room and sound an alarm if the temperature is either too high or too low. A triple beep will sound if the temperature is outside the programmed range.
The temperature sensor in the Nursery Unit is very sensitive and readings can be affected by (e.g.) cold or warm draughts, placement next to a cold window or above a heating radiator. Always use a 2nd separate digital thermometer placed in a different part of the room to achieve an accurate reading of the temperature in the baby's room.
Options
| Options | Icons shown on display |
| Temperature Control OFF | OF |
| Temperature Control ON | ON |
How to change this setting
- Press the MENU button briefly five times; the icons of the current setting will appear (OFF).
- Select ON or OFF (display will show OFF) with the ARROWS UP or DOWN.
- Press SELECT to confirm your choice.
- If you have selected ON and pressed SELECT, press MENU to set the desired lowest temperature level (snowflake icon will appear) with the ARROWS UP and DOWN. Press SELECT to confirm your setting.
- Press MENU again to set the desired highest temperature level (sun icon will appear) with the ARROWS UP and DOWN. Press SELECT to confirm your setting. Press EXIT if you are finished programming (or MENU if you would like to go back to MENU 1).
Other Functions
PARENT UNIT WITH LOW BATTERY
LOW BATTERY WARNING
The parent unit should be recharged when the battery icon appears empty and a short beep is heard every 15 seconds, until the unit shuts itself off.
Only Use Rechargable Batteries in the Parent Unit.
NURSERY UNIT WITH LOW BATTERY
When the Nursery Unit's Low Battery Indicator (red light) is flashing, its batteries need to be replaced. On the screen of the Parent Unit, the empty battery icon flashes and the Nursery Unit icon appears, to show you that it is the batteries in the nursery unit that are low.
A short beep will also be heard every 15 seconds for about 30 minutes until the unit shuts itself off.
Only Use Standard Alkaline Batteries in the Nursery Unit.
HOLD FUNCTION ACTIVATED
HOLD FUNCTION
This function allows you to put the monitor on HOLD when you need to pick up the baby out of his/her bed for a short period of time. When the monitor is on HOLD, the movement alarm will not go off and no sound is being transmitted.
Press and hold the DOWN ARROW for 2 seconds. The symbol 'H' will appear on the Parent Unit display.
The Parent Unit will sound a DOUBLE BEEP every minute to confirm the monitor is still on HOLD. Press and hold the DOWN ARROW for 2 seconds again to deactivate the HOLD function. The display will return to normal.
TIP: When the movement alarm sounds, press the down arrow button to put the monitor on hold.
NOTE: Hold function does not work when your monitor is programmed for SOUND only. (See Temporary Mute).
MUTE FUNCTION ACTIVATED
TEMPORARY MUTE FUNCTION
Press the EXIT button to mute the sound transmission for 2 minutes.
The sound icon will flash on the Parent Unit screen.
To reactivate the sound transmission before the 2 minutes have lapsed, press EXIT again.
PAGING
PAGING THE PARENT UNIT
Press the TOP BUTTON of the Nursery Unit to locate the Parent Unit.
- PAIRING/PAGING BUTTON
FREQUENTLY ASKED QUESTIONS
Q. MY MONITOR KEEPS BEEPING/ ALARMING AS I SET IT UP
A. Your monitor (Nursery Unit) is already pre-programmed to record movement (and sound). This means that as soon as the nursery unit receives mains or battery power, it will start to record movements (whether or not the SensorPad is plugged into the nursery unit.) If no movement is detected the alarm will sound after 15 seconds and will be signalled by one short beep (rouse alarm), and then 5 seconds later, loud beeps in rapid succession. To stop the alarm sounding turn off the Nursery Unit (using the Power ON/OFF - left wing), and insert the jack from the SensorPad (if not already inserted). Turn on the unit and place your hand on the sensor pad and tap lightly (simulating movement from your baby).
As movement is detected the green light on the Nursery Unit will be flashing, indicating that the unit is picking up movement. Now remove your hand from the sensor pad and stand still until the green light stops flashing and you will hear first the rouse alarm, which is a short beep, and then the main alarm. This shows that your monitor is working properly.
Q. I DON'T WANT TO MONITOR MOVEMENT WHILST MY BABY IS IN THE COT NEXT TO MY BED?
A. It is easy to change any settings on your monitor, by following the instructions in the manual.
Your Parent Unit is used to remotely transmit any changes you wish to make to your Nursery Unit.
You can reactivate or deactivate movement or sound as your needs change.
NOTE: If your monitor is set up to record movement, please ensure that the cot is not touching your bed as it could be picking up your movements instead of your baby's.
Q. WHAT DO THE ALARMS SOUND LIKE?
A. MOVEMENT ALARM - Single short beep followed by rapid loud beeps.
There are a sequence of alarms that you will hear when the monitor is recording movement. Should the sensor pad not detect movement for 15 seconds, then a 'Rouse' alarm will sound. This is a single beep and may wake baby from a deep sleep. If the sensor pad does not pick up any movement in the 5 seconds following the rouse alarm then the main alarm will sound. This sounds like a rapid succession of loud beeps that are audible from a distance.
There is a small loudspeaker on the nursery unit which emits this sound. Also the nursery unit transmits this sound to the parent unit which, if is turned on will also emit the alarm sound. The parent unit can also be set up to vibrate as a means of alarm.
OTHER ALARMS
| Out of Range Replace Batteries | Short low volume beeps |
| HOLD Function Temperature Warning | Soft short beeps that are merely a gentle warning to remind you |
Q. I WANT TO TAKE MY MONITOR ON HOLIDAY ABROAD WITH ME. WILL IT WORK?
A. Within the EU your monitor should work. However other countries use different transmission frequencies and therefore it may not be possible. (Please contact us for the latest frequency data). For short periods of time you can use mains convertors, however for longer periods please use the appropriate mains adaptor which can be supplied by the local Angelcare dealer (please visit our website for the International Dealers). If you only wish to monitor movement, you can use your sensor pad and nursery unit on batteries or mains. Note that batteries will not last for more than a few days however where a power supply is not available this is an alternative option.
Q. CAN I USE THE ANGELCARE MOVEMENT MONITOR IN A TRAVEL COT?
A. Your sensor pad will give you optimal performance if it is placed on a steady flat rigid surface. We recommend ¼ inch ply cut to 10cm bigger than the pad. However if you are travelling with a travel cot, that has a soft/hammock base, this base type is too unstable to support your sensor pad.
Q. WHEN I RETURNED HOME WITH MY MONITOR AFTER A TRIP IT LOST CONNECTION.
A. Sometimes your monitor can lose connection if it is moved from one location to another. This can be perfectly normal and does not mean that your monitor is faulty. To establish connection please refer to Part 2 Step 4 Establishing Connection, in the Manual.
Q. WHAT MATTRESS CAN I USE THE SENSORPAD WITH?
A. Your SensorPad can be used under a cot mattress or a cot bed mattress or any other children's mattress. The thickness/ depth of the mattress does not always affect the performance, however if you have a very thick mattress you may need to adjust the sensitivity of the SensorPad. NOTE: You cannot use the SensorPad with memory foam mattresses which are denser than normal mattresses, nor mattresses with a hollow frame.
Q. I CAN HEAR BUZZING AND STRANGE NOISES THROUGH MY PARENT UNIT MICROPHONE
A. This is commonly known as Interference. As modern homes use a variety of wireless devises which can occasionally cause interference. This is not harmful to your monitor but can impair your reception sound quality. Please visit the Support Section of our website for more information on Interference.
Q. IS THE SENSOR PAD SAFE TO USE?
A. The SensorPad and its wire are completely safe to use. They do not carry any current nor radiate any form of energy. The surface area of the sensor pad merely collects movements and transmits this data to the nursery unit.
Q. HOW LONG CAN I USE MY SENSOR PAD FOR?
A. Most parents use the SensorPad until baby is about 14 to 16 months old. Some parents like to monitor their baby for longer. The monitor will work with older babies but you may experience false alarms as baby stands in the cot or moves away from the SensorPad.
Q. MY BABY WAS VERY PREMATURE, WILL THE MONITOR STILL PICK UP MY BABY'S MOVEMENTS?
A. Yes your monitor will work even with the tiniest babies. You many need to adjust the sensitivity slightly when baby is very small, or if you have a small baby in a bigger cot. Please refer to the Adjusting the Sensitivity Section in the Manual.
Q. MY SENSOR PAD KEEPS ALARMING.
A. The SensorPad is alarming because it does not detect any movement.
If your baby seems well, there are a few situations that can cause false alarms:
- Babies breathing patterns do change as they grow and develop. When baby is in a deep sleep the breathing can be very shallow.
- Moving baby to a bigger bed can also cause false alarms since there is a larger surface area.
- When babies get to a certain age they do tend to move around their bed space.
- Thicker mattresses, sleeping bags, babygros and full nappies can make it harder for the sensor pad to pick up movement.
In these instances you may need to adjust slightly the Sensitivity Settings on the Nursery Unit. Please refer to Part 2, Step 7 - Adjusting the Sensitivity Settings. We have created a Factsheet to give you more information. This can be downloaded from our website.
If you are concerned about your baby's health in any way, please contact your Health Professional for further advice.
IMPORTANT WARRANTY INFORMATION IF SOLD/USED OUTSIDE OF THE UK, IRELAND & ROI
This product is for use within the UK, Ireland & ROI. If used or exported permanently outside of the UK, Ireland or ROI this will invalidate the 12 months manufacturer warranty. In this event only a limited after sales service can be provided and in some countries no after sales service can be provided. Please contact our Helpline for more information."
TROUBLESHOOTING PROBLEMS
| DESCRIPTION | POSSIBLE CAUSE | HOW TO SOLVE |
| The SensorPad is giving false alarms | Baby was removed from his/her bed and Nursery Unit was not switched OFF. | Turn off the Nursery Unit. |
| The SensorPad plug is not connected properly to the Nursery Unit. | Verify the connection between the SensorPad and Nursery Unit. Unplug and reconnect the cord. | |
| The SensorPad is not in full contact with baby's mattress and/or the mattress is not resting on a completely flat or rigid surface. | Make sure there is no bedding between mattress and SensorPad. The SensorPad must rest on a completely flat and rigid surface. Place a piece of 6mm thick plywood under the SensorPad. Please follow the instructions in Part 2, Step 1. | |
| Your baby is in a very deep sleep or has moved to a corner of the bed, away from the SensorPad. | Make sure the SensorPad is positioned, installed and tested as described in Part 2, Steps 1 to ensure that the SensorPad is covering the complete mattress, also in the corners of the bed. | |
| The sensitivity setting of the SensorPad is too low, e.g. level 1. | If the sensitivity level is too low, the SensorPad may not detect your baby's movements. The standard setting of the SensorPad sensitivity is approx. 3. This setting works for most baby bed sizes and mattresses and can be adjusted with the dial on the back of the Nursery Unit. ALWAYS install and test the SensorPad according to the instructions in Part 2, Step 7. | |
| The SensorPad alarm does not go off | The Nursery Unit is detecting external movement or vibrations when baby's bed is being touched. | Avoid contact with the crib when monitor is ON. |
| No sound is being transmitted | The units are not connected. The Parent Unit shows a flashing Nursery Unit and '- -' in the display. | Re-establish connection between the two units, see Part 2, Step 4. |
| One of the units if OFF, due to low or incorrect installed batteries. | Check/replace the batteries or recharge the Parent Unit. | |
| One of the units is OFF, due to the AC adapters are not connected properly or the mains socket is turned off. | Check if all AC adapters are working correctly and if the mains socket are turned ON. | |
| One of the units is OFF. | Ensure both units are ON. | |
| The Parent Unit shows a flashing Nursery Unit icon and '- -' in the display. There is no connection between the Parent Unit and Nursery Unit | If both units are ON, the two units are not connected. | Re-establish connection between the two units, see Part 2, Step 4. |
| The Nursery Unit is not switched ON. | Turn the Nursery Unit on by moving the left wing to the UP position. | |
| The sound transmission is intermittent | There might be some interference on the chosen transmission channel. | Change the transmission channel to one of the other 8 channels until sound transmission is clear or follow the reconnection procedure, see Part 2, Step 5. |
| The power ON indicator (second green light) on the Nursery Unit does not light up | The AC adapters are not connected properly or the mains socket is out of order or not switched on. | Check the connections and/or change to another electrical socket. |
| The Nursery unit is not turned ON. | Move the left wing to the ON position (UP). | |
| There is very weak reception | The Parent and Nursery Units are too far apart and the 'Out of Range' indicator is OFF. | Reduce the distance between the two units until communication is established. Ensure both units are ON. Turn the Out of Range function ON to avoid this in the future (see Part 3, Other Functions). |
| One or both units are placed near a large metal construction which obstructs the transmission. | Reduce the distance between the two units until communication is established. Ensure both units are ON. Turn the Out of Range function ON to avoid this in the future (see Part 3, Other Functions). | |
| One or both units are not in the upright position. | Place both units on a flat surface. Never place either unit within 1m (3ft) of the cot. Keep well away from baby's reach. | |
| The batteries are low. | Check/replace the batteries or recharge the Parent Unit (see Part 3, Other Functions). Check if all AC adapters are working correctly and if the mains socket is turned ON. | |
| There is no connection between the Parent and Nursery Units. | Re-establish connection between the two units, see Part 2, Step 4. | |
| There is interference or noise coming from the Parent Unit (e.g. interference from other monitors, wireless phones and networks, walkie-talkies, etc) | There is other external 'transmission' on the selected channel. | Select a different channel as described in Part 2, Step 5. Your Angelcare Monitor has 8 channels. |
| The Parent Unit is located near motorized devices, fluorescent lights, televisions, etc. | If you have two Angelcare Monitors, ALWAYS ensure that the channels on both monitors are as far apart as possible, e.g. channel 1 for one monitor and channel 8 for the other monitor. Also keep at least 1 metre distance between both Parent Units and both Nursery Units. Keep the Parent Unit away from any devices that can be a source of interference | |
| There is 'feedback' coming from the Parent Unit (loud howling noise) | The Parent Unit and the Nursery Unit are too close together. | Keep the Parent and Nursery Units at least 3 metres/10 feet apart. Decrease the volume level on the Parent Unit using the ARROWS UP and DOWN. |
| The mattress has become mouldy | There is not enough air circulation under the mattress. | If you have placed a large piece of plywood under the SensorPad as instructed, please drill holes in the plywood to allow air circulation. The SensorPad is a passive device and does not radiate any form of energy or heat. |
IMPORTANT INFORMATION
Wireless Interference
Wireless devices (including monitors, speakers, WIFI internet systems and mobile phones) can be prone to Radio Frequency Interference emanating from other devices. There are many wireless products available on the market and new products are introduced regularly. In addition there are radio frequency emissions from various electronic devices (like microwaves). Most of these wireless products are transmitting within a range of the 2.4 GHz frequency, which may increase the potential occurrence of Radio Frequency Interference.
Although wireless devices (including Angelcare Baby Monitors) are designed, manufactured and tested to comply with applicable regulations governing radio frequency emissions, wireless transmitters and electrical circuits, they may be still be subject to interference.
If wireless devices are held in close proximity to mobile phones, but more specifically GSM phones which operate with higher signal strength for long range communications, this may affect the operation of short range devices such as baby monitors.
It is recommended to keep these devices (e.g. mobile smart phones) away from (and certainly not in contact with) wireless products such as baby monitors, loud speakers and other audio equipment.
HOW TO AVOID INTERFERENCE?
Angelcare Baby Monitors are designed to provide optimal performance when set-up and used according to the instructions. However, due to increase in wireless products and systems found on the market today, some level of interference might occur. To reduce or avoid such interference we recommend the following:
- Always read the Instructions carefully. Install and set-up the baby monitor in accordance to the Instructions provided with your product
- Always keep your baby monitor (Parent and Nursery Unit) away from other wireless devices
- Never place a cordless or mobile phone or other radio frequency emissions device (microwave, wireless router or sound system) in close proximity or in direct contact with your baby monitor (Parent and Nursery Unit)
- If you would like to use the belt clip on the Parent Unit, please ensure your mobile phone is placed in the pocket opposite the position of the Parent Unit on your belt
- Make sure the batteries in the Parent Unit are fresh and fully charged for best performance (use only NiMH rechargeable batteries)
- If you still experience interference, please refer to the Instructions or the Customer Service website for more solutions in solving interference issues
Please refer to the Instruction Manual for more information on product installation, testing, warnings and warranty.
Warnings
- This product is NOT a medical device designed to prevent cases of Sudden Infant Death Syndrome (SIDS or cot death).
- This product is NOT a substitute for direct supervision of your baby. Check your baby's activities at regular intervals. Monitoring of premature babies, or babies considered to be at risk, should be carried out only under the supervision of a doctor or health professional.
- The SensorPad may detect movement from many sources from both inside and outside your baby's room, e.g. washing machine, loud music, etc. Make sure that all vibration sources are eliminated before using the Angelcare monitor. Please do not touch the baby's bed when the monitor is in use. Please read Part 2, Step 1 (Installation of SensorPad), Part 2, Step 5 (Testing your Monitor) and the Troubleshooting section.
- When monitor is in use, DO NOT use a crib mobile or other crib accessories that produce vibrations. This can prevent the movement alarm from working properly as the monitor will still be detecting movement.
- If the monitor has been stored or has been exposed to hot or cold temperatures, it may take up to one hour before the temperature displayed on the Parent Unit is accurate.
- ALWAYS place the Parent and Nursery Units on a flat surface in an upright position, away from baby's reach.
- Make sure to plug the adapter into a convenient accessible socket outlet.
![]() STRANGULATION HAZARD
STRANGULATION HAZARD
Children have STRANGLED in cords. Keep the Adapter cords and Sensor Pad cord WELL out of the reach of children.
DO NOT put the Nursery Unit inside a crib (cot) or play yard (play pen). Because of the serious strangulation risk to infants and toddlers, parents and caregivers should NEVER place the Nursery Unit within 1 meter (3 feet) of a crib. NEVER use extension cords with AC Adapters. ONLY use the AC Adaptors provided.![]()
![]()
- DO NOT touch the end of the adapter cord when it is plugged into the mains.
- The Angelcare monitor uses public airwaves to transmit signals. The Parent Unit may pick up signals or interference from other baby monitors in your area. Your monitor may also be picked up by receivers in other households. To protect your privacy, make sure both units are in the OFF position when not in use and change the channels regularly.
- The Angelcare monitor is perfectly safe. The SensorPad and its cord are entirely passive. They carry no electrical current and do not radiate any form of energy. The Nursery Unit emits only very low power radio signals through its antenna. These signals do not present a safety hazard.
- Your monitor can be used in any crib or sleeping area (that has no motion or vibration) designed to hold a baby safely.
- ONLY USE ORIGINAL ANGELCARE AC ADAPTERS, MODEL NO. T07505B001.

Monitoring more than one baby
- NEVER use the Angelcare Movement & Sound Monitor if multiple babies are sleeping together in ONE bed!
- For monitoring more than one baby (e.g. twins) you need two Angelcare AC401 Movement & Sound Monitors and the babies need to be in SEPARATE beds.
- If you are using two Angelcare monitors it is essential that:
- Each monitor is set to a different channel
- The distance between the two Nursery Units is at least 1 metre
- The distance between the Parent Units is at least 1 metre. If 2 babies are in one room, we recommend using 1 x Angelcare Movement and Sound Monitor AC401 and 1 x Angelcare Movement only Monitor AC300. Please see website for more information.
Maintenance of your Angelcare Monitor
RETAIN INSTRUCTIONS: Always keep this Instructions Manual for future reference.
WATER, MOISTURE AND HEAT DAMAGE: Keep all monitor components away from water (sink, bath tub, swimming pool) and places that emit heat (stove, radiator).
VENTILATION: ALWAYS place both units on a flat surface in an upright position to ensure free air circulation around the units. The SensorPad is made of plastic and does not permit the air to circulate. Therefore, mildew build-up could develop underneath the mattress in the SensorPad area. We suggest rotating the mattress regularly (as per the manufacturer's instructions) to prevent any mildew.
AC POWER SOURCE: Use only the AC adapters supplied with the Angelcare monitor.
CORD PROTECTION: Avoid damage to the cords of the SensorPad and adapters. Route cords so that they are not likely to be walked on or pinched by items placed upon or against them.
CLEANING: Disconnect all units before cleaning. DO NOT immerse in water. Use a dry cloth to keep monitor free from dust. DO NOT spray with cleaning products or solvents. Wipe SensorPad with a cloth moistened very slightly with an antiseptic or mild detergent.
OBJECT AND LIQUID ENTRY: Care should be taken so that objects do not fall onto units and that liquids are not spilled into either unit or SensorPad through its openings.
NON-USE PERIODS: When not using the monitor for any long period, remove the batteries from both units and disconnect the AC adapters from the electrical outlet.
Limited Warranty
The Angelcare monitor is a personal care product. Please DO NOT return this product to the retailer you bought it from. If you have questions or need help, please call the Angelcare Helpline on 0845 009 1789 or email to helpline@babyhelpline.co.uk.
Angelcare warrants to the original owner of this product that the Angelcare rechargeable movement and sound monitor (model AC401) is free from any material and workmanship defects, for a period of one (1) year from the date of the original purchase. If this monitoring system fails to function properly when used as directed under normal conditions within the one-year period, Angelcare will either repair or replace the product, at our discretion, free of charge. Please contact the Angelcare Helpline on 0845 009 1789 or email to helpline@babyhelpline.co.uk.
The product must be accompanied by a proof of purchase, either a bill of sale or other proof that the monitoring system is within the warranty period. Angelcare will bear the cost of repairing or replacing the product and shipping it back to you.
This warranty does not apply to a product which has been damaged as a result of improper maintenance, an accident, improper voltage supply or any other form of misuse. The warranty is also void if the owner repairs or modifies the product in any way. Angelcare is not liable for any incidental or consequential damages with regard to this product. The warranty also excludes any liability other than what is stated above. No other warranty is given.
LEGAL RIGHTS VARY FROM COUNTRY TO COUNTRY. SOME COUNTRIES DO NOT ALLOW THE EXCLUSION OR LIMITATION OF INCIDENTAL OR CONSEQUENTIAL DAMAGES, SO THE ABOVE LIMITATIONS MAY NOT APPLY TO YOU.
WE ARE NOT IN ANY WAY RESPONSIBLE FOR ANY OUTCOME RESULTING FROM THE USE OF THIS PRODUCT.
This device complies with Part 15 of the FCC Rules. Operation is subject to the following two conditions: (1) this device may not cause harmful interference; and (2) this device must accept any interference received, including interference that may cause undesired operation.
Changes or modifications to this equipment not expressly approved by the party responsible for compliance could void your authority to operate the equipment.
NOTE:
This equipment has been tested and found to comply with the limits for a Class B digital device, pursuant to Part 15 of the FCC Rules. These limits are designed to provide reasonable protection against interference in a residential installation. This equipment generates and can radiate radio frequency energy and, if not installed and used in accordance with the instructions, may cause harmful interference to radio communications. However, there is no guarantee that interference will not occur in a particular installation. If this equipment does cause interference to radio or television reception, which can be determined by turning the equipment off and on, please try to correct the interference through one or more of the following actions:
- Re-orient or relocate the receiving antenna.
- Increase the distance between the equipment and receiver.
- Connect the equipment into an outlet on a circuit different from that to which the receiver is needed - consult the dealer or an experienced radio/TV technician for advice and assistance.

To help to avoid the risk of electric shock, do not expose this appliance to rain or moisture. There is danger of explosion if the batteries are incorrectly replaced. The included batteries are 4 x AAA NiMH rechargeable batteries manufactured by Sanik Battery Co. Ltd. SN-AAA60HJ 1.2V 600mAh and by GPI International Limited, GN60AAAHC, 1.2V 600mAh. The batteries can only be replaced by 4 x AAA NiMH rechargeable batteries.
ONLY USE ORIGINAL ANGELCARE AC ADAPTERS, MODEL NO. T07505B001.
TRANSMISSION:
927 MHz (USA and Canada)
864 MHz (Europe, Asia, Africa, Oceania)
Data transmission between the Parent Unit and Nursery Unit is made on the 2.4 GHz frequency.
Protect the environment!
This electronic equipment contains reusable material and must not be disposed of with domestic waste. Please take it to a collecting point for electric and electronic equipment (ask your local authorities for details).
The Angelcare Baby Monitor is a Personal Care Product.
Please DO NOT return it to the store, but contact us initially for advice and assistance:
Angelcare Helpline 0845 009 1789; Monday to Friday, 10am - 3pm
Website: www.angelcare-uk.co.uk; Email: helpline@babyhelpline.co.uk

Documents / ResourcesDownload manual
Here you can download full pdf version of manual, it may contain additional safety instructions, warranty information, FCC rules, etc.
Advertisement


Need help?
Do you have a question about the AC401 and is the answer not in the manual?
Questions and answers