Table of Contents
Advertisement
Quick Links
Introduction
The 2x1 USB DisplayPort KVM Switch with Remote Control allows
you to switch between two computers to share a DisplayPort or HDMI
monitor and set of USB Mouse, USB Keyboard, USB 2.0 device, MIC
and Earphone. The input and output can be controlled by manual and
remote control.
Features and Benefits
Support two Dual‐mode DisplayPort inputs to one Dual‐mode
DisplayPort or HDMI output
Support DisplayPort version 1.1a for both 1.62 and 2.7 Gbps link
rates
Support HDMI specification max up to 1920x1080p@60Hz@36bit,
225MHz/2.25Gbps per channel (6.75Gbps all channel) bandwidth
Support HDMI uncompressed 2 channel audio such as LPCM
Support USB 2.0 port connection and enable HUB function for
sharing USB devices
Support MIC and Earphone function for external audio equipments
Front panel LEDs indicate which Source & Sink are selected
System Requirements
Device or PC computer with an available DisplayPort & USB Port
(USB 2.0 recommended)
Windows® 7 (32‐/64‐bit) / Vista (32‐/64‐bit) / XP (32‐/64‐bit)
Mac OS® X v10.4 or later
2x1 USB DisplayPort KVM
Switch with Remote Control
Quick Installation Guide
1
04‐0765B
Advertisement
Table of Contents

Related Manuals for SIIG 2x1 USB DisplayPort KVM Switch with Remote Control


Summary of Contents for SIIG 2x1 USB DisplayPort KVM Switch with Remote Control
-
Page 1: Features And Benefits
2x1 USB DisplayPort KVM Switch with Remote Control Quick Installation Guide Introduction The 2x1 USB DisplayPort KVM Switch with Remote Control allows you to switch between two computers to share a DisplayPort or HDMI monitor and set of USB Mouse, USB Keyboard, USB 2.0 device, MIC and Earphone. The input and output can be controlled by manual and remote control. Features and Benefits Support two Dual‐mode DisplayPort inputs to one Dual‐mode DisplayPort or HDMI output Support DisplayPort version 1.1a for both 1.62 and 2.7 Gbps link rates Support HDMI specification max up to 1920x1080p@60Hz@36bit, 225MHz/2.25Gbps per channel (6.75Gbps all channel) bandwidth Support HDMI uncompressed 2 channel audio such as LPCM Support USB 2.0 port connection and enable HUB function for sharing USB devices Support MIC and Earphone function for external audio equipments Front panel LEDs indicate which Source & Sink are selected System Requirements ... -
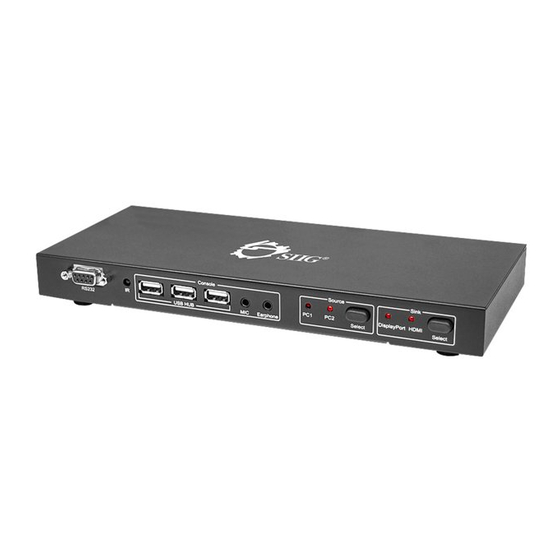
Page 2: Package Contents
Package Contents 2x1 USB DisplayPort KVM Switch with Remote Control DisplayPort to Mini DisplayPort (male) cable DisplayPort to Mini DisplayPort (female) cable Remote control Power adapter Quick installation guide Layout RS232 USB Port PC LED Display Sink Earphone Source Select Select Figure 1: Front Panel Layout RS232: Connect the port to PC, and PC will switch this product by super terminal command. IR: The IR receiver will accept commands from the Remote Control USB Port: The three USB ports will be connected to USB devices, such as mouse, keyboard and hard disk. MIC: The port will be connected to Microphone device Earphone: The port will be connected to audio amplifier device PC 1: The selected PC1 input will be indicated with an active LED ... - Page 3 LED Sink Select: Pressing this button will switch the DisplayPort or HDMI as output. DC/5V Power HDMI Output DisplayPort DisplayPort IR Ext Output Source Source Figure 2: Rear Panel Layout DC/5V: Connects to the included power adapter. Power LED: This LED will be lit once power is being supplied by included 5V power supply IR Ext: Extend IR function. HDMI Output: The port will be connected to HDMI display. DisplayPort Output: The port will be connected to DisplayPort display. DisplayPort Source: The port will be connected to DisplayPort source PC1 and PC2 devices. USB Source: The port will be connected to USB source PC1 and PC2 devices. ...
-
Page 4: Hardware Installation
Hardware Installation 1. Power off the computers and monitor you plan to connect to this switch. 2. Connect DisplayPort Port of the switch PC1 to Computer 1 using a DisplayPort cable or DisplayPort male to Mini DisplayPort male cable (included). 3. Connect USB port of the switch PC1 to Computer1 using a USB A male to B female cable (not included). 4. Repeat for step 1 & 2 for computer 2. 5. Connect USB device (such as mouse, keyboard) to the USB Hub port of the switch. 6. Connect your audio cables to the 3.5mm MIC and Earphone ports of the switch. 7. Connect your DisplayPort and HDMI displays to the switch’s sink ports using an DisplayPort and HDMI cable (not included). 8. Plug the power adapter into the switchʹs power jack then plug the power adapter into a reliable power outlet. 9. Ensure that the Power LED is lit. 10. The 2x1 USB DisplayPort KVM Switch with Remote Control is ready to use. Device Switching You can choose the Select button (that leads you through multiple computers), Remote control or RS232. 1. Selecting source and sink devices by buttons on the front panel, pressing two Select buttons separately to select input signals or output signals. 2. Selecting source and sink devices by Remote control. ‐... - Page 5 ‐ Input1 and Input2 button for DisplayPort and HDMI output Press the Input1 or Input2 button for DisplayPort, DisplayPort output of the product will be selected and input1 or input2 of the product will also be selected at the time. Press the Input1 or Input2 button for HDMI, HDMI output of the product will be selected and input1 or input2 of the product will also be selected at the time 3. Selecting source and sink devices by RS232 ‐ Introduction of RS232 remote operation: RS232 remote operation is mainly based on the super terminal of Windows operation system. Its parameter should be: ANSI 4800 8‐N‐1‐non ‐ Operation a. Connect the switch splitter to the COM of PC with a RS232 cable b. Chose the right COM when you setting super terminal and then set the parameter as follow: Baud frequency:4800 Data bit: 8 Parity bit: N Stop bit: 1 Data stream: NON c. Input your instruction and finish with Enter button on the Keyboard. Both capital and small letters of the instruction are fine. Please input next instruction in three seconds or the Overtime instruction will appear. The input instruction should be right, or you will be rejected with the wrong instruction, If the input or output that you chose is not connected to devices or not in power‐on mode, ineffective instruction will inform you. ...
- Page 6 ‐ Instruction function ON: Turning on the product OFF: Turning off the product QS: This order enables you know which input and output are available and the connections of input and output. DP1: Select source1 as input, Select DisplayPort as output DP2: Select source2 as input, Select DisplayPort as output HDMI1: Select source1 as input, Select HDMI as output HDMI2: Select source2 as input, Select HDMI as output ...
-
Page 7: Technical Support And Warranty
SIIG will refuse to accept any shipping package, and will not be responsible for a product returned without an RMA number posted on the outside of the shipping carton. You are responsible for the cost of shipping the product to SIIG at the following address: SIIG, Inc. - Page 8 Fremont, CA 94538-3152, USA Ph: 510-657-8688 2x1 USB DisplayPort KVM Switch with Remote Control is a trademark of SIIG, Inc. SIIG and the SIIG logo are registered trademarks of SIIG, Inc. Other names used in this publication are for identification only and may be trademarks of their respective companies.
Need help?
Do you have a question about the 2x1 USB DisplayPort KVM Switch with Remote Control and is the answer not in the manual?
Questions and answers