Table of Contents
Advertisement
Quick Links
Advertisement
Table of Contents

Related Manuals for AEMC 5212


Summary of Contents for AEMC 5212
-
Page 1: Digital Multimeter
Digital Multimeter Models 5212, 5215 & 5217 E N G L I S H User Manual... - Page 3 Copyright © Chauvin Arnoux , Inc. d.b.a. AEMC® Instruments. All rights reserved. ® No part of this documentation may be reproduced in any form or by any means (including electronic storage and retrieval or translation into any other language) without prior agreement and written consent from Chauvin Arnoux , Inc., as governed by United States and International copyright laws.
-
Page 4: Statement Of Compliance
The recommended calibration interval for this instrument is 12 months and begins on the date of receipt by the customer. For recalibration, please use our calibration services. Refer to our repair and calibration section at www.aemc.com. Serial #: ________________________________ Catalog #: 2154.07/2154.08/2154.09 Model #:... - Page 5 Thank you for purchasing the AEMC Multimeter. For best results from your instrument and for your safety, read the enclosed operating instructions carefully and comply with the precautions for use. These products must be only used by qualified and trained users.
- Page 6 ■ Strictly comply with the fuse specifications. Disconnect all cables before opening the fuse access cover. ■ Do not modify the instrument or replace components using substitute parts. Repairs and adjustments must be performed by AEMC Instruments. ® ■ Replace the battery immediately if the symbol appears on the display.
-
Page 7: Table Of Contents
Table of Contents 1. INTRODUCTION .....................5 1.1 Receiving Your Shipment..............5 1.2 Ordering Information ................5 1.2.1 Replacement Parts ..............5 1.3 Introducing the Models 5212, 5215 & 5217 ..........6 1.4 Front Panel ...................8 1.5 LCD Screen ..................9 1.6 Buttons ....................10 1.7 Selection Dial ..................10 1.8 Terminals ....................11... - Page 8 4.3 Testing and Replacing Fuses ..............28 4.3.1 Testing the 10A Fuse ..............28 4.3.2 Testing the 630mA Fuse ............29 4.3.3 Replacing a Fuse..............29 4.4 Metrological Check and Calibration ............30 4.5 Technical and Sales Assistance ............30 4.6 Limited Warranty .................31 4.7 Warranty Repairs ................31 Multimeter Models 5212/5215/5217...
-
Page 9: Introduction
0.4 x 1.2" (10 x 30mm) ..............Cat. #2154.75 Fuse - Set of 5, 0.63A, 1000V (Fast Blow), 10kA, 0.25 x 1.26" (6.3 x 32mm) ..............Cat. #2154.76 Order Accessories and Replacement Parts Directly Online Check our Storefront at www.aemc.com for availability Multimeter Models 5212/5215/5217... -
Page 10: Introducing The Models 5212, 5215 & 5217
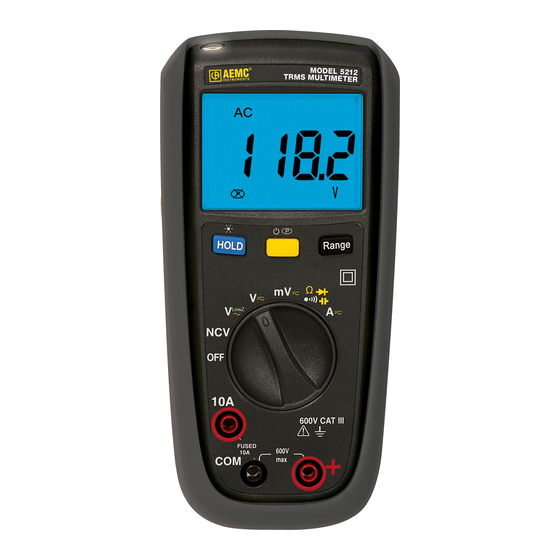
1.3 Introducing the Models 5212, 5215 & 5217 The Digital Multimeter Models 5212, 5215, and 5217 measure electrical and physical quantities, including: ■ AC and DC Voltage ■ AC and DC Current ■ Resistance and Continuity ■ Capacitance ■ Frequency and duty cycle (Model 5217) ■... - Page 11 Model 5212 Model 5215 Model 5217 Auto Range ● ● ● Max-Min ● ● Frequency (Hz) and ● Duty Cycle Relative Measurement ● ● Sleep Mode ● ● ● Multimeter Models 5212/5215/5217...
-
Page 12: Front Panel
Short press: Holds measurement Frequency/duty cycle button Long (>2s) press: turns on back- (Model 5217) light/flashlight Maximum/Minimum button µ/mA current input terminal (Models 5215 and 5217) (Models 5215/5217) Measurement selection dial Voltage input terminal 10A current input terminal Multimeter Models 5212/5215/5217... -
Page 13: Lcd Screen
Continuity test selected enabled Max, Min, or Max minus Min indicator Diode test selected Fahrenheit or Celsius indicator AC or DC indicator Decimal prefix Display Hold enabled (nano, micro, or milli) Amps or volts indicator; Capacitance (Farads) indicator Multimeter Models 5212/5215/5217... -
Page 14: Buttons
■ ΔREL (Models 5215 and 5217) enables relative measurement mode (§ 2.2.4). ■ Hz% (Model 5217) enables frequency and duty cycle measurement (§ 2.3.8). 1.7 Selection Dial The rotary selection dial determines the type of measurement to be made. µ Figure 2-4 (Model 5217) xxxx Multimeter Models 5212/5215/5217... -
Page 15: Terminals
■ 10A is used for measuring AC and DC current up to 10A, and (Model 5217) current frequency/duty cycle. For the Model 5212 this terminal is used for all current measurements. For the Models 5215 and 5217 this is used for (amp) measurements. -
Page 16: Set Up & Operation
7. Turn ON the instrument by selecting any dial setting and check that it powers up correctly. Then check the LCD to see whether or not the Low Battery indicator is displayed. If so, replace the batteries. Figure 3-1 Multimeter Models 5212/5215/5217... -
Page 17: Mounting
This lets you mount the instrument to a wall or other permanent location. ■ Magnet Mount: The removable protective housing includes a set of molded- in magnets located near the top. These allow the instrument to be affixed onto a magnetic surface. Multimeter Models 5212/5215/5217... -
Page 18: Instrument Check
■ Maximum/Minimum mode displays the maximum and minimum measurements and the difference between them (Models 5215 and 5217). ■ Relative Measurement defines a measurement value against which subsequent measurements will be compared (Models 5215 and 5217). Multimeter Models 5212/5215/5217... -
Page 19: Manual Range And Auto Range
(The MAX-MIN symbol appears.) 4. To exit this mode, press and hold down the Max-Min button for longer than 2 seconds. NOTE: Auto Range is disabled in Max-Min mode. Multimeter Models 5212/5215/5217... -
Page 20: Relative Measurement (Models 5215 And 5217)
■ Non-contact voltage detection In addition, the Model 5217 provides the following measurements: ■ Frequency and duty cycle ■ Temperature WARNING Be sure to carefully observe all safety precautions when testing components, especially when working with unknown currents or voltages. Multimeter Models 5212/5215/5217... -
Page 21: Non-Contact Voltage Detection (Ncv)
The closer the conductor, the more dashes are displayed and the faster the blinking/beeping. Hz/% µ Figure 3-1 Multimeter Models 5212/5215/5217... -
Page 22: Voltage Measurement
AC and DC measurements. (Note that V is not available in mode.) NOTE: When the Model 5212 or Model 5215 is set to , input above 400mV (Model 5212) or 600mV (Model 5215) displays the symbol on the LCD, indicating an overload condition. -
Page 23: Dc And Ac Current Measurement
3. Connect the probe tips to the circuit under test. 4. Press the yellow button to toggle back and forth between AC and DC measurements. NOTE: If current is above 10A, an alarm sounds and the instrument’s fuse may blow. Multimeter Models 5212/5215/5217... -
Page 24: Continuity Check
50Ω, the beeper also sounds, indicating a potential short circuit. NOTE: If there is no continuity (the resistance is above 600Ω), the LCD displays , indicating an open circuit or high resistance. symbol on the LCD, indicating an overload condition. Multimeter Models 5212/5215/5217... -
Page 25: Resistance Measurement
5. Touch the probes to the desired points in the circuit under test. The resistance measurement appears on the LCD. If the resistance between the two points is above 60MΩ (or 40MΩ in the Model 5212), the LCD displays the symbol. -
Page 26: Diode Test
6. If the polarity of the test leads is reversed with diode polarity (or if the forward bias voltage is above 3V) the symbol appears on the LCD. This can help identify the anode and cathode of the diode. < 50 Hz/% µ Figure 3-5 Multimeter Models 5212/5215/5217... -
Page 27: Capacitance Measurement
5. Touch the probes to the capacitor leads. After a few moments, the measurement will stabilize and display on the LCD. (This may require 15 seconds or more for measurements in the 100mF range.) Hz/% µ Figure 3-6 Multimeter Models 5212/5215/5217... -
Page 28: Frequency & Duty Cycle Measurement (Model 5217)
■ Touch the thermocouple tip to the object under measurement. ■ Allow one minute for thermal stabilization. ■ Press the yellow button to toggle between Celsius (°C) and Fahrenheit (°F). ■ If the measured temperature exceeds 1300°C (2372°F) the LCD displays the symbol. Multimeter Models 5212/5215/5217... -
Page 29: Specifications
600V CAT III IEC61010-1, IEC61010-2-033 Display Digital LCD: • Models 5215 and 5217: 6000 count updates 3 times/s • Model 5212: 4000 count updates 3 times/s Temperature Operating: -4°F to 120°F (-20° to 50°C) Storage: -22°F to 130°F (-30° to 55°C) Temperature coefficient 150ppm (for T °C function 0.15%/°C) -
Page 30: Measurement Resolution And Accuracy
0.2%+2cts 4.000A 6.000A 0.001A 1%+5cts 10.00A 0.01A 0.5%+5cts 4.000A 6.000A 0.001A 1%+5cts 10.00A 0.01A 0.5%+5cts 60.00mA 0.01mA 0.5%+5cts 600.0mA 0.1mA 60.00mA 0.01mA 0.5%+3cts 600.0mA 0.1mA 600.0µA 0.1µA µA 1%+5cts 6000µA 1µA 600.0µA 0.1µA µA 0.5%+5cts 6000µA 1µA Multimeter Models 5212/5215/5217... - Page 31 0°C to 50°C (32°F to 122°F) 0.1°C (0.2°F) (±5.4°F) -55°C to 0°C (-67°F to 32°F) 0.1°C (0.2°F) (9%+3.6°F) 10.00Hz 0.01Hz Frequency 100.0Hz 0.1Hz 1%+3cts 1.000kHz Duty cycle 0.1% to 99.9% approximately 1% Specifications are subject to change without notice Multimeter Models 5212/5215/5217...
-
Page 32: Maintenance
4. Touch the tips of the two leads together. The buzzer beeps, and a reading appears on the LCD. A reading between 0 and 000.2Ω indicates the fuse is good. If appears on the LCD, replace the fuse (see § 4.3.3). Multimeter Models 5212/5215/5217... -
Page 33: Testing The 630Ma Fuse
4. Locate the fuses (Figure 15). Carefully remove the fuse to be replaced, using a flathead screwdriver or similar implement if necessary. 5. Insert the replacement fuse. 6. Replace the battery cover, screws, and protective cover. Figure 4-1 Multimeter Models 5212/5215/5217... -
Page 34: Metrological Check And Calibration
Service Center at one-year intervals for recalibration, or as required by other standards or internal procedures. Note for Calibration Laboratories and Facilities: The Models 5212, 5215, and 5217 include onboard firmware enabling each instrument to be calibrated by connecting the inputs to a calibrator and pressing the front panel push buttons. -
Page 35: Limited Warranty
4.6 Limited Warranty The Models 5212, 5215 & 5217 are warranted to the owner for a period of three years from the date of original purchase against defects in manufacture. This limited warranty is given by AEMC Instruments, not by the distributor from ®... - Page 36 04/16 99-MAN 100419 v3 Chauvin Arnoux , Inc. d.b.a. AEMC Instruments ® ® 15 Faraday Drive • Dover, NH 03820 USA • Phone: (603) 749-6434 • Fax: (603) 742-2346 www.aemc.com...
Need help?
Do you have a question about the 5212 and is the answer not in the manual?
Questions and answers