Auriol Z29592 Operation And Safety Notes
Portable weather station
Hide thumbs
Also See for Z29592:
- Operation and safety notes (221 pages) ,
- Operation and safety notes (191 pages) ,
- Operation and safety notes (152 pages)
Table of Contents
Advertisement
Available languages
Available languages
Quick Links
ESTACIÓN METEOROLÓGICA PORTÁTIL
Instrucciones de utilización y de seguridad
STAZIONE METEOROLOGICA PORTATILE
Indicazioni per l'uso e per la sicurezza
ESTAÇÃO METEOROLÓGICA PORTÁTIL
Instruções de utilização e de segurança
PORTABLE WEATHER STATION
Operation and Safety Notes
TRAGBARE WETTERSTATION
Bedienungs- und Sicherheitshinweise
Z29592
Advertisement
Chapters
Table of Contents

Related Manuals for Auriol Z29592


Summary of Contents for Auriol Z29592
- Page 1 ESTACIÓN METEOROLÓGICA PORTÁTIL Instrucciones de utilización y de seguridad STAZIONE METEOROLOGICA PORTATILE Indicazioni per l’uso e per la sicurezza ESTAÇÃO METEOROLÓGICA PORTÁTIL Instruções de utilização e de segurança PORTABLE WEATHER STATION Operation and Safety Notes TRAGBARE WETTERSTATION Bedienungs- und Sicherheitshinweise Z29592...
- Page 2 Instrucciones de utilización y de seguridad Página IT / MT Indicazioni per l’uso e per la sicurezza Pagina Instruções de utilização e de segurança Página GB / MT Operation and Safety Notes Page DE / AT / CH Bedienungs- und Sicherheitshinweise Seite...
-
Page 4: Table Of Contents
Uso previsto ............Página Descripción de las piezas ......Página Datos técnicos ............Página Volumen de suministro .........Página Indicaciones generales de seguridad ..............Página Indicaciones de seguridad de la pila......Página 11 Puesta en funcionamiento de la estación metereológica Ajustes básicos: idioma / hora / fecha / zona horaria ..............Página 12 Activación / Desactivación del display ......Página 15 Conexión / Desconexión del sonido de pulsación... - Page 5 Utilización del barómetro / manómetro ......Página 23 Ajustar el manómetro ............Página 24 Utilización del altímetro ..........Página 25 Ajuste del altímetro ............Página 26 Medición de la diferencia de altura ......Página 27 Pronóstico del tiempo ............Página 27 Lectura de la temperatura y la humedad relativa del aire ..............Página 28 Consultar los valores mínimo y máximo ........
-
Page 6: Uso Previsto
Estación meteorológica portátil © Uso previsto La estación metereológica muestra la temperatura en grados Celsius (°C) o grados Farenheit (°F), la humedad relativa en (% RH), así como los valores mínimos y máximos. La estación muestra también valores relativos al pronóstico del tiempo, la hora en formato de 12 y 24 horas así... -
Page 7: Datos Técnicos
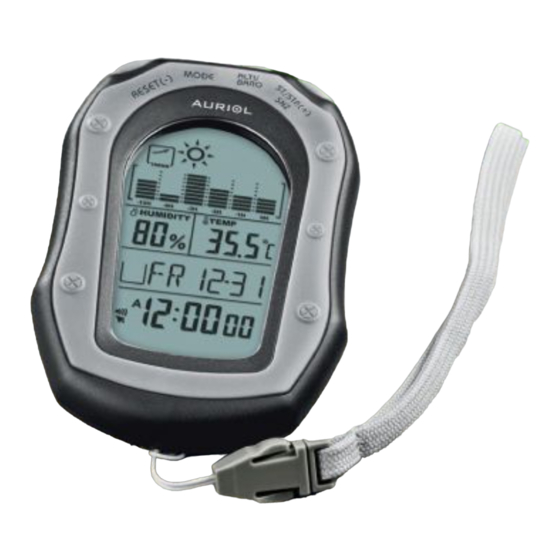
Símbolo de tiempo Indicador de barras de la presión del aire Indicación de temperatura Indicación de la fecha Indicación de la hora Indicación de la alarma diaria Indicación de la humedad relativa del aire Indicación de la tendencia de la presión del aire Cierre de seguridad ©... -
Page 8: Volumen De Suministro
Altura Desglose: Rango de medición: – 706 m - 9164 m – 2316 ft - 30065 ft Presión del aire Desglose: 0,1 mb / hPa (millibares / hectopascal) Rango de medición: 300 mb / hPa - 1100 mb / hPa 1 x pila de botón de litio 3 V Pila: (CR 2032) (se suministra con el... -
Page 9: Indicaciones Generales De Seguridad
Indicaciones generales de seguridad ½ ¡PELIGRO DE ¡ADVERTENCIA! MUERTE O ACCIDENTE PARA BEBÉS Y NIÑOS! No deje nunca a los niños sin vigilancia con el material de embalaje. Podrían asfixiarse con el material de embalaje. Los niños a menudo subesti- man los peligros. - Page 10 ½ No utilice el aparato en hospitales o instalaciones mé- dicas. Podría producir interferencias con los dispositivos de auxilio vital. ½ No exponga el aparato a - temperaturas extremas, - vibraciones fuertes, - grandes esfuerzos mecánicos, - directamente a la luz del sol. Puede dañar el aparato.
-
Page 11: Indicaciones De Seguridad De La Pila
Indicaciones de seguridad de la pila ½ Extraiga la pila cuando el aparato no se haya utilizado durante mucho tiempo. ¡ATENCIÓN! ¡RIESGO DE EXPLOSIÓN! No intente cargar pilas no recargables. ½ Aplique la polaridad correcta. La polaridad se indica en el compartimento de las pilas. ½... -
Page 12: Puesta En Funcionamiento De La Estación Metereológica
las pilas, enjuague inmediatamente las partes afectadas con abundante agua y acuda a un médico. © Puesta en funcionamiento de la estación metereológica Nota: Si durante las operaciones de ajuste no pulsa ninguna tecla en el transcurso de un minuto, la estación vuelve automáticamente al modo de partida correspondiente. - Page 13 Pulse la tecla MODE para ajustar el huso horaria. Con las teclas RESET o ST. / STP. puede elegir entre los husos horarios siguientes: 1. Casablanca CAS GMT +0 28. Dubai DXB GMT +4:00 2. Dublin DUB GMT +0 29. Karachi GMT +5:00 3.
- Page 14 55. Lima GMT -5:00 58. Santiago GMT -4:00 56. Toronto YTO GMT -5:00 59. Buenos Aires BUE GMT -3:00 57. Caracas CCS GMT -4:30 60. Rio de Janeiro RIO GMT -3:00 Pulse la tecla MODE para seleccionar el horario de verano (DST). Con las teclas RESET o ST.
-
Page 15: Activación / Desactivación Del Display
Pulse la tecla MODE para ajustar el mes. Con las teclas RESET o ST. / STP. ajuste el mes natural actual. Pulse la tecla MODE para ajustar el día. Con las teclas RESET o ST. / STP. ajuste el día natural actual. -
Page 16: Conexión / Desconexión Del Sonido De Pulsación De Las Teclas
Mantenga pulsada la tecla ALTI / BARO durante 5 segundos para desactivar el display Pulse cualquier tecla para volver a activar el display © Conexión / Desconexión del sonido de pulsación de las teclas La estación metereológica posee una función de sonoridad de las teclas. -
Page 17: Desconexión Automática Del Display / Activación De L Función De Hibernación
© Desconexión automática del display / Activación de l función de hibernación Con la función de hibernación el display se desactiva si no se pulsa ninguna tecla durante 48 horas. Pulse la tecla MODE hasta que visualice en el display la fecha (modo día de la semana). -
Page 18: Activación De La Alarma De Hora
Pulse las teclas RESET o ST. / STP para ajustar el valor deseado. Aparece el símbolo en el display Vuelva a pulsar la tecla MODE para ajustar los minutos. Pulse las teclas RESET o ST. / STP para ajustar el valor deseado. Pulse ALTI / BARO para salir del modo de ajuste. -
Page 19: Utilización Del Cronómetro
Mantenga pulsada la tecla RESET durante 2 segun- dos para activar o desactivar la alarma de hora. Nota: Cuando se activa la alarma de hora aparece el símbolo en el display . El tono de despertador suena cada hora transcurrida. En este caso se emite un único tono. -
Page 20: Medición / Grabación Y Consulta De Tiempos De Vueltas
© Medición / grabación y consulta de tiempos de vueltas Medición y grabación de tiempos de vueltas Puede medir y grabar los tiempos de hasta 10 vueltas. Pulse la tecla MODE hasta que visualice en el display la indicación CHR. Pulse la tecla ST. -
Page 21: Utilización De La Cuenta Atrás
Pulse la tecla ALTI / BARO para salir del modo de cronómetro. Pulse la tecla MODE durante 2 segundos para borrar los tiempos de las vueltas. © Utilización de la cuenta atrás 1. Pulse la tecla MODE hasta que visualice en el display la indicación TMR. -
Page 22: Visualización De Las Horas Del Mundo
9. Pulse cualquier tecla para finalizar el tono. Tras el tono se vuelve a visualizar el tiempo de cuenta atrás configurado en el display 10. Repita los pasos descritos para ajustar un nuevo intervalo de cuenta atrás. © Visualización de las horas del mundo Nota: Puede visualizar la hora de hasta 60 ciudades. -
Page 23: Utilización Del Barómetro / Manómetro
Pulse ALTI / BARO para salir del modo de ajuste de horas del mundo. © Utilización del barómetro / manómetro Nota: La presión del aire medida por encima de los 1100 h / Pa se visualiza con “HI” en el display Nota: La presión del aire medida por encima de los 300 h / Pa se visualiza con “LO”... -
Page 24: Ajustar El Manómetro
La estación metereológica muestra la tendencia de la presión del aire mediante la indicación de tendencia de presión del aire El presión de aire aumenta La presión del aire se mantiene constante La presión del aire cae © Ajustar el manómetro Para garantizar una medición lo más exacta posible debe calibrar el manómetro. -
Page 25: Utilización Del Altímetro
Pulse las teclas RESET y ST. / STP. para ajustar el valor deseado. En caso de error pulse la tecla MODE y ajuste el valor correcto. Pulse ALTI / BARO para salir del modo de ajuste. © Utilización del altímetro ¡ATENCIÓN! No utilice el altímetro en un avión. -
Page 26: Ajuste Del Altímetro
© Ajuste del altímetro El valor de medición de altura absoluto se mide a partir de la modificación de la presión del aire. Para garantizar una medición lo más exacta posible, es necesario ajustar el altímetro cada cierto tiempo. Procure calibrar el altímetro en un lugar al nivel del mar (0 m) o un punto fijo de referencia. -
Page 27: Medición De La Diferencia De Altura
© Medición de la diferencia de altura La estación metereológica mide el punto más profundo y el más elevado (p. ej. excursión). Pulse la tecla ALTI / BARO hasta que empiece a parpadear la indicación TRK en el display Mantenga pulsada la tecla RESET hasta que la indicación del altímetro se fije en 0. -
Page 28: Lectura De La Temperatura Y La Humedad Relativa Del Aire
Símbolos Significado = soleado = ligeramente nublado = nublado = lluvioso La indicación metereológica se actualiza cada 3 horas. La estación metereológica no indica cambios climáticos a corto plazo. El pronóstico del tiempo se basa en los cambios de la presión del aire. -
Page 29: Consultar Los Valores Mínimo Y Máximo
Por encima de los + 60 °C / 140 °F se visualiza la indicación “HI” en el display Con una temperatura inferior a –10 °C / 14 °F se visualiza la indicación “LO” en el display La temperatura se puede visualizar en grados Celsius o Fahrenheit. - Page 30 Visualizar máx. / mín. de temperatura / humedad relativa del aire Pulse la tecla MODE hasta que visualice en el display la fecha (modo día de la semana). Pulse la tecla RESET . El display muestra los valores mínimos y máximos medidos para la temperatura y la humedad relativa del aire.
-
Page 31: Indicación De Carga De La Pila
Pulse la tecla RESET . El display muestra los valores mínimos y máximos medidos para la temperatura, la humedad relativa del aire y la presión del aire. Pulse la tecla RESET durante aprox. 3 segundos para reinicializar los valores máximos. ©... -
Page 32: Limpieza Y Cuidados
Retire la pila agotada y coloque en su lugar una nueva (del tipo: pila de botón de litio 3 V (CR 2032). Aplique la polaridad correcta. Vuelva a colocar la tapa sobre el compartimento del a pila. Asegúrese de que la junta de goma se apoya correctamente sobre el lado inferior de la tapa. - Page 33 Para proteger el medioambiente, cuando ya no utilice el aparato no lo arroje a la basura domés- tica, deséchelo adecuadamente. Puede obtener información, respecto de los puestos de recolección y sus horarios de atención, en la administración competente. Las pilas defectuosas o usadas deben ser recicladas según lo indicado en la directiva 2006 / 66 / EC.
- Page 34 Utilizzo secondo la destinazione d’uso ..........Pagina 36 Descrizione dei componenti .....Pagina 36 Dati tecnici ..............Pagina 37 Volume di consegna ........Pagina 38 Avvisi di sicurezza generali .....Pagina 39 Indicazioni di sicurezza relative alla batteria .....Pagina 41 Avvio della stazione meteo Impostazione base della lingua / dell’orario / della data / del fuso orario ..........Pagina Disattivazione / attivazione del display ......Pagina...
- Page 35 Regolazione del misuratore di pressione atmosferica ... Pagina 55 Utilizzo del misuratore di altitudine ......Pagina 56 Regolazione del misuratore di altitudine.......Pagina Misurazione della differenza di altitudine ....Pagina 58 Previsione meteo ............Pagina 58 Lettura della temperatura e dell’umidità atmosferica ...Pagina 60 Richiamo dei valori massimi e minimi ......Pagina 61 Visualizzazione delle batterie ........Pagina 62 Sostituzione delle batterie ..........Pagina 63...
-
Page 36: Utilizzo Secondo La Destinazione D'uso
Stazione meteorologica portatile © Utilizzo secondo la destinazione d’uso La stazione meteo portatile visualizza la temperatura in gradi Celsius (°C) o Fahrenheit (°F), l’umidità atmosferica (% RH), nonché i loro valori minimi e massimi. Ulteriori valori visualizzati dalla stazione meteo sono la previsione meteo, l’orario nel formato 12 / 24 ore nonché... -
Page 37: Dati Tecnici
Taste ST. / STP (Start / Stop) Display Simbolo meteo Visualizzazione a barre del misuratore di pressione atmosferica Visualizzazione della temperatura Visualizzazione della data Visualizzazione dell’orario Visualizzazione dell’allarme giornaliero Visualizzazione dell’umidità atmosferica Visualizzazione della tendenza della pressione atmosferica Chiusura di sicurezza ©... -
Page 38: Volume Di Consegna
Misuratore dell’altitudine Arrotondamento: Gamma di pesatura: – 706 m - 9164 m – 2316 ft - 30065 ft Misuratore della pressione atmosferica Arrotondamento: 0,1 mb / hPa (millibar / Hectopascal) Gamma di misurazione: 300 mb / hPa - 1100 mb / hPa 1 x batteria a bottone al litio da Batteria: (CR 2032) (inclusa... -
Page 39: Avvisi Di Sicurezza Generali
Avvisi di sicurezza generali ½ AVVISO! PERICOLO PER L’INCO- LUMITÀ DEI BAMBINI! Vietare l’accesso al materiale d’imballaggio ai bambini, se non sotto sorveglianza di un adulto. Sussiste il pericolo di soffocamento dei bambini con il materiale d’imballaggio. I bambini non sono in grado di valutare l’entità dei pericoli. - Page 40 ½ Non faccia uso di quest’apparecchiatura negli ospedali o in istituti medici. In questi luoghi l’apparecchiatura può causare disturbi di funzionamento ai sistemi di manteni- mento della vita. ½ Non esponga l’apparecchiatura - a temperature estreme, - a forti vibrazioni, - a pesanti carichi meccanici, - all’irraggiamento diretto del sole.
-
Page 41: Indicazioni Di Sicurezza Relative Alla Batteria
Indicazioni di sicurezza relative alla batteria ½ Rimuovere la batteria dall’apparecchio qualora essa non venisse utilizzata per lungo tempo. ATTENZIONE! PERICOLO DI ESPLOSIONE! Non ricaricare mai la batteria! ½ Inserendo la batteria fare attenzione a che ne sia rispettata la polarità! Questa viene mostrata nel vano portabatterie. ½... -
Page 42: Avvio Della Stazione Meteo
© Avvio della stazione meteo Nota: Qualora durante le procedure di impostazione non venisse toccato alcun tasto per 1 minuto, la stazione meteo torna automaticamente nella rispettiva modalità di uscita. Durante le procedure di impostazione premere e mantenere premuti il tasto RESET oppure il tasto ST. - Page 43 Operando sul tasto RESET oppure sul tasto ST. / STP. è possibile scegliere tra i seguenti fusi orari: 1. Casablanca CAS GMT +0 29. Karachi GMT +5:00 2. Dublin DUB GMT +0 30. New Delhi GMT +5:30 3. Lisabon GMT +0 31.
- Page 44 57. Caracas CCS GMT -4:30 59. Buenos Aires BUE GMT -3:00 58. Santiago GMT -4:00 60. Rio de Janeiro RIO GMT -3:00 Per impostare l’ora legale (DST) premere il tasto MODE Per impostarla o rimuoverla operare sul tasto RESET oppure il tasto ST. / STP. Nota: Impostare l’ora legale solamente se l’utilizzatore si trova in un Paese dove essa viene applicata.
-
Page 45: Disattivazione / Attivazione Del Display
Per impostare il mese desiderato premere il tasto MODE . Impostare il mese solare in corso operando sul tasto RESET o sul tasto ST. / STP. Per impostare il giorno della settimana desiderato premere il tasto Mode . Impostare il giorno solare in corso operando sul tasto RESET o sul tasto ST. -
Page 46: Inserimento / Disinserimento Del Suono Dei Tasti
Premere ripetutamente il tasto MODE fino a quando sul display appare la visualizzazione della data (modalità giorno della settimana). Premere e mantenere premuto il tasto ALTI / BARO per 5 secondi per spegnere il display Per riattivare il display premere uno dei tasti ©... -
Page 47: Disinserimento Automatico Del Display / Attivazione Della Funzione Di Snooze (Ripetizione Della Suoneria)
Per lasciare la modalità di impostazione premere il tasto ALTI / BARO © Disinserimento automatico del display / Attivazione della funzione di snooze (ripetizione della suoneria) Se la funzione di snooze è inserita, il display si disinserisce qualora per 48 non sia stato premuto alcun tasto. Premere ripetutamente il tasto MODE fino a che sul display... -
Page 48: Impostazione Del Tempo Di Sveglia E Dell'allarme Giornaliero
© Impostazione del tempo di sveglia e dell’allarme giornaliero Premere ripetutamente il tasto MODE fino a quando appare sul display appare la visualizzazione ALM. Operando sul tasto ST. / STP. scegliere tra l’allarme giornaliero 1 e l’allarme giornaliero 2. Tenere premuto il tasto MODE per due secondi. -
Page 49: Attivazione Dell'allarme Orario
Se durante il suono della sveglia viene premuto il tasto ST. / STP. viene attivata la funzione di snooze ( Il suono di sveglia si interrompe e viene attivata nuova- mente dopo 8 minuti. Per lasciare la funzione di snooze premere un tasto qualsiasi. -
Page 50: Misurazione / Memorizzazione E Richiamo Dei Tempi Sul Giro
Premere ripetutamente il tasto MODE fino a quando sul display appare la visualizzazione CHR. Per avviare il cronometro premere il tasto ST. / STP. Per fermare il cronometro premere nuovamente lo stesso tasto. Il display visualizza il tempo intercorso tra l’avvio e l’interruzione del cronometro. - Page 51 rario mentre il tempo sul giro viene visualizzato per circa 10 secondi sul display . In seguito il tempo continua a scorrere. Per misurare il tempo su un ulteriore giro premere il tasto RESET Per fermare il cronometro premere il tasto ST./STP. Richiamo dei tempi sul giro Premere ripetutamente il tasto MODE fino a quando...
-
Page 52: Utilizzo Del Conto Alla Rovescia
© Utilizzo del conto alla rovescia 1. Premere ripetutamente il tasto MODE fino a quando appare sul display appare la visualizzazione TMR. 2. Premere e mantenere premuto il tasto MODE circa 2 secondi. Lampeggia la visualizzazione dell’ora. 3. Per impostare il valore desiderato premere i tasti RESET o ST. -
Page 53: Visualizzazione Dei Fusi Orari
10. Per impostare un altro tempo di conto alla rovescia ripetere i passi precedentemente descritti. © Visualizzazione dei fusi orari Nota: Vi è la possibilità di visualizzare gli orari di sessanta città in tutto il mondo. Premere ripetutamente il tasto MODE fino a quando appare sul display appare la visualizzazione WT. -
Page 54: Utilizzo Del Barometro / Del Misuratore Di Pressione Atmosferica
Per lasciare la modalità di fuso orario premere il tasto ALTI / BARO © Utilizzo del barometro / del misuratore di pressione atmosferica Nota: In presenza di una pressione atmosferica superiore a 1100 h / Pa sul display viene visualizzata la sigla “HI”. Nota: In presenza di una pressione atmosferica inferiore a 300 h / Pa sul display viene visualizzata la sigla “LO”. -
Page 55: Regolazione Del Misuratore Di Pressione Atmosferica
– 6 H: pressione atmosferica di sei ore prima –12 H: pressione atmosferica di dodici ore prima Attraverso la visualizzazione della tendenza pressione atmosferica la stazione meteo mostra inoltre la tendenza della pressione atmosferica medesima. La pressione atmosferica è in aumento La pressione atmosferica rimane costante La pressione atmosferica è... -
Page 56: Utilizzo Del Misuratore Di Altitudine
Premere e mantenere premuto il tasto MODE 2 secondi. Lampeggia la visualizzazione della pressione atmosferica. Per impostare il valore desiderato premere i tasti RESET e ST. / STP. In caso di inserimento errato premere il tasto MODE e impostare un nuovo valore. Per porre fine alle impostazioni premere il tasto ALTI / BARO ©... -
Page 57: Regolazione Del Misuratore Di Altitudine
Per scegliere tra le unità di misura “metro” (m) e “piede” (ft) premere il tasto ST. / STP. per 2 secondi Nota: La stazione meteo aggiorna automaticamente il misuratore di altitudine. © Regolazione del misuratore di altitudine Il valore assoluto di altitudine viene misurato in base al mutamento della pressione atmosferica. -
Page 58: Misurazione Della Differenza Di Altitudine
Per terminare le impostazioni premere il tasto ALTI / BARO © Misurazione della differenza di altitudine La stazione meteo misura il punto più in basso e quello più in alto (ad esempio in caso di passeggiata). Premere ripetutamente il tasto ALTI / BARO fino a quando sul display appare la visualizzazione TRK. - Page 59 discrepanze tra quanto mostrato dall’apparecchio e la pre- visione del servizio meteo locale, orientarsi sulla base delle indicazioni fornite dal servizio meteo locale. Simbolo Significato = soleggiato = leggermente coperto = coperto = piovoso La visualizzazione meteo viene aggiornata ogni 3 ore. E’...
-
Page 60: Lettura Della Temperatura E Dell'umidità Atmosferica
© Lettura della temperatura e dell’u- midità atmosferica Nota: Qualora la temperatura ambiente fosse troppo alta, la visualizzazione a cristalli liquidi diventa nera. In caso di misurazione di una temperatura superiore a + 60 °C / 140 °F sul display viene visualizzata la sigla “HI”. -
Page 61: Richiamo Dei Valori Massimi E Minimi
© Richiamo dei valori massimi e minimi E’ possibile visualizzare i valori massimi e minimi dell’umidità dell’aria, della temperatura, della pressione atmosferica e del misuratore di altitudine. Visualizzazione della temperatura massima / della temperatura minima / dell’umidità dell’aria Premere ripetutamente il tasto MODE fino a che sul display appare la visualizzazione della data... -
Page 62: Visualizzazione Delle Batterie
Per resettare i valori massimi premere il tasto RESET per circa 3 secondi. Visualizzazione di temperatura massima / della temperatura minima / dell’umidità atmosferica / della pressione atmosferica Premere ripetutamente il tasto ALTI / BARO fino a quando appaiono sul display le visualizzazioni hPa (Hectopascal) oppure mb (Millibar). -
Page 63: Sostituzione Delle Batterie
terie e riscaldarle nel palmo della mano. In seguito inserirle di nuovo come descritto nel capitolo “Sostituzione della batteria”. © Sostituzione della batteria Per aprire il coperchio del vano portabatterie ruotare il coperchio stesso in senso antiorario con una moneta adatta. -
Page 64: Smaltimento
Pulire l’apparecchio solo esternamente con un panno soffice, asciutto e privo di peli. © Smaltimento L’imballaggio è costituito di materiali ecologici che si possono smaltire nei punti di raccolta per riciclaggio locali. Informarsi presso l’amministrazione cittadina o comunale sulle possibilità di smaltimento del prodotto usato. Non smaltire l’apparecchio assieme ai rifiuti domestici, ma farlo secondo le disposizioni vigenti. - Page 65 Le batterie non devono essere smaltite nella spazzatura domestica. Esse possono contenere metalli pesanti velenosi e devono essere trattate quali rifiuti speciali. I simboli chimici dei metalli pesanti sono i seguenti: Cd = Cadmio, Hg = mercurio, Pb = piombo. Consegnare quindi le batterie usate ad un punto di raccolta comunale.
- Page 66 Utilização correcta ........... Página 68 Descrição das peças ........Página 68 Dados técnicos ............. Página 69 Material fornecido ........... Página 70 Indicações gerais de segurança ... Página 71 Indicações de segurança relativas às pilhas ....Página 73 Colocar a estação meteorológica em funcionamento Proceder à...
- Page 67 Utilizar o altímetro ............Página 87 Ajustar o altímetro ............Página 88 Medir o desnivelamento ..........Página 89 Previsão meteorológica ..........Página 89 Ler a temperatura e a humidade atmosférica .... Página 91 Consultar os valores máximos e mínimos ....Página 92 Indicação das pilhas ............
-
Page 68: Utilização Correcta
Estação meteorológica portátil © Utilização correcta A estação meteorológica portátil indica a temperatura em graus Celsius (°C) ou Fahrenheit (°F), a humidade do ar em (% RH), assim como os respectivos valores máximos e mínimos. Os restantes valores de indicação da estação meteorológica referem-se às previsões meteorológicas, à... -
Page 69: Dados Técnicos
Botão ALTI / BARO (“altímetro / manómetro de pressão de ar”) Botão ST. / STP. (iniciar / parar) Visor Símbolo meteorológico Barra de progresso do sensor de pressão atmosférica Indicação da temperatura Indicação da data Indicação das horas Indicação do alarme diário Indicação da humidade do ar Indicação da tendência da pressão atmosférica Fecho de segurança... -
Page 70: Material Fornecido
Altímetro Resolução: Amplitude de medição: – 706 m - 9164 m – 2316 ft - 30065 ft Manómetro de pressão de ar Resolução: 0,1 mb / hPa (millibar / hectopascal) Amplitude de medição: 300 mb / hPa - 1100 mb / hPa 1 x pilha tipo botão de lítio 3 V Pilha: (CR 2032) (incluídas no material... -
Page 71: Indicações Gerais De Segurança
Indicações gerais de segurança ½ PERIGO DE MORTE E DE AVISO! ACIDENTES PARA BEBÉS E CRIANÇAS! Nunca deixe crianças sem vigilância com o material da embalagem. Existe perigo de asfixia. As crianças subestimam frequentemente os perigos. Mantenha-as sempre afastadas do produto. Este produto não é... - Page 72 ½ Não exponha o aparelho a - temperaturas extremas, - fortes vibrações, - fortes esforços mecânicos, - não exponha a raios solares directos. Caso contrário, o aparelho pode ficar danificado. ½ Nunca exponha o aparelho a campos electromagnéticos extremamente elevados. Isto pode prejudicar o funcio- namento do aparelho.
-
Page 73: Indicações De Segurança Relativas Às Pilhas
Indicações de segurança relativas às pilhas ½ Retire a pilha do aparelho se este não for utilizado durante muito tempo. CUIDADO! PERIGO DE EXPLOSÃO! Nunca recarregue as pilhas! ½ Ao colocar as pilhas, tenha em atenção a polaridade correcta! Esta é indicada no compartimento das pilhas. ½... -
Page 74: Colocar A Estação Meteorológica Em Funcionamento
© Colocar a estação meteorológica em funcionamento Nota: Se durante a configuração não premir nenhum botão no espaço de 1 minuto, a estação meteorológica regressa automaticamente ao respectivo modo de saída. Prima e mantenha premido o botão RESET ST. / STP. durante a configuração. - Page 75 1. Casablanca CAS GMT +0 31. Dhaka DAC GMT +6:00 2. Dublin DUB GMT +0 32. Bangkok BKK GMT +7:00 3. Lisabon GMT +0 33. Jakarta GMT +7:00 4. London LON GMT +0 34. Beijing GMT +8:00 5. Munich AGB GMT +1:00 35.
- Page 76 Prima o botão MODE para ajustar a hora de Verão (DST). Ligue ou deslige este com o botão RESET ou o botão ST. / STP. Nota: Ligue a hora de Verão apenas se se encontrar numa região onde o período da hora de Verão for válido. Prima novamente o botão MODE para ajustar os segundos.
-
Page 77: Activar / Desactivar O Visor
Prima o botão MODE para ajustar o dia. Insira o dia de calendário actual com o botão RESET ou o botão ST. / STP. Prima o botão MODE para seleccionar o formato de data. Com o botão RESET ou o botão ST. / STP. opte entre o formato mês / dia ou o dia / mês. -
Page 78: Ligar / Desligar O Som Dos Botões
© Ligar / desligar o som dos botões A estação meteorológica está equipada com uma função de som dos botões. Se esta for activada, é emitido um som ao premir um botão. Prima o botão MODE repetidamente até a indicação da data (modo de dia da semana) surgir no visor Mantenha o botão MODE... -
Page 79: Ajustar A Hora De Despertar E Activar O Alarme Diário
Prima o botão MODE repetidamente até a indicação da data (modo de dia da semana) surgir no visor Mantenha o botão MODE premido durante dois segundos para retroceder ao modo de configuração. Prima o botão MODE repetidamente até chegar à configuração de ligar / desligar a função de adormecer. -
Page 80: Activar O Alarme Horário
Prima os botões RESET e ST. / STP. para ajustar o valor pretendido. Prima o botão ALTI / BARO para abandonar o modo de configuração. Prima o botão RESET para activar ou desactivar o alarme diário. Nota: Quando o alarme diário está ligado, o símbolo surge no visor O sinal sonoro de despertar é... -
Page 81: Utilizar O Cronómetro
Nota: Quando o alarme horário está ligado, o símbolo surge no visor . O sinal sonoro de despertar é audível a cada hora. O sinal sonoro de despertar é um som único. © Utilizar o cronómetro A estação meteorológica possui uma função de cronómetro. Pode cronometrar minutos, segundos e centésimos de segun- dos. -
Page 82: Cronometrar / Memorizar E Consultar O Tempo Por Volta
© Cronometrar / memorizar e consultar o tempo por volta Cronometrar e memorizar o tempo por volta Pode cronometrar e memorizar até 10 tempos por volta. Prima o botão MODE repetidamente até a indicação CHR surgir no visor Prima o botão ST. / STP. para iniciar o cronómetro. -
Page 83: Utilizar A Contagem Decrescente
Prima o botão ALTI / BARO para regressar ao modo de cronómetro. Prima o botão RESET durante 2 segundos para eliminar os tempos por volta. © Utilizar a contagem decrescente 1. Prima o botão MODE repetidamente até a indicação TMR surgir no visor 2. -
Page 84: Indicar A Hora Universal
9. Prima qualquer botão para terminar o sinal sonoro. Após o sinal sonoro é exibido novamente no visor o tempo da contagem decrescente introduzido. 10. Repita os passos anteriores necessários para ajustar outro tempo de contagem decrescente. © Indicar a hora universal Nota: Tem a possibilidade de indicar as horas de até... -
Page 85: Utilizar O Barómetro / Manómetro De Pressão De Ar
Nota: Assim que ligar a hora de Verão é apresentado o símbolo DST no visor LC. Prima o botão ALTI / BARO para abandonar o modo hora universal. © Utilizar o barómetro / manómetro de pressão de ar Nota: Com uma pressão atmosférica medida superior a 1100 h / Pa surge “HI”... -
Page 86: Ajustar O Sensor De Pressão Atmosférica
– 3 H: pressão atmosférica há três horas – 6 H: pressão atmosférica há seis horas –12 H: pressão atmosférica há doze horas A estação meteorológica apresenta adicionalmente a tendência da pressão atmosférica através da respectiva indicação A pressão atmosférica sobe A pressão atmosférica permanece constante A pressão atmosférica desce ©... -
Page 87: Utilizar O Altímetro
Prima o botão ALTI / BARO repetidamente até a indicação hPa (hectopascal), mb (milibar) ou inHg (polegadas de mercúrio) surgir no visor Mantenha o botão MODE premido durante 2 segundos. A indicação da pressão atmosférica pisca. Prima os botões RESET e ST. -
Page 88: Ajustar O Altímetro
Nota: A estação meteorológica actualiza automatica- mente o altímetro. © Ajustar o altímetro O valor absoluto do altímetro é medido através da alteração da pressão atmosférica. O altímetro deve ser ajustado periodicamente para garantir uma medição o mais precisa possível. Certifique-se de ajustar o altímetro num local que se encontre a 0 metros do nível do mar ou num local a cuja altitude pode introduzir um ponto fixo fiável. -
Page 89: Medir O Desnivelamento
© Medir o desnivelamento A estação meteorológica mede o ponto mais baixo e o mais alto (p. ex. caminhada). Prima o botão ALTI / BARO repetidamente até a indicação TRK surgir no visor Mantenha o botão RESET premido até a indicação do altímetro estar definida para 0. - Page 90 Símbolo Significado = céu limpo = céu pouco nublado = nublado = períodos de chuva A indicação meteorológica é actualizada a cada 3 horas. A estação meteorológica não consegue indicar alterações climáticas a curto prazo. A previsão meteorológica baseia-se nas variações da pressão atmosférica.
-
Page 91: Ler A Temperatura E A Humidade Atmosférica
© Ler a temperatura e a humidade atmosférica Nota: Se a temperatura ambiente for demasiado elevada, o visor LCD fica a preto. Com uma temperatura medida superior a + 60 °C / 140 °F a indicação “HI” surge no visor Com uma temperatura medida inferior a –10 °C / 14 °F a indicação “LO”... -
Page 92: Consultar Os Valores Máximos E Mínimos
© Consultar os valores máximos e mínimos Podem ser indicados os valores máximos e mínimos da humida- de atmosférica, temperatura, pressão atmosférica e altímetro. Visualizar a temperatura / humidade atmosférica máx. / mín. Prima o botão MODE repetidamente até a indicação da data (modo de dia da semana) surgir no visor Prima o botão RESET... -
Page 93: Indicação Das Pilhas
Visualizar a temperatura / humidade atmosférica / pressão atmosférica máx. / mín. Prima o botão ALTI / BARO repetidamente até a indicação hPa (hectopascal) ou mb (milibar) surgir no visor Prima o botão RESET . O visor indica os valores máximos e mínimos medidos da temperatura, humidade atmosférica e pressão atmosférica. -
Page 94: Substituir A Pilha
© Substituir a pilha Para abrir a tampa do compartimento de pilhas rode-a com uma moeda adequada no sentido oposto ao dos ponteiros do relógio. Retire a tampa. Retire a pilha gasta e substitua-a por uma pilha nova (tipo: pilha tipo botão 3 V de lítio CR 2032). -
Page 95: Eliminação
© Eliminação A embalagem é composta por materiais recicláveis, que pode eliminar nos pontos de reciclagem locais. Pode obter informações relativas à eliminação do móvel usado através dos responsáveis legais pela reciclagem no seu município. Não deposite o aparelho usado no lixo doméstico, a favor da protecção do ambiente. - Page 96 Como tal, deposite as pilhas utilizadas num ponto de recolha adequado do seu município. 96 PT...
- Page 97 Intended use ............Page Description of parts and features ..Page Technical data ............Page 100 Scope of supply ........... Page 101 General safety information ..... Page 102 Safety Instructions for the battery ........ Page 103 Starting the weather station up Regulating the default settings for language, time, date, time zone ............
- Page 98 Measuring the difference in height ......Page 119 Weather forecast ............Page 120 Reading off the temperature and humidity ....Page 121 Retrieving the maximum and minimum values .... Page 122 Battery display .............. Page 123 Changing the battery ........... Page 124 Cleaning and Maintenance .......
-
Page 99: Intended Use
Portable Weather Station © Intended use The portable weather station displays the temperature in Celsius (°C) or Fahrenheit (°F), the air humidity in per cent (% RH) and their maximum and minimum values. The weather station also displays the weather forecast, the time in 12 / 24-hour clock modes and the date. -
Page 100: Technical Data
Weather symbol Barometric pressure bar display Temperature display Date display Time display Daily alarm display Relative humidity display Barometric pressure trend display Security strap © Technical data Temperature Resolution: 0.1 °C (0.1 °F) Measuring range: -10 – + 60 °C 14 –... -
Page 101: Scope Of Supply
Altimeter Resolution: Measuring range: - 706 m – 9164 m - 2316 ft – 30065 ft Barometer Resolution: 0.1 mb / hPa (millibar / hectopascal) Measuring range: 300 mb / hPa – 1100 mb / hPa Battery: 1 x Lithium button cell 3 V (CR 2032) (included in delivery) ©... -
Page 102: General Safety Information
General safety information DANGER TO LIFE AND ACCIDENT HAZARD FOR TODDLERS AND SMALL CHILDREN! Never allow children to play unsupervised with the packaging material. There is a danger of suffocation from the packaging material. Children frequently underestimate the dangers. Children should be kept away from the product at all times. This is not a toy. -
Page 103: Safety Instructions For The Battery
½ Do not expose the device to – extreme temperatures, – strong vibrations, – heavy mechanical loads, – direct sunlight. Otherwise there is a danger that the device will be damaged. ½ Do not expose the device to an extremely high electro- magnetic field. - Page 104 CAUTION! DANGER OF EXPLOSION! The battery must never be recharged! ½ Ensure correct polarity when inserting the battery! This is indicated in the battery compartment. ½ If necessary, clean the battery and device contacts before inserting the battery. ½ Remove a spent battery immediately from the device. There is an increased danger of leaks! ½...
-
Page 105: Starting The Weather Station Up
© Starting the weather station up Note: When setting it up, if you do not press any button within 60 seconds, the weather station will automatically return to the output mode. During the set-up procedures, press and keep the RESET or ST. - Page 106 1. Casablanca CAS GMT +0 31. Dhaka DAC GMT +6:00 2. Dublin DUB GMT +0 32. Bangkok BKK GMT +7:00 3. Lisabon GMT +0 33. Jakarta GMT +7:00 4. London LON GMT +0 34. Beijing GMT +8:00 5. Munich AGB GMT +1:00 35.
- Page 107 Press the MODE button to set the daylight saving time (DST). Switch it on or off with the RESET button or ST. / STP. button Note: Only switch the daylight saving time on if you are in a region in which the daylight saving time applies. Press the MODE button again in order to set the seconds.
-
Page 108: Deactivating / Activating The Display
Press the MODE button to select the hour format. Use the RESET button or the ST. / STP. button choose between the 12-hour or 24-hour format. Press the ALTI / BARO button to leave the set-up mode if needed. © Deactivating / activating the display You can deactivate the display to save battery power. -
Page 109: Switching Off The Automatic Display / Activating The Sleep Function
Press the MODE button as often as necessary until the date display (day of the week mode) appears in the display Hold the MODE button down for two seconds to get to the set-up mode. Press the MODE button as often as necessary until you get to set-up procedure for switching the touch beep function on / off... -
Page 110: Setting The Alarm Time And Activating The Daily Alarm
Press the RESET button or the ST. / STP. button to switch the sleep function on or off. Press the ALTI / BARO button to leave the set-up mode. © Setting the alarm time and activating the daily alarm Press the MODE button as often as necessary until ALM appears in the display Using the ST. -
Page 111: Activating The Hourly Alarm
The alarm will sound for 30 seconds every day at the set time. Press button to stop the alarm sounding. If you press the ST. / STP. button when the alarm is sounding, you will activate the snooze function ( The alarm sound will stop and will be re-activated after 8 minutes. -
Page 112: Timing / Storing And Retrieving Lap Times
Before using it for the first time, the stopwatch will read 0. Press the MODE button as often as necessary until CHR appears in the display Press the ST. / STP. button to start the stopwatch. Press the button again to stop the stopwatch. The display will indicate the time between start and stop. -
Page 113: Using The Countdown Counter
Press the RESET button to time a lap. The lap number will flash in the time display and the lap time will be indicated in the display for about 10 seconds. After that, the time will continue. Press the RESET button again to time another lap. -
Page 114: Displaying The World Times
2. Press the MODE button down for about 2 seconds. The hour display will flash. 3. Press the RESET or the ST. / STP. button to set the value you wish to have. 4. Press the MODE button . The minute display will flash. 5. -
Page 115: Using The Barometer
Press the RESET or ST. / STP. button to select the town you wish to have. Note: The towns are indicated by means of letter codes. Please consult the table in the section called “Regulating the default settings for language, time, date” to find the code you want. - Page 116 Press the ST. / STP. button for 2 Seconds to choose between the units hPa, mb and inHg. Note: The weather station will automatically update the air pressure. The weather station will display the air pressure history of the last 12 hours in the bar display 0 H: current air pressure –1 H:...
-
Page 117: Adjusting The Barometer
© Adjusting the barometer In order to ensure a measurement that is as precise as pos- sible, the barometer has to be adjusted. Contact your local weather service for precise information regarding air pressure. Entering incorrect data could lead to errors in measurements carried out at a later date. -
Page 118: Adjusting The Altimeter
Note: If the height measured is less than - 706 m / - 2316 ft, “LO” will appear in the display Press the ALTI / BARO button until ALT appears in the display Press the ST. / STP. button for 2 seconds to choose between the units of meters (m) and feet (ft). -
Page 119: Measuring The Difference In Height
Press the RESET or ST. / STP. button to set the value you wish to have. If you enter incorrect information, press the MODE button and enter a new value. Press the ALTI / BARO button to stop the adjustments. ©... -
Page 120: Weather Forecast
© Weather forecast Note: Please take the weather forecast from your local weather forecasting service into account as well as the forecast from your weather station. If there are discrepancies between the information from your device and from the local weather forecasting service, please take the advice of the latter as authoritative. -
Page 121: Reading Off The Temperature And Humidity
The weather forecast is based on changes in the air pressure. You can get a more precise weather forecast if you stay in a place with constant air pressure for 24 hours. © Reading off the temperature and humidity Note: If the ambient temperature is too high, the LC display will turn black. -
Page 122: Retrieving The Maximum And Minimum Values
When the air humidity measured is more than 95 %, “HI” is indicated on the display When the humidity measured is less than 25 %, “LO” appears in the display © Retrieving the maximum and minimum values You can display the maximum / minimum values of the humidity, temperature, air pressure and height measured. -
Page 123: Battery Display
Displaying the max. / min. temperature / humidity/ height Press the ALTI / BARO button until ALT appears in the display Press the RESET button . The display will indicate the maximum and minimum values measured for temperature, humidity and the height. Press the RESET button for approx. -
Page 124: Changing The Battery
The battery symbol also appears in the display when you use the weather station in very cold weather. When you get to a warmer ambient temperature, the battery symbol will disappear again. If the weather station does not work in extremely cold environments, remove the battery and warm it up in the palm of your hand. -
Page 125: Cleaning And Maintenance
© Cleaning and Maintenance ½ Under no circumstances should you use liquids or detergents, as these will damage the device. The device should only be cleaned on the outside with a soft, dry and lint-free cloth. © Disposal The packaging is made entirely of recyclable materials, which you may dispose of at local recycling facilities. - Page 126 Faulty or used batteries must be recycled in accordance with Directive 2006 / 66 / EC. Please return the batteries and / or the device to the available collection points. Environmental damage through incorrect disposal of the batteries! Batteries must not be disposed off with domestic waste. They may contain toxic heavy metals and are subject to hazardous waste treatment rules and regulations.
- Page 127 Bestimmungsgemäße Verwendung ..Seite 129 Teilebeschreibung ..........Seite 129 Technische Daten ..........Seite 130 Lieferumfang ............Seite 131 Allgemeine Sicherheitshinweise .....Seite 132 Sicherheitshinweise zur Batterie ........Seite 134 Wetterstation in Betrieb nehmen Grundeinstellung Sprache / Uhrzeit /Datum / Zeitzone vornehmen ............Seite 135 Display deaktivieren / aktivieren ........Seite 139 Tastenton ein- / ausschalten ..........Seite 139 Automatische Display Abschaltung / Schlummerfunktion aktivieren .........Seite 140...
- Page 128 Wettervorhersage ............Seite 151 Temperatur und Luftfeuchtigkeit ablesen ......Seite 153 Maximal- / Minimal-Werte abrufen ........Seite 154 Batterieanzeige ..............Seite 155 Batterie wechseln .............Seite 156 Reinigung und Pflege ........Seite 156 Entsorgung ..............Seite 157 128 DE/AT/CH...
-
Page 129: Bestimmungsgemäße Verwendung
Tragbare Wetterstation © Bestimmungsgemäße Verwendung Die tragbare Wetterstation zeigt die Temperatur in Celsius (°C) oder Fahrenheit (°F), die Luftfeuchtigkeit in (% RH), sowie deren Maximal- und Minimalwerte an. Weitere Anzeigewerte der Wetterstation sind die Wetterprognose, die Zeit im 12- / 24 Stundenformat sowie das Datum. Des Weiteren verfügt die Wetterstation über eine Alarm- und Kalenderfunktion und über einen Luftdruck- und Höhen- messer. -
Page 130: Technische Daten
Display Wettersymbol Balkenanzeige Luftdruckmesser Temperatur-Anzeige Datumsanzeige Zeit-Anzeige Tagesalarm-Anzeige Luftfeuchtigkeits-Anzeige Luftdruck-Trend-Anzeige Sicherheitsverschluss © Technische Daten Temperatur Auflösung: 0,1 °C (0,1 °F) Messbereich: - 10 – + 60 °C 14 – + 140 °F Luftfeuchtigkeit Auflösung: 1 % RH (% RH – relative humidity = % relative Luft- feuchtigkeit) Messbereich:... -
Page 131: Lieferumfang
Höhenmesser Auflösung: Messbereich: - 706 m – 9164 m - 2316 ft – 30065 ft Luftdruckmesser Auflösung: 0,1 mb / hPa (millibar / Hecto- pascal) Messbereich: 300 mb / hPa – 1100 mb / hPa 1 x Lithium Knopfzelle 3 V Batterie: (CR 2032) (im Lieferumfang enthalten) -
Page 132: Allgemeine Sicherheitshinweise
Allgemeine Sicherheitshinweise LEBENS- UND UNFALLGEFAHR FÜR KLEINKINDER UND KINDER! Lassen Sie Kinder niemals unbeaufsichtigt mit dem Verpackungsmaterial. Es besteht Erstickungsgefahr durch Verpackungsmaterial. Kinder unterschätzen häufig die Gefahren. Halten Sie Kinder stets vom Produkt fern. Das Produkt ist kein Spielzeug. LEBENSGEFAHR! Batterien können verschluckt werden, was lebensgefährlich sein kann. - Page 133 Funktionsstörungen von lebenserhaltenden Systemen führen. ½ Setzen Sie das Gerät – keinen extremen Temperaturen, – starken Vibrationen, – starken mechanischen Beanspruchungen, – keiner direkten Sonneneinstrahlung aus. Andernfalls droht eine Beschädigung des Gerätes. ½ Setzen Sie das Gerät keinem extrem hohen elektro- magnetischen Feld aus.
-
Page 134: Sicherheitshinweise Zur Batterie
Sicherheitshinweise zur Batterie ½ Entfernen Sie die Batterie, wenn sie längere Zeit nicht verwendet worden ist, aus dem Gerät. VORSICHT! EXPLOSIONSGEFAHR! Laden Sie die Batterie niemals wieder auf! ½ Achten Sie beim Einlegen auf die richtige Polarität! Diese wird im Batteriefach angezeigt. ½... -
Page 135: Wetterstation In Betrieb Nehmen
die betroffene Stelle mit reichlich Wasser ab und / oder suchen Sie einen Arzt auf! © Wetterstation in Betrieb nehmen Hinweis: Wenn Sie während Einstellvorgängen innerhalb von 1 Minute keine Taste drücken, kehrt die Wetterstation automatisch in den jeweiligen Ausgangs-Modus zurück. Drücken und halten Sie während Einstellvorgängen die Tasten RESET bzw. - Page 136 Drücken Sie die MODE-Taste , um die Zeitzone einzustellen. Sie können mit der RESET-Taste oder ST. / STP.-Taste zwischen folgenden Zeitzonen wählen: 1. Casablanca CAS GMT +0 26. Jerusalem GMT +2:00 2. Dublin DUB GMT +0 27. Moscow MOW GMT +3:00 3.
- Page 137 51. Denver DEN GMT -7:00 56. Toronto YTO GMT -5:00 52. Chicago CGX GMT -6:00 57. Caracas CCS GMT -4:00 53. Mexico MEX GMT -6:00 58. Santiago GMT -4:30 54. New York GMT -5:00 59. Buenos Aires BUE GMT -3:00 55.
- Page 138 Wenn die Stundenanzeige blinkt, stellen Sie mit der RESET-Taste oder ST. / STP.-Taste den gewünschten Wert ein. Drücken Sie die MODE-Taste , um das Jahr einzustellen. Stellen Sie mit der RESET-Taste oder ST. / STP.-Taste das aktuelle Kalenderjahr ein. Drücken Sie die MODE-Taste , um den Monat einzustellen.
-
Page 139: Display Deaktivieren / Aktivieren
© Display deaktivieren / aktivieren Sie können das Display deaktivieren, um Batterie- Energie zu sparen. Hinweis: Die Uhr funktioniert auch bei deaktiviertem Display Drücken Sie so oft die MODE-Taste , bis im Display die Datumsanzeige (Modus Wochentag) erscheint. Halten Sie die ALTI / BARO-Taste 5 Sekunden lang gedrückt, um das Display abzuschalten. -
Page 140: Automatische Display Abschaltung / Schlummerfunktion Aktivieren
Drücken Sie die MODE-Taste so oft, bis Sie in die Einstellung Tastenton-Funktion Ein / Ausschalten gelangen (BEEP). Drücken Sie die RESET-Taste oder ST. / STP.-Taste um den Tastenton ein- bzw. auszuschalten. Drücken Sie die ALTI / BARO-Taste , um den Einstel- lungs-Modus zu verlassen. -
Page 141: Weckzeit Einstellen Und Tagesalarm Aktivieren
© Weckzeit einstellen und Tagesalarm aktivieren Drücken Sie so oft die MODE-Taste , bis im Display die Anzeige ALM erscheint. Wählen Sie mit der ST. / STP.-Taste Tagesalarm 1 oder Tagesalarm 2 aus. Halten Sie die MODE-Taste zwei Sekunden gedrückt. Die Stundenanzeige blinkt. -
Page 142: Stundenalarm Aktivieren
Wenn Sie während des Wecktons die ST. / STP.-Taste drücken, aktivieren Sie die Schlummer-Funktion ( Der Weckton stoppt und wird nach 8 Minuten erneut aktiviert. Drücken Sie eine beliebige Taste, um die Schlummer- funktion zu verlassen. © Stundenalarm aktivieren Drücken Sie so oft die MODE-Taste , bis im Display die Anzeige ALM erscheint. -
Page 143: Rundenzeiten Messen / Speichern Und Abrufen
Drücken Sie so oft die MODE-Taste , bis im Display die Anzeige CHR erscheint. Drücken Sie die ST. / STP.-Taste , um die Stoppuhr zu starten. Drücken Sie die Taste erneut, um die Stoppuhr zu stoppen. Das Display zeigt die Zeit zwischen Start und Stopp an. Wenn Sie erneut die ST. -
Page 144: Countdownzähler Verwenden
und die Rundenzeit wird für ca. 10 Sekunden im Dis- play angezeigt. Anschließend läuft die Zeit weiter. Drücken Sie erneut die RESET-Taste , um eine weitere Rundenzeit zu messen. Drücken Sie die ST. / STP.-Taste , um die Stoppuhr zu stoppen. - Page 145 2. Halten Sie die MODE-Taste für 2 Sekunden gedrückt. Die Stundenanzeige blinkt. 3. Drücken Sie die Tasten RESET bzw. ST. / STP. um den gewünschten Wert einzustellen. 4. Drücken Sie die MODE-Taste . Die Minutenanzeige blinkt. 5. Wiederholen Sie die Schritte 3. und 4., um die Werte für Minuten und Sekunden einzustellen.
-
Page 146: Weltzeiten Anzeigen
© Weltzeiten anzeigen Hinweis: Sie haben die Möglichkeit sich die Zeiten in bis zu 60 Städten weltweit anzeigen zu lassen. Drücken Sie so oft die MODE-Taste , bis im Display die Anzeigen WT erscheint. Drücken Sie die Tasten RESET oder ST. / STP. , um die gewünschte Stadt auszuwählen. -
Page 147: Barometer / Luftdruckmesser Verwenden
© Barometer / Luftdruckmesser verwenden Hinweis: Bei einem gemessenen Luftdruck von über 1100 h / Pa wird „HI“ im Display angezeigt. Hinweis: Bei einem gemessenen Luftdruck von unter 300 h / Pa wird „LO“ im Display angezeigt. Drücken Sie so oft die ALTI / BARO-Taste , bis die Anzeigen hPa (Hectopascal) oder mb (Millibar) im Display... -
Page 148: Luftdruckmesser Justieren
Die Wetterstation zeigt Ihnen über die Luftdruck-Trend- Anzeige zusätzlich den Luftdrucktrend an. Der Luftdruck steigt Der Luftdruck bleibt konstant Der Luftdruck fällt © Luftdruckmesser justieren Um eine möglichst genaue Messung zu gewährleisten, muss der Luftdruckmesser justiert werden. Wenden Sie sich für genaue Angaben zum Luftdruck an Ihren lokalen Wetterdienst. -
Page 149: Höhenmesser Verwenden
Drücken Sie bei Falscheingabe erneut die MODE-Taste und stellen einen neuen Wert ein. Drücken Sie die ALTI / BARO-Taste , um die Einstel- lungen zu beenden. © Höhenmesser verwenden VORSICHT! Verwenden Sie den Höhenmesser nicht im Flugzeug. Hinweis: Bei einer gemessenen Höhe von über 9164 m / 30065 ft wird „HI“... -
Page 150: Höhenmesser Justieren
© Höhenmesser justieren Der absolute Höhenmesswert wird durch die Veränderung des Luftdrucks gemessen. Um eine möglichst genaue Messung zu gewährleisten, muss der Höhenmesser von Zeit zu Zeit justiert werden. Achten Sie darauf, dass Sie den Höhenmesser an einem Ort justieren, der auf einem Meeresspiegel von 0 Metern liegt oder an einem Ort dessen Höhe Sie als verlässlichen Fixpunkt eingeben können. -
Page 151: Höhenunterschied Messen
© Höhenunterschied messen Die Wetterstation misst den tiefsten und den höchsten Punkt (z.B. Wanderung). Drücken Sie so oft die ALTI / BARO-Taste , bis im Display die Anzeige TRK erscheint. Halten Sie die RESET-Taste gedrückt, bis die Höhenmesser-Anzeige auf 0 gesetzt ist. Drücken Sie am Startpunkt Ihrer Wanderung die ST. - Page 152 Symbol Bedeutung = sonnig = leicht bewölkt = bewölkt = regnerisch Die Wetteranzeige wird alle 3 Stunden aktualisiert. Die Wetterstation kann kurzfristige Wetteränderungen nicht anzeigen. Die Wettervorhersage basiert auf Luftdruckänderungen. Eine genauere Vorhersage erzielen Sie, wenn Sie sich für 24 Stunden an einem Ort mit gleich bleibendem Luftdruck aufhalten.
-
Page 153: Temperatur Und Luftfeuchtigkeit Ablesen
© Temperatur und Luftfeuchtigkeit ablesen Hinweis: Ist die Umgebungstemperatur zu hoch, wird die LCD-Anzeige schwarz. Bei einer gemessenen Temperatur von über +60 °C / 140 °F wird die Anzeige „HI“ im Display angezeigt. Bei einer gemessenen Temperatur von unter -10 °C / 14 °F wird die Anzeige „LO“... -
Page 154: Maximal- / Minimal-Werte Abrufen
© Maximal- / Minimal-Werte abrufen Sie können sich die Maximal- / Minimal-Werte der gemes- senen Luftfeuchtigkeit, Temperatur, des Luftdrucks und Höhenmessers anzeigen lassen. Max. / Min. Temperatur / Luftfeuchtigkeit anzeigen Drücken Sie so oft die MODE-Taste , bis im Display die Datumsanzeige (Modus Wochentag) erscheint. -
Page 155: Batterieanzeige
Max. / Min. Temperatur / Luftfeuchtigkeit / Luftdruck anzeigen Drücken Sie so oft die ALTI / BARO-Taste , bis die Anzeigen hPa (Hectopascal) oder mb (Millibar) im Display erscheinen. Drücken Sie die RESET-Taste . Das Display zeigt die minimal und maximal gemessenen Werte für Temperatur, Luftfeuchtigkeit und Luftdruck an. -
Page 156: Batterie Wechseln
© Batterie wechseln Drehen Sie mit einer passenden Münze den Deckel des Batteriefachs gegen den Uhrzeigersinn, um diesen zu öffnen. Nehmen Sie den Deckel ab. Entnehmen Sie die verbrauchte Batterie und tauschen diese gegen eine neue Batterie (Typ: Knopfzelle 3 V Lithium CR 2032) aus. -
Page 157: Entsorgung
© Entsorgung Die Verpackung besteht aus umweltfreundlichen Materialien, die Sie über die örtlichen Recycling- stellen entsorgen können. Möglichkeiten zur Entsorgung des ausgedienten Produkts erfahren Sie bei Ihrer Gemeinde- oder Stadtverwaltung. Werfen Sie Ihr Gerät, wenn es ausgedient hat, im Interesse des Umweltschutzes nicht in den Hausmüll, sondern führen Sie es einer fachge- rechten Entsorgung zu. - Page 158 der Sondermüllbehandlung. Die chemischen Symbole der Schwermetalle sind wie folgt: Cd = Cadmium, Hg = Queck- silber, Pb = Blei. Geben Sie deshalb verbrauchte Batterien bei einer kommunalen Sammelstelle ab. 158 DE/AT/CH...
- Page 159 / o Milomex Services Hilltop Cottage Barton Road Pulloxhill Bedfordshire MK45 5HP Model No.: Z29592 Version: 12 / 2011 © by ORFGEN Marketing Estado de las informaciones · Versione delle informazioni · Estado das informações · Last Information Update · Stand der Informationen:...
Need help?
Do you have a question about the Z29592 and is the answer not in the manual?
Questions and answers